一 简介
confluence是一个专业的企业知识管理与协同软件,可以用于构建企业wiki。通过它可以实现团队成员之间的协作和知识共享。
网上有关confluence的教程比较多,在此我们以confluence6.4.2版本为例进行相关的实验。
二 环境准备
1 confluence的运行是依赖java环境的,也就是说需要安装jdk并且要是1.7以上版本,如下:
[root@localhost src]# java -version
java version "1.8.0_171"
Java(TM) SE Runtime Environment (build 1.8.0_171-b11)
Java HotSpot(TM) 64-Bit Server VM (build 25.171-b11, mixed mode)
具体jdk环境的安装请参考其他文章,简单贴一下jdk的配置
vim /etc/profile
export JAVA_HOME=/usr/local/src/jdk1.8.0_171
export JRE_HOME=/usr/local/src/jdk1.8.0_171/jre
export CLASSPATH=.:$JAVA_HOME/lib:$JRE_HOME/lib
export PATH=$JAVA_HOME/bin:$PATH
下载地址参见:https://www.oracle.com/technetwork/java/javase/downloads/jdk8-downloads-2133151.html
2 创建数据库,这里选用mysql5.7,有关它的安装请移步其他文章
下载地址:ftp.iij.ad.jp/pub/db/mysql/Downloads/MySQL-5.7 一点小提示,安装的时候最好下载免编译版本gblic的
创建数据库
mysql -uroot -p'123456' -e "create database confluence default character set utf8 collate utf8_bin;grant all on confluence.* to 'confluenceuser'@'%' identified by 'confluencepasswd';
查看创建的数据库,以及测试登录
[root@localhost src]# mysql -uconfluenceuser -p
Enter password:
Welcome to the MySQL monitor.  Commands end with ; or g.
Your MySQL connection id is 2783
Server version: 5.7.23-log MySQL Community Server (GPL)

Copyright (c) 2000, 2018, Oracle and/or its affiliates. All rights reserved.

Oracle is a registered trademark of Oracle Corporation and/or its
affiliates. Other names may be trademarks of their respective
owners.

Type 'help;' or 'h' for help. Type 'c' to clear the current input statement.

mysql> show databases;
+--------------------+
| Database |
+--------------------+
| information_schema |
| confluence |
+--------------------+
2 rows in set (0.01 sec)
这样基础环境就配置完毕。
三 开始安装confluence
1 在官方网站下载confluence
https://www.atlassian.com/software/confluence/download-archives
在此我们选择的是bin方式
cd /usr/local/src

wget https://www.atlassian.com/software/confluence/downloads/binary/atlassian-confluence-6.4.2-x64.bin
2安装及破解confluence
修改可执行权限
chmod 755 atlassian-confluence-6.4.2-x64.bin
安装开始
 1 [root@localhost src]# ./atlassian-confluence-6.4.2-x64.bin
 2 Unpacking JRE ...
 3 Starting Installer ...
 4 Nov 13, 2018 8:13:26 PM java.util.prefs.FileSystemPreferences$1 run
 5 INFO: Created user preferences directory.
 6 Nov 13, 2018 8:13:26 PM java.util.prefs.FileSystemPreferences$2 run
 7 INFO: Created system preferences directory in java.home.
 8
 9 This will install Confluence 6.4.2 on your computer.
10 OK [o, Enter], Cancel [c]
11 o
12 Choose the appropriate installation or upgrade option.
13 Please choose one of the following:
14 Express Install (uses default settings) [1],
15 Custom Install (recommended for advanced users) [2, Enter],
16 Upgrade an existing Confluence installation [3]
17 1
18 See where Confluence will be installed and the settings that will be used.
19 Installation Directory: /opt/atlassian/confluence
20 Home Directory: /var/atlassian/application-data/confluence
21 HTTP Port: 8090
22 RMI Port: 8000
23 Install as service: Yes
24 Install [i, Enter], Exit [e]
25 i
26
27 Extracting files ...
28
29
30 Please wait a few moments while we configure Confluence.
31 Installation of Confluence 6.4.2 is complete
32 Start Confluence now?
33 Yes [y, Enter], No [n]
34 y
35
36 Please wait a few moments while Confluence starts up.
37 Launching Confluence ...
38 Installation of Confluence 6.4.2 is complete
39 Your installation of Confluence 6.4.2 is now ready and can be accessed via
40 your browser.
41 Confluence 6.4.2 can be accessed at http://localhost:8090
42 Finishing installation ...
通过上图,我们可以很明显的看出confluence默认安装到了/opt/atlassian/confluence和/var/atlassian/application-data/confluence目录下,并且confluence监听的端口是8090
confluence的主要配置文件,存放在/opt/atlassian/confluence/conf/server.xml文件中,如下:
vim /opt/atlassian/confluence/conf/server.xml
<Server port="8000" shutdown="SHUTDOWN" debug="0">
    <Service name="Tomcat-Standalone">
        <Connector port="8090" connectionTimeout="20000" redirectPort="8443"
                maxThreads="48" minSpareThreads="10"
                enableLookups="false" acceptCount="10" debug="0" URIEncoding="UTF-8"
                protocol="org.apache.coyote.http11.Http11NioProtocol" />
至此,可以在浏览器中输入http://localhost:8090 或者http://ip:8090,即可看到初始化界面
3 破解
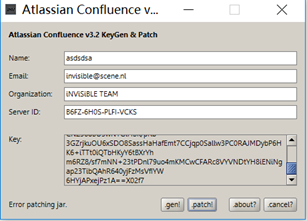
进入初始化界面,语言选择中文,当文字切换好后,界面将显示中文,此时选中“产品安装”,点击下一步,继续下一步(因为没有授权,所以不需要选中任何插件),此时进入License key界面,记下Server ID,破解需要。停止confluence
/etc/init.d/confluence stop
3.1 先下载注册机,然后拷贝包到本地进行破解
查看相关文件
[root@localhost lib]# ls -l atlassian-extras-*
-rw-r--r--. 1 root root 14935 Nov 13 20:57 atlassian-extras-api-3.2.jar
-rw-r--r--. 1 root root 21788 Nov 13 20:57 atlassian-extras-common-3.2.jar
-rw-r--r--. 1 root root 38244 Nov 13 20:57 atlassian-extras-core-3.2.jar
-rw-r--r--. 1 root root  5171 Nov 13 20:57 atlassian-extras-decoder-api-3.2.jar
-rw-r--r--. 1 root root  6642 Nov 13 20:58 atlassian-extras-decoder-v2-3.2.jar
-rw-r--r--. 1 root root 68438 Nov 13 20:57 atlassian-extras-legacy-3.2.jar
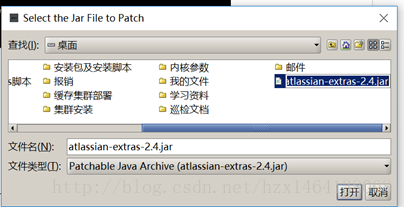
将/opt/atlassian/confluence/confluence/WEB-INF/lib/atlassian-extras-decoder-v2-3.2.jar jar文件ftp到本地,并重命名为atlassian-extras-2.4.jar,运行confluence_keygen.jar,点击.patch,选择atlassian-extras-2.4.jar文件,点击打开,jar文件破解成功。
将破解后的atlassian-extras-2.4.jar上传到服务器/opt/atlassian/confluence/confluence/ WEB-INF/lib/目录下,并重命名为atlassian-extras-decoder-v2-3.2.jar
破解插件管理中心:
将本地破解好的atlassian-universal-plugin-manager-plugin-2.22.2.jar文件(这个文件是我在网上下载别人的,亲测可以使用)拷贝到/opt/atlassian/confluence/confluence/WEB-INF/atlassian-bundled-plugins目录下,(本来目录下面有个atlassian-universal-plugin-manager-plugin-2.22.1.jar文件,所以这里重新命名吧)
mv atlassian-universal-plugin-manager-plugin-2.22.2.jar atlassian-universal-plugin-manager-plugin-2.22.1.jar
重要一点是还需要上传mysql的驱动mysql-connector-java-5.1.47-bin.jar到/opt/atlassian/confluence/confluence/ WEB-INF/lib/下,下载地址
https://dev.mysql.com/downloads/file/?id=480090
https://www.w3resource.com/mysql/mysql-java-connection.php
四 配置
启动confluence,回到输入密钥的地方
/etc/init.d/confluence start

在破解机里面输入ID进行破解
在链接数据库环节选择jdbc,其他不变,填写数据库名字,输入用户名密码就行了。
这样就基本完成了
在插件中心,安装收费插件,然后点击license申请使用,将申请下来的license,粘贴进去你会发现已经不是试用版本了。

一些说明,有些人本地电脑如果没有安装jdk可能无法打开破解机,这是就需要安装jdk,安装配置参考
https://www.cnblogs.com/liuhongfeng/p/4177568.html
其他参考:https://www.ilanni.com/?p=11989 *******
https://blog.csdn.net/hzx1464138068/article/details/79390606
https://www.jianshu.com/p/fb2574567eae
如果使用mysql可能会在安装完成之后,健康检查的时候,有个参数需要注意:
https://confluence.atlassian.com/confkb/exceeds-max-allowed-packet-for-mysql-179443425.html
全部涉及软件下载:
链接:https://pan.baidu.com/s/1VdJBbbuNdBQ-liyG5ljI8A
提取码:8qx9