1.相对布局
代码:
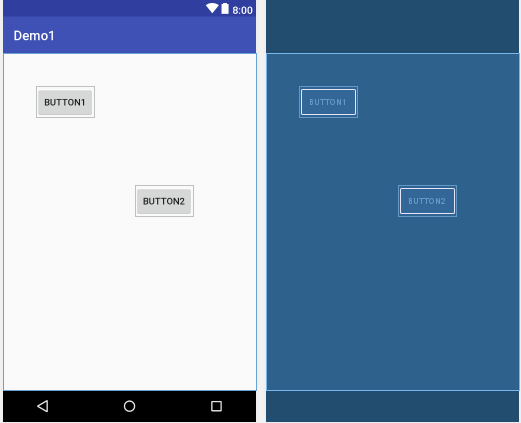
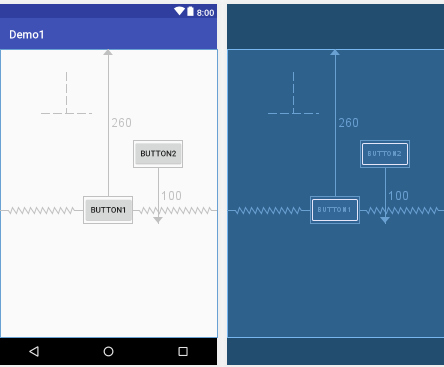
<?xml version="1.0" encoding="utf-8"?>

<RelativeLayout xmlns:android="http://schemas.android.com/apk/res/android"

xmlns:app="http://schemas.android.com/apk/res-auto"

xmlns:tools="http://schemas.android.com/tools"

android:layout_width="match_parent"

android:layout_height="match_parent"

tools:context=".MainActivity">

<Button

android:id="@+id/button1"

android:layout_width="wrap_content"

android:layout_height="wrap_content"

android:text="Button1"

android:layout_marginTop="260dp"

android:layout_alignParentTop="true"

android:layout_centerHorizontal="true" />

<Button

android:id="@+id/button2"

android:layout_width="wrap_content"

android:layout_height="wrap_content"

android:layout_toRightOf="@id/button1"

android:text="Button2"

android:layout_alignBottom="@id/button1"

android:layout_marginBottom="100dp"/>

</RelativeLayout>
如图:
2.线性布局
代码:
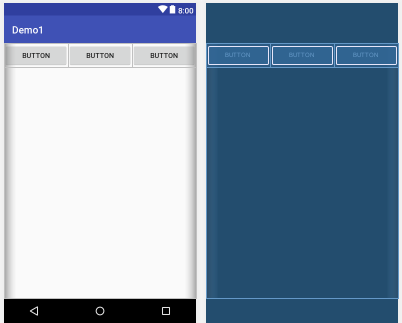
<?xml version="1.0" encoding="utf-8"?>

<LinearLayout xmlns:android="http://schemas.android.com/apk/res/android"

android:layout_width="match_parent"

android:layout_height="match_parent"

android:orientation="horizontal">

<Button

android:id="@+id/button3"

android:layout_width="wrap_content"

android:layout_height="wrap_content"

android:layout_weight="1"

android:text="Button" />

<Button

android:id="@+id/button4"

android:layout_width="wrap_content"

android:layout_height="wrap_content"

android:layout_weight="1"

android:text="Button" />

<Button

android:id="@+id/button"

android:layout_width="wrap_content"

android:layout_height="wrap_content"

android:layout_weight="1"

android:text="Button" />

</LinearLayout>
如图:
3.表格布局
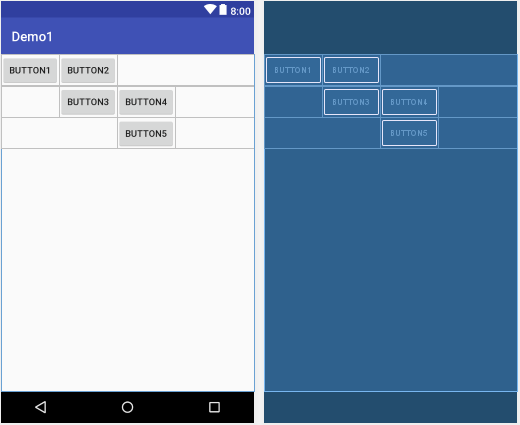
表格布局就是让控件以表格的形式来排列组件的,只要将组件或信息放在单元格中,控件就可以整齐的排列
在TableLayout中,行数是由TableRow对象控制的,即对象中有多少个TableRow,就有多少行。
代码:
<?xml version="1.0" encoding="utf-8"?>

<TableLayout xmlns:android="http://schemas.android.com/apk/res/android"

android:layout_width="match_parent"

android:layout_height="match_parent">

<TableRow

android:layout_width="match_parent"

android:layout_height="match_parent"

android:id="@+id/tableRow1"

>

<Button

android:id="@+id/button1"

android:layout_width="wrap_content"

android:layout_height="wrap_content"

android:text="Button1"

android:layout_column="0"/>

<Button

android:id="@+id/button2"

android:layout_width="wrap_content"

android:layout_height="wrap_content"

android:text="Button2"

android:layout_column="1"/>

</TableRow>


<TableRow


android:layout_width="match_parent"

android:layout_height="match_parent"

android:id="@+id/tableRow2">

<Button

android:id="@+id/button3"

android:layout_width="wrap_content"

android:layout_height="wrap_content"

android:text="Button3"

android:layout_column="1"/>

<Button

android:id="@+id/button4"

android:layout_width="wrap_content"

android:layout_height="wrap_content"

android:text="Button4"

android:layout_column="2"/>

</TableRow>


<TableRow

android:layout_width="match_parent"

android:layout_height="match_parent"

android:id="@+id/tableRow3">

<Button

android:id="@+id/button5"

android:layout_width="wrap_content"

android:layout_height="wrap_content"

android:text="Button5"

android:layout_column="2"/>

</TableRow>

</TableLayout>
如图:
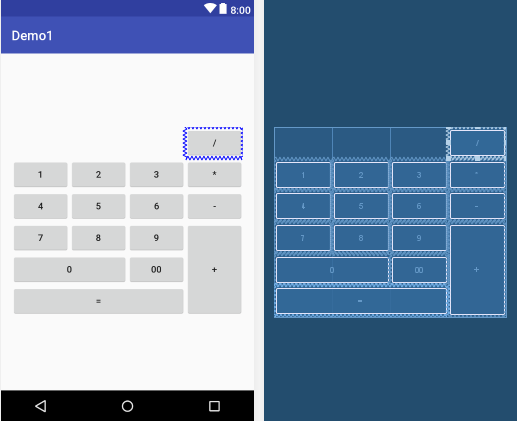
4.网格布局
代码:
<?xml version="1.0" encoding="utf-8"?>

<GridLayout xmlns:android="http://schemas.android.com/apk/res/android"

android:layout_width="wrap_content"

android:layout_height="wrap_content"

android:layout_gravity="center"

android:columnCount="4"

android:orientation="horizontal">

<Button

android:layout_column="3"

android:text="/" />

<Button

android:text="1" />

<Button

android:text="2" />

<Button

android:text="3" />

<Button

android:text="*" />

<Button

android:text="4" />

<Button

android:text="5" />

<Button

android:text="6" />

<Button

android:text="-" />

<Button

android:text="7" />

<Button

android:text="8" />

<Button

android:text="9" />

<Button

android:text="+"

android:layout_gravity="fill"

android:layout_rowSpan="3"/>

<Button

android:text="0"

android:layout_gravity="fill"

android:layout_columnSpan="2"/>

<Button

android:text="00" />

<Button

android:text="="

android:layout_gravity="fill"

android:layout_columnSpan="3"/>


</GridLayout>
如图:
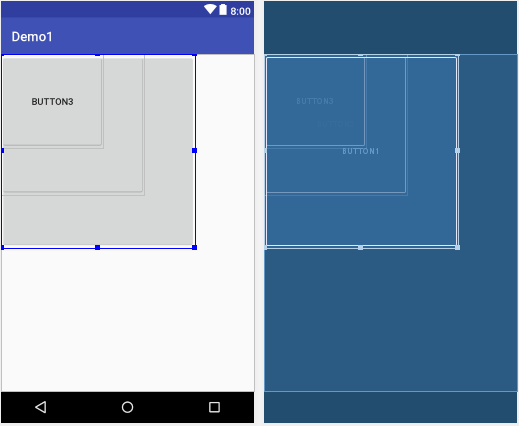
5.帧布局
代码:
<?xml version="1.0" encoding="utf-8"?>

<FrameLayout xmlns:android="http://schemas.android.com/apk/res/android"

android:layout_width="match_parent"

android:layout_height="match_parent">

<Button

android:id="@+id/button1"

android:layout_width="294dp"

android:layout_height="294dp"

android:text="Button1"

android:visibility="visible" />

<Button

android:id="@+id/button2"

android:layout_width="218dp"

android:layout_height="214dp"

android:text="Button2"

android:visibility="visible" />

<Button

android:id="@+id/button3"

android:layout_width="156dp"

android:layout_height="143dp"

android:text="Button3"

android:visibility="visible" />

</FrameLayout>
如图:
6. 绝对布局
代码:
<?xml version="1.0" encoding="utf-8"?>

<AbsoluteLayout xmlns:android="http://schemas.android.com/apk/res/android"

xmlns:tools="http://schemas.android.com/tools"

android:layout_width="match_parent"

android:layout_height="match_parent">

<Button

android:id="@+id/button1"

android:layout_width="wrap_content"

android:layout_height="wrap_content"

android:text="Button1"

android:layout_y="50dp"

android:layout_x="50dp"/>

<Button

android:id="@+id/button2"

android:layout_width="wrap_content"

android:layout_height="wrap_content"

android:text="Button2"

android:layout_x="200dp"

android:layout_y="200dp"/>

</AbsoluteLayout>
如图: