了解学习pyhton web的简单demo
1. 安装Django, 安装pyhton 自行百度
2. 执行命令创建project django-admin.py startproject mysite
3. 执行命令创建app python manage.py startapp polls
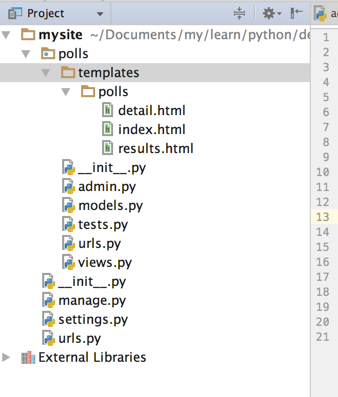
目录结构: polls/templates/polls 目录 和 polls/admin.py 都是自己手动创建的。
4. 编辑setting.py 添加app polls 同时打开admin
INSTALLED_APPS = (
    'django.contrib.auth',
    'django.contrib.contenttypes',
    'django.contrib.sessions',
    'django.contrib.sites',
    'django.contrib.messages',
    'django.contrib.staticfiles',
    'polls',
    # Uncomment the next line to enable the admin:
    'django.contrib.admin',
    # Uncomment the next line to enable admin documentation:
    # 'django.contrib.admindocs',
)
5. 编辑setting.py 添加数据库连接信息
DATABASES = {
    'default': {
        'ENGINE': 'django.db.backends.mysql', # Add 'postgresql_psycopg2', 'postgresql', 'mysql', 'sqlite3' or 'oracle'.
        'NAME': 'polls',                      # Or path to database file if using sqlite3.
        'USER': 'root',                      # Not used with sqlite3.
        'PASSWORD': '123',                  # Not used with sqlite3.
        'HOST': '',                      # Set to empty string for localhost. Not used with sqlite3.
        'PORT': '',                      # Set to empty string for default. Not used with sqlite3.
    }
}
6. 创建Modle模型 :
# coding=utf-8


from django.db import models

# Create your models here.
class Question(models.Model):
    question_text = models.CharField(max_length=200)
    pub_date = models.DateTimeField('date published')

    def __unicode__(self):
        return self.question_text


class Choice(models.Model):
    question = models.ForeignKey(Question)
    choice_text = models.CharField(max_length=200)
    votes = models.IntegerField(default=0)

    def __unicode__(self):
        return self.choice_text
7. 执行数据库同步 (ORM)自动根据model定义创建表接口 (我这里使用的mysql)
首先创建数据库
create database polls;
然后执行命令:
python manage.py syncdb
8. 检查数据库中表的创建:
use polls
show tables
9. 创建admin.py
# coding=utf-8


from django.contrib import admin
from .models import Question, Choice


# Register your models here.
class ChoiceInline(admin.TabularInline):
    model = Choice
    extra = 3


class QuestionAdmin(admin.ModelAdmin):
    fieldsets = [
        (None,               {'fields': ['question_text']}),
        ('Date information', {'fields': ['pub_date'], 'classes': ['collapse']}),
    ]
    inlines = [ChoiceInline]
    list_display = ('question_text', 'pub_date')


admin.site.register(Choice)
admin.site.register(Question, QuestionAdmin)
10. 启动应用
python manage.py runserver
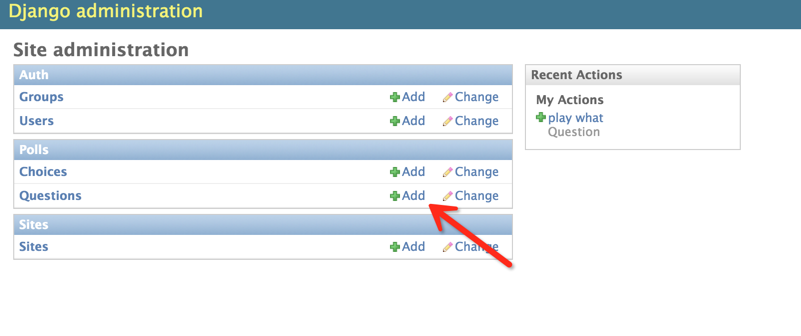
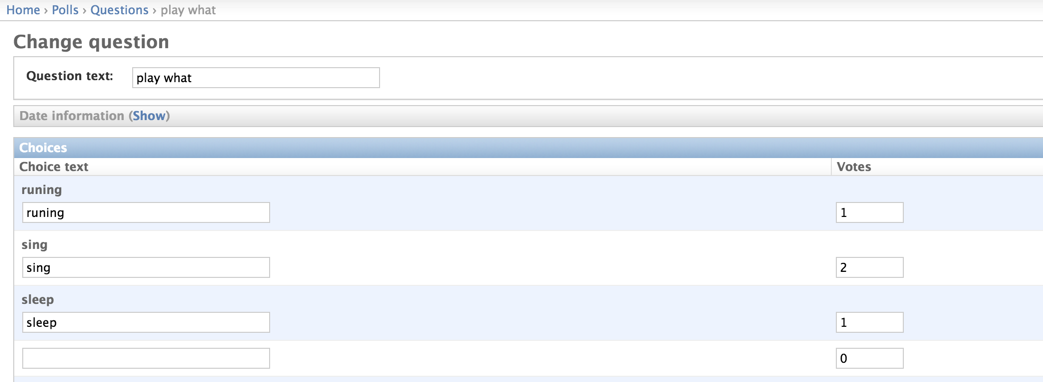
登录后台:http://127.0.0.1:8000/admin 通过Django自动的后台进行问题添加
11. 编写视图控制层
视图起着承前启后的作用,前是指前端页面,后是指后台数据库。将数据库表中的内容查询出来显示到页面上。
编写polls/views.py文件:
# coding=utf-8
from django.shortcuts import render, get_object_or_404
from django.http import HttpResponseRedirect, HttpResponse
from django.core.urlresolvers import reverse
from .models import Question, Choice


# Create your views here.
# 首页展示所有问题
def index(request):
    # latest_question_list2 = Question.objects.order_by('-pub_data')[:2]
    latest_question_list = Question.objects.all()
    context = {'latest_question_list': latest_question_list}
    return render(request, 'polls/index.html', context)


# 查看所有问题
def detail(request, question_id):
    question = get_object_or_404(Question, pk=question_id)
    return render(request, 'polls/detail.html', {'question': question})


# 查看投票结果
def results(request, question_id):
    question = get_object_or_404(Question, pk=question_id)
    return render(request, 'polls/results.html', {'question': question})


# 选择投票
def vote(request, question_id):
    p = get_object_or_404(Question, pk=question_id)
    try:
        selected_choice = p.choice_set.get(pk=request.POST['choice'])
    except (KeyError, Choice.DoesNotExist):
        # Redisplay the question voting form.
        return render(request, 'polls/detail.html', {
            'question': p,
            'error_message': "You didn't select a choice.",
        })
    else:
        selected_choice.votes += 1
        selected_choice.save()
        # Always return an HttpResponseRedirect after successfully dealing
        # with POST data. This prevents data from being posted twice if a
        # user hits the Back button.
        return HttpResponseRedirect(reverse('polls:results', args=(p.id,)))
12. 配置视图展示层与逻辑控制层url映射
url是一个请求配置文件,页面中的请求转交给由哪个函数处理,由该文件决定。
首先配置polls/urls.py(该文件需要创建)
from django.conf.urls import url
from . import views

urlpatterns = [
    # ex : /polls/
    url(r'^$', views.index, name='index'),
    # ex : /polls/5/
    url(r'^(?P<question_id>[0-9]+)/$', views.detail, name='detail'),
    # ex : /polls/5/results/
    url(r'^(?P<question_id>[0-9]+)/results/$', views.results, name='results'),
    # ex : /polls/5/vote
    url(r'^(?P<question_id>[0-9]+)/vote/$', views.vote, name='vote'),
]
接着,编辑mysite/urls.py文件。
from django.conf.urls import include, url
from django.contrib import admin

urlpatterns = [
    url(r'^polls/', include('polls.urls', namespace="polls")),
    url(r'^admin/', include(admin.site.urls)),
]
13. 创建视图模板
模板就是前端页面,用来将数据显示到web页面上。
首先创建polls/templates/polls/目录,分别在该目录下创建index.html、detail.html和results.html文件。
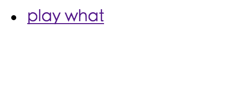
index.html
{% if latest_question_list %}
    <ul>
    {% for question in latest_question_list %}
        <li><a href="{% url polls:detail question.id %}">{{ question.question_text }}</a></li>
    {% endfor %}
    </ul>
{% else %}
    <p>No polls are available.</p>
{% endif %}
detail.html
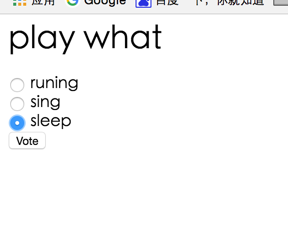
<h1>{{ question.question_text }}</h1>

{% if error_message %}<p><strong>{{ error_message }}</strong></p>{% endif %}

<form action="{% url polls:vote question.id %}" method="post">
{% csrf_token %}
{% for choice in question.choice_set.all %}
    <input type="radio" name="choice" id="choice{{ forloop.counter }}" value="{{ choice.id }}" />
    <label for="choice{{ forloop.counter }}">{{ choice.choice_text }}</label><br />
{% endfor %}
<input type="submit" value="Vote" />
</form>
results.html
<h1>{{ question.question_text }}</h1>

<ul>
{% for choice in question.choice_set.all %}
    <li>{{ choice.choice_text }} -- {{ choice.votes }} vote{{ choice.votes|pluralize }}</li>
{% endfor %}
</ul>

<a href="{% url polls:detail question.id %}">Vote again?</a>
14. 启动web容器,访问:http://127.0.0.1:8000/polls/