本文内容为转载,重新排版以供学习研究。如有侵权,请联系作者删除。
转载请注明本文出处:Professional C# 6 and .NET Core 1.0 - 40 ASP.NET Core
-----------------------------------------------------------------------
What’s In This Chapter?
- Understanding ASP.NET Core 1.0 and Web Technologies
- Using Static Content
- Working with HTTP Request and Response
- Using Dependency Injection with ASP.NET
- Defining Custom Simple Routing
- Creating Middleware Components
- Using Sessions for State Management
- Reading Configuration Settings
Wrox.com Code Downloads for This Chapter
The wrox.com code downloads for this chapter are found at http://www.wrox.com/go/professionalcsharp6 on the Download Code tab. The code for this chapter contains this example project: WebSampleApp.
ASP.NET Core 1.0
After 15 years of ASP.NET, ASP.NET Core 1.0 is a complete rewrite of ASP.NET. It features modular programming, is fully open sourced, is lightweight for best use on the cloud, and is available to non-Microsoft platforms.
A full rewrite of ASP.NET gives a lot of advantages, but this also means reworking existing web applications based on older versions of ASP.NET. Is it necessary to rewrite existing web applications to ASP.NET Core 1.0? Let’s try to answer this question.
ASP.NET Web Forms is no longer part of ASP.NET Core 1.0. However, having web applications that include this technology does not mean you have to rewrite them. It’s still possible to maintain legacy applications written with ASP.NET Web Forms with the full framework. ASP.NET Web Forms even received some enhancements with the newest version ASP.NET 4.6, such as asynchronous model
binding.
ASP.NET MVC is still part of ASP.NET Core 1.0. Because ASP.NET MVC 6 has been completely rewritten, you need to make some changes to web applications written with ASP.NET MVC 5 or older versions to bring them to the new application stack.
Converting ASP.NET Web Forms to ASP.NET MVC might be a lot of work. ASP.NET Web Forms abstracts HTML and JavaScript from the developer. Using ASP.NET Web Forms, it’s not necessary to know HTML and JavaScript. Instead you use server-side controls with C# code. The server-side controls themselves return HTML and JavaScript. This programming model is similar to the old Windows Forms programming model. With ASP.NET MVC, developers need to know HTML and JavaScript. ASP.NET MVC is based on the Model-View- Controller (MVC) pattern, which makes unit testing easy. Because ASP.NET Web Forms and ASP.NET MVC are based on very different architecture patterns, it can be a huge undertaking to migrate ASP.NET Web Forms applications to ASP.NET MVC. Before taking on this task, you should create a checklist of the advantages and the disadvantages of keeping the old technology with your solution and compare this with the advantages and disadvantages of going to the new technology. You will still be able to work with ASP.NET Web Forms for many years to come.
NOTE My website at http://www.cninnoation.com was originally created with ASP.NET Web Forms. I’ve converted this website with an early version of ASP.NET MVC to this new technology stack. Because my original site already made use of a lot of separate components to abstract the database and service code, it was not really a huge undertaking and was done very fast. I was able to use the database and service code directly from ASP.NET MVC. On the other hand, if I had used Web Forms controls to access the database instead of using my own controls, it would have been a lot more work.
NOTE This book does not cover the legacy technology ASP.NET Web Forms. ASP.NET MVC 5 is also not covered. This book has a focus on new technologies; consequently with regard to web applications, the material is based on ASP.NET 5 and ASP.NET MVC 6. These technologies should be used for new web applications. In case you need to maintain older applications, you should read older editions of this book, such as rofessional C# 5.0 and .NET 4.5.1, which covers ASP.NET 4.5, ASP.NET Web Forms 4.5, and ASP.NET MVC 5.
This chapter covers the foundation of ASP.NET Core 1.0, and Chapter 41 explains using ASP.NET MVC 6, a framework that is built on top of ASP.NET Core 1.0.
Web Technologies
Before getting into the foundations of ASP.NET later in this chapter, this section describes core web technologies that are important to know when creating web applications: HTML, CSS, JavaScript, and jQuery.
HTML
HTML is the markup language that is interpreted by web browsers. It defines elements to display various headings, tables, lists, and input elements such as text and combo boxes.
HTML5 has been a W3C recommendation since October 2014 (http://w3.org/TR/html5), and it is already offered by all the major browsers. With the features of HTML5, several browser add-ins (such as Flash and Silverlight) are not required anymore because the things the add-ins do can now be done directly with HTML and JavaScript. Of course, you might still need Flash and Silverlight because not all websites have moved to the new technologies or your users might still be using older browser versions that don’t support HTML5.
HTML5 adds new semantic elements that search engines are better able to use for analyzing the site. A canvas element enables the dynamic use of 2D shapes and images, and video and audio elements make the object element obsolete. With recent additions to the media source (http://w3c.github.io/media-source), adaptive streaming is also offered by HTML; previously this had been an advantage of Silverlight.
HTML5 also defines APIs for drag-and-drop, storage, web sockets, and much more.
CSS
Whereas HTML defines the content of web pages, CSS defines the look. In the earlier days of HTML, for example, the list item tag <li> defined whether list elements should be displayed with a circle, a disc, or a square. Nowadays such information is completely removed from HTML and is instead put into a cascading style sheet (CSS).
With CSS styles, you can use flexible selectors to select HTML elements, and you can define styles for these elements. You can select an element via its ID or its name, and you can define CSS classes that can be referenced from within the HTML code. With newer versions of CSS, you can define quite complex rules for selecting specific HTML elements.
As of Visual Studio 2015, the web project templates make use of Twitter Bootstrap. This is a collection of CSS and HTML conventions, and you can easily adapt different looks and download ready-to-use templates. Visit www.getbootstrap.com for documentation and basic templates.
JavaScript and TypeScript
Not all platforms and browsers can use .NET code, but nearly every browser understands JavaScript. One common misconception about JavaScript is that it has something to do with Java. In fact, only the name is similar because Netscape (the originator of JavaScript) made an agreement with Sun (Sun invented Java) to be allowed to use Java in the name. Nowadays, both of these companies no longer exist. Sun was bought by Oracle, and now Oracle holds the trademark for Java.
Both Java and JavaScript (and C#) have the same roots—the C programming anguage. JavaScript is a functional programming language that is not object-oriented, although object-oriented capabilities have been added to it.
JavaScript enables accessing the document object model (DOM) from the HTML page, which makes it possible to change elements dynamically on the client.
ECMAScript is the standard that defines the current and upcoming features of the JavaScript language. Because other companies are not allowed to use the term Java with their language implementations, the standard has the name ECMAScript. Microsoft’s implementation of JavaScript had the name JScript. Check http://www.ecmascript.org for the current state and future changes of the JavaScript language.
Even though many browsers don’t support the newest ECMAScript version, you can still write ECMAScript 5 code. Instead of writing JavaScript code, you can use TypeScript. The TypeScript syntax is based on ECMAScript, but it has some enhancements, such as strongly typed code and annotations. You’ll find many similarities between C# and TypeScript. Because the TypeScript compiler compiles to JavaScript, TypeScript can be used in every place where JavaScript is needed. For more information on TypeScript, check http://www.typescriptlang.org.
Scripting Libraries
Beside the JavaScript programming language, you also need scripting libraries to make life easier.
- jQuery (http://www.jquery.org) is a library that abstracts browser differences when accessing DOM elements and reacting to events.
- Angular (http://angularjs.org) is a library based on the MVC pattern for simplifying development and testing with single-page web applications. (Unlike ASP.NET MVC, Angular offers the MVC pattern with client-side code.)
The ASP.NET web project template includes jQuery libraries and Bootstrap. Visual Studio 2015 supports IntelliSense and debugging JavaScript code.
NOTE Styling web applications and writing JavaScript code is not covered in this book. You can read more about HTML and styles in HTML and CSS: Design and Build Websites by John Ducket (Wiley, 2011); and get up to speed with Professional JavaScript for Web Developers by Nicholas C. Zakas (Wrox, 2012).
ASP.NET Web Project
Start by creating an empty ASP.NET Core 1.0 Web Application named WebSampleApp (see Figure 40.1). You start with an empty template and add features as you make your way through this chapter.
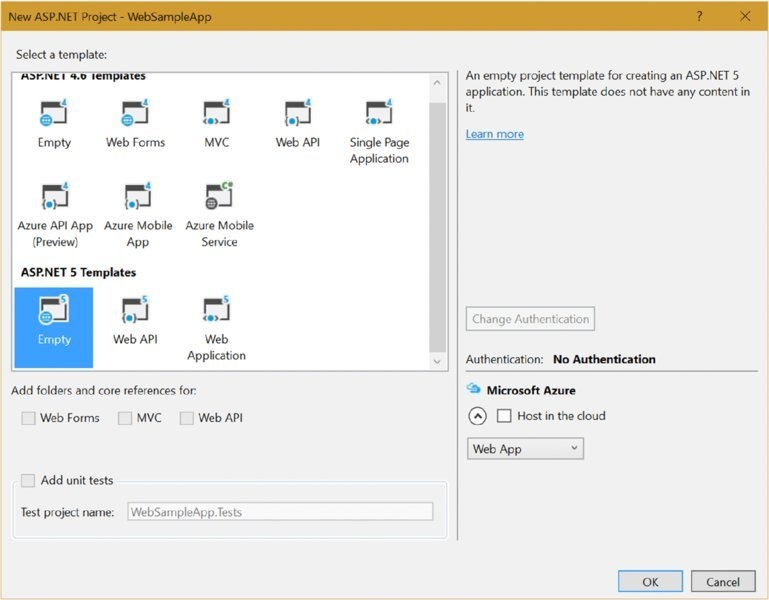
Figure 40.1
NOTE With the sample code download of this chapter, you need to uncomment specific code blocks in the Startup class to activate the features discussed. You can also create the project from scratch. There’s not too much code to write to see all the functionality in action.
After you’ve created the project, you see a solution and a project file named WebSampleApp, which includes a few files and folders (see Figure 40.2).
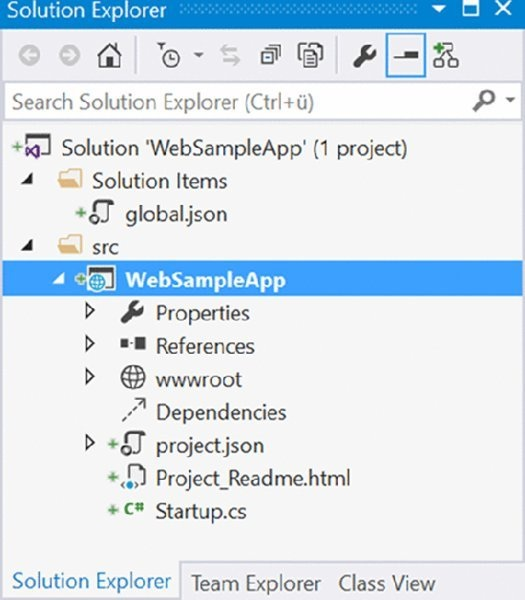
Figure 40.2
The solution includes the global.json configuration file. This file lists the directories of the solution. You can see this with the values of the projects key in the following code snippet. The src directory contains all the projects of the solution with the source code. The test directory is for defining the unit tests, although they don’t exist yet. The sdk setting defines the version number of the SDK used (code file global.json).
{
  "projects": ["src","test" ],
  "sdk": {
    "version":"1.0.0-0"
  }
}
Within the project structure, when you open the file Project_Readme.html with a browser, you see some overall information about ASP.NET Core 1.0. You can see a References folder within the project folder. This contains all the referenced NuGet packages. With an empty ASP.NET Web Application project, the only packages referenced are Microsoft.AspNetCore.IISPlatformHandler and Microsoft.AspNetCore.Server.Kestrel.
IISPlatformHandler contains a Module for IIS that maps the IIS infrastructure to ASP.NET Core 1.0. Kestrel is a new web server for ASP.NET Core 1.0 that you can also use on the Linux platform.
You can also find the references for the NuGet packages within the project.json file. (In the following code snippet, they are in the dependencies section.) The frameworks section lists the supported .NET frameworks, such as net452 (.NET 4.5.2) and netstandard1.0 (.NET Core 1.0). You can remove the one you don’t need for hosting. The exclude section lists the files and directories that should not be used for compiling the application. The publishExclude section lists the files and folders that should not be published (code file WebSampleApp/project.json):
{
  "version":"1.0.0-*",
  "compilationOptions": {
    "emitEntryPoint": true
  },
  "dependencies": {
    "NETStandard.Library":"1.0.0-*",
    "Microsoft.AspNetCore.IISPlatformHandler":"1.0.0-*",
    "Microsoft.AspNetCore.Server.Kestrel":"1.0.0-*"
  },
  "frameworks": {
    "net452": { },
    "netstandard1.0": {
      "dependencies": {
        "NETStandard.Library":"1.0.0-*"
       }
     }
  },
  "content": ["hosting.json" ]
  "exclude": [
    "wwwroot",
    "node_modules"
  ],
  "publishExclude": [
    "**.user",
    "**.vspscc"
  ]
}
You can configure the web server that is used while developing with Visual Studio with the Debug option in Project settings (see Figure 40.3). By default, IIS Express is configured with the port number specified with the Debug settings. IIS Express derives from Internet Information Server (IIS) and offers all the core features of IIS. This makes it easy to develop the web application in practically the same environment where the application will be hosted later (if IIS is used for hosting).
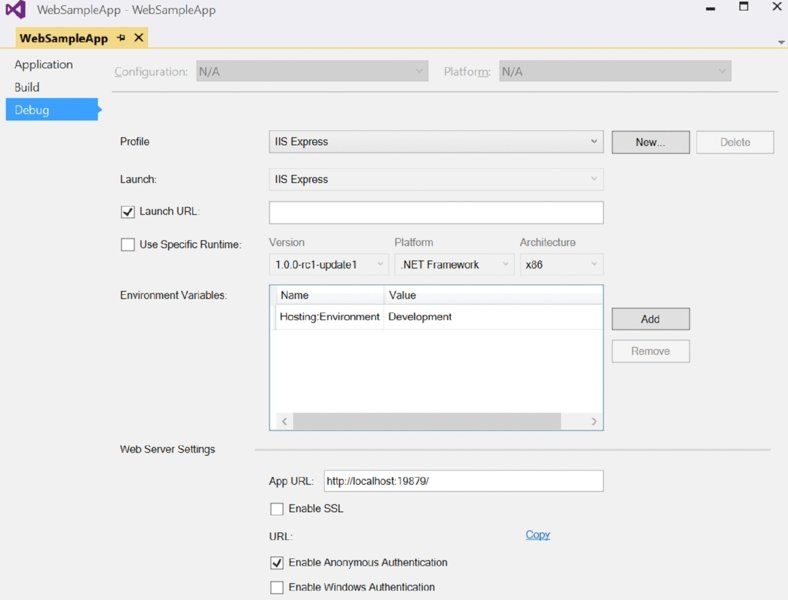
Figure 40.3
To run the application with the Kestrel server, you can select the web profile with the Debug Project settings. The options that are available with the list in the Profile options are the commands listed in project.json.
The settings that you change with the Visual Studio project settings influence the configuration of the launchSettings.json file. With this file you can define some additional configurations such as command line arguments (code file WebSampleApp/Properties/launchsettings.json):
{
  "iisSettings": {
    "windowsAuthentication": false,
    "anonymousAuthentication": true,
    "iisExpress": {
      "applicationUrl":"http://localhost:19879/",
      "sslPort": 0
    }
  },
  "profiles": {
    "IIS Express": {
      "commandName":"IISExpress",
      "launchBrowser": true,
      "environmentVariables": {
        "Hosting:Environment":"Development"
      }
    },
    "web": {
      "commandName":"web",
      "launchBrowser": true,
      "launchUrl":"http://localhost:5000/",
      "commandLineArgs":"Environment=Development",
      "environmentVariables": {
        "Hosting:Environment":"Development"
      }
    }
  }
}
The Dependencies folder in the project structure in Solution Explorer shows the dependencies on the JavaScript libraries. When you create an empty project, this folder is empty. You add dependencies later in this chapter in the section “Adding Static Content.”
The wwwroot folder is the folder for static files that need to be published to the server. Currently, this folder is empty, but as you work through this chapter you add HTML and CSS files and JavaScript libraries.
A C# source file—Startup.cs—is included with an empty project as well. This file is discussed next.
During the creation of the project, these dependencies and namespaces are needed:
Dependencies
Microsoft.AspNetCore.Http.Abstractions
Microsoft.AspNetCore.IISPlatformHandler
Microsoft.AspNetCore.Server.Kestrel
Microsoft.AspNetCore.StaticFiles
Microsoft.AspNetCore.Session
Microsoft.Extensions.Configuration
Microsoft.Extensions.Configuration.UserSecrets
Microsoft.Extensions.Logging
Microsoft.Extensions.Logging.Console
Microsoft.Extensions.Logging.Debug
Microsoft.Extensions.PlatformAbstractions
Newtonsoft.Json
System.Globalization
System.Text.Encodings.Web
System.Runtime
Namespaces
Microsoft.AspNetCore.Builder;
Microsoft.AspNetCore.Hosting;
Microsoft.AspNetCore.Http;
Microsoft.Extensions.Configuration
Microsoft.Extensions.DependencyInjection
Microsoft.Extensions.Logging
Microsoft.Extensions.PlatformAbstractions
Newtonsoft.Json
System
System.Globalization
System.Linq
System.Text
System.Text.Encodings.Web
System.Threading.Tasks
Startup
It’s time to start to get some functionality out of the web application. To get information about the client and return a response, you need to write a response to the HttpContext.
The empty ASP.NET web application template creates a Startup class that contains the following code (code file WebSampleApp/Startup.cs):
using Microsoft.AspNetCore.Builder;
using Microsoft.AspNetCore.Hosting;
using Microsoft.AspNetCore.Http;
using Microsoft.Extensions.DependencyInjection;
// etc.
namespace WebSampleApp
{
  public class Startup
  {
    public void ConfigureServices(IServiceCollection services)
    {
    }
    public void Configure(IApplicationBuilder app, ILoggerFactory loggerFactory)
    {
      app.UseIISPlatformHandler();
      // etc.

      app.Run(async (context) =>
      {
        await context.Response.WriteAsync("Hello World!");
      });
    }
    public static void Main(string[] args)
    {
      var host = new WebHostBuilder()
        .UseDefaultConfiguration(args)
        .UseStartup<Startup>()
        .Build();
      host.Run();
    }
  }
}
The entry point for the web application is the Main method. With the emitEntryPoint configuration you’ve seen earlier in the project.json configuration file you can define if a Main method should be used. You also defined the Main method with .NET Core console applications created in this book. Only libraries don’t need a Main method.
With the default implementation as it is generated from the Visual Studio template, the web application is configured with the help of a WebHostBuilder instance. Using the WebHostBuilder, the method UseDefaultConfiguration is invoked. This method receives the command-line arguments and creates a configuration that includes the optional hosting file (hosting.json), adds environmental variables, and adds the command-line arguments to the configuration. The method UseStartup defines to use the Startup class, which in turn invokes the methods ConfigureServices and Configure. The last method invoked with the WebApplicationBuilder is the Build method, which returns an object implementing the interface IWebApplication. With the returned application object, the Run method is invoked, which starts the hosting engine; now the server is listening and waiting for requests.
The hosting.json file is used to configure the server (code file
WebSampleApp/hosting.json):
{
  "server":"Microsoft.AspNetCore.Server.Kestrel",
  "server.urls":"http://localhost:5000"
}
Because the Startup class is passed to the UseStartup method with a generic template parameter, in turn the methods ConfigureServices and Configure are invoked.
The Configure method receives an internal application builder type via dependency injection that implements the interface IApplicationBuilder. This interface is used to define services used by the application. Calling the Use method of this interface, you can build the HTTP request pipeline to define what should be done in answer to a request. The Run method is an extension method for the interface IApplicationBuilder; it invokes the Use method. This method is implemented via the RunExtensions extension class in the assembly Microsoft.AspNetCore.Http.Abstractions and the namespace Microsoft.AspNetCore.Builder.
The parameter of the Run method is a delegate of type RequestDelegate. This type receives an HttpContext as a parameter, and it returns a Task. With the HttpContext (the context variable in the code snippet), you have access to the request information from the browser (HTTP headers, cookies, and form data) and can send a response. The code snippet returns a simple string—Hello, World! —to the client, as shown in Figure 40.4.

Figure 40.4
NOTE If you’re using Microsoft Edge for testing the web application, you need to enable localhost. Type about:flags in the URL box, and enable the Allow Localhost Loopback option (see Figure 40.5). Instead of using the built-in user interface of Microsoft Edge to set this option, you can also use a command line option: the utility CheckNetIsolation. The command CheckNetIsolation LoopbackExempt -a - n=Microsoft.MicrosoftEdge_8wekyb3d8bbwe enables localhost similarly to using the more friendly user interface for Microsoft Edge. The utility CheckNetIsolation is useful if you want to configure other Windows apps to allow localhost.

Figure 40.5
Adding logging information to your web application is really useful to get more information about what’s going on. For this, the Configure method of the Startup class receives an ILoggerFactory object. With this interface you can add logger providers using the AddProvider method, and you create a logger implementing the ILogger interface with the CreateLogger method. The AddConsole and AddDebug methods shown in the following code snippet are extension methods to add different providers. The AddConsole method adds a provider to write log information to the console, the AddDebug method adds a provider to write log information to the debugger. Using both of these methods without passing argument values, a default is used to configure log messages. The default specifies to write log messages of type information and higher. You can use different overloads to specify other filters for logging, or you can use configuration files to configure logging (code file WebSampleApp/Startup.cs):
public void Configure(IApplicationBuilder app, ILoggerFactory
loggerFactory)
{
  // etc.
  loggerFactory.AddConsole();
  loggerFactory.AddDebug();
  // etc.
}
With the ILogger interface you can write custom log information using the Log method.
Adding Static Content
Usually you don’t want to just send simple strings to the client. By default, simple HTML files and other static content can’t be sent. ASP.NET 5 reduces the overhead as much as possible. Even static files are not returned from the server if you do not enable them.
To enable static files served from the web server, you can add the extension method UseStaticFiles (and comment the previously created Run method):
public void Configure(IApplicationBuilder app, ILoggerFactory
loggerFactory)
{
  app.UseiISPlatformHandler();
  app.UseStaticFiles();
  //etc.
}
As soon as you add this code line with the same capitalization to the Configure method, the smart tag from the editor offers adding the NuGet package Microsoft.AspNet.StaticFiles. Select this, and the NuGet package is downloaded and listed in project.json:
  "dependencies": {
    "Microsoft.AspNetCore.IISPlatformHandler":"1.0.0-*",
    "Microsoft.AspNetCore.Server.Kestrel":"1.0.0-*",
    "Microsoft.AspNetCore.StaticFiles":"1.0.0-*"
  },
The folder where you add static files is the wwwroot folder within the project. You can configure the name of the folder in the project.json file with the webroot setting. If no folder is configured, it’s wwwroot. With the configuration and the NuGet package added, you can add an HTML file to the wwwroot folder (code file WebSampleApp/wwwroot/Hello.html), as shown here:
<!DOCTYPE html>
<html>
<head>
  <meta charset="utf-8" />
  <title></title>
</head>
<body>
  <h1>Hello, ASP.NET with Static Files</h1>
</body>
</html>
Now you make a request to the HTML file from the browser after starting the server—for example, http://localhost:5000/Hello.html . Depending on the configuration you are using, the port number might differ for your project.
NOTE When creating web applications with ASP.NET MVC, you also need to know HTML, CSS, JavaScript, and some JavaScript libraries. As this book’s focus is C# and .NET, the content for these topics is kept to a minimum. I just cover the most important tasks you need to know with ASP.NET MVC and Visual Studio.
Using a JavaScript Package Manager: npm
With web applications, you typically need some JavaScript libraries. Before Visual Studio 2015, JavaScript libraries were available as NuGet packages—similarly to how .NET assemblies are available as NuGet packages. Because the communities around script libraries typically don’t use the NuGet server, they also don’t create NuGet packages. Extra work was required from Microsoft or Microsoft-friendly communities to create NuGet packages for JavaScript libraries. Instead of using NuGet, communities around JavaScript use servers with functionality similar to NuGet.
The Node Package Manager (npm) is a package manager for JavaScript libraries. Originally coming from Node.Js (a JavaScript library for server-side development), npm is strong with server-side scripts. However, more and more client-side scripting libraries are available with npm as well.
Using Visual Studio 2015, you can add npm to the project by adding the NPM Configuration File from the item templates. When you add the item template, the package.json file is added to the project:
{
  "version":"1.0.0",
  "name":"ASP.NET",
  "private":"true",
  "devDependencies": {
  }
}
With the file open within Visual Studio, you can see the npm logo in the editor, as shown in Figure 40.6.
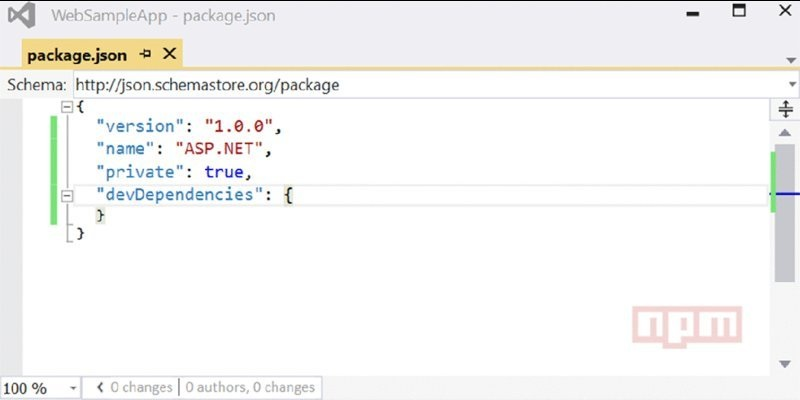
Figure 40.6
NOTE The package.json file is visible in the Solution Explorer only if you click the button Show All Files.
If you start adding JavaScript libraries to the devDependencies section of this file, the npm server is contacted as you type to allow completing the JavaScript library, and to show available version numbers. When you select the version number in the editor, you also get the offer for a ^ and ~ prefix. Without the prefix, exactly the version of the library with the exact name you typed is retrieved from the server. With the ^ prefix, the latest library with the same major version number is retrieved; with the ~ prefix, the latest library with the same minor version number is retrieved.
The following package.json file references a few gulp libraries and the rimraf library. As you save the package.json file, the npm packages are loaded from the server. In the Solution Explorer you can see the npm-loaded libraries in the Dependencies section. The Dependencies section has an npm child node where all the libraries loaded are shown.
{
  "version":"1.0.0",
  "name":"ASP.NET",
  "private":"true",
  "devDependencies": {
    "gulp":"3.9.0",
    "gulp-concat":"2.6.0",
    "gulp-cssmin":"0.1.7",
    "gulp-uglify":"1.2.0",
    "rimraf":"2.4.2"
  }
}
What are these JavaScript libraries referenced good for? gulp is a build system that is discussed in the next section. gulp-concat concatenates JavaScript files; gulp-cssmin minifies CSS files; gulp-uglify minifies JavaScript files; and rimraf allows you to delete files in a hierarchy. Minification removes all unnecessary characters.
After the packages are added, you can easily update or uninstall the package using the npm node within the Dependencies section in Solution Explorer.
Building with Gulp
Gulp is a build system for JavaScript. Whereas npm can be compared to NuGet, gulp can be compared to .NET Development Utility (DNU). JavaScript code is interpreted; why do you need a build system with JavaScript? There are a lot of things to do with HTML, CSS, and JavaScript before putting these files on the server. With a build system, you can convert Syntactically Awesome Stylesheets (SASS) files (CSS with scripting features) to CSS, you can minify and compress files, you can start unit tests for scripts, and you can analyze JavaScript code (for example, with JSHint)—there are a lot useful tasks you can do.
After adding gulp with npm, a Gulp Configuration File can be added using a Visual Studio item template. This template creates the following gulp file (code file MVCSampleApp/gulpfile.js):
/*
This file is the main entry point for defining Gulp tasks and using Gulp
plugins.
Click here to learn more. http://go.microsoft.com/fwlink/?LinkId=518007
*/
var gulp = require('gulp');
gulp.task('default', function () {
    // place code for your default task here
});
The editor with the gulp logo is shown in Figure 40.7.

Figure 40.7
Now let’s add some tasks to the gulp file. The first lines define required libraries for this file and assign variables to the scripts. Here, the libraries that have been added with npm are in use. The gulp.task function creates gulp tasks that you can start using the Visual Studio Task Runner Explorer:
"use strict";
var gulp = require("gulp"),
    rimraf = require("rimraf"),
    concat = require("gulp-concat"),
    cssmin = require("gulp-cssmin"),
    uglify = require("gulp-uglify")
var paths = {
    webroot:"./wwwroot/"
};
paths.js = paths.webroot +"js/**/*.js";
paths.minJs = paths.webroot +"js/**/*.min.js";
paths.css = paths.webroot +"css/**/*.css";
paths.minCss = paths.webroot +"css/**/*.min.css";
paths.concatJsDest = paths.webroot +"js/site.min.js";
paths.concatCssDest = paths.webroot +"css/site.min.css";
gulp.task("clean:js", function (cb) {
    rimraf(paths.concatJsDest, cb);
});
gulp.task("clean:css", function (cb) {
    rimraf(paths.concatCssDest, cb);
});
gulp.task("clean", ["clean:js","clean:css"]);
gulp.task("min:js", function () {
    gulp.src([paths.js,"!" + paths.minJs], { base:"." })
        .pipe(concat(paths.concatJsDest))
        .pipe(uglify())
        .pipe(gulp.dest("."));
});
gulp.task("min:css", function () {
    gulp.src([paths.css,"!" + paths.minCss])
        .pipe(concat(paths.concatCssDest))
        .pipe(cssmin())
        .pipe(gulp.dest("."));
});
gulp.task("min", ["min:js","min:css"]);
Visual Studio 2015 offers a Task Runner Explorer (see Figure 40.8) for gulp files. Double-click on a task to start it. You can also map the gulp tasks to Visual Studio commands. This way gulp tasks are started automatically when a project is opened, before or after the build, or when the Clean menu entry is selected within the Build menu.
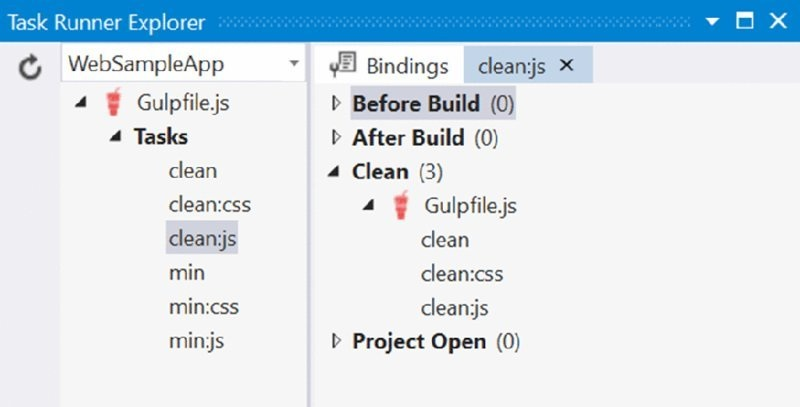
Figure 40.8
NOTE Another JavaScript build system supported by Visual Studio is Grunt. The focus in Grunt is building via configuration, whereas the focus in Gulp is on building via JavaScript code.
Using Client-Side Libraries with Bower
Most client-side JavaScript libraries are available via Bower. Bower is a package manager like npm. Whereas the npm project started with JavaScript libraries for server-side code (although many client-side scripting libraries are also available with npm), Bower offers thousands of JavaScript client libraries.
Bower can be added to an ASP.NET web project by using the item template Bower Configuration File. This template adds the file bower.json as shown here:
{
  "name":"ASP.NET",
  "private": true,
  "dependencies": {
  }
}
Adding Bower to the project also adds the .bowerrc file that configures Bower. By default, when you use the directory setting, the script files (as well as CSS and HTML files that come with the scripting libraries) are copied to the wwwroot/lib directory:
{
  "directory":"wwwroot/lib"
}
NOTE Similar to NPM, you need to click the Show All Files button in the Solution Explorer to see the bower-related files. Visual Studio 2015 has special support for Bower. Figure 40.9 shows the Bower logo in the editor.
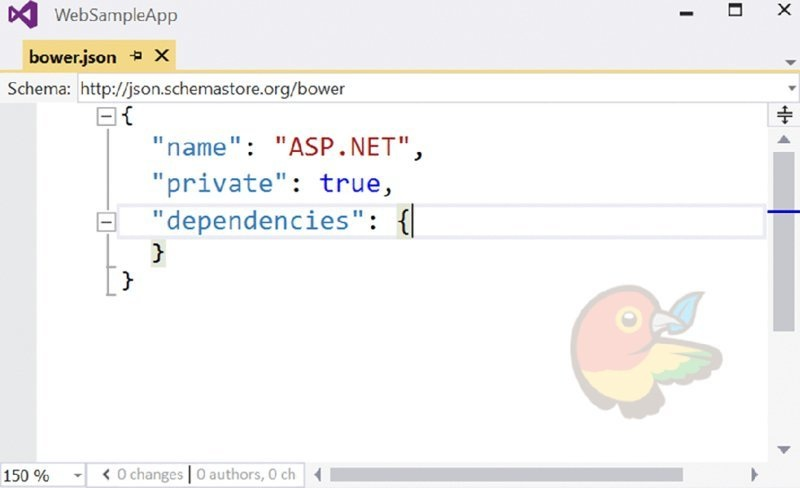
Figure 40.9
If you start adding scripting libraries to the bower.json file, you get IntelliSense by typing both the name of the library and the version number. Similarly to npm, when you save the file, libraries are retrieved from the server and can be found within the Dependencies folder. Because of the configuration within .bowerrc, the files from the scripting libraries are copied to the wwwroot/lib folder (code file MVCSampleApp/.bowerrc):
{
  "name":"ASP.NET",
  "private": true,
  "dependencies": {
    "bootstrap":"3.3.5",
    "jquery":"2.1.4",
    "jquery-validation":"1.14.0",
    "jquery-validation-unobtrusive":"3.2.5"
  }
}
Management of Bower packages is also available with the Manage Bower Packages tool that you can access by clicking the application context menu Manage Bower Packages. This tool is very similar to the NuGet Package Manager; it just makes it easy to manage Bower packages (see Figure 40.10).
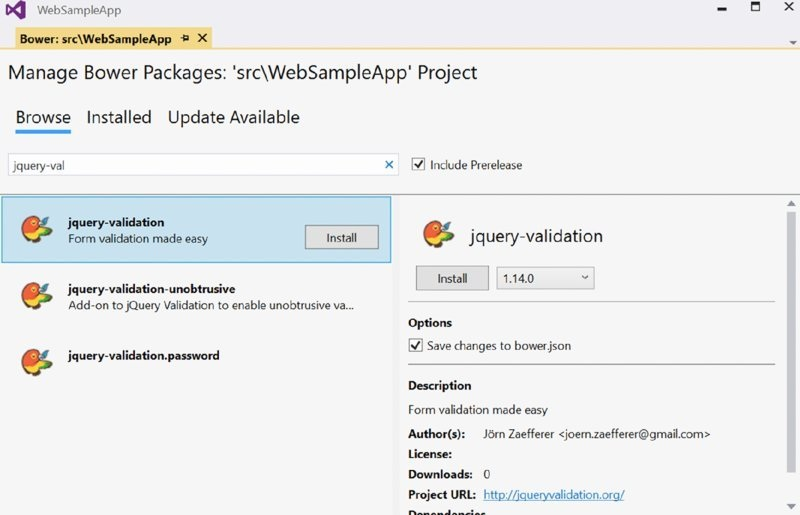
Figure 40.10
Now that the infrastructure is in place, it’s time to get into the HTTP request and response.
Request and Response
With the HTTP protocol, the client makes a request to the server. This request is answered with a response.
The request consists of a header and, in many cases, body information to the server. The server uses the body information to define different results based on the needs of the client. Let’s have a look at what information can be read from the client.
To return an HTML-formatted output to the client, the GetDiv method creates a div element that contains span elements with the passed arguments key and value (code file WebSampleApp/RequestAndResponseSample.cs):
public static string GetDiv(string key, string value) =>
  $"<div><span>{key}:</span><span>{value}</span></div>";
Because such HTML div and span tags are needed to surround strings in following examples, extension methods are created to cover this functionality (code file WebSampleApp/HtmlExtensions.cs):
public static class HtmlExtensions
{
  public static string Div(this string value) =>
    $"<div>{value}</div>";
  public static string Span(this string value) =>
    $"<span>{value}</span>";
}
The method GetRequestInformation uses an HttpRequest object to access Scheme, Host, Path, QueryString, Method, and Protocol properties (code file WebSampleApp/RequestAndResponseSample.cs):
public static string GetRequestInformation(HttpRequest request)
{
  var sb = new StringBuilder();
  sb.Append(GetDiv("scheme", request.Scheme));
  sb.Append(GetDiv("host", request.Host.HasValue ? request.Host.Value :
    "no host"));
  sb.Append(GetDiv("path", request.Path));
  sb.Append(GetDiv("query string", request.QueryString.HasValue ?
    request.QueryString.Value :"no query string"));
  sb.Append(GetDiv("method", request.Method));
  sb.Append(GetDiv("protocol", request.Protocol));
  return sb.ToString();
}
The Configure method of the Startup class is changed to invoke the GetRequestInformation method and pass the HttpRequest via the Request property of the HttpContext. The result is written to the Response object (code file WebSampleApp/Startup.cs):
app.Run(async (context) =>
{
  await context.Response.WriteAsync(
    RequestAndResponseSample.GetRequestInformation(context.Request));
});
Starting the program from Visual Studio results in the following information:
scheme:http
host:localhost:5000
path: /
query string: no query string
method: GET
protocol: HTTP/1.1
Adding a path, such as http://localhost:5000/Index, to the request results in the path value set:
scheme:http
host:localhost:5000
path: /Index
query string: no query string
method: GET
protocol: HTTP/1.1
When you add a query string, such as http://localhost:5000/Add?x=3&y=5, the query string accessing the property QueryString shows up:
query string: ?x=3&y=5
In the next code snippet you use the Path property of the HttpRequest to create a lightweight custom routing. Depending on the path that is set by the client, different methods are invoked (code file WebSampleApp/Startup.cs):
app.Run(async (context) =>
{
  string result = string.Empty;
  switch (context.Request.Path.Value.ToLower())
  {
    case"/header":
      result =
RequestAndResponseSample.GetHeaderInformation(context.Request);
      break;
    case"/add":
      result = RequestAndResponseSample.QueryString(context.Request);
      break;
    case"/content":
      result = RequestAndResponseSample.Content(context.Request);
      break;
    case"/encoded":
      result = RequestAndResponseSample.ContentEncoded(context.Request);
      break;
    case"/form":
      result = RequestAndResponseSample.GetForm(context.Request);
      break;
    case"/writecookie":
      result = RequestAndResponseSample.WriteCookie(context.Response);
      break;
    case"/readcookie":
      result = RequestAndResponseSample.ReadCookie(context.Request);
      break;
    case"/json":
      result = RequestAndResponseSample.GetJson(context.Response);
      break;
    default:
      result =
RequestAndResponseSample.GetRequestInformation(context.Request);
      break;
  }
  await context.Response.WriteAsync(result);
});
The following sections implement the different methods to show request headers, query strings, and more.
Request Headers
Let’s have a look at what information the client sends within the HTTP header. To access the HTTP header information, the HttpRequest object defines the Headers property. This is of type IHeaderDictionary, and it contains a dictionary with the name of the header and a string array for the values. Using this information, the GetDiv method created earlier is used to write div elements for the client (code file WebSampleApp/RequestAndResponseSample.cs):
public static string GetHeaderInformation(HttpRequest request)
{
  var sb = new StringBuilder();
  IHeaderDictionary headers = request.Headers;
  foreach (var header in request.Headers)
  {
    sb.Append(GetDiv(header.Key, string.Join(";", header.Value)));
  }
  return sb.ToString();
}
The results you see depend on the browser you’re using. Let’s compare a few of them. The following is from Internet Explorer 11 on a Windows 10 touch device:
Connection: Keep-Alive
Accept: text/html,application/xhtml+xml,image/jxr,*.*
Accept-Encoding: gzip, deflate
Accept-Language: en-Us,en;q=0.8,de-AT;q=0.6,de-DE;q=0.4,de;q=0.2
Host: localhost:5000
User-Agent: Mozilla/5.0 (Windows NT 10.0; WOW64; Trident/7.0; Touch;
rv:11.0)
like Gecko
Google Chrome version 47.0 shows this information, including version numbers from AppleWebKit, Chrome, and Safari:
Connection: keep-alive
Accept:
text/html,application/xhtml,application/xml;q=0.9,image/webp,*.*;q=0.8
Accept-Encoding: gzip, deflate, sdch
Accept-Language: en-Us;en;q=0.8
Host: localhost:5000
User-Agent: Mozilla/5.0 (Windows NT 10.0; WOW64) AppleWebKit/537.36
(KHTML, like Gecko) Chrome 47.0.2526.80 Safari/537.36
And Microsoft Edge comes with this information, including version numbers from AppleWebKit, Chrome, Safari, and Edge:
Connection: Keep-Alive
Accept: text/html,application/xhtml+xml,image/jxr,*.*
Accept-Encoding: gzip, deflate
Accept-Language: en-Us,en;q=0.8,de-AT;q=0.6,de-DE;q=0.4,de;q=0.2
Host: localhost:5000
User-Agent: Mozilla/5.0 (Windows NT 10.0; Win64; x64) AppleWebKit/537.36
(KHTML,
What can you get out of this header information?
The Connection header was an enhancement of the HTTP 1.1 protocol. With this header the client can request to keep connections open. Usually with HTML, the client makes multiple requests, e.g. to get the images, CSS, and JavaScript files. The server might honor the request, or it might ignore the request in case the load is too high and it’s better to close the connection.
The Accept header defines the mime formats the browser accepts. The list is in order by the preferred formats. Depending on this information, you might decide to return data with different formats based on the client’s needs. IE prefers HTML followed by XHTML and JXR. Google Chrome has a different list. It prefers these formats: HTML, XHTML, XML, and WEBP. With some of this information, a quantifier is also defined. The browsers used for the output all have *.* at the end of this list to accept all data returned.
The Accept-Language header information shows the languages the user has configured. Using this information, you can return localized information. Localization is discussed in Chapter 28, “Localization.”
NOTE In ancient times, the server kept long lists of browser capabilities. These lists have been used to know what feature is available with which browser. To identify a browser, the agent string from the browser was used to map the capabilities. Over time, browsers lied by giving wrong information, or they even allowed the user to configure the browser name that should be used so that they could get some more features (because browser lists often were not updated on the server). In the past, Internet Explorer (IE) often required different programming than all the other browsers. Microsoft Edge is very different from IE and has more features in common with other vendors’ browsers. That’s why Microsoft Edge shows Mozilla, AppleWebKit, Chrome, Safari, and Edge in the User-Agent string. It’s best not to use this User-Agent string at all for getting a list of features available. Instead, check for specific features you need programmatically.
The header information that you’ve seen so far that was sent with the browser is what is sent for very simple sites. Usually, there will be more detail, such as cookies, authentication information, and also custom information. To see all the information that is sent to and from a server, including the header information, you can use the browser’s developer tools and start a Network session; you’ll see not only all the requests that are sent to the server but also header, body, parameters, cookies, and timing information as shown in Figure 40.11.
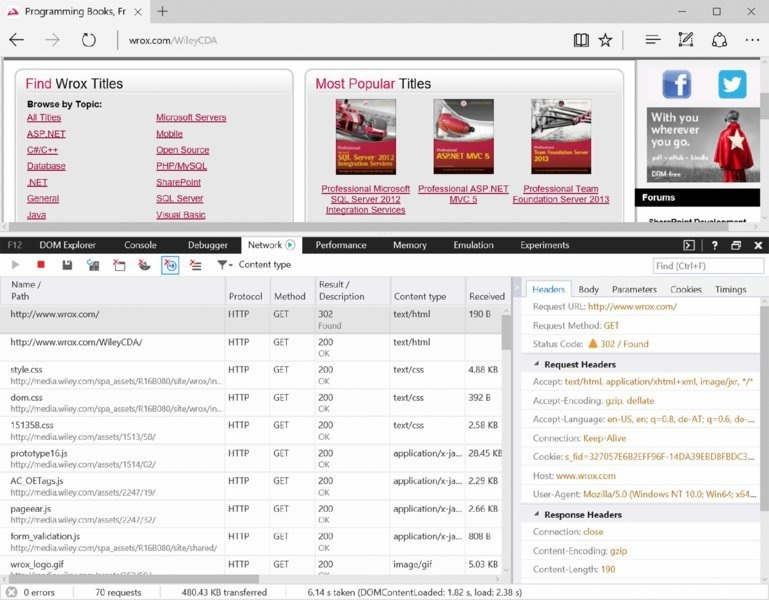
Figure 40.11
Query String
You can use the Add method to analyze the query string. This method requires x and y parameters, makes an addition if these parameters are numbers, and returns the calculation within a div tag. The method GetRequestInformation shown in the previous section demonstrated how to access the complete query string using the QueryString property of the HttpRequest object. To access the parts of the query string, you can use the Query property. The following code snippet accesses the values of x and y by using the Get method. This method returns null if the corresponding key is not found in the query string (code file WebSampleApp/RequestAndResponseSample.cs):
public static string QueryString(HttpRequest request)
{
  var sb = new StringBuilder();
  string xtext = request.Query["x"];
  string ytext = request.Query["y"];
  if (xtext == null ∥ ytext == null)
  {
    return"x and y must be set";
  }
  int x, y;
  if (!int.TryParse(xtext, out x))
  {
    return $"Error parsing {xtext}";
  }
  if (!int.TryParse(ytext, out y))
  {
    return $"Error parsing {ytext}";
  }
  return $"{x} + {y} = {x + y}".Div();
}
The IQueryCollection returned from the Query string also enables you to access all the keys using the Keys property, and it offers a ContainsKey method to check whether a specified key is available.
Using the URL http://localhost:5000/add?x=39&y=3 shows this result in the browser:
39 + 3 = 42
Encoding
Returning data that has been entered by a user can be dangerous. Let’s do this with the Content method. The following method directly returns the data that is passed with the query data string (code file WebSampleApp/RequestAndResponseSample.cs):
public static string Content(HttpRequest request) =>
  request.Query["data"];
Invoking this method using the URL http://localhost:5000/content?data=sample, just the string sample is returned. Using the same method, users can also pass HTML content such as http://localhost:5000/content?data=<h1>Heading 1</h1>
What’s the result of this? Figure 40.12 shows that the h1 element is interpreted by the browser, and the text is shown with the heading format. There are cases where you want to allow this—for example, when users (maybe not anonymous users) are writing articles for a site.

Figure 40.12
Without checking the user input, it is also possible for the users to pass JavaScript such as http://localhost:5000/content?data=<script>alert(“hacker”);</script>.
You can use the JavaScript alert function to make a message box pop up. It’s similarly easy to redirect the user to a different site. When this user input is stored in the site, one user can enter such a script, and all other users who open this page are redirected accordingly.
Returning user-entered data should always be encoded. Let’s have a look at how the result looks with and without encoding. You can do HTML encoding using the HtmlEncoder class as shown in the following code snippet (code file WebSampleApp/RequestResponseSample.cs):
public static string ContentEncoded(HttpRequest request) => HtmlEncoder.Default.Encode(request.Query["data"]);
NOTE Using the HtmlEncoder requires the NuGet package System.Text.Encodings.Web.
When the application is run, the same JavaScript code with encoding is passed using http://localhost:5000/encoded?data=<script>alert(“hacker”);</script>, and the client just sees the JavaScript code in the browser; it is not interpreted (see Figure 40.13).

Figure 40.13
The encoded string that is sent looks like the following example—with the character reference less-than sign (<), greater-than sign (>), and quotation mark (“):
<script>alert("hacker");</script>
Form Data
Instead of passing data from the user to the server with a query string, you can use the form HTML element. This example uses an HTTP POST request instead of GET. With a POST request the user data are passed with the body of the request instead of within the query string.
Using form data is defined with two requests. First, the form is sent to the client with a GET request and then the user fills in the form and submits the data with a POST request. The method that is invoked passing the /form path in turn invokes the GetForm or ShowForm method, depending on the HTTP method type (code file WebSampleApp/RequestResponseSample.cs):
public static string GetForm(HttpRequest request)
{
  string result = string.Empty;
  switch (request.Method)
  {
    case"GET":
      result = GetForm();
      break;
    case"POST":
      result = ShowForm(request);
      break;
    default:
      break;
  }
  return result;
}
The form is created with an input element named text1 and a Submit button. Clicking the Submit button invokes the form’s action method with an HTTP method as defined with the method argument:
private static string GetForm() =>
private static string GetForm() =>
  "<form method="post" action="form">" +
    "<input type="text" name="text1" />" +
    "<input type="submit" value="Submit" />" +
  "</form>";
For reading the form data, the HttpRequest class defines a Form property. This property returns an IFormCollection object that contains all the data from the form that is sent to the server:
private static string ShowForm(HttpRequest request)
{
  var sb = new StringBuilder();
  if (request.HasFormContentType)
  {
    IFormCollection coll = request.Form;
    foreach (var key in coll.Keys)
    {
      sb.Append(GetDiv(key, HtmlEncoder.Default.Encode(coll[key])));
    }
    return sb.ToString();
  }
  else return"no form".Div();
}
Using the /form link, the form is received with the GET request (see Figure 40.14). When you click the Submit button, the form is sent with the POST request, and you can see the text1 key of the form data (see Figure 40.15).

Figure 40.14

Figure 40.15
Cookies
To remember user data between multiple requests, you can use cookies. Adding a cookie to the HttpResponse object sends the cookie within the HTTP header from the server to the client. By default, a cookie is temporary (not stored on the client), and the browser sends it back to the server if the URL is the same domain where the cookie was coming from. You can set the Path to restrict when the browser returns the cookie. In this case, the cookie is only returned when it comes from the same domain and the path /cookies is used. When you set the Expires property, the cookie is a persistent cookie and thus is stored on the client. When the expiration time passes, the cookie will be removed. However, there’s no guarantee that the cookie isn’t removed earlier (code file WebSampleApp/RequestResponseSample.cs):
public static string WriteCookie(HttpResponse response)
{
  response.Cookies.Append("color","red",
    new CookieOptions
    {
      Path ="/cookies",
      Expires = DateTime.Now.AddDays(1)
    });
  return"cookie written".Div();
}
The cookie can be read again by reading the HttpRequest object. The Cookies property contains all the cookies that are returned by the browser:
public static string ReadCookie(HttpRequest request)
{
  var sb = new StringBuilder();
  IRequestCookieCollection cookies = request.Cookies;
  foreach (var key in cookies.Keys)
  {
    sb.Append(GetDiv(key, cookies[key]));
  }
  return sb.ToString();
}
For testing cookies, you can also use the browser’s developer tools. The tools show all the information about the cookies that are sent and received.
Sending JSON
The server returns more than HTML code; it also returns many different kind of data formats, such as CSS files, images, and videos. The client knows what kind of data it receives with the help of a mime type in the response header.
The method GetJson creates a JSON string from an anonymous object with Title, Publisher, and Author properties. To serialize this object with JSON, the NuGet package NewtonSoft.Json is added, and the namespace NewtonSoft.Json imported. The mime type for the JSON format is application /json. This is set via the ContentType property of the HttpResponse (code file WebSampleApp/RequestResponseSample.cs):
public static string GetJson(HttpResponse response)
{
  var b = new
  {
    Title ="Professional C# 6",
    Publisher ="Wrox Press",
    Author ="Christian Nagel"
  };
  string json = JsonConvert.SerializeObject(b);
  response.ContentType ="application/json";
  return json;
}
NOTE To use the JsonConvert class, the NuGet package Newtonsoft.Json needs to be added.
This is the data returned to the client.
{"Title":"Professional C# 6","Publisher":"Wrox Press", "Author":"Christian Nagel"}
NOTE Sending and receiving JSON is covered in Chapter 42, “ASP.NET Web API.”
Dependency Injection
Dependency injection is deeply integrated within ASP.NET Core. This design pattern gives loose coupling as a service is used only with an interface. The concrete type that implements the interface is injected. With the ASP.NET built-in dependency injection mechanism, injection happens via constructors that have arguments of the injected interface type.
Dependency injection separates the service contract and the service implementation. The service can be used without knowing the concrete implementation—just a contract is needed. This allows replacing the service (e.g. logging) in a single place for all using the service.
Let’s have a more detailed look at dependency injection by creating a custom service.
Defining a Service
First, a contract for a sample service is declared. Defining a contract via an interface enables you to separate the service implementation from its use—for example, to use a different implementation for unit testing (code file WebSampleApp/Services/ISampleService.cs):
public interface ISampleService
{
  IEnumerable<string> GetSampleStrings();
}
You implement the interface ISampleService with the class DefaultSampleService (code file WebSampleApp/Services/DefaultSampleService.cs):
public class DefaultSampleService : ISampleService
{
  private List<string> _strings = new List<string> {"one","two","three" };
  public IEnumerable<string> GetSampleStrings() => _strings;
}
Registering the Service
Using the AddTransient method (which is an extension method for IServiceCollection defined in the assembly Microsoft.Extensions.DependencyInjection.Abstractions in the namespace Microsoft.Extensions.DependencyInjection), the type DefaultSampleService is mapped to ISampleService. When you use the ISampleService interface, the DefaultSampleService type is instantiated (code file WebSampleApp/Startup.cs):
public void ConfigureServices(IServiceCollection services)
{
  services.AddTransient<ISampleService, DefaultSampleService>();
  // etc.
}
The built-in dependency injection service defines several lifetime options. Using the AddTransient method, the service is newly instantiated every time the service is injected.
Using the AddSingleton method, the service is instantiated only once. Every injection makes use of the same instance:
services.AddSingleton<ISampleService, DefaultSampleService>();
The AddInstance method requires you to instantiate a service and pass the instance to this method. This way you’re defining the lifetime of the service:
var sampleService = new DefaultSampleService();
services.AddInstance<ISampleService>(sampleService);
With the fourth option, the lifetime of the service is based on the current context. With ASP.NET MVC, the current context is based on the HTTP request. As long as actions for the same request are invoked, the same instance is used with different injections. With a new request, a new instance is created. For defining a context-based lifetime, the AddScoped method maps the service contract to the service:
services.AddScoped<ISampleService>();
Injecting the Service
After the service is registered, you can inject it. A controller type named HomeController is created in the directory Controllers. The built-in dependency injection framework makes use of constructor injection; thus a constructor is defined that receives an ISampleService interface. The method Index receives an HttpContext and can use this to read request information, and it returns a HTTP status value. Within the implementation, the ISampleService is used to get the strings from the service. The controller adds some HTML elements to put the strings in a list (code file WebSampleApp/Controllers/HomeController.cs):
public class HomeController
{
  private readonly ISampleService _service;
  public HomeController(ISampleService service)
  {
    _service = service;
  }
  public async Task<int> Index(HttpContext context)
  {
    var sb = new StringBuilder();
    sb.Append("<ul>");
    sb.Append(string.Join("", _service.GetSampleStrings().Select(
        s => $"<li>{s}</li>").ToArray()));
    sb.Append("</ul>");
    await context.Response.WriteAsync(sb.ToString());
    return 200;
  }
}
NOTE This sample controller directly returns HTML code. It’s better to separate the functionality from the user interface and to create the HTML code from a different class—a view. For this separation it’s best to use a framework: ASP.NET MVC. This framework is explained in Chapter 41.
Calling the Controller
To instantiate the controller via dependency injection, the HomeController class is registered with the IServiceCollection services. This time you do not use an interface; thus you need only the concrete implementation of the service type with the AddTransient method call (code file WebSampleApp/Startup.cs):
public void ConfigureServices(IServiceCollection services)
{
  services.AddTransient<ISampleService, DefaultSampleService>();
  services.AddTransient<HomeController>();
  // etc.
}
The Configure method that contains the route information is now changed to check for the /home path. If this expression returns true, the HomeController is instantiated via dependency injection by calling the GetService method on the registered application services. The IApplicationBuilder interface defines an
ApplicationServices property that returns an object implementing IServiceProvider. Here, you can access all the services that have been registered. Using this controller, the Index method is invoked by passing the HttpContext. The status code is written to the response object:
public void Configure(IApplicationBuilder app, ILoggerFactory
loggerFactory)
{
  app.Run(async (context) =>
  {
    // etc.
    if (context.Request.Path.Value.ToLower() =="/home")
    {
      HomeController controller =
        app.ApplicationServices.GetService<HomeController>();
      int statusCode = await controller.Index(context);
      context.Response.StatusCode = statusCode;
      return;
    }
  });
  // etc.
}
Figure 40.16 shows the output of the unordered list when you run the application with a URL to the home address

Figure 40.16
Routing Using Map
With the previous code snippet, the HomeController class was invoked when the path of the URL equals /home. You didn’t pay attention to query strings or subfolders. Of course, you could do this by checking only a subset of the string. However, there’s a much better way. ASP.NET supports subapplications with an extension of the IApplicationBuilder: the Map method.
The following code snippet defines a map to the /home2 path and runs the Invoke method of the HomeController (code file WebSampleApp/Startup.cs):
public void Configure(IApplicationBuilder app, ILoggerFactory
loggerFactory)
{
  // etc.
  app.Map("/home2", homeApp =>
  {
    homeApp.Run(async context =>
    {
      HomeController controller =
        app.ApplicationServices.GetService<HomeController>();
      int statusCode = await controller.Index(context);
      context.Response.StatusCode = statusCode;
    });
  });
  // etc.
}
Instead of using the Map method, you can also use MapWhen. With the following code snippet, the map managed by MapWhen applies when the path starts with /configuration. The remaining path is written to the variable remaining and can be used to differ with the method invocations:
PathString remaining;
app.MapWhen(context =>
  context.Request.Path.StartsWithSegments("/configuration", out remaining),
    configApp =>
    {
      configApp.Run(async context =>
      {
        // etc.
      }
    });
Instead of just using the path, you can also access any other information of the HttpContext, such as the host information of the client (context.Request.Host) or authenticated users (context.User.Identity .IsAuthenticated).
Using Middleware
ASP.NET Core makes it easy to create modules that are invoked before the controller is invoked. This can be used to add header information, verify tokens, build a cache, create log traces, and so on. One middleware module is chained after the other until all connected middleware types have been invoked.
You can create a middleware class by using the Visual Studio item template Middleware Class. With this middleware type, you create a constructor that receives a reference to the next middleware type. RequestDelegate is a delegate that receives an HttpContext as parameter and returns a Task. This is exactly the signature of the Invoke method. Within this method, you have access to request and response information. The type HeaderMiddleware adds a sample header to the response of the HttpContext. As the last action, the Invoke method invokes the next middleware module (code file WebSampleApp/Middleware/HeaderMiddleware.cs):
public class HeaderMiddleware
{
  private readonly RequestDelegate _next;
  public HeaderMiddleware(RequestDelegate next)
  {
    _next = next;
  }
  public Task Invoke(HttpContext httpContext)
  {
    httpContext.Response.Headers.Add("sampleheader",
      new string[] {"addheadermiddleware"});
    return _next(httpContext);
  }
}
For making it easy to configure the middleware type, the extension method UseHeaderMiddleware extends the interface IApplicationBuilder where the method UseMiddleware is called:
public static class HeaderMiddlewareExtensions
{
  public static IApplicationBuilder UseHeaderMiddleware(
    this IApplicationBuilder builder) =>
      builder.UseMiddleware<HeaderMiddleware>();
}
Another middleware type is Heading1Middleware. This type is similar to the previous middleware type; it just writes heading 1 to the response (code file WebSampleApp/Middleware/Heading1Middleware.cs):
public class Heading1Middleware
{
  private readonly RequestDelegate _next;
  public Heading1Middleware(RequestDelegate next)
  {
    _next = next;
  }
  public async Task Invoke(HttpContext httpContext)
  {
    await httpContext.Response.WriteAsync("<h1>From Middleware</h1>");
    await _next(httpContext);
  }
}
public static class Heading1MiddlewareExtensions
{
  public static IApplicationBuilder UseHeading1Middleware(
    this IApplicationBuilder builder) =>
      builder.UseMiddleware<Heading1Middleware>();
}
Now it’s the job of the Startup class and the Configure method to configure all the middleware types. The extension methods are already prepared for invocation (code file WebSampleApp/Startup.cs):
public void Configure(IApplicationBuilder app, ILoggerFactory
loggerFactory)
{
  // etc.

  app.UseHeaderMiddleware();
  app.UseHeading1Middleware();
  // etc.
}
When you run the application, you see the header returned to the client (using the browser’s developer tools), and the heading shows up in every page, no matter which of the previously created links you use (see Figure 40.17).

Figure 40.17
Session State
A service that is implemented using middleware is session state. Session state enables temporarily remembering data from the client on the server. Session state itself is implemented as middleware.
Session state is initiated when a user first requests a page from a server. While the user keeps opening pages on the server, the session continues until a timeout (typically 10 minutes) occurs. To keep state on the server while the user navigates to a new page, state can be written to a session. When a timeout is reached, the session data is removed.
To identify a session, on the first request a temporary cookie with a session identifier is created. This cookie is returned from the client with every request to the server until the browser is closed, and then the cookie is deleted. Session identifiers can also be sent in the URL string as an alternative to using cookies.
On the server side, session information can be stored in memory. In a web farm, session state that is stored in memory doesn’t propagate between different systems. With a sticky session configuration, the user always returns to the same physical server. Using sticky sessions, it doesn’t matter that the same state is not available on other systems (with the exception when one server fails). Without sticky sessions, and to also deal with failing servers, options exist to store session state within distributed memory of a SQL server database. Storing session state in distributed memory also helps with process recycling of the server process; recycling kills session state also if you’re using just a single server process.
For using session state with ASP.NET, you need to add the NuGet package Microsoft.AspNet.Session. This package gives the AddSession extension method that can be called within the ConfigureServices method in the Startup class. The parameter enables you to configure the idle timeout and the cookie options. The cookie is used to identify the session. The session also makes use of a service that implements the interface IDistributedCache. A simple implementation is the cache for in-process session state. The method AddCaching adds the following cache service (code file WebSampleApp/Startup.cs):
public void ConfigureServices(IServiceCollection services)
{
  services.AddTransient<ISampleService, DefaultSampleService>();
  services.AddTransient<HomeController>();
  services.AddCaching();
  services.AddSession(options =>
    options.IdleTimeout = TimeSpan.FromMinutes(10));
}
NOTE Other implementations of IDistributedCache are RedisCache and SqlServerCache in the NuGet packages Microsoft.Extensions.Caching.Redis and Microsoft.Extensions.Caching.SqlServer.
For using the session, you need to configure the session by calling the UseSession extension method. You need to invoke this method before any response is written to the response—such as is done with the UseHeaderMiddleware and UseHeading1Middleware—thus UseSession is called before the other methods. The code that uses session information is mapped to the /session path (code file WebSampleApp/Startup.cs):
public void Configure(IApplicationBuilder app, ILoggerFactory
loggerFactory)
{
  // etc.
  app.UseSession();
  app.UseHeaderMiddleware();
  app.UseHeading1Middleware();
  app.Map("/session", sessionApp =>
  {
    sessionApp.Run(async context =>
    {
      await SessionSample.SessionAsync(context);
    });
  });
  // etc.
}
You can write session state using Setxxx methods, such as SetString and SetInt32. These methods are defined with the ISession interface that is returned from the Session property of the HttpContext. Session data is retrieved using Getxxx methods (code file WebSampleApp/SessionSample.cs):
public static class SessionSample
{
  private const string SessionVisits = nameof(SessionVisits);
  private const string SessionTimeCreated = nameof(SessionTimeCreated);
  public static async Task SessionAsync(HttpContext context)
  {
    int visits = context.Session.GetInt32(SessionVisits) ?? 0;
    string timeCreated = context.Session.GetString(SessionTimeCreated) ??
      string.Empty;
    if (string.IsNullOrEmpty(timeCreated))
    {
      timeCreated = DateTime.Now.ToString("t",
CultureInfo.InvariantCulture);
      context.Session.SetString(SessionTimeCreated, timeCreated);
    }
    DateTime timeCreated2 = DateTime.Parse(timeCreated);
    context.Session.SetInt32(SessionVisits, ++visits);
    await context.Response.WriteAsync(
      $"Number of visits within this session: {visits}" +
      $"that was created at {timeCreated2:T};" +
      $"current time: {DateTime.Now:T}");
  }
}
NOTE The sample code uses an invariant culture to store the time when the session was created. The time shown to the user is using a specific culture. It’s a good practice to use invariant cultures storing culture-specific data on the server. Information about invariant cultures and how to set cultures is explained in Chapter 28, “Localization.
Configuring ASP.NET
With web applications, it’s necessary to store configuration information that can be changed by system administrators—for example, connection strings. In the next chapter you create a data-driven application where a connection string is needed.
Configuration of ASP.NET Core 1.0 is no longer based on the XML configuration files web.config and machine.config as was the case with previous versions of ASP.NET. With the old configuration file, assembly references and assembly redirects were mixed with database connection strings and application settings. This is no longer the case. You’ve seen the project.json file to define assembly references. Connection strings and application settings are not defined there. Application settings are typically stored within appsettings.json, but the configuration is a lot more flexible and you can choose to make your configuration with several JSON or XML files and with environment variables.
A default ASP.NET configuration file—appsettings.json—is added from the item template ASP.NET Configuration File. The item template automatically creates the DefaultConnection setting; the AppSettings have been added later on (code file WebSampleApp/appsettings.json):
{
  "AppSettings": {
    "SiteName":"Professional C# Sample"
  },
  "Data": {
    "DefaultConnection": {
      "ConnectionString":
  "Server=
(localdb)\MSSQLLocalDB;Database=_CHANGE_ME;Trusted_Connection=True;"
    }
  }
}
You need to configure the configuration file that’s used. You do this in the constructor of the Startup class. The ConfigurationBuilder class is used to build the configuration from configuration files. There can be more than one configuration file. The sample code adds appsettings.json to the ConfigurationBuilder using the extension method AddJsonFile. After the setup of the configuration is done, the configuration files are read using the Build method. The returned IConfigurationRoot result is assigned to the read-only property Configuration, which makes it easy to read configuration information later on (code file WebSampleApp/Startup.cs):
public Startup(IHostingEnvironment env)
{
  var builder = new ConfigurationBuilder()
    .AddJsonFile("appsettings.json");

  // etc.
  Configuration = builder.Build();
}
public IConfigurationRoot Configuration { get; }
// etc.
You can use the methods AddXmlFile to add an XML configuration file, AddEnvironmentVariables to add environment variables, and AddCommandLine to add command line arguments to the configuration.
For the configuration files, by default the current directory of the web application is used. In case you need to change the directory, you can invoke the method SetBasePath before invoking the method AddJsonFile. To retrieve the directory of the web application, you can inject the IApplicationEnvironment interface in the constructor and use the ApplicationBasePath property.
Reading the Configuration
The different configuration values are read by mapping the /configuration/appsettings, /configuration/database, and /configuration/secret links (code file WebSampleApp/Startup.cs):
PathString remaining;
app.MapWhen(context =>
  context.Request.Path.StartsWithSegments("/configuration", out remaining),
    configApp =>
    {
      configApp.Run(async context =>
      {
        if (remaining.StartsWithSegments("/appsettings"))
        {
          await ConfigSample.AppSettings(context, Configuration);
        }
        else if (remaining.StartsWithSegments("/database"))
        {
          await ConfigSample.ReadDatabaseConnection(context,
Configuration);
        }
        else if (remaining.StartsWithSegments("/secret"))
        {
          await ConfigSample.UserSecret(context, Configuration);
        }
      });
    });
The configuration can now be read by using the indexer of the IconfigurationRoot object. You can access the hierarchical elements of the JSON tree by using a colon (code file WebSampleApp/ConfigSample.cs):
public static async Task AppSettings(HttpContext context, IConfigurationRoot config)
{
  string settings = config["AppSettings:SiteName"];
  await context.Response.WriteAsync(settings.Div());
}
This is similar to accessing the database connection string:
public static async Task ReadDatabaseConnection(HttpContext context,
  IConfigurationRoot config)
{
  string connectionString =
config["Data:DefaultConnection:ConnectionString"];
  await context.Response.WriteAsync(connectionString.Div());
}
Running the web application accessing the corresponding /configuration URLs returns the values from the configuration file.
Different Configurations Based on the Environment
When running your web application with different environments—for example, during development, testing, and production—you might also use a staging server because it’s likely you are using some different configurations. You don’t want to add test data to the production database.
ASP.NET 4 created transformations for XML files to define the differences from one configuration to the other. This can be done in a simpler way with ASP.NET Core 1.0. For the configuration values that should be different, you can use different configuration files.
The following code snippet adds the JSON configuration files with the environment name—for example, appsettings.development.json or appsettings.production.json (code file WebSampleApp/Startup.cs):
var builder = new ConfigurationBuilder()
  .AddJsonFile("appsettings.json")
  .AddJsonFile($"appsettings.{env.EnvironmentName}.json", optional: true);
You can configure the environment by setting an environmental variable or application arguments in the project properties as shown in Figure 40.18.
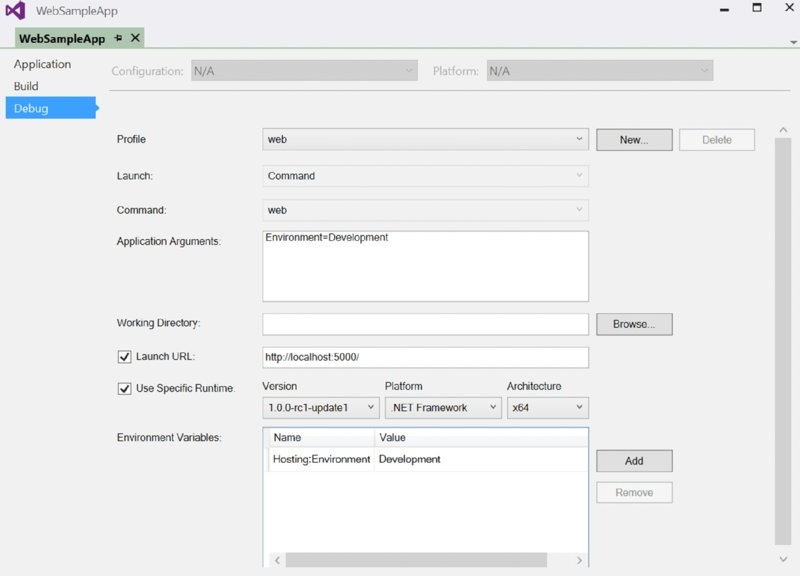
Figure 40.18
To verify the hosting environment programmatically, extension methods are defined for the IHostingEnvironment, such as IsDevelopment, IsStaging, and IsProduction. To test for any environmental name, you can pass a verification string to IsEnvironment:
if (env.IsDevelopment())
{
  // etc.
}
User Secrets
Having the connection string in the configuration file is not a big problem as long as Windows authentication is used. When you store username and password with the connection string, adding the connection string to a configuration file and storing the configuration file along with the source code repository can be a big issue. Having a public repository and storing Amazon keys with the configuration can lead to losing thousands of dollars very quickly. Hackers’ background jobs comb through public GitHub repositories to find Amazon keys to hijack accounts and create virtual machines for making Bitcoins. You can read http://readwrite.com/2014/04/15/amazon-web-services-hack-bitcoin-miners-githubto find out more about this situation.
ASP.NET Core 1.0 has some mitigations around this: user secrets. With user secrets, configuration is not stored in a configuration file of the project; it’s stored in a configuration file associated with your account.
With the installation of Visual Studio, the SecretManager is already installed on your system. On other systems, you need to install the NuGet package Microsoft.Extensions.SecretManager. After the SecretManager is installed and secrets are defined with the application, you can use the command-line tool user-secret to set, remove, and list user secrets from the application.
Secrets are stored in this user-specific location:
%AppData%MicrosoftUserSecrets
An easy way to manage user secrets is from the Solution Explorer in Visual Studio. Select the project node and open the context menu to select Manage User Secrets. When you select this the first time in the project, it adds a secret identifier to project.json (code file WebSampleApp/project.json):
"userSecretsId":"aspnet5-WebSampleApp-20151215011720"
This identifier represents the same subdirectory you will find in the user-specific UserSecrets folder. The Manage User Secrets command also opens the file secrets.json, where you can add JSON configuration information:
{
  "secret1":  "this is a user secret"
}
The user secrets are now added only if the hosting environment is Development (code file WebSampleApp/Startup.cs):
if (env.IsDevelopment())
{
  builder.AddUserSecrets();
}
This way your secrets are not stored in the code repository, and they can be stolen only by hacking your system
Summary
In this chapter, you explored the foundation of ASP.NET and web applications. You’ve seen tools such as npm, Gulp, and Bower, and how they are integrated with Visual Studio. The chapter discussed dealing with requests from the client and answering with a response. You’ve seen the foundation of ASP.NET with dependency injection and services, and you’ve seen a concrete implementation using dependency injection such as session state. You’ve also seen how configuration information can be stored in different ways, such as JSON configuration for different environments such as development and production, and how to store secrets such as keys to cloud services.
The next chapter shows how ASP.NET MVC 6, which uses the foundation discussed in this chapter, can be used to create web applications.