本文内容为转载,重新排版以供学习研究。如有侵权,请联系作者删除。
-----------------------------------------------------------------------
What’s In This Chapter?
- Overview of the ASP.NET Web API
- Creating Web API controllers
- Using repositories with dependency injection
- Creating .NET clients calling REST APIs
- Using Entity Framework from services
- Creating Metadata using Swagger
- Using OData
Wrox.com Code Downloads for This Chapter
The wrox.com code downloads for this chapter are found at
www.wrox.com/go/professionalcsharp6 on the Download Code tab. The code for
this chapter is divided into the following major examples:
- Book Service Sample
- Book Service Async Sample
- Book Service Client App
- Metadata Samples
Overview
When Windows Communication Foundation (WCF) was announced with .NET 3.0, it was the technology for communication and replaced several other technologies in the .NET stack (a few mentioned here are .NET Remoting and ASP.NET Web Services). The goal was to have one communication technology that is very flexible and fulfills all needs. However, WCF was initially based on SOAP (Simple Object Access Protocol). Nowadays we have many scenarios where the powerful SOAP enhancements are not needed. For simpler scenarios such as HTTP requests returning JSON, WCF is too complex. That’s why another technology was introduced in 2012: ASP.NET Web API. With the release of ASP.NET MVC 6 and Visual Studio 2015, the third major version of ASP.NET Web API was released. ASP.NET MVC and ASP.NET Web API previously had different types and configurations (the previous versions were ASP.NET MVC 5 and ASP.NET Web API 2), but ASP.NET Web API is now part of ASP.NET MVC 6.
ASP.NET Web API offers a simple communication technology based on
Representational State Transfer (REST). REST is an architecture style based on some constraints. Let’s compare a service that is based on the REST architectural style with a service that makes use of SOAP to see these constraints.
Both REST services and services making use of the SOAP protocol make use of a client-server technology. SOAP services can be stateful or stateless; REST services are always stateless. SOAP defines its own message format with a header and body to select a method of the service. With REST, HTTP verbs such as GET, POST, PUT, and DELETE are used. GET is used to retrieve resources, POST to add new resources, PUT to update resources, and DELETE to delete resources.
This chapter takes you through a journey covering various important aspects of ASP.NET Web API—creating a service, using different routing methods, creating a client, using OData, securing the service, and using custom hosts.
NOTE SOAP and WCF are covered in Chapter 44, “Windows Communication Foundation.”
Creating Services
Let’s start with creating a service. Using the new .NET Core framework, you need to start with an ASP.NET web application and select the ASP.NET Core 1.0 Template Web API (see Figure 42.1). This template adds folders and references needed with ASP.NET Web API. You can also use the template Web Application in case you need both web pages and services. 
Figure 42.1
NOTE ASP.NET MVC is discussed in Chapter 41, “ASP.NET MVC,” the core technology that is the foundation of ASP.NET MVC in Chapter 40, “ASP.NET Core.”
The directory structure that is created with this template contains folders that are needed for creating the services. The Controllers directory contains the Web API controllers. You’ve seen such controllers already in Chapter 41, and indeed, ASP.NET Web API and ASP.NET MVC make use of the same infrastructure. This was not the case with previous versions.
The Models directory is for the data model. You can add your entity types to this directory, as well as repositories that return model types.
The service that is created returns a list of book chapters and allows adding and deleting chapters dynamically. The sample project that offers this service has the name BookServiceSample.
Defining a Model
First you need a type that represents the data to return and change. The class defined in the Models directory has the name BookChapter and includes simple properties to represent a chapter (code file
BookServiceSample/Models/BookChapter.cs):
public class BookChapter
{
  public Guid Id { get; set; }
  public int Number { get; set; }
  public string Title { get; set; }
  public int Pages { get; set; }
}
Creating a Repository
Next, you create a repository. The methods offered by the repository are defined with the interface IBookChapterRepository—methods to retrieve, add, and update book chapters (code file BookServiceSample/Models/IBookChaptersRepository.cs):
public interface IBookChaptersRepository
{
  void Init();
  void Add(BookChapter bookChapter);
  IEnumerable<BookChapter> GetAll();
  BookChapter Find(Guid id);
  BookChapter Remove(Guid id);
  void Update(BookChapter bookChapter);
}
The implementation of the repository is defined by the class SampleBookChaptersRepository. The book chapters are kept in a collection class. Because multiple tasks from different client requests can access the collection concurrently, the type ConcurrentList is used for the book chapters. This class is thread safe. The Add, Remove, and Update methods make use of the collection to add, remove, and update book chapters (code file BookServiceSample/Models/SampleBookChapterRepository.cs):
public class SampleBookChaptersRepository: IBookChapterRepository
{
  private readonly ConcurrentDictionary<Guid, BookChapter> _chapters =
    new ConcurrentDictionary<Guid, BookChapter>();
  public void Init()
  {
    Add(new BookChapter
    {
      Number = 1,
      Title ="Application Architectures",
      Pages = 35
    });
    Add(new BookChapter
    {
      Number = 2,
      Title ="Core C#",
      Pages = 42
    });
    // more chapters
  }
  public void Add(BookChapter chapter)
  {
    chapter.Id = Guid.NewGuid();
    _chapters[chapter.Id] = chapter;
  }
  public BookChapter Find(Guid id)
  {
    BookChapter chapter;
    _chapters.TryGetValue(id, out chapter);
    return chapter;
  }
  public IEnumerable<BookChapter> GetAll() => _chapters.Values;
  public BookChapter Remove(Guid id)
  {
    BookChapter removed;
    _chapters.TryRemove(id, out removed);
    return removed;
  }
  public void Update(BookChapter chapter)
  {
    _chapters[chapter.Id] = chapter;
  }
}
NOTE With the sample code, the Remove method makes sure that the BookChapter passed with the id parameter is not in the dictionary. If the dictionary already does not contain the book chapter, that’s okay.
An alternative implementation of the Remove method can throw an exception if the book chapter passed cannot be found.
NOTE Concurrent collections are discussed in Chapter 12, “Special Collections.”
With the startup, the SampleBookChapterRepository is registered with the AddSingleton method of the dependency injection container to create just one instance for all clients requesting the service. In this code snippet, an overloaded method of AddSingleton is used that allows passing a previously created instance, which allows initializing the instance by invoking the Init method (code file BookServiceSample/Startup.cs):
public void ConfigureServices(IServiceCollection services)
{
  services.AddMvc();
  IBookChaptersRepository repos = new SampleBookChaptersRepository();
  repos.Init();
  services.AddSingleton<IBookChaptersRepository>(repos);
  // etc.
}
Creating a Controller
The ASP.NET Web API controller uses the repository. The controller can be created from the Solution Explorer context menu Add New Item ➪ Web API Controller Class. The controller class to manage book chapters is named BookChaptersController. This class derives from the base class Controller. The route to the controller is defined with the Route attribute. The route starts with api followed by the name of the controller—which is the name of the controller class without the Controller postfix. The constructor of the BooksChapterController requires an object implementing the interface IBookChapterRepository. This object is injected via dependency injection (code file BookServiceSample/Controllers/BookChaptersController.cs):
[Route("api/[controller]"]
public class BookChaptersController: Controller
{
  private readonly IBookChapterRepository _repository;
  public BookChaptersController(IBookChapterRepository
bookChapterRepository)
  {
    _repository = bookChapterRepository;
  }
The Get method that is created from the template is renamed and modified to return the complete collection of type IEnumerable<BookChapter>:
// GET api/bookchapters
[HttpGet]
public IEnumerable<BookChapter> GetBookChapters() => _repository.GetAll();
The Get method with a parameter is renamed to GetBookChapterById and filters the dictionary of the repository with the Find method. The parameter of the filter, id, is retrieved from the URL. The repository’s Find method returns null if the chapter was not found. In this case, NotFound is returned. NotFound returns a 404 (not found) response. When the object is found, it is returned creating a new ObjectResult: The ObjectResult returns a status code 200 with the book chapter in the body:
// GET api/bookchapters/guid
[HttpGet("{id}", Name=nameof(GetBookChapterById))]
public IActionResult GetBookChapterById(Guid id)
{
  BookChapter chapter = _repository.Find(id);
  if (chapter == null)
  {
    return NotFound();
  }
  else
  {
    return new ObjectResult(chapter);
  }
}
NOTE Read Chapter 41 for information on defining routes.
On adding a new book chapter, the method PostBookChapter is added. This method receives a BookChapter as part of the HTTP body that is assigned to the method parameter after deserialization. In case the parameter chapter is null, an BadRequest (HTTP error 400) is returned. Adding the BookChapter, this method returns CreatedAtRoute. CreatedAtRoute returns the HTTP status 201 (Created) with the object serialized. The returned header information contains a link to the resource—that is, a link to the GetBookChapterById with the id set to the identifier of the newly created object:
// POST api/bookchapters
[HttpPost]
public IActionResult PostBookChapter([FromBody]BookChapter chapter)
{
  if (chapter == null)
  {
    return BadRequest();
  }
  _repository.Add(chapter);
  return CreatedAtRoute(nameof(GetBookChapterById), new { id = chapter.Id
},
    chapter);
}
Updating items is based on the HTTP PUT request. The PutBookChapter method updates an existing item from the collection. In case the object is not yet in the collection, NotFound is returned. If the object is found, it is updated, and a success result 204—no content with an empty body—is returned:
// PUT api/bookchapters/guid
[HttpPut("{id}")]
public IActionResult PutBookChapter(Guid id, [FromBody]BookChapter chapter)
{
  if (chapter == null || id != chapter.Id)
  {
    return BadRequest();
  }
  if (_repository.Find(id) == null)
  {
    return NotFound();
  }
  _repository.Update(chapter);
  return new NoContentResult();
}
With the HTTP DELETE request, book chapters are simply removed from the dictionary:
// DELETE api/bookchapters/5
[HttpDelete("{id}")]
public void Delete(Guid id)
{
  _repository.Remove(id);
}
With this controller in place, it is already possible to do first tests from the browser. Opening the link http://localhost:5000/api/BookChapters returns JSON.
Port 5000 is the default port number when using the Kestrel web server. You canselect this server in the Debug section of the project properties (see Figure 42.2) by choosing the Web profile.
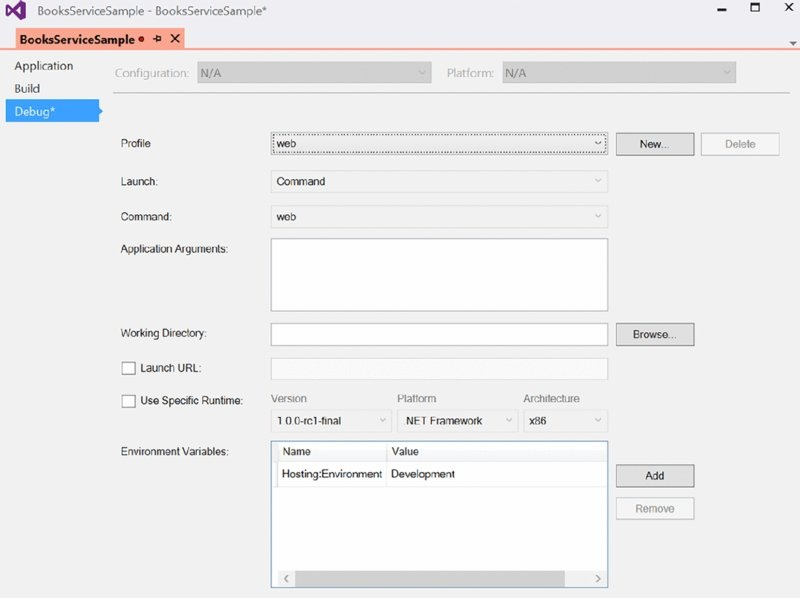
Figure 42.2
When you open this link in a browser, a JSON array is returned as shown:
[{"Id":"2d0c7eac-cb37-409f-b8da-c8ca497423a2",
  "Number":6,"Title":"Generics","Pages":22},
 {"Id":"d62e1182-3254-4504-a56b-f0441ee1ce8e",
  "Number":1,"Title":"Application Architectures","Pages":35},
 {"Id":"cb624eed-7e6c-40c6-88f2-28cf03eb652e",
  "Number":4,"Title":"Inheritance","Pages":18},
 {"Id":"6e6d48b5-fa04-43b5-b5f5-acd11b72c821",
  "Number":3,"Title":"Objects and Types","Pages":30},
 {"Id":"55c1ea93-2c0d-4071-8cee-cc172b3746b5",
  "Number":2,"Title":"Core C#","Pages":42},
 {"Id":"5c391b33-76f3-4e12-8989-3a8fbc621e96",
  "Number":5,"Title":"Managed and Unmanaged Resources","Pages":20}]
Changing the Response Format
ASP.NET Web API 2 returned JSON or XML, depending on the requested format by the client. With ASP.NET MVC 6, when returning an ObjectResult, by default JSON is returned. In case you need to return XML as well, you can add the NuGet package Microsoft.AspNet.Mvc.Formatters.Xml and add a call to AddXmlSerializerFormatters to the Startup class. AddXmlSerializerFormatters is an extension method for the IMvcBuilder interface and can be added using fluent API to the AddMvc method (code file BooksServiceSample/Startup.cs):
public void ConfigureServices(IServiceCollection services)
{
  services.AddMvc().AddXmlSerializerFormatters();
  IBookChaptersRepository repos = new SampleBookChaptersRepository();
  repos.Init();
  services.AddSingleton<IBookChaptersRepository>(repos);
}
With the controllers, the allowed content type(s) and selectable result can be specified with the Produces attribute (BooksServiceSample/Controllers/BookChaptersController.cs):
[Produces("application/json","application/xml")]
[Route("api/[controller]")]
public class BookChaptersController: Controller
{
  // etc.
}
NOTE Later in this chapter, in the section “Receiving XML from the Service,” you see how to receive XML-formatted responses.
REST Results and Status Codes
The following table summarizes the results a service returns based on the HTTP methods:
|
HTTP Method |
Description |
Request Body |
Response Body |
|
GET |
Returns a resource |
Empty |
The resource |
|
POST |
Adds a resource |
The resource to add |
The resource |
|
PUT |
Updates a resource |
The resource to update |
None |
|
DELETE |
Deletes a resource |
Empty |
Empty |
The following table shows important HTTP status codes as well as the Controller method with the instantiated object that returns the status code. To return any HTTP status code, you can return an HttpStatusCodeResult object that can be initialized with the status code you need:
All success status codes start with 2; error status codes start with 4. You can find a list of status codes in RFC 2616: http://www.w3.org/Protocols/rfc2616/rfc2616-sec10.html
Creating an Async Service
The previous sample code made use of a synchronous repository. Using Entity Framework Core with your repository, you can use either synchronous or asynchronous methods. Entity Framework supports both. However, many technologies, for example calling other services with the HttpClient class, offer only asynchronous methods. This can lead to an asynchronous repository as shown in the project BooksServiceAsyncSample.
With the asynchronous project, the IBookChaptersRepository has been changed to an asynchronous version. This interface is defined to use it with repositories accessing asynchronous methods, such as network or database clients. All the methods return a Task (code file
BooksServiceAsyncSample/Models/IBookChaptersRepository.cs):
public interface IBookChaptersRepository
{
  Task InitAsync();
  Task AddAsync(BookChapter chapter);
  Task<BookChapter> RemoveAsync(Guid id);
  Task<IEnumerable<BookChapter>> GetAllAsync();
  Task<BookChapter> FindAsync(Guid id);
  Task UpdateAsync(BookChapter chapter);
}
The class SampleBookChaptersRepository implements the asynchronous methods. When reading and writing from the dictionary, asynchronous functionality is not needed, so the Task to return is created using the FromResult method (code file BooksServiceAsyncSample/Models/SampleBookChaptersRepository.cs):
public class SampleBookChaptersRepository: IBookChaptersRepository
{
  private readonly ConcurrentDictionary<string, BookChapter> _chapters =
    new ConcurrentDictionary<string, BookChapter>();
  public async Task InitAsync()
  {
    await AddAsync(new BookChapter
    {
      Number = 1,
      Title ="Application Architectures",
      Pages = 35
    });
    //... more book chapters
  }
  public Task AddAsync(BookChapter chapter)
  {
    chapter.Id = Guid.NewGuid();
    _chapters[chapter.Id] = chapter;
    return Task.FromResult<object>(null);
  }

  public Task<BookChapter> RemoveAsync(Guid id)
  {
    BookChapter removed;
    _chapters.TryRemove(id, out removed);
    return Task.FromResult(removed);
  }
  public Task<IEnumerable<BookChapter>> GetAllAsync() =>
    Task.FromResult<IEnumerable<BookChapter>>(_chapters.Values);
  public Task<BookChapter> FindAsync(Guid id)
  {
    BookChapter chapter;
    _chapters.TryGetValue(id, out chapter);
    return Task.FromResult(chapter);
  }
  public Task UpdateAsync(BookChapter chapter)
  {
    _chapters[chapter.Id] = chapter;
    return Task.FromResult<object>(null);
  }
}
The API controller BookChaptersController just needs a few changes to be implemented as asynchronous. The controller methods return a Task as well. With this it is easy to invoke the asynchronous methods of the repository (code file BooksServiceAsyncSample/Controllers/BookChaptersController.cs):
[Produces("application/json","application/xml")]
[Route("api/[controller]")]
public class BookChaptersController: Controller
{
  private readonly IBookChaptersRepository _repository;
  public BookChaptersController(IBookChaptersRepository repository)
  {
    _repository = repository;
  }
  // GET: api/bookchapters
  [HttpGet()]
  public Task<IEnumerable<BookChapter>> GetBookChaptersAsync() =>
    _repository.GetAllAsync();
  // GET api/bookchapters/guid
  [HttpGet("{id}", Name = nameof(GetBookChapterByIdAsync))]
  public async Task<IActionResult> GetBookChapterByIdAsync(Guid id)
  {
    BookChapter chapter = await _repository.FindAsync(id);
    if (chapter == null)
    {
      return NotFound();
    }
    else
    {
      return new ObjectResult(chapter);
    }
  }
  // POST api/bookchapters
  [HttpPost]
  public async Task<IActionResult> PostBookChapterAsync(
    [FromBody]BookChapter chapter)
  {
    if (chapter == null)
    {
      return BadRequest();
    }
    await _repository.AddAsync(chapter);
    return CreatedAtRoute(nameof(GetBookChapterByIdAsync),
      new { id = chapter.Id }, chapter);
  }
  // PUT api/bookchapters/guid
  [HttpPut("{id}")]
  public async Task<IActionResult> PutBookChapterAsync(
    string id, [FromBody]BookChapter chapter)
  {
    if (chapter == null || id != chapter.Id)
    {
      return BadRequest();
    }
    if (await _repository.FindAsync(id) == null)
    {
      return NotFound();
    }
    await _repository.UpdateAsync(chapter);
    return new NoContentResult();
  }
  // DELETE api/bookchapters/guid
  [HttpDelete("{id}")]
  public async Task DeleteAsync(Guid id)
  {
    await _repository.RemoveAsync(id);
  }
}
For the client, it doesn’t matter if the controller is implemented as synchronous or asynchronous. The client creates the same HTTP requests for both kinds.
Creating a .NET Client
Using the browser to call the service is a simple way to handle testing. The clients more typically make use of JavaScript—this is where JSON shines—and .NET clients. In this book, a Console Application (Package) project is created to call the service.
The sample code for BookServiceClientApp makes use of the following
dependencies and namespaces:
Dependencies
NETStandard.Library
Newtonsoft.Json
System.Net.Http
System.Xml.XDocument
Namespaces
Newtonsoft.Json
System
System.Collections.Generic
System.Linq
System.Linq.Xml
System.Net.Http
System.Net.Http.Headers
System.Text
System.Threading.Tasks
static System.Console
Sending GET Requests
For sending HTTP requests, you use the HttpClient class. This class is introduced in Chapter 25, “Networking.” In this chapter, this class is used to send different kinds of HTTP requests. To use the HttpClient class, you need to add the NuGet package System.Net.Http and open the namespace System .Net.Http. To convert JSON data to a .NET type, the NuGet package Newtonsoft.Json is added.
NOTE JSON serialization and using Json.NET is discussed in Chapter 27, “XML and JSON.”
With the sample project, the generic class HttpClientHelper is created to have just one implementation for different data types. The constructor expects a base address of the service (code file BookServiceClientApp/HttpClientHelper.cs):
public abstract class HttpClientHelper<T>
  where T: class
{
  private Uri _baseAddress;
  public HttpClientHelper(string baseAddress)
  {
    if (baseAddress == null)
      throw new ArgumentNullException(nameof(baseAddress));
    _baseAddress = new Uri(baseAddress);
  }
  // etc.
}
The method GetInternalAsync makes a GET request to receive a list of items. This method invokes the GetAsync method of the HttpClient to send a GET request. The HttpResponseMessage contains the information received. The status code of the response is written to the console to show the result. In case the server returns an error, the GetAsync method doesn’t throw an exception. An exception is thrown from the method EnsureSuccessStatusCode that is invoked with the HttpResponseMessage instance that is returned. This method throws an exception in case the HTTP status code is of an error type. The body of the response contains the JSON data returned. This JSON information is read as string and returned (code file BookServiceClientApp/HttpClientHelper.cs):
private async Task<string> GetInternalAsync(string requestUri)
{
  using (var client = new HttpClient())
  {
    client.BaseAddress = _baseAddress;
    HttpResponseMessage resp = await client.GetAsync(requestUri);
    WriteLine($"status from GET {resp.StatusCode}");
    resp.EnsureSuccessStatusCode();
    return await resp.Content.ReadAsStringAsync();
  }
}
The server controller defines two methods with GET requests: one method that returns all chapters and the other one returns just a single chapter but requires the chapter’s identifier with the URI. The method GetAllAsync invokes the GetInternalAsync method to convert the returned JSON information to a collection, while the method GetAsync converts the result to a single item. These methods are declared virtual to allow overriding them from a derived class (code file BookServiceClientApp/HttpClientHelper.cs):
public async virtual Task<T> GetAllAsync(string requestUri)
{
  string json = await GetInternalAsync(requestUri);
  return JsonConvert.DeserializeObject<IEnumerable<T>>(json);
}
public async virtual Task<T> GetAsync(string requestUri)
{
  string json = await GetInternalAsync(requestUri);
  return JsonConvert.DeserializeObject<T>(json);
}
Instead of using the generic HttpClientHelper class from the client code, a specialization is done with the BookChapterClient class. This class derives from HttpClientHelper passing a BookChapter for the generic parameter. This class also overrides the GetAllAsync method from the base class to have the returned chapters sorted by the chapter number (code file BookServiceClientApp/BookChapterClient.cs):
public class BookChapterClient: HttpClientHelper<BookChapter>
{
  public BookChapterClient(string baseAddress)
   : base(baseAddress) { }
  public override async Task<IEnumerable<BookChapter>> GetAllAsync(
    string requestUri)
  {
    IEnumerable<BookChapter> chapters = await base.GetAllAsync(requestUri);
    return chapters.OrderBy(c => c.Number);
  }
}
The BookChapter class contains the properties that are received with the JSON content (code file BookServiceClientApp/BookChapter.cs):
public class BookChapter
{
  public Guid Id { get; set; }
  public int Number { get; set; }
  public string Title { get; set; }
  public int Pages { get; set; }
}
The Main method of the client application invokes the different methods to show GET, POST, PUT, and DELETE requests (code file BookServiceClientApp/Program.cs):
static void Main()
{
  WriteLine("Client app, wait for service");
  ReadLine();
  ReadChaptersAsync().Wait();
  ReadChapterAsync().Wait();
  ReadNotExistingChapterAsync().Wait();
  ReadXmlAsync().Wait();
  AddChapterAsync().Wait();
  UpdateChapterAsync().Wait();
  RemoveChapterAsync().Wait();
  ReadLine();
}
The method ReadChaptersAsync invokes the GetAllAsync method from the BookChapterClient to retrieve all chapters and shows the titles of the chapters on the console (code file BookServiceClientApp/Program.cs):
private static async Task ReadChaptersAsync()
{
  WriteLine(nameof(ReadChaptersAsync));
  var client = new BookChapterClient(Addresses.BaseAddress);
  IEnumerable<BookChapter> chapters =
    await client.GetAllAsync(Addresses.BooksApi);
  foreach (BookChapter chapter in chapters)
  {
    WriteLine(chapter.Title);
  }
  WriteLine();
}
When you run the application (starting both the service and the client app), the ReadChaptersAsync method shows the OK status code and the titles from the chapters:
ReadChaptersAsync
status from GET OK
Application Architectures
Core C#
Objects and Types
Inheritance
Managed and Unmanaged Resources
Generics
The method ReadChapterAsync shows the GET request to retrieve a single chapter. With this, the identifier of a chapter is added to the URI string (code file BookServiceClientApp/Program.cs):
private static async Task ReadChapterAsync()
{
  WriteLine(nameof(ReadChapterAsync));
  var client = new BookChapterClient(Addresses.BaseAddress);
  var chapters = await client.GetAllAsync(Addresses.BooksApi);
  Guid id = chapters.First().Id;
  BookChapter chapter = await client.GetAsync(Addresses.BooksApi + id);
  WriteLine($"{chapter.Number} {chapter.Title}");
  WriteLine();
}
The result of the ReadChapterAsync method is shown here. It shows the OK status two times because the first time this method retrieves all the chapters before sending a request for a single chapter:
ReadChapterAsync
status from GET OK
status from GET OK
1 Application Architectures
What if a GET request is sent with a nonexistent chapter identifier? How to deal with this is shown in the method ReadNotExistingChapterAsync. Calling the GetAsync method is similar to the previous code snippet, but an identifier that does not exist is added to the URI. Remember from the implementation of the HttpClientHelper class, the GetAsync method of the HttpClient class does not throw an exception. However, the EnsureSuccessStatusCode does. This exception is caught with a catch to the HttpRequestException type. Here, an exception filter is also used to only handle exception code 404 (not found) (code file BookServiceClientApp/Program.cs):
private static async Task ReadNotExistingChapterAsync()
{
  WriteLine(nameof(ReadNotExistingChapterAsync));
  string requestedIdentifier = Guid.NewGuid().ToString();
  try
  {
    var client = new BookChapterClient(Addresses.BaseAddress);
    BookChapter chapter = await client.GetAsync(
      Addresses.BooksApi + requestedIdentifier.ToString());
    WriteLine($"{chapter.Number} {chapter.Title}");
  }
  catch (HttpRequestException ex) when (ex.Message.Contains("404"))
  {
    WriteLine($"book chapter with the identifier {requestedIdentifier}" +
      "not found");
  }
  WriteLine();
}
NOTE Handling exceptions and using exception filters is discussed in Chapter 14, “Errors and Exceptions.”
The result of the method shows the NotFound result from the service:
ReadNotExistingChapterAsync
status from GET NotFound
book chapter with the identifier d38ea0c5-64c9-4251-90f1-e21c07d6937a not
found
Receiving XML from the Service
In the section “Changing the Response Format,” the XML format was added to the service. With a service that is enabled to return XML beside JSON, XML content can be explicitly requested by adding the accept header value to accept application/xml content.
How this can be done is shown in the following code snippet. Here, the MediaTypeWithQualityHeaderValue specifying application/xml is added to the Accept headers collection. Then, the result is parsed as XML using the Xelement class (code file BookServiceClientApp/BookChapterClient.cs):
public async Task<XElement> GetAllXmlAsync(string requestUri)
{
  using (var client = new HttpClient())
  {
    client.BaseAddress = _baseAddress;
    client.DefaultRequestHeaders.Accept.Add(
      new MediaTypeWithQualityHeaderValue("application/xml"));
    HttpResponseMessage resp = await client.GetAsync(requestUri);
    WriteLine($"status from GET {resp.StatusCode}");
    resp.EnsureSuccessStatusCode();
    string xml = await resp.Content.ReadAsStringAsync();
    XElement chapters = XElement.Parse(xml);
    return chapters;
  }
}
NOTE The XElement class and XML serialization are discussed in Chapter 27.
From the Program class, the GetAllXmlAsync method is invoked to directly write the XML result to the console (code file BookServiceClientApp/Program.cs):
private static async Task ReadXmlAsync()
{
  WriteLine(nameof(ReadXmlAsync));
  var client = new BookChapterClient(Addresses.BaseAddress);
  XElement chapters = await client.GetAllXmlAsync(Addresses.BooksApi);
  WriteLine(chapters);
  WriteLine();
}
When you run this method, you can see that now XML is returned from the service:
ReadXmlAsync
status from GET OK
<ArrayOfBookChapter xmlns:xsi="http://www.w3.org/2001/XMLSchema-instance"
  xmlns:xsd="http://www.w3.org/2001/XMLSchema">
  <BookChapter>
    <Id>1439c261-2722-4e73-a328-010e82866511</Id>
    <Number>4</Number>
    <Title>Inheritance</Title>
    <Pages>18</Pages>
  </BookChapter>
  <BookChapter>
    <Id>d1a53440-94f2-404c-b2e5-7ce29ad91ef6</Id>
    <Number>3</Number>
    <Title>Objects and Types</Title>
    <Pages>30</Pages>
  </BookChapter>
  <BookChapter>
    <Id>ce1a5203-5b77-43e9-b6a2-62b6a18fac44</Id>
    <Number>38</Number>
    <Title>Windows Store Apps</Title>
    <Pages>45</Pages>
  </BookChapter>
  <!—... more chapters…—>
Sending POST Requests
Let’s send new objects to the service using the HTTP POST request. The HTTP POST request works similarly to the GET request. This request creates a new object server side. The PostAsync method of the HttpClient class requires the object that is added with the second parameter. You use Json.NET’s JsonConvert class to serialize the object to JSON. With a successful return, the Headers.Location property contains a link where the object can be retrieved again from the service. The response also contains a body with the object returned. When the object changed from the service, the Id property was filled in the service code on creating the object. This new information is returned by the PostAsync method after deserialization of the JSON code (code file BookServiceClientApp/HttpClientHelper.cs):
public async Task<T> PostAsync(string uri, T item)
{
  using (var client = new HttpClient())
  {
    client.BaseAddress = _baseAddress;
    string json = JsonConvert.SerializeObject(item);
    HttpContent content = new StringContent(json, Encoding.UTF8,
      "application/json");
    HttpResponseMessage resp = await client.PostAsync(uri, content);
    WriteLine($"status from POST {resp.StatusCode}");
    resp.EnsureSuccessStatusCode();
    WriteLine($"added resource at {resp.Headers.Location}");

    json = await resp.Content.ReadAsStringAsync();
    return JsonConvert.DeserializeObject<T>(json);
  }
}
With the Program class, you can see the chapter that is added to the service. After invoking the PostAsync method of the BookChapterClient, the returned Chapter contains the new identifier (code file BookServiceClientApp/Program.cs):
private static async Task AddChapterAsync()
{
  WriteLine(nameof(AddChapterAsync));
  var client = new BookChapterClient(Addresses.BaseAddress);
  BookChapter chapter = new BookChapter
  {
    Number = 42,
    Title ="ASP.NET Web API",
    Pages = 35
  };
  chapter = await client.PostAsync(Addresses.BooksApi, chapter);
  WriteLine($"added chapter {chapter.Title} with id {chapter.Id}");
  WriteLine();
}
The result of the AddChapterAsync method shows a successful run to create the object:
AddChapterAsync
status from POST Created
added resource at http://localhost:5000/api/BookChapters/0e99217d-8769-
46cd-93a4-2cf615cda5ae
added chapter ASP.NET Web API with id 0e99217d-8769-46cd-93a4-2cf615cda5ae
Sending PUT Requests
The HTTP PUT request—used for updating a record—is sent with the help of the HttpClient method PutAsync. PutAsync requires the updated content with the second parameter, and the URL to the service including the identifier in the first (code file BookServiceClientApp/HttpClientHelper.cs):
public async Task PutAsync(string uri, T item)
{
  using (var client = new HttpClient())
  {
    client.BaseAddress = _baseAddress;
    string json = JsonConvert.SerializeObject(item);
    HttpContent content = new StringContent(json, Encoding.UTF8,
      "application/json");
    HttpResponseMessage resp = await client.PutAsync(uri, content);
    WriteLine($"status from PUT {resp.StatusCode}");
    resp.EnsureSuccessStatusCode();
  }
}
In the Program class, the chapter Windows Store Apps is updated to a different chapter number and the title Windows Apps (code file BookServiceClientApp/Program.cs):
private static async Task UpdateChapterAsync()
{
  WriteLine(nameof(UpdateChapterAsync));
  var client = new BookChapterClient(Addresses.BaseAddress);
  var chapters = await client.GetAllAsync(Addresses.BooksApi);
  var chapter = chapters.SingleOrDefault(c => c.Title =="Windows Store
Apps");
  if (chapter != null)
  {
    chapter.Number = 32;
    chapter.Title ="Windows Apps";
    await client.PutAsync(Addresses.BooksApi + chapter.Id, chapter);
    WriteLine($"updated chapter {chapter.Title}");
  }
  WriteLine();
}
The console output of the UpdateChapterAsync method shows an HTTP NoContent result and the updated chapter title:
UpdateChapterAsync
status from GET OK
status from PUT NoContent
updated chapter Windows Apps
Sending DELETE Requests
The last request shown with the sample client is the HTTP DELETE request. After invoking GetAsync, PostAsync, and PutAsync of the HttpClient class, it should be obvious that the format is DeleteAsync. What’s shown in this code snippet is that the DeleteAsync method just needs a URI parameter to identify the object to delete (code file BookServiceClientApp/HttpClientHelper.cs):
public async Task DeleteAsync(string uri)
{
  using (var client = new HttpClient())
  {
    client.BaseAddress = _baseAddress;
    HttpResponseMessage resp = await client.DeleteAsync(uri);
    WriteLine($"status from DELETE {resp.StatusCode}");
    resp.EnsureSuccessStatusCode();
  }
}
The Program class defines the RemoveChapterAsync method (code file BookServiceClientApp/Program.cs):
private static async Task RemoveChapterAsync()
{
  WriteLine(nameof(RemoveChapterAsync));
  var client = new BookChapterClient(Addresses.BaseAddress);
  var chapters = await client.GetAllAsync(Addresses.BooksApi);
  var chapter = chapters.SingleOrDefault(c => c.Title =="ASP.NET Web
Forms");
  if (chapter != null)
  {
    await client.DeleteAsync(Addresses.BooksApi + chapter.Id);
    WriteLine($"removed chapter {chapter.Title}");
  }
  WriteLine();
}
When you run the application, the RemoveChapterAsync method first shows the status of the HTTP GET method as a GET request is done first to retrieve all chapters, and then the successful DELETE request on deleting the ASP.NET Web Forms chapter:
RemoveChapterAsync
status from GET OK
status from DELETE OK
removed chapter ASP.NET Web Forms
Writing to the Database
Chapter 38, “Entity Framework Core,” introduced you to mapping objects to relations with the Entity Framework. An ASP.NET Web API controller can easily use a DbContext. In the sample app, you don’t need to change the controller at all; you just need to create and register a different repository for using the Entity Framework. All the steps needed are described in this section.
Defining the Database
Let’s start defining the database. For using Entity Framework with SQL Server, the NuGet packages EntityFramework.Core and EntityFramework.MicrosoftSqlServer need to be added to the service project. To create the database from code, the NuGet package EntityFramework.Commands is added as well.
The BookChapter class was already defined earlier. This class stays unchanged for filling instances from the database. Mapping to properties is defined in the BooksContext class. With this class, the OnModelCreating method is overridden to map the BookChapter type to the Chapters table and to define a unique identifier for the Id column with a default unique identifier created from the database. The Title column is restricted to a maximum of 120 characters (code file BookServiceAsyncSample/Models/BooksContext.cs):
public class BooksContext: DbContext
{
  public DbSet<BookChapter> Chapters { get; set; }
  protected override void OnModelCreating(ModelBuilder modelBuilder)
  {
    base.OnModelCreating(modelBuilder);
    EntityTypeBuilder<BookChapter> chapter = modelBuilder
      .Entity<BookChapter>();
    chapter.ToTable("Chapters").HasKey(p => p.Id);
    chapter.Property<Guid>(p => p.Id)
      .HasColumnType("UniqueIdentifier")
      .HasDefaultValueSql("newid()");
    chapter.Property<string>(p => p.Title)
      .HasMaxLength(120);
  }
}
To allow creation of the database using .NET CLI tools, the ef command is defined in the project.json configuration file to map it to the EntityFrameworkCore.Commands (code file BookServiceAsyncSample/project .json):
"tools": {
  "dotnet-ef":"1.0.*"
 },
With the dependency injection container, Entity Framework and SQL Server need to be added to invoke the extension methods AddEntityFramework and AddSqlServer. The just-created BooksContext needs to be registered as well. The BooksContext is added with the method AddDbContext. With the options of this method, the connection string is passed (code file BookServiceAsyncSample/Startup.cs):
public async void ConfigureServices(IServiceCollection services)
{
  services.AddMvc().AddXmlSerializerFormatters();
  // etc.

  services.AddEntityFramework()
    .AddSqlServer()
    .AddDbContext<BooksContext>(options =>
      options.UseSqlServer(
        Configuration["Data:BookConnection:ConnectionString"]));
    // etc.
}
The connection string itself is defined with the application settings (code file BookServiceAsyncSample/appsettings.json):
"Data": {
  "BookConnection": {
    "ConnectionString":
      "Server=(localdb)\mssqllocaldb;Database=BooksSampleDB;
       Trusted_Connection=True;MultipleActiveResultSets=true"
  }
},
With this in place, it’s now possible to create migrations and the database. To add code-based migrations to the project, you can start this dnx command from a Developer Command Prompt where you change the current directory to the directory of the project—the directory where the project.json file is placed. This statement uses the ef command that is defined in the project.json file to invoke migrations and add the InitBooks migration to the project. After a successful run of this command, you can see a Migrations folder in the project with classes to create the database:
>dotnet ef migrations add InitBooks
The following command creates the database based on the connection string defined with the startup code:
>dotnet ef database update
Creating the Repository
For using the BooksContext, you need to create a repository implementing the interface IBookChaptersRepository. The class BookChaptersRepository makes use of the BooksContext instead of using an in-memory dictionary as was done with the SampleBookChaptersRepository (code file BookServiceAsyncSample/Models/BookChaptersRepository.cs):
public class BookChaptersRepository: IBookChaptersRepository, IDisposable
{
  private BooksContext _booksContext;
  public BookChaptersRepository(BooksContext booksContext)
  {
    _booksContext = booksContext;
  }
  public void Dispose()
  {
    _booksContext?.Dispose();
  }
  public async Task AddAsync(BookChapter chapter)
  {
    _booksContext.Chapters.Add(chapter);
    await _booksContext.SaveChangesAsync();
  }
  public Task<BookChapter> FindAsync(Guid id) =>
    _booksContext.Chapters.SingleOrDefaultAsync(c => c.Id == id);
  public async Task<IEnumerable<BookChapter>> GetAllAsync() =>
    await _booksContext.Chapters.ToListAsync();
  public Task InitAsync() => Task.FromResult<object>(null);
  public async Task<BookChapter> RemoveAsync(Guid id)
  {
    BookChapter chapter = await _booksContext.Chapters
      .SingleOrDefaultAsync(c => c.Id == id);
    if (chapter == null) return null;
    _booksContext.Chapters.Remove(chapter);
    await _booksContext.SaveChangesAsync();
    return chapter;
  }
  public async Task UpdateAsync(BookChapter chapter)
  {
    _booksContext.Chapters.Update(chapter);
    await _booksContext.SaveChangesAsync();
  }
}
If you are wondering about the use of the context, read Chapter 38, which covers more information about the Entity Framework Core.
To use this repository, you have to remove the SampleBookChaptersRepository from the registration in the container (or comment it out), and add the BookChaptersRepository to let the dependency injection container create an instance of this class when asked for the interface IBookChapterRepository (code file BookServiceAsyncSample/Startup.cs):
public async void ConfigureServices(IServiceCollection services)
{
  services.AddMvc().AddXmlSerializerFormatters();
  // comment the following three lines to use the DookChaptersRepository
  //IBookChaptersRepository repos = new SampleBookChaptersRepository();
  //services.AddSingleton<IBookChaptersRepository>(repos);
  //await repos.InitAsync();

  services.AddEntityFramework()
   .AddSqlServer()
   .AddDbContext<BooksContext>(options => options.UseSqlServer(
     Configuration["Data:BookConnection:ConnectionString"]));
  services.AddSingleton<IBookChaptersRepository, BookChaptersRepository>();
}
Now—without changing the controller or the client—you can run the service and client again. Depending on the data you enter initially in the database, you see results for the GET/POST/PUT/DELETE requests.
Creating Metadata
Creating metadata for a service allows getting a description on the service, and also allows you to create the client by using this metadata. With web services using SOAP, metadata have been around since the early days of SOAP—with the Web Services Description Language (WSDL). WSDL is explained in detail in Chapter 44. Nowadays, metadata for REST services is here as well. Currently it’s not a standard as with WSDL, but the most popular framework for describing APIs is Swagger (http://www.swagger.io). As of January 2016, the Swagger specification has been renamed to OpenAPI, and a standard is in the works (http://www.openapis.org).
To add Swagger or OpenAPI to an ASP.NET Web API service, you can use Swashbuckle. The NuGet package Swashbuckle.SwaggerGen contains code to generate swagger, the package Swashbuckle.SwaggerUi to offer a dynamically created user interface. Both packages will be used to extend the BooksServiceSample project.
After you add the NuGet packages, you need to add Swagger to the service collection. AddSwaggerGen is an extension method to add swagger services to the collection. To configure Swagger, you invoke the methods ConfigureSwaggerDocument and ConfigureSwaggerSchema. ConfigureSwaggerDocument configures the title, description, and the API version. ConfigureSwaggerSchema defines how the generated JSON schema should look. The sample code is configured that obsolete properties are not shown, and enum values should be shown as strings (code file BooksServiceSample/Startup.cs):
public void ConfigureServices(IServiceCollection services)
{
  // Add framework services.
  services.AddMvc();
  IBookChaptersRepository repos = new SampleBookChaptersRepository();
  repos.Init();
  services.AddSingleton<IBookChaptersRepository>(repos);
  services.AddSwaggerGen();
  services.ConfigureSwaggerDocument(options =>
  {
    options.SingleApiVersion(new Info
    {
      Version ="v1",
      Title ="Book Chapters",
      Description ="A sample for Professional C# 6"
    });
    options.IgnoreObsoleteActions = true;
  });

  services.ConfigureSwaggerSchema(options =>
  {
    options.DescribeAllEnumsAsStrings = true;
    options.IgnoreObsoleteProperties = true;
  }
}
What’s left is the Swagger configuration in the Configure method of the Startup class. The extension method UseSwaggerGen specifies that a JSON schema file should be generated. The default URL that you can configure with UseSwaggerGen is /swagger/{version}/swagger.json. With the document configured in the previous code snippet, the URL is /swagger/v1/swagger.json. The method UseSwaggerUi defines the URL for the Swagger user interface. Using the method without arguments, the URL is swagger/ui, but of course you can change this URL by using a different overload of the UseSwaggerUi method:
public void Configure(IApplicationBuilder app, IHostingEnvironment env, ILoggerFactory loggerFactory)
{
  loggerFactory.AddConsole(Configuration.GetSection("Logging"));
  loggerFactory.AddDebug();
  app.UseIISPlatformHandler();
  app.UseStaticFiles();
  app.UseMvc();
  app.UseSwaggerGen();
  app.UseSwaggerUi();
}
When you run the application with Swagger configured, you can see nice information about the APIs offered by the service. Figure 42.3 shows the APIs offered by the BooksServiceSample, the template generated by Values service, and the BooksService sample. You can also see the title and description as configured with the Swagger document.

Figure 42.3
Figure 42.4 shows the details of the BookChapters service. You can see details of every API including the model, and also test the API calls.
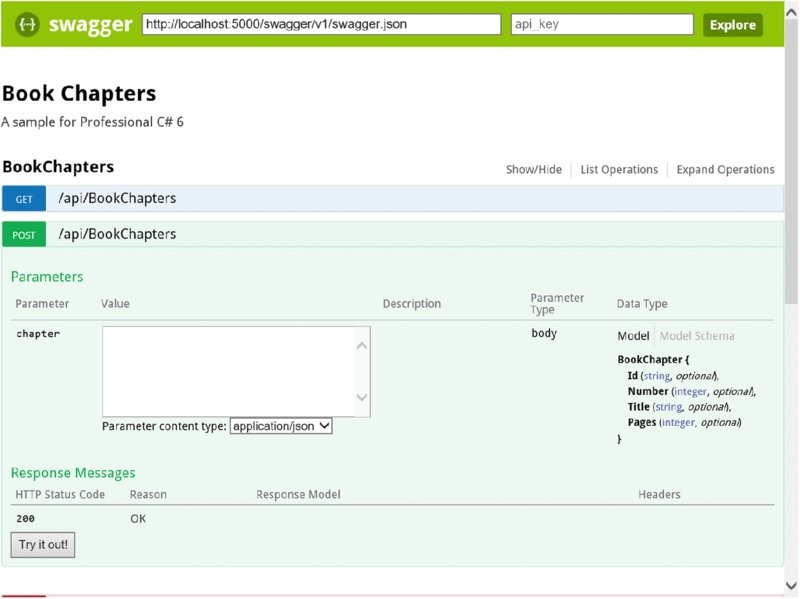
Figure 42.4
Creating and Using OData Services
The ASP.NET Web API offers direct support for the Open Data Protocol (OData). OData offers CRUD access to a data source via the HTTP protocol. Sending a GET request retrieves a collection of entity data; a POST request creates a new entity; a PUT request updates existing entities; and a DELETE request removes an entity. In this chapter you’ve already seen the HTTP methods mapped to action methods
in the controller. OData is built on JSON and AtomPub (an XML format) for the data serialization. You’ve seen direct support of JSON and XML with the ASP.NET Web API as well. What OData offers more of is that every resource can be accessed with simple URI queries. For having a look into that, and how this is solved with ASP.NET Web API, let’s get into a sample and start with a database.
With the service application BooksODataService, for offering OData, the NuGet package Microsoft.AspNet.OData needs to be added. To use OData with ASP.NET Core 1.0, you need at least version 6 of the Microsoft.AspNet.OData package. The sample service enables you to query Book and Chapter objects and the relation between.
Creating a Data Model
The sample service defines the Book and Chapter classes for the model. The Book class defines simple properties and a one-to-many relationship with the Chapter type (code file BooksODataService/Models/Book.cs):
public class Book
{
  public Book()
  {
    Chapters = new List<Book>();
  }
  public int BookId { get; set; }
  public string Isbn { get; set; }
  public string Title { get; set; }
  public List<Chapter> Chapters { get; }
}
The Chapter class defines simple properties and a many-to-one relation to the Book type (code file BooksODataService/Models/Book.cs):
public class Chapter
{
  public int ChapterId { get; set; }
  public int BookId { get; set; }
  public Book Book { get; set; }
  public string Title { get; set; }
  public int Number { get; set; }
  public string Intro { get; set; }
}
The BooksContext class defines the Books and Chapters properties as well as the definition of the SQL database relations (code file BooksODataService/Models/BooksContext.cs):
public class BooksContext: DbContext
{
  public DbSet<Book> Books { get; set; }
  public DbSet<Chapter> Chapters { get; set; }
  protected override void OnModelCreating(ModelBuilder modelBuilder)
  {
    base.OnModelCreating(modelBuilder);
    EntityTypeBuilder<Book> bookBuilder = modelBuilder.Entity<Book>();
    bookBuilder.HasMany(b => b.Chapters)
      .WithOne(c => c.Book)
      .HasForeignKey(c => c.BookId);
    bookBuilder.Property<string>(b => b.Title)
      .HasMaxLength(120)
      .IsRequired();
    bookBuilder.Property<string>(b => b.Isbn)
      .HasMaxLength(20)
      .IsRequired(false);
    EntityTypeBuilder<Chapter> chapterBuilder =
modelBuilder.Entity<Chapter>();
    chapterBuilder.Property<string>(c => c.Title)
      .HasMaxLength(120);
  }
}
Creating a Service
With ASP.NET Core 5, you can easily add OData Services. You don’t need to make many changes to a controller. Of course, you need to add OData to the dependency injection container (code file BooksODataService/Startup.cs):
public void ConfigureServices(IServiceCollection services)
{
  services.AddMvc();
  services.AddEntityFramework()
   .AddSqlServer()
   .AddDbContext<BooksContext>(options => options.UseSqlServer(
     Configuration["Data:BookConnection:ConnectionString"]));
  services.AddOData();
}
The BooksController class just needs the EnableQuery attribute applied. This
makes it an OData controller. You can use OData queries to access the controller. The Route attribute applied to the BooksController class defines an odata prefix for the route. This is just a convention, and you can change the route as you like (code file BooksODataService/Controllers/BooksController.cs):
[EnableQuery]
[Route("odata/[controller]")]
public class BooksController: Controller
{
  private readonly BooksContext _booksContext;
  public BooksController(BooksContext booksContext)
  {
    _booksContext = booksContext;
  }
  [HttpGet]
  public IEnumerable<Book> GetBooks() =>
    _booksContext.Books.Include(b => b.Chapters).ToList();
  // GET api/values/5
  [HttpGet("{id}")]
  public Book GetBook(int id) =>
    _booksContext.Books.SingleOrDefault(b => b.BookId == id);
  // etc.
}
Other than the change with the EnableQuery attribute, no other special actions are needed for the controller.
OData Query
Now it’s an easy task to get all the books from the database using this URL (the port number might differ on your system):
http://localhost:50000/odata/Books
For getting just a single book, the identifier of the book can be passed with the URL. This request calls the GetBook action method passing the key that returns a single result:
http://localhost:50000/odata/Books(9)
Each book has multiple results. With a URL query it’s also possible to get all the chapter results of one book:
http://localhost:50000/odata/Books(9)/Chapters
OData offers more query options that are supported by ASP.NET Web API. The OData specification allows passing parameters to the server for paging, filtering, and sorting. Let’s get into these.
To return only a limited number of entities to the client, the client can limit the count using the $top parameter. This also allows paging by using $skip; for example, you can skip 3 and take 3:
http://localhost:50000/odata/Books?$top=3&$skip=3
With $skip and $top options, the client decides the number of entities to retrieve. In case you want to restrict what the client can request—for example, having millions of records that should never be requested with one call—you can limit this by configuring the EnableQuery attribute. Setting the PageSize to 10 only returns 10 entities at max:
[EnableQuery(PageSize=10)]
There are many more named parameters for the Queryable attribute to restrict the query—for example, the maximum skip and top values, the maximum expansion depth, and restrictions for sorting.
To filter the requests based on properties of the Book type, the $filter option can be applied to properties of the Book. To filter only the books that are from the publisher Wrox Press, you can use the eq operator (equals) with $filter:
http://localhost:50000/odata/Books?$filter=Publisher eq 'Wrox Press'
You can use lt (less than) and gt (greater than) logical operators with $filter as well. This request returns only chapters with more than 40 pages:
http://localhost:50000/odata/Chapters?$filter=Pages gt 40 To request a sorted result, the $orderby option defines the sorting order. Adding the desc keyword makes the sorting in descending order:
http://localhost:50000/odata/Book(9)/Chapters?$orderby=Pages%20desc
You can easily make all these requests to the service by using the HttpClient class. However, there are other options as well, such as by using a WCF Data Services created proxy.
NOTE With the service, you can also restrict the query options by setting the AllowedQueryOptions of the EnableQuery attribute. You can also restrict logical and arithmetic operators with the properties AllowedLogicalOperators and AllowedArithmeticOperators.
Summary
This chapter described the features of the ASP.NET Web API that is now part of ASP.NET MVC. This technology offers an easy way to create services that can be called from any client—be it JavaScript or a .NET client—with the help of the HttpClient class. Either JSON or XML can be returned.
Dependency injection was already used in several chapters of this book, particularly in Chapter 31, “Patterns with XAML Apps.” In this chapter you’ve seen how easy it is to replace a memory-based repository using a dictionary with a repository by making use of the Entity Framework.
This chapter also introduced you to OData with which it’s easy to reference data in a tree using resource identifiers.
The next chapter continues with web technologies and gives information on publish and subscribe technologies such as WebHooks and SignalR.