文件格式
图片加载性能取决于加载大图的时间和解压小图时间的权衡。很多苹果的文档都说PNG是iOS所有图片加载的最好格式。但这是极度误导的过时信息了。
PNG图片使用的无损压缩算法可以比使用JPEG的图片做到更快地解压,但是由于闪存访问的原因,这些加载的时间并没有什么区别。
清单14.6展示了标准的应用程序加载不同尺寸图片所需要时间的一些代码。为了保证实验的准确性,我们会测量每张图片的加载和绘制时间来确保考虑到解压性能的因素。另外每隔一秒重复加载和绘制图片,这样就可以取到平均时间,使得结果更加准确。
清单14.6


 1 #import "ViewController.h"
 2
 3 static NSString *const ImageFolder = @"Coast Photos";
 4
 5 @interface ViewController ()
 6
 7 @property (nonatomic, copy) NSArray *items;
 8 @property (nonatomic, weak) IBOutlet UITableView *tableView;
 9
10 @end
11
12 @implementation ViewController
13
14 - (void)viewDidLoad
15 {
16     [super viewDidLoad];
17     //set up image names
18     self.items = @[@"2048x1536", @"1024x768", @"512x384", @"256x192", @"128x96", @"64x48", @"32x24"];
19 }
20
21 - (CFTimeInterval)loadImageForOneSec:(NSString *)path
22 {
23     //create drawing context to use for decompression
24     UIGraphicsBeginImageContext(CGSizeMake(1, 1));
25     //start timing
26     NSInteger imagesLoaded = 0;
27     CFTimeInterval endTime = 0;
28     CFTimeInterval startTime = CFAbsoluteTimeGetCurrent();
29     while (endTime - startTime < 1) {
30         //load image
31         UIImage *image = [UIImage imageWithContentsOfFile:path];
32         //decompress image by drawing it
33         [image drawAtPoint:CGPointZero];
34         //update totals
35         imagesLoaded ++;
36         endTime = CFAbsoluteTimeGetCurrent();
37     }
38     //close context
39     UIGraphicsEndImageContext();
40     //calculate time per image
41     return (endTime - startTime) / imagesLoaded;
42 }
43
44 - (void)loadImageAtIndex:(NSUInteger)index
45 {
46     //load on background thread so as not to
47     //prevent the UI from updating between runs dispatch_async(
48     dispatch_get_global_queue(DISPATCH_QUEUE_PRIORITY_HIGH, 0), ^{
49         //setup
50         NSString *fileName = self.items[index];
51         NSString *pngPath = [[NSBundle mainBundle] pathForResource:filename
52                                                             ofType:@"png"
53                                                        inDirectory:ImageFolder];
54         NSString *jpgPath = [[NSBundle mainBundle] pathForResource:filename
55                                                             ofType:@"jpg"
56                                                        inDirectory:ImageFolder];
57         //load
58         NSInteger pngTime = [self loadImageForOneSec:pngPath] * 1000;
59         NSInteger jpgTime = [self loadImageForOneSec:jpgPath] * 1000;
60         //updated UI on main thread
61         dispatch_async(dispatch_get_main_queue(), ^{
62             //find table cell and update
63             NSIndexPath *indexPath = [NSIndexPath indexPathForRow:index inSection:0];
64             UITableViewCell *cell = [self.tableView cellForRowAtIndexPath:indexPath];
65             cell.detailTextLabel.text = [NSString stringWithFormat:@"PNG: %03ims JPG: %03ims", pngTime, jpgTime];
66         });
67     });
68 }
69
70 - (NSInteger)tableView:(UITableView *)tableView numberOfRowsInSection:(NSInteger)section
71 {
72     return [self.items count];
73 }
74
75 - (UITableViewCell *)tableView:(UITableView *)tableView cellForRowAtIndexPath:(NSIndexPath *)indexPath
76 {
77     //dequeue cell
78     UITableViewCell *cell = [self.tableView dequeueReusableCellWithIdentifier:@"Cell"];
79     if (!cell) {
80         cell = [[UITableViewCell alloc] initWithStyle: UITableViewCellStyleValue1 reuseIdentifier:@"Cell"];
81     }
82     //set up cell
83     NSString *imageName = self.items[indexPath.row];
84     cell.textLabel.text = imageName;
85     cell.detailTextLabel.text = @"Loading...";
86     //load image
87     [self loadImageAtIndex:indexPath.row];
88     return cell;
89 }
90
91 @end
PNG和JPEG压缩算法作用于两种不同的图片类型:JPEG对于噪点大的图片效果很好;但是PNG更适合于扁平颜色,锋利的线条或者一些渐变色的图片。为了让测评的基准更加公平,我们用一些不同的图片来做实验:一张照片和一张彩虹色的渐变。JPEG版本的图片都用默认的Photoshop60%“高质量”设置编码。结果见图片14.5。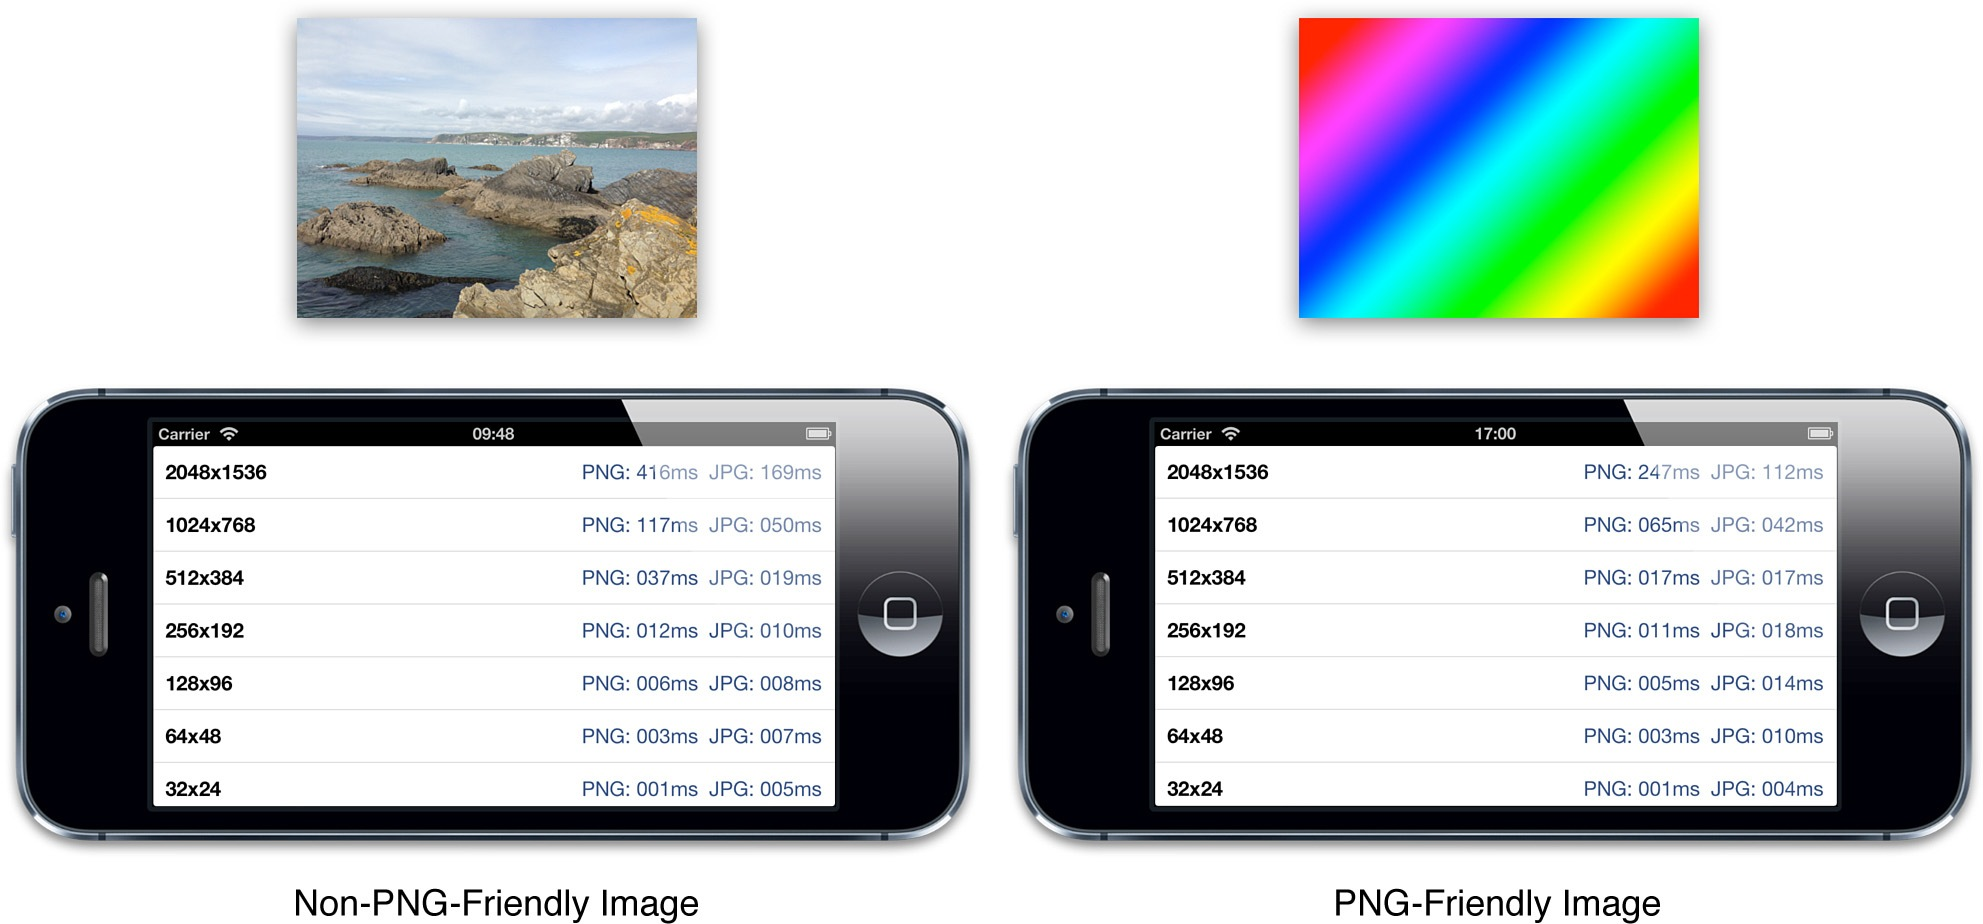
图14.5 不同类型图片的相对加载性能
如结果所示,相对于不友好的PNG图片,相同像素的JPEG图片总是比PNG加载更快,除非一些非常小的图片、但对于友好的PNG图片,一些中大尺寸的图效果还是很好的。
所以对于之前的图片传送器程序来说,JPEG会是个不错的选择。如果用JPEG的话,一些多线程和缓存策略都没必要了。
但JPEG图片并不是所有情况都适用。如果图片需要一些透明效果,或者压缩之后细节损耗很多,那就该考虑用别的格式了。苹果在iOS系统中对PNG和JPEG都做了一些优化,所以普通情况下都应该用这种格式。也就是说在一些特殊的情况下才应该使用别的格式。
混合图片
对于包含透明的图片来说,最好是使用压缩透明通道的PNG图片和压缩RGB部分的JPEG图片混合起来加载。这就对任何格式都适用了,而且无论从质量还是文件尺寸还是加载性能来说都和PNG和JPEG的图片相近。相关分别加载颜色和遮罩图片并在运行时合成的代码见14.7。
清单14.7 从PNG遮罩和JPEG创建的混合图片
 1 #import "ViewController.h"
 2
 3 @interface ViewController ()
 4
 5 @property (nonatomic, weak) IBOutlet UIImageView *imageView;
 6
 7 @end
 8
 9 @implementation ViewController
10
11 - (void)viewDidLoad
12 {
13     [super viewDidLoad];
14     //load color image
15     UIImage *image = [UIImage imageNamed:@"Snowman.jpg"];
16     //load mask image
17     UIImage *mask = [UIImage imageNamed:@"SnowmanMask.png"];
18     //convert mask to correct format
19     CGColorSpaceRef graySpace = CGColorSpaceCreateDeviceGray();
20     CGImageRef maskRef = CGImageCreateCopyWithColorSpace(mask.CGImage, graySpace);
21     CGColorSpaceRelease(graySpace);
22     //combine images
23     CGImageRef resultRef = CGImageCreateWithMask(image.CGImage, maskRef);
24     UIImage *result = [UIImage imageWithCGImage:resultRef];
25     CGImageRelease(resultRef);
26     CGImageRelease(maskRef);
27     //display result
28     self.imageView.image = result;
29 }
30
31 @end
对每张图片都使用两个独立的文件确实有些累赘。JPNG的库(https://github.com/nicklockwood/JPNG)对这个技术提供了一个开源的可以复用的实现,并且添加了直接使用+imageNamed:和+imageWithContentsOfFile:方法的支持。
JPEG 2000
除了JPEG和PNG之外iOS还支持别的一些格式,例如TIFF和GIF,但是由于他们质量压缩得更厉害,性能比JPEG和PNG糟糕的多,所以大多数情况并不用考虑。
但是iOS之后,苹果低调添加了对JPEG 2000图片格式的支持,所以大多数人并不知道。它甚至并不被Xcode很好的支持 - JPEG 2000图片都没在Interface Builder中显示。
但是JPEG 2000图片在(设备和模拟器)运行时会有效,而且比JPEG质量更好,同样也对透明通道有很好的支持。但是JPEG 2000图片在加载和显示图片方面明显要比PNG和JPEG慢得多,所以对图片大小比运行效率更敏感的时候,使用它是一个不错的选择。
但仍然要对JPEG 2000保持关注,因为在后续iOS版本说不定就对它的性能做提升,但是在现阶段,混合图片对更小尺寸和质量的文件性能会更好。
PVRTC
当前市场的每个iOS设备都使用了Imagination Technologies PowerVR图像芯片作为GPU。PowerVR芯片支持一种叫做PVRTC(PowerVR Texture Compression)的标准图片压缩。
和iOS上可用的大多数图片格式不同,PVRTC不用提前解压就可以被直接绘制到屏幕上。这意味着在加载图片之后不需要有解压操作,所以内存中的图片比其他图片格式大大减少了(这取决于压缩设置,大概只有1/60那么大)。
但是PVRTC仍然有一些弊端:
-
尽管加载的时候消耗了更少的RAM,PVRTC文件比JPEG要大,有时候甚至比PNG还要大(这取决于具体内容),因为压缩算法是针对于性能,而不是文件尺寸。
-
PVRTC必须要是二维正方形,如果源图片不满足这些要求,那必须要在转换成PVRTC的时候强制拉伸或者填充空白空间。
-
质量并不是很好,尤其是透明图片。通常看起来更像严重压缩的JPEG文件。
-
PVRTC不能用Core Graphics绘制,也不能在普通的
UIImageView显示,也不能直接用作图层的内容。你必须要用作OpenGL纹理加载PVRTC图片,然后映射到一对三角板来在CAEAGLLayer或者GLKView中显示。 -
创建一个OpenGL纹理来绘制PVRTC图片的开销相当昂贵。除非你想把所有图片绘制到一个相同的上下文,不然这完全不能发挥PVRTC的优势。
-
PVRTC使用了一个不对称的压缩算法。尽管它几乎立即解压,但是压缩过程相当漫长。在一个现代快速的桌面Mac电脑上,它甚至要消耗一分钟甚至更多来生成一个PVRTC大图。因此在iOS设备上最好不要实时生成。
如果你愿意使用OpehGL,而且即使提前生成图片也能忍受得了,那么PVRTC将会提供相对于别的可用格式来说非常高效的加载性能。比如,可以在主线程1/60秒之内加载并显示一张2048×2048的PVRTC图片(这已经足够大来填充一个视网膜屏幕的iPad了),这就避免了很多使用线程或者缓存等等复杂的技术难度。
Xcode包含了一些命令行工具例如texturetool来生成PVRTC图片,但是用起来很不方便(它存在于Xcode应用程序束中),而且很受限制。一个更好的方案就是使用Imagination Technologies PVRTexTool,可以从http://www.imgtec.com/powervr/insider/sdkdownloads免费获得。
安装了PVRTexTool之后,就可以使用如下命令在终端中把一个合适大小的PNG图片转换成PVRTC文件:
/Applications/Imagination/PowerVR/GraphicsSDK/PVRTexTool/CL/OSX_x86/PVRTexToolCL -i {input_file_name}.png -o {output_file_name}.pvr -legacypvr -p -f PVRTC1_4 -q pvrtcbest
清单14.8的代码展示了加载和显示PVRTC图片的步骤(第6章CAEAGLLayer例子代码改动而来)。
清单14.8 加载和显示PVRTC图片
  1 #import "ViewController.h"
  2 #import
  3 #import
  4
  5 @interface ViewController ()
  6
  7 @property (nonatomic, weak) IBOutlet UIView *glView;
  8 @property (nonatomic, strong) EAGLContext *glContext;
  9 @property (nonatomic, strong) CAEAGLLayer *glLayer;
 10 @property (nonatomic, assign) GLuint framebuffer;
 11 @property (nonatomic, assign) GLuint colorRenderbuffer;
 12 @property (nonatomic, assign) GLint framebufferWidth;
 13 @property (nonatomic, assign) GLint framebufferHeight;
 14 @property (nonatomic, strong) GLKBaseEffect *effect;
 15 @property (nonatomic, strong) GLKTextureInfo *textureInfo;
 16
 17 @end
 18
 19 @implementation ViewController
 20
 21 - (void)setUpBuffers
 22 {
 23     //set up frame buffer
 24     glGenFramebuffers(1, &_framebuffer);
 25     glBindFramebuffer(GL_FRAMEBUFFER, _framebuffer);
 26     //set up color render buffer
 27     glGenRenderbuffers(1, &_colorRenderbuffer);
 28     glBindRenderbuffer(GL_RENDERBUFFER, _colorRenderbuffer);
 29     glFramebufferRenderbuffer(GL_FRAMEBUFFER, GL_COLOR_ATTACHMENT0, GL_RENDERBUFFER, _colorRenderbuffer);
 30     [self.glContext renderbufferStorage:GL_RENDERBUFFER fromDrawable:self.glLayer];
 31     glGetRenderbufferParameteriv(GL_RENDERBUFFER, GL_RENDERBUFFER_WIDTH, &_framebufferWidth);
 32     glGetRenderbufferParameteriv(GL_RENDERBUFFER, GL_RENDERBUFFER_HEIGHT, &_framebufferHeight);
 33     //check success
 34     if (glCheckFramebufferStatus(GL_FRAMEBUFFER) != GL_FRAMEBUFFER_COMPLETE) {
 35         NSLog(@"Failed to make complete framebuffer object: %i", glCheckFramebufferStatus(GL_FRAMEBUFFER));
 36     }
 37 }
 38
 39 - (void)tearDownBuffers
 40 {
 41     if (_framebuffer) {
 42         //delete framebuffer
 43         glDeleteFramebuffers(1, &_framebuffer);
 44         _framebuffer = 0;
 45     }
 46     if (_colorRenderbuffer) {
 47         //delete color render buffer
 48         glDeleteRenderbuffers(1, &_colorRenderbuffer);
 49         _colorRenderbuffer = 0;
 50     }
 51 }
 52
 53 - (void)drawFrame
 54 {
 55     //bind framebuffer & set viewport
 56     glBindFramebuffer(GL_FRAMEBUFFER, _framebuffer);
 57     glViewport(0, 0, _framebufferWidth, _framebufferHeight);
 58     //bind shader program
 59     [self.effect prepareToDraw];
 60     //clear the screen
 61     glClear(GL_COLOR_BUFFER_BIT);
 62     glClearColor(0.0, 0.0, 0.0, 0.0);
 63     //set up vertices
 64     GLfloat vertices[] = {
 65         -1.0f, -1.0f, -1.0f, 1.0f, 1.0f, 1.0f, 1.0f, -1.0f
 66     };
 67     //set up colors
 68     GLfloat texCoords[] = {
 69         0.0f, 1.0f, 0.0f, 0.0f, 1.0f, 0.0f, 1.0f, 1.0f
 70     };
 71     //draw triangle
 72     glEnableVertexAttribArray(GLKVertexAttribPosition);
 73     glEnableVertexAttribArray(GLKVertexAttribTexCoord0);
 74     glVertexAttribPointer(GLKVertexAttribPosition, 2, GL_FLOAT, GL_FALSE, 0, vertices);
 75     glVertexAttribPointer(GLKVertexAttribTexCoord0, 2, GL_FLOAT, GL_FALSE, 0, texCoords);
 76     glDrawArrays(GL_TRIANGLE_FAN, 0, 4);
 77     //present render buffer
 78     glBindRenderbuffer(GL_RENDERBUFFER, _colorRenderbuffer);
 79     [self.glContext presentRenderbuffer:GL_RENDERBUFFER];
 80 }
 81
 82 - (void)viewDidLoad
 83 {
 84     [super viewDidLoad];
 85     //set up context
 86     self.glContext = [[EAGLContext alloc] initWithAPI:kEAGLRenderingAPIOpenGLES2];
 87     [EAGLContext setCurrentContext:self.glContext];
 88     //set up layer
 89     self.glLayer = [CAEAGLLayer layer];
 90     self.glLayer.frame = self.glView.bounds;
 91     self.glLayer.opaque = NO;
 92     [self.glView.layer addSublayer:self.glLayer];
 93     self.glLayer.drawableProperties = @{kEAGLDrawablePropertyRetainedBacking: @NO, kEAGLDrawablePropertyColorFormat: kEAGLColorFormatRGBA8};
 94     //load texture
 95     glActiveTexture(GL_TEXTURE0);
 96     NSString *imageFile = [[NSBundle mainBundle] pathForResource:@"Snowman" ofType:@"pvr"];
 97     self.textureInfo = [GLKTextureLoader textureWithContentsOfFile:imageFile options:nil error:NULL];
 98     //create texture
 99     GLKEffectPropertyTexture *texture = [[GLKEffectPropertyTexture alloc] init];
100     texture.enabled = YES;
101     texture.envMode = GLKTextureEnvModeDecal;
102     texture.name = self.textureInfo.name;
103     //set up base effect
104     self.effect = [[GLKBaseEffect alloc] init];
105     self.effect.texture2d0.name = texture.name;
106     //set up buffers
107     [self setUpBuffers];
108     //draw frame
109     [self drawFrame];
110 }
111
112 - (void)viewDidUnload
113 {
114     [self tearDownBuffers];
115     [super viewDidUnload];
116 }
117
118 - (void)dealloc
119 {
120     [self tearDownBuffers];
121     [EAGLContext setCurrentContext:nil];
122 }
123
124 @end
如你所见,非常不容易,如果你对在常规应用中使用PVRTC图片很感兴趣的话(例如基于OpenGL的游戏),可以参考一下GLView的库(https://github.com/nicklockwood/GLView),它提供了一个简单的GLImageView类,重新实现了UIImageView的各种功能,但同时提供了PVRTC图片,而不需要你写任何OpenGL代码。