提交和显示博客文章
app/models.py 文章模型
class Post(db.Model):
    __tablename__ = 'posts'
    id = db.Column(db.Integer, primary_key=True)
    body = db.Column(db.Text)
    timestamp = db.Column(db.DateTime,index=True,default=datetime.utcnow)
    author_id=db.Column(db.Integer,db.ForeignKey('users.id'))
class User(UserMixin,db.Model):
    posts = db.relationship('Post',backref = 'author',lazy='dynamic')
app/main/form.py 博客文章表单
class PostForm(FlaskForm):
    body = TextAreaField('你在想什么?',validators=[DataRequired()])
    submit = SubmitField('提交')
app/main/views.py 处理博客文章的首页路由 把以前发布的文章列表传给魔板
# 使用蓝本自定义路由
@main.route('/', methods=['get', 'post'])
def index():
  form = PostForm()
    # 检查用户是否有写文章的权限并检查是否可以通过验证
    if current_user.can(Permission.WRITE_ARTICLES) and form.validate_on_submit():
        # current_user._get_current_object() 新文章对象,内含真正的用户对象
        post = Post(body = form.body.data,author=current_user._get_current_object())
        db.session.add(post)
        return redirect(url_for('.index'))
    posts = Post.query.order_by(Post.timestamp.desc()).all()
    return render_template('index.html',form=form,posts=posts)
index.html 显示博客文章首页模板
{% block page_content %}
    <div class="page-header">
        <h1>Hello,
        {% if current_user.is_authenticated %}{{ current_user.username }}{% else %}访客{% endif %}!</h1>
    </div>
    <div>
        {% if current_user.can(Permission.WRITE_ARTICLES) %} # 如果没有对应权限,则不会显示文章列表
        {{ wtf.quick_form(form) }}
        {% endif %}
    </div>
    {% include '_posts.html' %} # 引导局部模板
styles.css


.profile-thumbnail {
    position: absolute;
}
.profile-header {
    min-height: 260px;
    margin-left: 280px;
}
ul.posts {
    list-style-type: none;
    padding: 0px;
    margin: 16px 0px 0px 0px;
    border-top: 1px solid #e0e0e0;
}
ul.posts li.post {
    padding: 8px;
    border-bottom: 1px solid #e0e0e0;
}
ul.posts li.post:hover {
    background-color: #f0f0f0;
}
div.post-date {
    float: right;
}
div.post-author {
    font-weight: bold;
}
div.post-thumbnail {
    position: absolute;
}
div.post-content {
    margin-left: 48px;
    min-height: 48px;
}
_post.html 降被以{% include '_posts.html' %}引入
<ul class="posts">
        {% for post in posts %}
            <li class="post">
                <div class="profile-thumbnail">
                    <a href="{{ url_for('.user',username=post.author.username) }}"><img class="img-rounded profile-thumbnail" src="{{ post.author.gravatar(size=40) }}"></a>
                </div>
                <div class="post-content">
                    <div class="post-date">{{ moment(post.timestamp).fromNow() }}</div>
                    <div class="post-author">
                        <a href="{{ url_for('.user',username=post.author.username) }}">{{ post.author.username }}</a>
                    </div>
                    <div class="post-body">{{ post.body }}</div>
                </div>
            </li>
        {% endfor %}
</ul>
在资料页显示博客文章
main/views.py
@main.route('/user/<username>')
def user(username):
    user = User.query.filter_by(username=username).first()
    #user = User.query.filter_by(username=username).first_or_404()
    if user is None:
        abort(404)
    posts =user.posts.order_by(Post.timestamp.desc()).all()
    return render_template('user.html',user=user,posts=posts)
user.html 显示有博客文章的资料页模板
<h3>发表自 {{ user.username }}</h3>
{% include '_posts.html' %}
分页显示长博客文章列表
创建虚拟博客文章数据
pip install forgerypy
整合目录
dev.txt
-r common.txt
Forgerypy==0.1
app/models.py 生成虚拟用户和博客文章
class User(UserMixin,db.Model):
@staticmethod
    def generate_fake(count = 100):
        from sqlalchemy.exc import IntegrityError
        from random import seed
        import forgery_py

        seed()
        for i in range(count):
            u = User(email=forgery_py.internet.email_address(),
                     username = forgery_py.internet.user_name(True),
                     password = forgery_py.lorem_ipsum.word(),
                     confirmed=True,
                     name = forgery_py.name.full_name(),
                     location=forgery_py.address.city(),
                     about_me=forgery_py.lorem_ipsum.sentence(),
                     member_since=forgery_py.date.date(True))
            db.session.add(u)
            try:
                db.session.commit()
            # 邮箱和用户名如果随机出重复的数据,则回滚到之前的对话,并不会写入到数据库
            except IntegrityError:
                db.session.rollback()
class Post(db.Model):
@staticmethod
    def generate_fake(count=100):
        from random import seed,randint
        import forgery_py

        seed()
        user_count=User.query.count()
        for i in range(count):
            # 为每篇文章随机制定一个用户,offset 会跳过参数中制定的记录数量,设定一个随机的偏移值
            u = User.query.offset(randint(0,user_count -1)).first()
            p=Post(body=forgery_py.lorem_ipsum.sentences(randint(1,3)),
                   timestamp=forgery_py.date.date(True),
                   author=u,)
            db.session.add(p)
            db.session.commit()
manage.py 绑定post类
from app.models import User,Role,Post

def make_shell_context():
    return dict(app=app, db=db, User=User, Role=Role,Post=Post)
生成虚拟用户和文章
python manage.py shell

User.generate_fake(100)
Post.generate_fake(100)
在页面只渲染数据
app/main/views.py 分页显示博客文章列表
@main.route('/', methods=['get', 'post'])
def index():
    form = PostForm()
    # 检查用户是否有写文章的权限并检查是否可以通过验证
    if current_user.can(Permission.WRITE_ARTICLES) and form.validate_on_submit():
        # current_user._get_current_object() 新文章对象,内含真正的用户对象
        post = Post(body = form.body.data,author=current_user._get_current_object())
        db.session.add(post)
        return redirect(url_for('.index'))
    #posts = Post.query.order_by(Post.timestamp.desc()).all()
    # 分页显示博客文章列表
    # 页数请求从查询字符串中获取,如果没有制定默认为第一页
    page = request.args.get('page',1,type=int)
    # 显示分页需要用到sqlachemy提供的paginate方法
    pagination=Post.query.order_by(Post.timestamp.desc()).paginate(page,per_page=current_app.config['FLASKY_POSTS_PER_PAGE'],error_out=False)
    # 显示当前页面的记录
    posts = pagination.items
    return render_template('index.html',form=form,posts=posts,pagination=pagination)
添加分页导航
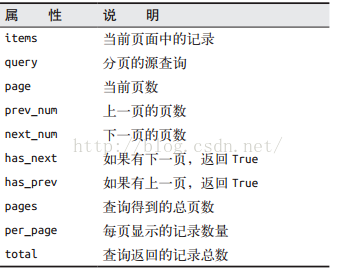
Flask-SQLAlchemy 分页对象的属性简介
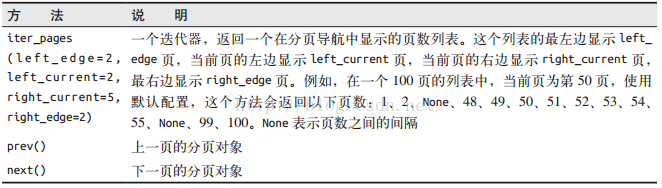
Flask-SQLAlchemy 分页对象的方法简介
构建分页导航
templates/_macros.html 分页模版宏
{% macro pagination_widget(pagination,endpoint) %} <ul class="pagination"> <li {% if not pagination.has_prev %}class="disabled" {% endif %}> # 如果当前页是第一页,则为这个链接加上不可用的属性 <a href="{% if pagination.has_prev %}{{ url_for(endpoint,page = pagination.page - 1,**kwargs) }}{% else %}#{% endif %}"> « </a> </li> {% for p in pagination.iter_pages() %} # 迭代返回所有页面链接 {% if p %} {% if p ==pagination.page %} # 当前显示的页面高亮显示 <li class="active"> <a href="{{ url_for(endpoint,page=p,**kwargs) }}">{{ p }}</a> </li> {% else %} # 否则正常显示 <li> <a href="{{ url_for(endpoint,page=p,**kwargs) }}">{{ p }}</a> </li> {% endif %} {% else %} # 中间间隔用省略号表示 <li class="disabled"><a href="#">…</a></li> {% endif %} {% endfor %} <li {% if not pagination.has_next %}class="disabled" {% endif %}> <a href="{% if pagination.has_next %}{{ url_for(endpoint,page = pagination.page + 1,**kwargs) }}{% else %}#{% endif %}"> » </a> </li> </ul> {% endmacro %}
app/templates/index.html 在博客文章列表下面添加分页导航
{% extends 'base.html' %}
{% import 'bootstrap/wtf.html' as wtf %}
{% import '_macros.html' as macros %}
。。。
<div class="pagination">
    {{ macros.pagination_widget(pagination,'.index') }}
</div>
使用Markdown和Flask-PageDown支持富文本文章
Pagedown:使用JavaScript实现的客户端Markdown到Html的转换程序
Flask-PageDown: 为Flask包装的Pagedown 把Pagedown集成到Form表单中
Markdown: 使用python实现的从服务器端的MarkDOWN到HTML的转换程序
Bleach:使用python实现的HTML清理器
pip install flask-pagedown markdown bleach
使用flask-pagedown
app/__init__.py 初始化flask-pagedown
from flask_pagedown import PageDown

pagedown = PageDown()


pagedown.init_app(app)
flask-pagedown 扩展定义的PageDownField类和WTForm中的TextAreaField接口一致
把多行文本空间转换成Markdown富文本编辑器,需要修改body字段
app/main/forms.py 启用markdown的文章表单
from flask_pagedown.fields import PageDownField

class PostForm(FlaskForm):
    body = PageDownField('你在想什么?',validators=[DataRequired()])
    submit = SubmitField('提交')
markdown的预览生成直接调用flask-pagedown提供的模板宏即可
app/index.html flask-pagedown 模板声明
{% block scripts %}
    {{ super() }}
    {{ pagedown.include_pagedown() }}
{% endblock %}
在服务器上处理富文本
app/models.py 在post模型中处理Markdown文本
from markdown import markdown
import bleach

class Post(db.Model):
    body_html =db.Column(db.Text)
    @staticmethod
    def on_changed_body(target,value,oldvalue,initiator):
        allowed_tags=['a','abbr','acronym','b','blockquote','code','em','i','li','ol','pre','strong','ul','h1','h2','h3','p']
     # 把body字段中的值渲染成HTML格式,结果保存到body_html中,clean函数删除不在名单里的标签,linkify函数把纯文本中的url转换成适当的<a>标签
     target.body_html=bleach.linkify(bleach.clean(markdown(value,output_format='html'),tags=allowed_tags,strip=True))

# 把on_changed_body 注册在body字段上,用set监听程序,只要body字段更新,函数就会被调用
db.event.listen(Post.body,'set',Post.on_changed_body)
如果post.body_html字段存在,就把post.body换成post.body_html
templates/_posts.html 在模板中使用文章内容的HTML格式
<div class="post-body">
     {% if post.body_html %}
     {{ post.body_html | safe }}
     {% else %}
     {{ post.body }}
     {% endif %}
</div>
博客文章固定链接
app/main/views.py 文章的固定链接
# 文章固定链接
@main.route('/post/<int:id>')
def post(id):
    post=Post.query.get_or_404(id)
    return render_template('post.html',post=[post])
templates/_posts.html
<div class="post-footer">
    <a href="{{ url_for('.post',id=post.id) }}">
       <span class="label label-default">永久链接</span>
    </a>
</div>
在post.html中引入固定链接模板
{% extends "base.html" %}
{% block title %}Flasky - 文章{% endblock %}

{% block page_content %}
{% include '_posts.html' %}
{% endblock %}
博客文章编辑器
templates/edit_post.html 编辑博客文章的模板
{% extends "base.html" %}
{% import "bootstrap/wtf.html" as wtf %}

{% block title %}Flasky - 编辑文章{% endblock %}

{% block page_content %}
<div class="page-header">
    <h1>编辑你的文章</h1>
</div>
<div>
    {{ wtf.quick_form(form) }}
</div>
{% endblock %}

{% block scripts %}
    {{ super() }}
    {{ pagedown.include_pagedown() }}
{% endblock %}
app/main/views.py 编辑博客文章的路由
# 编辑博客路由
@main.route('/edit/<int:id>',methods=['get','post'])
@login_required
def edit(id):
    post=Post.query.get_or_404(id)
    if current_user != post.author and not current_user.can(Permission.ADMINISTER):
        abort(403)
    form = PostForm()
    if form.validate_on_submit():
        post.body=form.body.data
        db.session.add(post)
        flash('文章已经更新')
        return redirect(url_for('.post',id=post.id))
    form.body.data=post.body

    return render_template('edit_post.html',form=form)
templates/_posts.html 编辑博客文章的链接
<div class="post-footer">
    <a href="{{ url_for('.post',id=post.id) }}">
       <span class="label label-default">永久链接</span>
    </a>
    {% if current_user ==post.author %}
     <a href="{{ url_for('.edit',id=post.id) }}"><span class="label label-primary">编辑</span></a>
    {% elif current_user.is_administrator() %}
    <a href="{{ url_for('.edit',id=post.id) }}">
    <span class="label label-danger">编辑[管理员]</span>
    </a>
    {% endif %}
</div>