WPF如何用TreeView制作好友列表、播放列表
前言
TreeView这个控件对于我来说是用得比较多的,以前做的小聊天软件(好友列表)、音乐播放器(播放列表)、类库展示器(树形类结构)等都用的是TreeView,下面以一个好友列表为例,说明一下制作过程,这个过程可以搬迁到其他类似的场景中去(树形结构的场景)。
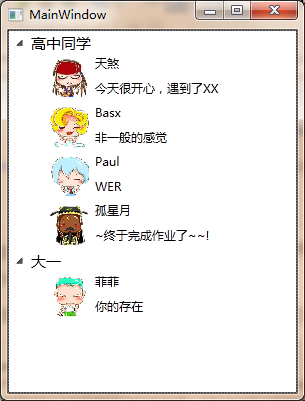
结果展示
制作过程
一:新建一个WPF工程,我命名为TreeViewDemo。(这步不解释)
二:准备图片,就是系统头像。在工程中新建一个Heads文件夹,并且添加系统头像图片,最后不要忘记需要把生成方式改为Resource、不复制,这样才能用标准的Pack URI的方式来读取到图片。(我喜欢用Pack Uri,因为比较通用,安全) 下载头像
三:好了,资源图片准备好了以后,来定义数据类,在这里我们需要用到两个类,一个代表好友,一个代表好友列表(对应的音乐播放器就是音乐和音乐列表)。
1.Friend(好友)

class Friend
    {
        public Friend(FriendList list)
        {
            this.List = list;
        }
        //头像的路径
        public String HeadPath { set; get; }
        //好友名字
        public String Name { set; get; }
        //签名
        public String Autograph { set; get; }

        public FriendList List { set; get; }

    }
2.FriendList(好友列表)
class FriendList
    {
        public FriendList(String name)
        {
            this.ListName = name;
        }
        public String ListName { set; get; }

        private ObservableCollection<Friend> _friends = new ObservableCollection<Friend>();
        public ObservableCollection<Friend> Friends
        {
            private set{}
            get
            {
                return _friends;
            }
        }

        public void AddFriend(Friend newFriend)
        {
            _friends.Add(newFriend);
        }

        public void RemoveFriend(Friend friend)
        {
            _friends.Remove(friend);
        }
    }
四:这一步是重点,就是在一个TreeView的节点中,如何去区分Friend和FriendList呢?我使用模板,我分别为Friend和FriendList定义属于它们各自的模板,一起定义在一个字典中,新建一个字典,我命名为GlobeDictionary。这里应该要用的是数据模板(DataTemplate),系统有一个数据模板叫HierarchicalDataTemplate,这个模板专门用于有头部和子数据的数据结构的,用在这个TreeView中刚好合适。
<ResourceDictionary xmlns="http://schemas.microsoft.com/winfx/2006/xaml/presentation"
                    xmlns:x="http://schemas.microsoft.com/winfx/2006/xaml"
                    xmlns:local="clr-namespace:TreeViewDemo">

    <HierarchicalDataTemplate DataType="{x:Type local:FriendList}" ItemsSource="{Binding Path=Friends,UpdateSourceTrigger=PropertyChanged, Mode=OneWay}" x:Key="ListTemple" >
        <Border x:Name="bord" Margin="-1,-1,0,-1">
            <TextBlock Text="{Binding Path=ListName, Mode=TwoWay}" HorizontalAlignment="Left" Width="227" Padding="2" FontSize="15"></TextBlock>
        </Border>
    </HierarchicalDataTemplate>
    <HierarchicalDataTemplate DataType="{x:Type local:Friend}"  x:Key="FriendTemple">
        <Grid>
            <Grid.ColumnDefinitions>
                <ColumnDefinition Width="40"></ColumnDefinition>
                <ColumnDefinition Width="150"></ColumnDefinition>
            </Grid.ColumnDefinitions>
            <Image Source="{Binding Path=HeadPath}" ></Image>
            <StackPanel Orientation="Horizontal" Grid.Column="1" Margin="6,2,2,2">
                <StackPanel Orientation="Vertical">
                    <TextBlock Text="{Binding Path=Name}"  Height="25" HorizontalAlignment="Left" ></TextBlock>
                    <TextBlock Text="{Binding Path=Autograph}"  Height="20" HorizontalAlignment="Left"></TextBlock>
                </StackPanel>
            </StackPanel>
        </Grid>
    </HierarchicalDataTemplate>

</ResourceDictionary>
(注意:因为需要再这里引用自定义类,所以命名空间local的引入一定要正确,冲上面的定义可以看出,好友列表只显示名字,好友就用Grid来组织一个类QQ的布局,头像,签名等。)
五:主界面。
主界面比较简单,在这个Demo中,只使用TreeView控件。
<Window x:Class="TreeViewDemo.MainWindow"
        xmlns="http://schemas.microsoft.com/winfx/2006/xaml/presentation"
        xmlns:x="http://schemas.microsoft.com/winfx/2006/xaml"
        xmlns:local="clr-namespace:TreeViewDemo"
        Title="MainWindow" Height="401" Width="305">
    <Grid>
        <TreeView x:Name="ListTV" ></TreeView>
    </Grid>
</Window>
六:有了躯壳,我们填入灵魂(数据绑定和数据模板应用)。
模板有两个,直接填充TreeView的ItemTemplate属性是不行的,但是WPF中有一个思想很重要(Selector、Converter等),在TreeView中有一个属性ItemTemplateSelector。所以,新建一个Selector类,继承DataTemplateSelector:
class FriendOrListTemplateSelector : DataTemplateSelector
    {
        public override DataTemplate SelectTemplate(object item, DependencyObject container)
        {
            ResourceDictionary directory = new ResourceDictionary();
            directory.Source = new Uri("pack://Application:,,,/GlobeDictionary.xaml", UriKind.RelativeOrAbsolute);//使用pack uri载入模板字典
            if (item != null && item is FriendList)
            {
                return directory["ListTemple"] as DataTemplate;
            }
            return directory["FriendTemple"] as DataTemplate;
        }
    }
首先使用pack uri加载位于当前exe程序集中的字典资源(如果加载不了,请将字典生成方式改为Resource),然后根据传入的数据类型来返回对应的DataTemplate,这样就能有效的自动选择模板。
模板能自动选择了,另外数据怎么提供呢,我们使用在WPF中最常用的DataContext绑定来填充ItemsSource。下面看主界面的完整代码。
<Window x:Class="TreeViewDemo.MainWindow"
        xmlns="http://schemas.microsoft.com/winfx/2006/xaml/presentation"
        xmlns:x="http://schemas.microsoft.com/winfx/2006/xaml"
        xmlns:local="clr-namespace:TreeViewDemo"
        Title="MainWindow" Height="401" Width="305">
    <Grid>
        <Grid.Resources>
            <local:FriendOrListTemplateSelector x:Key="Myselector"></local:FriendOrListTemplateSelector>
        </Grid.Resources>
        <TreeView x:Name="ListTV"
                  ItemsSource="{Binding Path=DataContext, Mode=TwoWay,RelativeSource={RelativeSource Mode=Self}}"
                  ItemTemplateSelector="{StaticResource Myselector}" >
        </TreeView>
    </Grid>
</Window>
这里的命名空间local是FriendOrListTemplateSelector所在的命名空间中,请填写对。最后在主界面的代码中加入数据,测试一下。
public partial class MainWindow : Window
    {
        public MainWindow()
        {
            InitializeComponent();
            ObservableCollection<FriendList> Root = new ObservableCollection<FriendList>();
            FriendList listOne = new FriendList("高中同学");
            Friend friend1 = new Friend(listOne) { Autograph = "今天很开心,遇到了XX", HeadPath = "Heads/h1.png", Name = "天煞" };
            Friend friend2 = new Friend(listOne) { Autograph = "非一般的感觉", HeadPath = "Heads/h2.png", Name = "Basx" };
            Friend friend3 = new Friend(listOne) { Autograph = "WER", HeadPath = "Heads/h3.png", Name = "Paul" };
            Friend friend4 = new Friend(listOne) { Autograph = "~终于完成作业了~~!", HeadPath = "Heads/h4.png", Name = "孤星月" };
            listOne.AddFriend(friend1);
            listOne.AddFriend(friend2);
            listOne.AddFriend(friend3);
            listOne.AddFriend(friend4);
            FriendList listTwo = new FriendList("大一");
            Friend friend5 = new Friend(listOne) { Autograph = "你的存在", HeadPath = "Heads/h5.png", Name = "菲菲" };
            listTwo.AddFriend(friend5);
            Root.Add(listOne);
            Root.Add(listTwo);
            this.ListTV.DataContext = Root;
        }
    }
大功告成~!
总结
过程比较简单,但是最重要的是学习其方法,有几点通用的知识需要注意的:
1.Xaml中需要使用自定义类的时候,需要在头部xmlns中添加一项,并且确保命名空间是对的。
2.Pack URI的使用,任何资源的引用都可以使用Pack URI,下面举两个例子:
*pack://Application:,,,/路径/路径/文件名(带后缀) <-这种方式是引用当前程序集的Resouce资源的。
*pack://Application:,,,/引用的程序集名称;component/路径/路径/文件名(带后缀)<-这种方式是引用其他程序集的Resouce资源的。
3.选择器(Selecter),转换器(Converter)等的思想要深入理解。
4.数据模板是为数据定制外观,例如这里就为Friend和FriendList定制了外观了。
转:http://www.cnblogs.com/Jarvin/p/3792171.html