zoukankan      html  css  js  c++  java
  • CentOS7设置系统/yum以及firefox web代理上网

    一.系统全局的代理设置;

    1. 用vi/vim编辑器打开/etc/profile,追加如下内容:

    http_proxy=http://192.168.78.124:8080
    ftp_proxy=http://192.168.78.124:8080
    export http_proxy
    export ftp_proxy
     

        如果需要输入账号和密码,则追加的内容如下:

    http_proxy=http://username:passwd@192.168.78.124:8080
    ftp_proxy=http://username:passwd@192.168.78.124:8080
    export http_proxy
    export ftp_proxy
     

        另外,如果不想做全局配置,只为某一用户配置,例如root,则可以将上述内容之一配置追加到/root/.bash_profile

    二.yum的代理设置;

    1. 用vi/vim编辑器打开/etc/yum.conf,追加如下内容:

    http_proxy=http://192.168.78.124:8080
    ftp_proxy=http://192.168.78.124:8080
     

        或者:

    http_proxy=http://192.168.78.124:8080
    ftp_proxy=http://192.168.78.124:8080
    proxy_username=username
    proxy_password=password
     

        另外,ubuntu的OS apt-get代理联网设置可以用如下方法:

    echo 'Acquire::http::proxy “http://192.168.78.124:8080”;' > /etc/apt/apt.conf
     

     三.wget的代理设置;

    1. 用vi/vim编辑器打开/etc/wgetrc,找到代理设置所在行,然后追加如下内容:

    # You can set the default proxies for Wget to use for http, https, and ftp.
    # They will override the value in the environment.
    #https_proxy = http://proxy.yoyodyne.com:18023/
    #http_proxy = http://proxy.yoyodyne.com:18023/
    #ftp_proxy = http://proxy.yoyodyne.com:18023/
    http_proxy=http://192.168.78.124:8080/
    ftp_proxy=http://192.168.78.124:8080/
     

        说明:如果需要设置用户名和密码,依照上述格式即可。

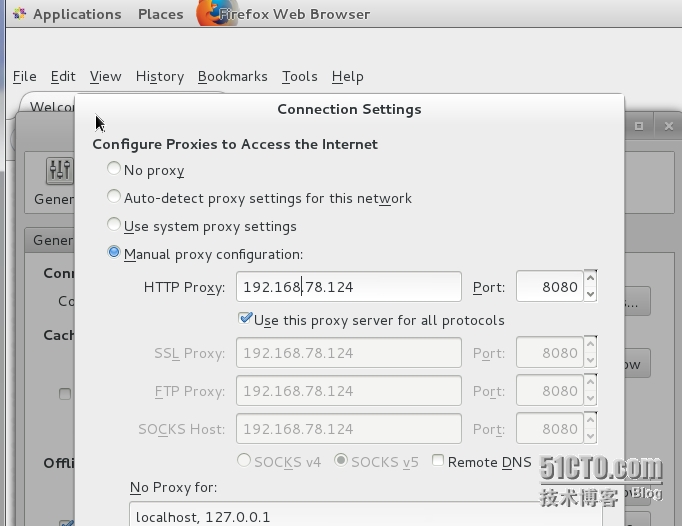
    四.firefox浏览器代理联网设置;

        说明:设置路径,Edit--> Preferences-->Advanced-->Network-->Settings.

        wKiom1UsthXhIuU5AAIaAmMEAfw630.jpg

    五.附注

    1. 192.168.78.124为代理联网服务器IP地址;

    2. 8080为自定义端口号。

        End.

  • 相关阅读:
    《机器学习》第二次作业——第四章学习记录和心得
    机器学习一到三章笔记
    [ML] 第四章学习总结
    [CV] Mnist手写数字分类
    ModelArts (华为GPU/CPU计算云平台)体验
    [DataSturcture] 红黑树求逆序对
    [CV] 边缘提取和角点判断
    [CV] 灰度共生矩阵
    [DataStructure] AC 自动机(Aho–Corasick Automata)
    [GIT] 如何删除git上保存的文件(包含历史文件)
  • 原文地址:https://www.cnblogs.com/ExMan/p/9579828.html
Copyright © 2011-2022 走看看