Runtime的使用
一直以来,OC被大家冠以动态语言的称谓,其实是因为OC中包含的runtime机制。Runtime 又叫运行时,是一套底层的 C 语言 API,其为 iOS 内部的核心之一,我们平时编写的 OC 代码,底层都是基于它来实现的。这一组API可以在Xcode的runtime.h文档中看到。
关于Runtime的深层次的东西,在很多其他开发者的博客中都有介绍。比如下面这些。
http://www.cnblogs.com/ioshe/ 这篇文章对与初识runtime做了很多基础性的介绍,并就runtime一些特性做了深入的讲解。
https://github.com/ChenYilong/iOSInterviewQuestions/blob/master/01《招聘一个靠谱的iOS》面试题参考答案/《招聘一个靠谱的iOS》面试题参考答案 (上).md 这里针对一些高质量的iOS面试题做的讲解。 其中包含了很多关于runtime 的知识。 看完之后大有裨益。
在本文中,不会很会很深入的进入到Runtime,而是就我们的开发过程中,如何使用runtime来简便的实现一些功能。主要包含以下方面的内容:
- runtime 获取类与对象的信息。
- 如何动态给对象添加成员变量。
- 如何动态给成员变量添加属性。
- 如何动态的给对象添加方法。
- categroy关联属性。
- 消息转发如何实现。
- 如何替换一个已有的方法的实现。
一、runtime 获取对象的信息。
通过简单的使用runtime可以获取到有关于类和对象的一些信息。
@interface GetClassAndIvarInfo ()

//属性
@property (nonatomic,copy) NSString* name;
@property (nonatomic,assign) int age;
@property (nonatomic,assign) BOOL isMan;

@end

@implementation GetClassAndIvarInfo{
   //添加的变量
    NSString* _adr;
}

/**
 获取类相关的信息
 */
- (void)getRegisteredClassInfo{
    int bufferCount = 0;
    bufferCount = objc_getClassList(NULL, bufferCount);
    //开辟一段空间 用于存储即将获取的类。
    //类型的目的是: 告诉编译器我需要多大的空间
    __unsafe_unretained Class *buffer = ( __unsafe_unretained Class *)malloc(sizeof(Class) * bufferCount);
    objc_getClassList(buffer, bufferCount);
    for (int i = 0; i < bufferCount; i++) {
        //查找本类是不是在里面
        if(strcmp(class_getName([self class]), class_getName(buffer[i])) == 0){
            NSLog(@"%s",   class_getName(buffer[i]));
        }
    }
}

/**
 获取所有的属性
 */
- (void)getAllProp{
    unsigned int outCount = 0;
    NSLog(@"属性");
    objc_property_t *props = class_copyPropertyList([self class], &outCount);
    for (int i = 0; i < outCount; i++) {
        NSLog(@"%s",property_getName(props[i]));
    }
    free(props);
}

/**
 获取所有的变量
 */
- (void)getAllIvar{
    unsigned int outCount = 0;
    Ivar *ivars = class_copyIvarList( object_getClass(self),&outCount);
    NSLog(@"变量");
    for (int i = 0; i < outCount; i++) {
        NSLog(@"%s",ivar_getName(ivars[i]));
    }
    free(ivars);
}

/**
 获取所有的方法
 */
- (void)getAllMethod{
    unsigned int outCount = 0;
    Method *methods = class_copyMethodList(object_getClass(self),&outCount);
    NSLog(@"方法名");
    for (int i = 0; i < outCount; i++) {
        NSLog(@"%s",sel_getName(method_getName(methods[i])));
    }
   free(methods);
}
通过上面的这些方法。 我们可以方便的做一些有关方法属性的工作了。 比如,当对某个类进行归档的时候,如果能获取累类的所有属性,运用KVC进行赋值和取值。就能用很简短的代码实现整个类的归档动作。
除了上面的几个简单的方法之外,还有很多非常实用的runtime的API:
- OBJC_EXPORT id object_getIvar(id obj, Ivar ivar) //给变量设置值 KVC通过这个方式做
- OBJC_EXPORT void object_setIvar(id obj, Ivar ivar, id value) //获取成员变量的值 KVC
- OBJC_EXPORT Class objc_getMetaClass(const char *name) //获取该类的元类, 用于分析isa指针
- Protocol * __unsafe_unretained *class_copyProtocolList(Class cls, unsigned int *outCount) //获取类遵循的协议中的方法列表
- OBJC_EXPORT Class objc_getFutureClass(const char *name) //toll-free bridging. 分析中,获取转换类的名字
二、runtime 给类添加成员变量
oc中,我们还可以给一个类动态的添加成员变量。 但是有一个前提是:被添加成员变量的类必须是动态创建的类。曾经有个人问我,对于已经编译的类,能否使用运行时添加成员变量, 答案是不行的。 好,下面的代码演示如何创建一个动态的类。
/*
     1. 创建一个类。比如: Car,继承自NSObjest
     2. 给这个类添加两个成员变量,分别是: 车身的颜色 bodyColor 和 车的最高速度 maxSpeed
     3. 添加一些方法。以便可以访问两个成员变量。
     3. 使用这个类创建对象,并对对象的成员属性进行访问。
     */
    NSString *bodyColorName = @"bodyColor";   //类型为  UIcolor
    NSString *maxSpeedName = @"maxSpeed";     // 类型为 NSString
    NSString *className = @"Car";
    Class Car = objc_getClass([className UTF8String]);
    if (!Car)
    {
        Class superClass = [NSObject class];
        Car = objc_allocateClassPair(superClass, [className UTF8String], 0);

        //添加成员变量的代码必须放在这里

        objc_registerClassPair(Car);  //注册到运行时

    }
这些代码演示添加成员变量
 if(class_addIvar([Car class],[maxSpeedName UTF8String], sizeof(NSString *), log2(_Alignof(NSString *)), @encode(NSString *))){

            NSLog( @"添加最高速度成功。");
  }
 if(class_addIvar([Car class],[bodyColorName UTF8String], sizeof(UIColor *), log2(_Alignof(UIColor *)), @encode(UIColor *))){

            NSLog( @"添加车身速颜色成功。");
  }
虽然每次添加成功之后,会打印相关的提示文字,何不验证一下呢?运用上一节的内容,打印一下car的所有的成员变量吧
 id car = [[Car alloc]init];
        unsigned int outCount = 0;
        Ivar *ivars = class_copyIvarList( object_getClass(car),&outCount);

        NSLog(@"变量");
        for (int i = 0; i < outCount; i++) {
            NSLog(@"%s",ivar_getName(ivars[i]));
        }
        free(ivars);
结果是:
2017-05-12 11:11:31.784 runtimeTest[3072:90675] 添加最高速度成功。
2017-05-12 11:11:31.784 runtimeTest[3072:90675] 添加车身速颜色成功。
2017-05-12 11:11:31.784 runtimeTest[3072:90675] maxSpeed
2017-05-12 11:11:31.784 runtimeTest[3072:90675] bodyColor
看来对了。
如何访问添加的变量? 通过runtime可以做到。
  unsigned int outCount = 0;
        Ivar *ivars = class_copyIvarList( object_getClass(car),&outCount);

        NSLog(@"变量");
        //runtime 赋值
        for (int i = 0; i < outCount; i++) {
            NSLog(@"%s",ivar_getName(ivars[i]));

            if(strcmp(ivar_getName(ivars[i]), [bodyColorName UTF8String])){
               object_setIvar(car, ivars[i] , [UIColor blueColor]);
            }
            if(strcmp(ivar_getName(ivars[i]), [maxSpeedName UTF8String])){
                object_setIvar(car, ivars[i] ,@"205.5 km/h");
            }
        }

        //runtime 取值
        for (int i = 0; i < outCount; i++) {
            if(strcmp(ivar_getName(ivars[i]), [bodyColorName UTF8String])){

                 NSLog(@"车的颜色是%@", object_getIvar(car, ivars[i]));
            }
            if(strcmp(ivar_getName(ivars[i]), [maxSpeedName UTF8String])){
                object_getIvar(car, ivars[i]);
                 NSLog(@"速度是%@",object_getIvar(car, ivars[i]));
            }
        }
        free(ivars);
当然这样每次写起来实在是不怎么友好。 其实又个更简单的办法,利用KVC。
 //利用KVC赋值 取值
        [car setValue:[UIColor redColor] forKey:bodyColorName];
        [car setValue:@"199.6 km/h" forKey:maxSpeedName];
        NSLog(@"车的颜色是%@, 速度是%@",[car valueForKey:bodyColorName],[car valueForKey:maxSpeedName]);
三、如何动态的给成员变量添加属性。
刚才我创建了一个类,并给他添加了成员变量,并且做到了如何进行访问。 接下来我还希望能给这些成员变量添加添加的属性,以便编译器更好的帮我们做内存的管理等。比如nonatomic、copy之类的属性。
比如我们要为成员变量 maxSpeedName 添加 nonatomic、copy属性。看这些代码.
       /* 添加成员变量的属性 */

        //在添加之前,需要先编辑属性。  //这里给 maxSpeed成员变量添加属性。 这些属性的 encode 可以官网看到。
        objc_property_attribute_t type = { "T", [[NSString stringWithFormat:@"@"%@"",NSStringFromClass([car class])] UTF8String] };
        objc_property_attribute_t ownership = { "&", "N" };
        objc_property_attribute_t ownership0 = { "C", "" }; // C = copy
        objc_property_attribute_t ownership1 = { "N", "" }; // N = nonatomic
        objc_property_attribute_t backingivar  = { "V", [[NSString stringWithFormat:@"_%@", maxSpeedName] UTF8String] };

        //这里需要注意的是: type和backingivar 必须放在头部和尾部 不然会有意想不到的后果
        objc_property_attribute_t attrs[] = { type, ownership,ownership0,ownership1,backingivar};

        //参数的描述分别是: 对象的类,属性的预设名字,属性数组,属性的个数
        if(class_addProperty([car class], [maxSpeedName UTF8String], attrs, 5)){
            NSLog(@"添加属性maxSpeedName 成功");
            //打印下
            unsigned int outCount = 0;
            NSLog(@"属性");
            objc_property_t *props = class_copyPropertyList([car class], &outCount);
            for (int i = 0; i < outCount; i++) {

                NSLog(@"名字:%s",property_getName(props[i]));
                //属性值
                NSLog(@"属性值:%s",property_getAttributes(props[i]));
            }
            free(props);
添加属性之后,如果设置setter和getter方法,那么这些操作需要根据不同的属性进行设置,比如,storeWeak 就表示对带有weak属性的变量进行存储。
四、如何动态的给对象添加方法。
添加属性之后,我们最好还是能添加响应的个体和set方法,这是OC一贯的风格。
  //添加get和set方法
            class_addMethod([car class], NSSelectorFromString(maxSpeedName), (IMP)getter, "@@:");
            class_addMethod([car class], NSSelectorFromString([NSString stringWithFormat:@"set%@:",[maxSpeedName capitalizedString]]), (IMP)setter, "v@:@");
            outCount = 0;
            Method *methods = class_copyMethodList(object_getClass(car),&outCount);
            NSLog(@"方法名");
            for (int i = 0; i < outCount; i++) {
                NSLog(@"%s",sel_getName(method_getName(methods[i])));
                NSLog(@"%p",sel_getName(method_getImplementation(methods[i])));


            }
            free(methods);

            //调用
            [self setMaxSpeed:@"300km/h" target:car];
            NSLog(@"%@",[self maxSpeedWithTarget:car]);
- (void)setMaxSpeed:(NSString *)maxSpeed target:(NSObject*)car{
    // 动态添加的方法,需要使用performselector调用。  因为在注册的类中,我们还没有设置改变类的变量布,也没有设置方法列表。
    if([car respondsToSelector:NSSelectorFromString(@"setMaxspeed:" )]){
    [car performSelector:NSSelectorFromString(@"setMaxspeed:") withObject:@"300 km/h"];
    }
}

- (NSString *)maxSpeedWithTarget:(NSObject*)car{
    //这里不仅判断有可能报错的
    if([car respondsTOSelector:NSSelectorFromString:(@"maxspeed")]){
        return [car performSelector:NSSelectorFromString(@"maxspeed")];
    }
}

id getter(id self1, SEL _cmd1) {
    NSString *key = NSStringFromSelector(_cmd1);
    Ivar ivar = class_getInstanceVariable([self1 class], [key cStringUsingEncoding:NSUTF8StringEncoding]);
    NSString *s = object_getIvar(self1, ivar);
    return s;
}

void setter(id self1, SEL _cmd1, id newValue) {
    //移除set
    NSString *key = [NSStringFromSelector(_cmd1) stringByReplacingCharactersInRange:NSMakeRange(0, 3) withString:@""];
    //首字母小写
    NSString *head = [key substringWithRange:NSMakeRange(0, 1)];
    head = [head lowercaseString];
    key = [key stringByReplacingCharactersInRange:NSMakeRange(0, 1) withString:head];
    //移除后缀 ":"
    key = [key stringByReplacingCharactersInRange:NSMakeRange(key.length - 1, 1) withString:@""];

    Ivar ivar = class_getInstanceVariable([self1 class], [key cStringUsingEncoding:NSUTF8StringEncoding]);
    object_setIvar(self1, ivar, newValue);
}
对于 BOOL class_addMethod(Class cls, SEL name, IMP imp, const char *types), 几个参数相信很容易理解。 cls是要操作的类,name方法的名字,imp实现函数的指针,types是方法的类型。像文中的 "v@:@" 它是方法的类型,是一种缩写,有利于编译时提升效率。 我们还可以通过
- method_copyReturnType
-
method_copyArgumentType
这两个runtime API获取对应的方法type。 当然去苹果官网了解下相信会更明白。
这里就不详细介绍。
五、categroy关联属性。
刚开始接触的OC的时候,大部分都会有这么一个认知,category是不能添加属性的,只能添加成员变量,并在私有中使用。但是可以使用runtime来添加属性,使得属性可在 public中使用,这种操作也即是关联属性。
static const NSString* addProp = @"addName";

@implementation NSObject (ClassInfo)


/**
 设置get方法

 @return  value
 */
- (NSString *)name{

    return  objc_getAssociatedObject(self, [addProp UTF8String]);
}

/**
 设置set方法

 @param name newVlaue
 */
- (void)setName:(NSString *)name{
    objc_setAssociatedObject(self, [addProp UTF8String], name, OBJC_ASSOCIATION_COPY_NONATOMIC);

}
之后就可以直接调用这个变量了。这种方法用的非常多。不仅可以使得category增加属性,还特别的简洁明了。
   [self setName:@"test000000"];
    NSLog(@"%@",self.name);
六、消息发送/转发是如何实现。
我们知道。OC中所有的调用其实就是消息的传递。在使用OC方法的时候,实际上在runtime中是将放啊放转化成了C语言的 API :
id objc_msgSend(id self, SEL op, ...) //这里包含消息的发送者,方法名,方法的类型。举个简单的例子: 如果我们要执行一个方法:
[self setName:@"小明"]; ----> objc_msgSend(self,method_getName(method),method_getTypeEncoding(method))
除了 objc_msgSend 还有如下几个发送消息的API
- objc_msgSend(self,sel); // 发送着为本类的实例对象 如果返回的是常用的类型值的时候,调用
- objc_msgSendSuper(); // 发送着是 超类的实例对象的时候 返回常用类型 调用
- objc_msgSend_stret(); // 发送者是 本类的实例对象, 返回一个结构体 调用
- objc_msgSendSuper_stret(); // 发送者是 超类的实例对象, 返回一个结构体 调用
- objc_msgSend_fpret(); // 本类的实例对象, 返回一个浮点类型 调用
这些方法调用的流程是什么呢? 通过一副图片了解下。当一个msgSend执行的时候,经过以下几个步骤:
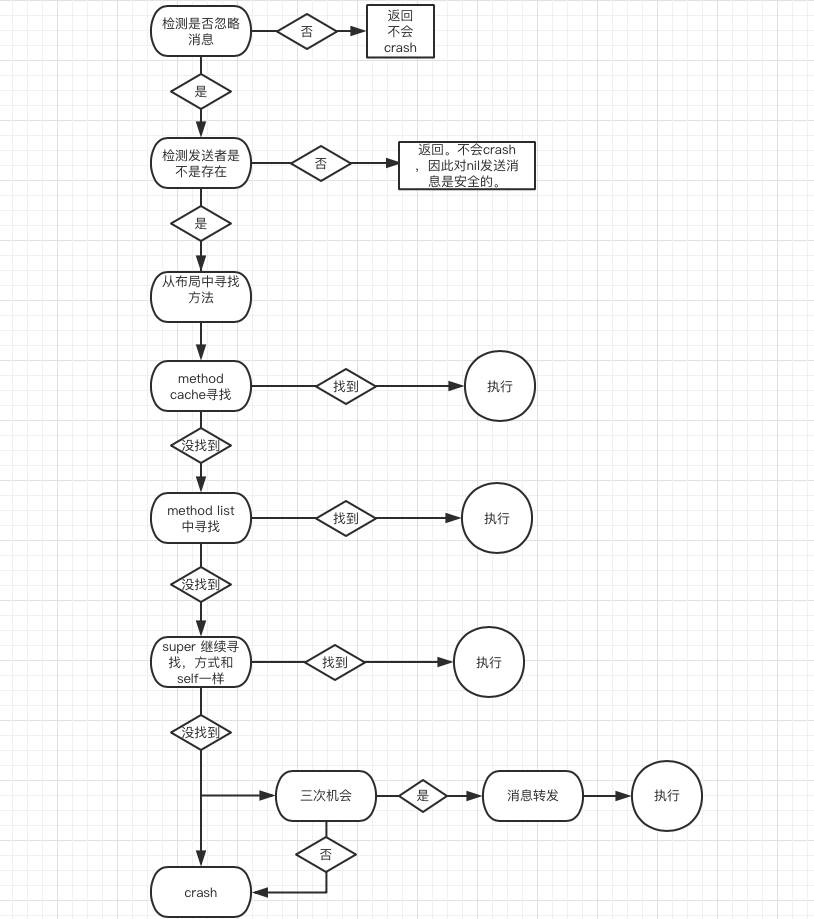
1.检测消息类型是否被忽略,mac上的retain等操作是被忽略的。
2.检测发送者是不是空指针,如果是,直接retrun ,这里不会产生Crash。
3.在mothod cache 中寻找对应的IMP,有则执行。没有进行下一步。
4.在mothod list 中寻找IMP ,有则执行,没有则下一步。 执行之后会将IMP放入cache,以便下次访问提升效率。
5.在父类中继续寻找。有则执行,没有则进行下一步/ 执行之后会将IMP放入cache,以便下次访问提升效率。
6.进入消息转发,或者crash 抛出异常。
在这里详细讲一下消息的转发。一张示意图。
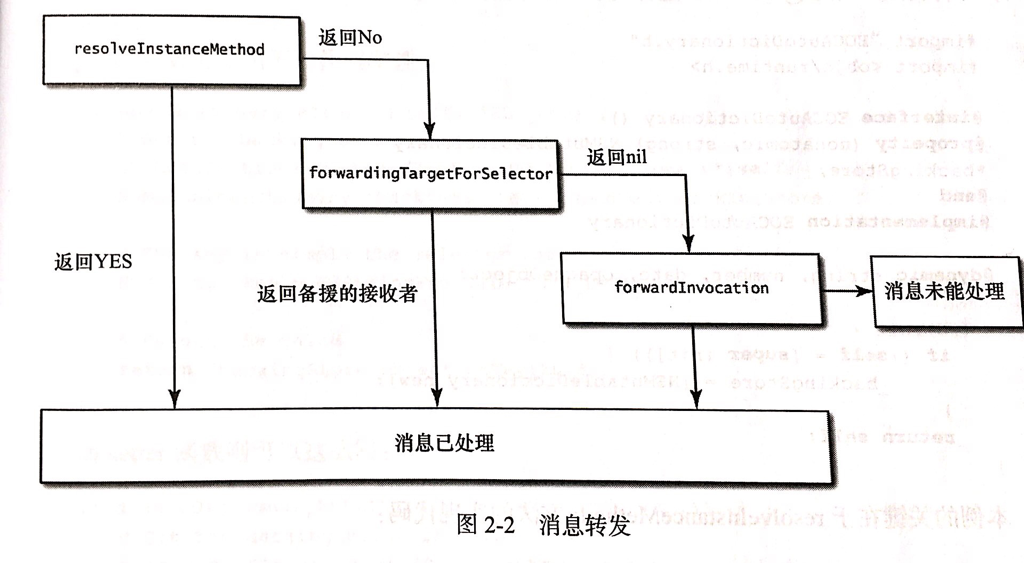
在上面的那副图中,消息转发的类型有两大类,一类是 对象方法,也就是我们说的 - 方法。另一类是 类方法,即 + 方法。-方法 有三次机会可以进行消息的转发,但是对于 + 方法,只有一次。
我们先看看 +方法。 如果想要转发+方法,只需要重写 + (BOOL)resolveClassMethod:(SEL)sel 即可。如下
// runtime中的消息
- (void)testTwo{
    //我们随便发送一个没有定义过的方法
    [[self class] performSelector:@selector(classMethodTest)];
}

+ (BOOL)resolveClassMethod:(SEL)sel{
//针对类方法
    //第一种 使用自定义方法制作IMP 进行转发
    class_addMethod(objc_getMetaClass([NSStringFromClass([self class]) UTF8String]), NSSelectorFromString(@"classMethodTest"), (IMP)classForwardFunc,"V@:" );
      return [super resolveClassMethod:sel];

    //第二种 使用制作block的方法得到IMP  进行转发
    methodBlock ablock = ^{
        NSLog(@"使用 block的 IMP 接到消息的转发");
    };
    IMP amethod = imp_implementationWithBlock(ablock);
    class_addMethod(objc_getMetaClass([NSStringFromClass([self class]) UTF8String]), NSSelectorFromString(@"classMethodTest"), amethod,"V@:" );
    return [super resolveClassMethod:sel];
}

void classForwardFunc(id self1, SEL _cmd1) {
    NSLog(@"类消息转发成功");
}
classMethodTest在self 中是没有定义的,如果我们强行调用,会提示警报,并且运行会crash. 如果重写 resolveClassMethod ,会先进入这个方法中,我们在这里进行 IMP的添加替换,注意这里操作的对象是self的元类, 因为在OC的内存布局中,元类中存放静态方法。如果这里不进行转发,接下来程序将回崩溃。
对于- 方法有所不同,它有三次机会进行消息的转发。第一种有点类似的,- 方法也有一个方法用于替换IMP的。
// runtime中的消息
- (void)testTwo{
    //我们随便发送一个没有定义过的方法
    [self performSelector:@selector(instanceMethodTest)];
    // [[self class] performSelector:@selector(classMethodTest)];
}

+ (BOOL)resolveInstanceMethod:(SEL)sel{
//针对实例方法

//  1.
    class_addMethod([self class], NSSelectorFromString(@"instanceMethodTest"), (IMP)instanceForwardFunc,"V@:" );
    return [super resolveInstanceMethod:sel];

//  2.
    //同样可以使用block方法得到IMP 进行转发
    methodBlock ablock = ^{
        NSLog(@"使用 block的 IMP 接到消息的转发");
    };
    IMP amethod = imp_implementationWithBlock(ablock);
    class_addMethod(objc_getMetaClass([NSStringFromClass([self class]) UTF8String]), NSSelectorFromString(@"instanceMethodTest"), amethod,"V@:" );
    return [super resolveClassMethod:sel];
}

void instanceForwardFunc(id self1, SEL _cmd1) {
    NSLog(@"对象消息转发成功");
}
跟+方法很类似的。
第二种情况 ,替换消息发送者转发。 如果self 中没有对应的方法,除了替换IMP达到转发的目的,替换self也是可以的。这个动作将在下面的方法中实现。
//  这是消息发送者转发阶段
-(id)forwardingTargetForSelector:(SEL)aSelector{
    NSLog(@"FlyElephant-http://www.cnblogs.com/xiaofeixiang/");
    NSLog(@"forwardingTargetForSelector");
    if (aSelector == @selector(instanceMethodTest)) { //对象方法
        return [[Other alloc] init];
    }return self;
}
@interface Other : NSObject

- (void)instanceMethodTest;
@end

@implementation Other
- (void)instanceMethodTest{

    NSLog(@"更换对象转发  对象 消息成功");
}
@end
如果前面两种情况我们都没有使用,苹果还提供了一种方式用语转发: 完整转发! 意思就是将IMP和self都替换掉。 看下面的代码。
//如果第二种情况还是没有转发  第三种情况 整体转发
- (NSMethodSignature*)methodSignatureForSelector:(SEL)selector
{   // 返回一个签名
    // 只有包含了selector方法的对象的签名才是有效的
    //用另一个实现了seletor的对象 创建si。
    Another *another = [[Another alloc] init];

    NSMethodSignature * si = [another methodSignatureForSelector:selector];
    if(si){
        return si;
    }
    return [super methodSignatureForSelector:selector];
}

- (void)forwardInvocation:(NSInvocation *)anInvocation{


    [anInvocation setSelector:anInvocation.selector];
    //这里有点小技巧, 这里的 selector 是可以更改的,只需要确保another的method list包含这个selecor
//    比如:
    [anInvocation setSelector:NSSelectorFromString(@"anotherFunc")];

    [anInvocation invokeWithTarget:[[Another alloc] init]];

}
@interface Another : NSObject
- (void)instanceMethodTest;
- (void)anotherFunc;

@end

@implementation Another
- (void)instanceMethodTest{
    NSLog(@"更换对象转发  对象 消息成功   Another对象");
}
- (void)anotherFunc{
    NSLog(@"消息转发 同时更改方法名字  Another对象");
}


@end
如果将Another的所有的方法都使用这种方式转发,包括它的属性的set和get,那么就做到类似于继承的效果。 再者,对于多个类做到同样的效果, 就有了OC的多继承实现了。
七、如何替换一个已有的方法的实现。
替换一个已有的方法的实现,使用继承加上重写就可以做到,但是我今天来说下使用runtime做到不继承的情况下,实现方法实现的替换。也就是大名鼎鼎的 method swizzling的做法。
首先我们来看看metodSwizzling的原理是什么。
在runtime中,method 的结构体大概是这样的。
typedef struct objc_ method {
SEL method_name; 方法名 SEL
char *method_types; 方法类型, 包括了参数和返回值类型 通过method_getTypeEncoding获得
IMP method_imp; 方法实现的函数指针 IMP
};
在runtime中有几个API:
- IMP method_getImplementation(Method m) //获取某个方法的函数的实现
- IMP method_setImplementation(Method m, IMP imp) //设置某个方法的函数的实现
- void method_exchangeImplementations(Method m1, Method m2) //改变某个方法的函数的实现
- Method class_getInstanceMethod(Class cls, SEL name) //通过方法名获取 method
// runtime的方法交换
- (void)testThree{

    Method methodA = class_getInstanceMethod([self class], NSSelectorFromString(@"funcA"));
    Method methodB = class_getInstanceMethod([self class], NSSelectorFromString(@"funcB"));

    IMP impA = method_getImplementation(methodA);
    IMP impB = method_getImplementation(methodB);

    method_setImplementation(methodA, impB);
    method_setImplementation(methodB, impA);

    if([self funcA]){
        NSLog(@"执行了 方法A");
    }

    if([self funcB]){
        NSLog(@"执行了 方法B");
    }
}

//定义方法A
- (BOOL)funcA{

    NSLog( @"我是方法A");
    return YES;
}

//定义方法B
- (BOOL)funcB{

    NSLog( @"我是方法B");
    return YES;
}
打印:
2017-05-12 11:11:35.595 runtimeTest[3072:90675] 我是方法B
2017-05-12 11:11:35.595 runtimeTest[3072:90675] 执行了方法A
2017-05-12 11:11:35.595 runtimeTest[3072:90675] 我是方法A
2017-05-12 11:11:35.595 runtimeTest[3072:90675] 执行了方法B
方法被交换。
如果使用的 method_exchangeImplementations 也是等效的 ,代码如下:
  Method methodA = class_getInstanceMethod([self class], NSSelectorFromString(@"funcA"));
    Method methodB = class_getInstanceMethod([self class], NSSelectorFromString(@"funcB"));

//    IMP impA = method_getImplementation(methodA);
//    IMP impB = method_getImplementation(methodB);

//    method_setImplementation(methodA, impB);
//    method_setImplementation(methodB, impA);

    //使用 method_exchangeImplementations 等效
    method_exchangeImplementations(methodA, methodB);


    if([self funcA]){
        NSLog(@"执行了 方法A");
    }

    if([self funcB]){
        NSLog(@"执行了 方法B");
    }
仔细想想,这个方式的作用非常有效,我们如果需要替换某个系统的方法的时候,盲目的重写可能带来无法预知的后果,并且维护起来也很困难。 使用方法替换可做到一次替换,一直有效,并可在局部进行。 正常情况下,我们会在
+(void)load{

 //执行替换

}
替换方法,原因是,再不主动调用的情况下,load只会执行一次,并且不会收到超类或者类别的影响。 当然为了防止程序员手动调用,执行了过多次数的替换,可以把替换的代码使用 GCD 的oncetime_t中扩写。这样保证了绝对的一次调用。(偶数次的调用会回到没有替换的状态)。
以上的代码在https://github.com/lufubinGit/runtimeTest上
相关链接:
http://www.cnblogs.com/ioshe/p/5489086.html