Apache Httpd 2.2 实现https加密通讯
实际生产中CA证书一般是向一些专业认证的国际机构来进行申请的。我们会模拟使用OpenSSL生成的证书,来实现Apache的安全加密通讯,这与实际生产中是类似的。
实验环境准备
主机A:172.16.0.57-------->httpd服务器
主机B:172.16.0.58--------->CA openssl
接下来,我们分两个部分进行,在主机B上搭建CA证书环境,然后在主机A上配置证书环境。
主机B上搭建CA证书环境
CA证书环境中,私钥的名称以及存放路径,还有证书的名称和存放路径都是有一定规则的,所以,如果不明白的话,可以查看/etc/pki/tls/openssl.cnf 文件
1、构建私钥文件
[root@localhost ~]#(umask 066;openssl genrsa -out /etc/pki/CA/private/cakey.pem  2048 )
Generating RSA private key, 2048 bit long modulus
.............................................+++
.........................+++
e is 65537 (0x10001)
2、根据私钥文件,创建自签名的根CA证书
证书的名字必须是cacert.pem ,而且存放路径必须是/etc/pki/CA/cacert.pem
[root@localhost ~]#openssl req -new -x509 -key  /etc/pki/CA/private/cakey.pem -days 7300 -out  /etc/pki/CA/cacert.pem
You are about to be asked to enter information that will be incorporated
into your certificate request.
What you are about to enter is what is called a Distinguished Name or a DN.
There are quite a few fields but you can leave some blank
For some fields there will be a default value,
If you enter '.', the field will be left blank.
-----
Country Name (2 letter code) [XX]:CN
State or Province Name (full name) []:shandong
Locality Name (eg, city) [Default City]:qingdao
Organization Name (eg, company) [Default Company Ltd]:pojun.tech
Organizational Unit Name (eg, section) []:Opt
Common Name (eg, your name or your server's hostname) []:ca.pojun.tech
Email Address []:
3、此时如果我们去查看证书的内容话,是可以查看我们刚刚指定的这些信息的。
[root@localhost ~]#openssl x509 -in /etc/pki/CA/cacert.pem -noout -text
Certificate:
    Data:
        Version: 3 (0x2)
        Serial Number: 17076170100312404196 (0xecfabe3b994470e4)
    Signature Algorithm: sha256WithRSAEncryption
        Issuer: C=CN, ST=shandong, L=qingdao, O=pojun.tech, OU=Opt, CN=ca.pojun.tech
        Validity
            Not Before: Sep 29 03:40:10 2017 GMT
            Not After : Sep 24 03:40:10 2037 GMT
        Subject: C=CN, ST=shandong, L=qingdao, O=pojun.tech, OU=Opt, CN=ca.pojun.tech
    *******************省略了公钥和签名信息*************************
3、创建颁发证书必须的两个文件
如果不提前创建这两个文件,那么在生成证书的过程中会出现错误。
我们将文件创建在配置文件中指定的路径下面。
touch /etc/pki/CA/index.txt

 echo 01 > /etc/pki/CA/serial
在主机A上申请证书
1、首先安装mod_ssl动态模块
首先在主机A上安装mod_ssl 模块 ,然后我们来查看一下这个模块里面都包含哪些内容
[root@CentOS6 ~]$rpm -ql mod_ssl
/etc/httpd/conf.d/ssl.conf  # 配置文件
/usr/lib64/httpd/modules/mod_ssl.so  # Apache 动态模块
/var/cache/mod_ssl
/var/cache/mod_ssl/scache.dir
/var/cache/mod_ssl/scache.pag
/var/cache/mod_ssl/scache.sem
2、生成私钥文件
因为私钥文件是给Web服务器来使用的,所以私钥文件可以存放在web服务器的配置目录下。这样方便管理 。
# 首先创建一个目录用来管理生成的私钥和证书请求文件,可根据自己的实际情况而定
[root@centos6 ~]$ mkdir /etc/httpd/conf.d/ssl

# 生成自己的私钥文件
[root@centos6 ~]$(umask 066; openssl genrsa -out /etc/httpd/conf.d/ssl/httpd.key 1024)
Generating RSA private key, 1024 bit long modulus
.++++++
...++++++
e is 65537 (0x10001)
3、生成证书请求文件
生成自己的证书请求文件,这里的请求文件是要传给主机B(根CA)来申请证书的。其中的域名采用了范域名解析。
也就是说,当我们把所有的环境配置结束之后,就应该使用https://*.a.com的方式来访问网站,这样话,服务器就会自动采用加密的方式来处理我们的请求。
# 生成自己的证书申请文件,以 .csr 结尾的文件。
[root@centos6 ssl]$openssl req -new -key /etc/httpd/conf.d/ssl/httpd.key -out /etc/httpd/conf.d/ssl/httpd.csr
You are about to be asked to enter information that will be incorporated
into your certificate request.
What you are about to enter is what is called a Distinguished Name or a DN.
There are quite a few fields but you can leave some blank
For some fields there will be a default value,
If you enter '.', the field will be left blank.
-----
Country Name (2 letter code) [XX]:CN
State or Province Name (full name) []:shandong
Locality Name (eg, city) [Default City]:yantai
Organization Name (eg, company) [Default Company Ltd]:pojun.tech
Organizational Unit Name (eg, section) []:opt
Common Name (eg, your name or your server's hostname) []:*.a.com
Email Address []:

Please enter the following 'extra' attributes
to be sent with your certificate request
A challenge password []:
An optional company name []:
4、将证书请求文件发送给证书颁发机构(主机B)
我们需要将证书请求文件发送给证书颁发机构。
[root@centos6 ssl]$scp /etc/httpd/conf.d/ssl/httpd.csr  172.18.2.77:/etc/pki/CA/
root@172.18.2.77's password:
httpd.csr                                        100%  647     0.6KB/s   00:00
5、在根CA(主机B)颁发证书
我们需要将证书请求文件发送给证书颁发机构。
# 根据主机A提交的证书申请内容,生成证书
[root@localhost ~]#openssl ca -in /etc/pki/CA/httpd.csr -out /etc/pki/CA/certs/httpd.crt -days 365
*****************中间省略了输出信息***********************
将生成的证书文件颁发给申请者(主机A)
#  前面我们说过,证书文件都存放在/etc/httpd/conf.d/ssl/目录下
[root@localhost ~]#scp  /etc/pki/CA/certs/httpd.crt  172.18.2.66:/etc/httpd/conf.d/ssl/
The authenticity of host '172.18.2.66 (172.18.2.66)' can't be established.
RSA key fingerprint is 00:c0:e5:a6:39:e9:a7:bb:1b:f4:ab:0d:75:9b:38:b0.
Are you sure you want to continue connecting (yes/no)? yes
Warning: Permanently added '172.18.2.66' (RSA) to the list of known hosts.
root@172.18.2.66's password:
httpd.crt                                         100% 3714     3.6KB/s   00:00
同时将根CA的证书也发送给Web服务器(主机A)。这一点很重要。
[root@localhost ~]#scp  /etc/pki/CA/cacert.pem   172.18.2.66:/etc/httpd/conf.d/ssl/
root@172.18.2.66's password:
cacert.pem                                   100% 1334     1.3KB/s   00:00
在主机A上配置Web服务器
首先配置Web服务器的私钥文件和证书文件,编辑”/etc/httpd/conf.d/ssl.conf”
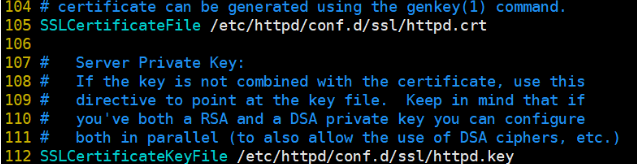
然后将根CA的证书路径,配置在配置文件中。

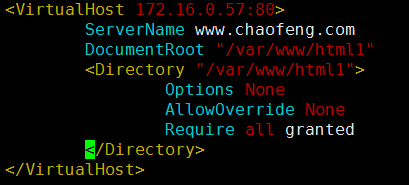
配置虚拟机主机站点
在/etc/httpd/conf.d/目录下创建一个以.conf结尾的文件,并写上:
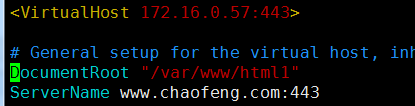
在ssl.conf文件中进行配置:
我这里是在windows系统上操作的,需要在windows的hosts文件中添加ip映射才可以

接下来在浏览器中添加根证书
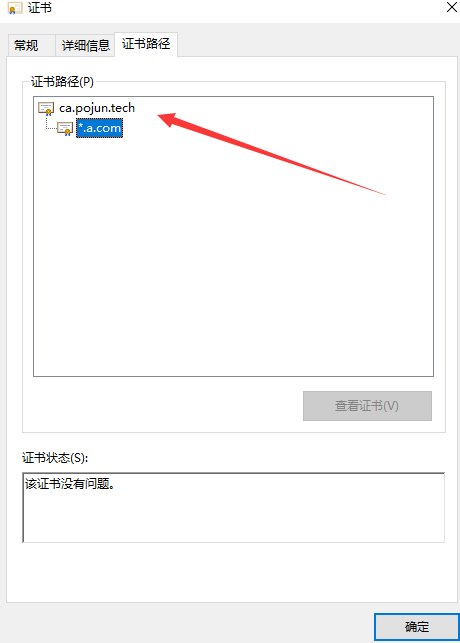
最后我们来访问一下:

好了,这样子就配置成功了。