网上大多数博客讲的xfs分区扩容都是基于LVM逻辑管理的,但是我这里有一块磁盘/dev/sdb,大小只有50G,格式化的xfs文件系统,但是现在想扩容到100G大小,所以可以这样做:
首先看一下当前/dev/sdb磁盘
[root@localhost ~]# df -Th
Filesystem              Type      Size  Used Avail Use% Mounted on
devtmpfs                devtmpfs  1.2G     0  1.2G   0% /dev
tmpfs                   tmpfs     1.2G     0  1.2G   0% /dev/shm
tmpfs                   tmpfs     1.2G  9.3M  1.2G   1% /run
tmpfs                   tmpfs     1.2G     0  1.2G   0% /sys/fs/cgroup
/dev/mapper/centos-root xfs        22G  1.5G   21G   7% /
/dev/sda1               xfs      1014M  186M  829M  19% /boot
tmpfs                   tmpfs     234M     0  234M   0% /run/user/0
/dev/sdb1               xfs        50G   33M   50G   1% /data
[root@localhost ~]# cat /data/haha/a.txt
abcdefg
hijklmn
opqrstu
vwxyz
其中/dev/sdb1分区有大小50G的空间,已经全部被格式化为xfs文件系统并挂载到/data目录下了。并且该目录下面有存储的文件a.txt。现在要扩容到100G的空间。
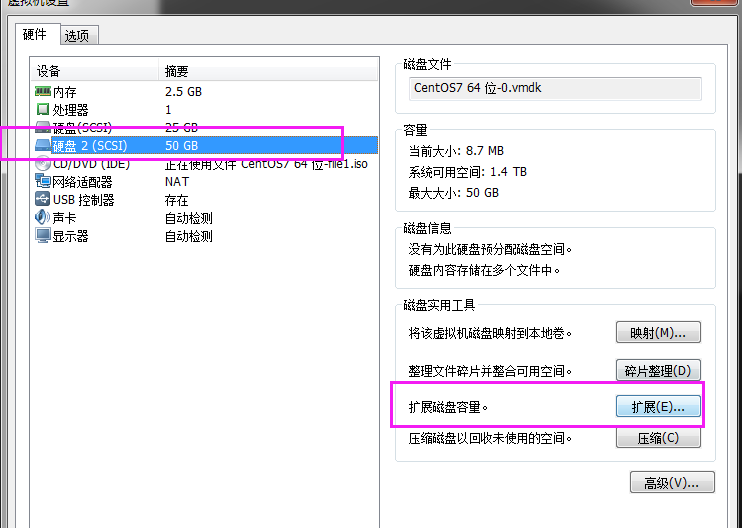
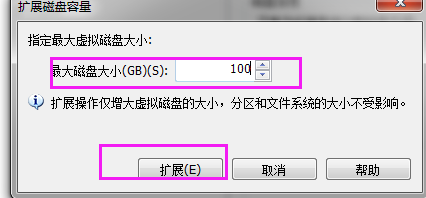
1、首先是vmware磁盘扩容
把虚拟机关机,然后点击扩容
整好之后开机后进行一波操作
2、查看当前系统的磁盘
[root@localhost ~]# lsblk
NAME            MAJ:MIN RM  SIZE RO TYPE MOUNTPOINT
fd0               2:0    1    4K  0 disk
sda               8:0    0   25G  0 disk
├─sda1            8:1    0    1G  0 part /boot
└─sda2            8:2    0   24G  0 part
  ├─centos-root 253:0    0 21.5G  0 lvm  /
  └─centos-swap 253:1    0  2.5G  0 lvm  [SWAP]
sdb               8:16   0  100G  0 disk
└─sdb1            8:17   0   50G  0 part
sr0              11:0    1  4.2G  0 rom
发现磁盘并没有扩大,继续往下
3、卸载之前的数据盘
注意:一定要提前备份好数据
umount /data
4、fdisk命令扩容
[root@localhost ~]# fdisk /dev/sdb
Welcome to fdisk (util-linux 2.23.2).

Changes will remain in memory only, until you decide to write them.
Be careful before using the write command.


Command (m for help): p                                                                                #打印当前分区

Disk /dev/sdb: 107.4 GB, 107374182400 bytes, 209715200 sectors
Units = sectors of 1 * 512 = 512 bytes
Sector size (logical/physical): 512 bytes / 512 bytes
I/O size (minimum/optimal): 512 bytes / 512 bytes
Disk label type: dos
Disk identifier: 0xf9cd0df5

   Device Boot      Start         End      Blocks   Id  System
/dev/sdb1            2048   104857599    52427776   83  Linux

Command (m for help): d                                                                               #删除分区,但是接下来千万不要保存
Selected partition 1
Partition 1 is deleted

Command (m for help): n                                                                               #开始创建新分区/dev/sdb1
Partition type:
   p   primary (0 primary, 0 extended, 4 free)
   e   extended
Select (default p):                                                                                     #一路回车即可
Using default response p
Partition number (1-4, default 1):
First sector (2048-209715199, default 2048):
Using default value 2048
Last sector, +sectors or +size{K,M,G} (2048-209715199, default 209715199):
Using default value 209715199
Partition 1 of type Linux and of size 100 GiB is set                                                      #现在已经是100G空间了

Command (m for help): w                                                                                #保存分区并退出
The partition table has been altered!

Calling ioctl() to re-read partition table.
Syncing disks.
5、修复分区
[root@localhost ~]# xfs_repair /dev/sdb1
Phase 1 - find and verify superblock...
Phase 2 - using internal log
        - zero log...
        - scan filesystem freespace and inode maps...
        - found root inode chunk
Phase 3 - for each AG...
        - scan and clear agi unlinked lists...
        - process known inodes and perform inode discovery...
        - agno = 0
        - agno = 1
        - agno = 2
        - agno = 3
        - process newly discovered inodes...
Phase 4 - check for duplicate blocks...
        - setting up duplicate extent list...
        - check for inodes claiming duplicate blocks...
        - agno = 0
        - agno = 1
        - agno = 2
        - agno = 3
Phase 5 - rebuild AG headers and trees...
        - reset superblock...
Phase 6 - check inode connectivity...
        - resetting contents of realtime bitmap and summary inodes
        - traversing filesystem ...
        - traversal finished ...
        - moving disconnected inodes to lost+found ...
Phase 7 - verify and correct link counts...
done
6、重新挂载磁盘
mount /dev/sdb1 /data
7、扩容磁盘
[root@localhost ~]# xfs_growfs /dev/sdb1
meta-data=/dev/sdb1              isize=512    agcount=4, agsize=3276736 blks
         =                       sectsz=512   attr=2, projid32bit=1
         =                       crc=1        finobt=0 spinodes=0
data     =                       bsize=4096   blocks=13106944, imaxpct=25
         =                       sunit=0      swidth=0 blks
naming   =version 2              bsize=4096   ascii-ci=0 ftype=1
log      =internal               bsize=4096   blocks=6399, version=2
         =                       sectsz=512   sunit=0 blks, lazy-count=1
realtime =none                   extsz=4096   blocks=0, rtextents=0
data blocks changed from 13106944 to 26214144
看到最后一行data blocks changed from 13106944 to 26214144就表示扩容了
7、再次查看分区大小
[root@localhost ~]# lsblk
NAME            MAJ:MIN RM  SIZE RO TYPE MOUNTPOINT
fd0               2:0    1    4K  0 disk
sda               8:0    0   25G  0 disk
├─sda1            8:1    0    1G  0 part /boot
└─sda2            8:2    0   24G  0 part
  ├─centos-root 253:0    0 21.5G  0 lvm  /
  └─centos-swap 253:1    0  2.5G  0 lvm  [SWAP]
sdb               8:16   0  100G  0 disk
└─sdb1            8:17   0  100G  0 part /data
sr0              11:0    1  4.2G  0 rom
成功了
建议:虽然测试过程中原有的磁盘的数据没有被毁坏,但是仍然强烈建议提前备份好原有数据