转自(http://blog.csdn.net/wenmang1977/article/details/7733685)
序
前些天想写一下制作安装程序,由于要写的内容比较多,一拖再拖,不过坚持就是胜利,今天终于写完了。
1概述
做应用软件制作安装程序是很必要的一件事情,本文主要介绍使用VS2010自带的打包组建来开发一个安装程序,用一个例子的形式一步一步的叙述其中的一些技巧。
2基本的安装
2.1HelloWorld
为了有一个安装的目标,使用VS2010创建一个HelloWorld的C# Windows Forms Application工程,Solution的名称也为HelloWorld,由于我所在项目的目标平台为x64,所以将HelloWorld编译为x64。
2.2MyInstaller
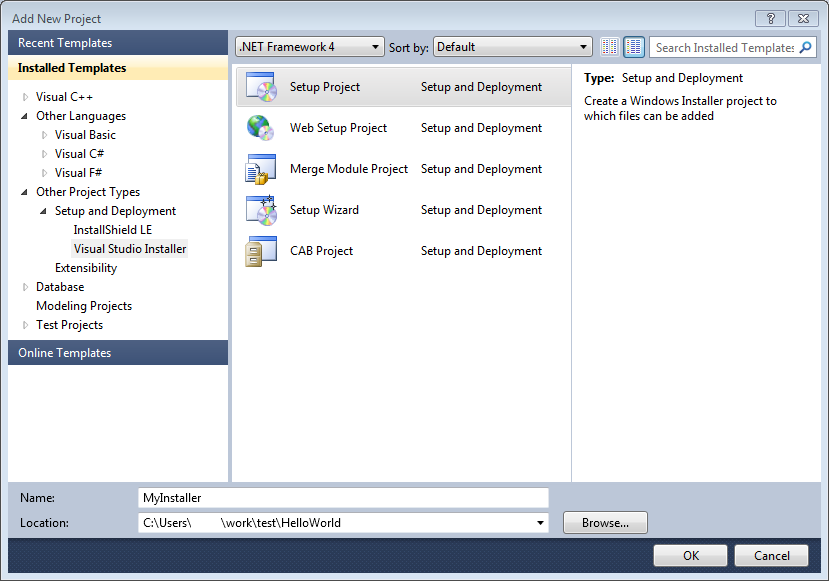
在HelloWorld Solution中加入一个新的VS Installer工程,命名为MyInstaller如下图:
左键单击MyInstaller工程在打开的Properties中简单进行一下设置,由于我所在的项目目标平台为x64所以TargetPlatform选择x64,如下图:

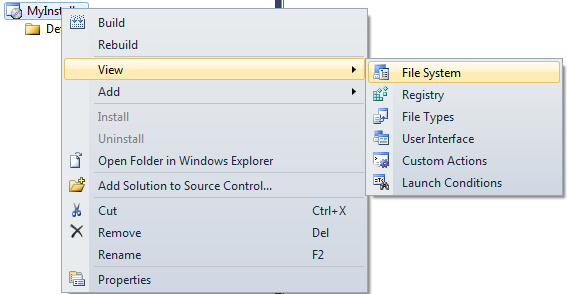
通过MyInstaller工程的右键菜单我们可以看到VS Installer为我们提供了File System、Registry、File Types等几个视图:
在File System视图中设置目标机中的安装位置及需要创建的目录结构,其中Application Folder是程序在目标机的安装位置,我们在Application Folder下创建一个bin目录和一个data目录,在bin目录中加入一个File,选择HelloWorld.exe。User’s Programs Menu是安装程序的系统菜单项,我们在之下创建一个HelloWorld目录,并在其中加入一个Shortcut,并选择HelloWorld.exe,完成后大体结构如下图:

打开Register视图在注册表中再写些东西,大体如图:

这样一个简单的安装程序就做成了,编译并进行安装,则相应的快捷方式,注册表将会依据设置进行创建。
在编译的时候经常会遇到类似于下面“ERROR: Build could not create 'C:Usersxxx work estHelloWorldx64DebugMyInstaller.tmp' 'The Windows Installer service failed to start. Contact your support personnel.'”的错误,这个错误比较折磨人,不是代码的问题但是影响工作,可以尝试几种方法进行解决:
1, Build->Clean Solution,然后重新编译
2, 删除Debug目录下所有文件,然后重新编译
3, 重新启动VS2010后重新编译
4, 更改Debug目录的属性去掉只读,然后重新编译(这个方法很好用)
3Custom Action
3.1Custom Action Library
有很多时候我们需要安装程序做更多的事情,例如依据用户的一些选择创建文件夹或者配置文件等,这样我们就需要使用Custom Action了,不明思议就是定制的一些操作。我们在HelloWorld Solution中Add一个新C# Class Library工程,如下:
在Custom Action工程中加入一个Installer Class,可以看到MyHelloWorldInstaller类继承至Installer,我们可以重写Installer中的函数来达到定制化的一些目的。
我们的目的是在安装的时候在data目录中创建一个配置文件,这样我们需要override一下Install函数,这个函数在安装时将被安装程序调用,并且能够传入一些安装信息,代码如下:
publicoverridevoid Install(IDictionary stateSaver)
{
base.Install(stateSaver);
strInstallPath = this.Context.Parameters["path"];
FileStream fs = newFileStream(strInstallPath+@"datahello.txt",FileMode.OpenOrCreate);
StreamWriter fw = newStreamWriter(fs);
fw.WriteLine("my test string");
fw.Close();
fs.Close();
}
3.2Installer设置
Custom Action准备好之后,需要安装程序进行一些设置将安装程序和Custom Action关联起来,右键单击MyInstaller工程,然后Add->Project Output… 选择MyCustomAction Project和Primary output,点击OK完成,如图:

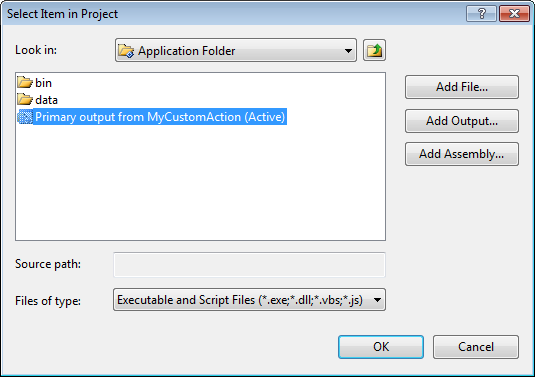
打开MyInstaller的Custom Actions视图,选择Install->Add Custom Actions…,在Application Folder中选择Primary output from MyCustomAction:
为了把安装路径传入CustomAction需要设置一下Action属性中的CustomActionData,具体如下图:

再重新编译MyInstaller并进行安装,这样就会在安装目录的data目录下发现一个hello.txt文件。
4Shell Extension
有些时候我们还需要更近一步,让我们的程序能够关联到Windows系统菜单中,像winzip等软件一样,单纯的使用注册表就不能满足这个要求了,我们需要使用ShellExtension技术来完成。
关于如何进行ShellExtension编程可以参考http://www.codeproject.com/Articles/441/The-Complete-Idiot-s-Guide-to-Writing-Shell-Extens,这里介绍的C++版本的,由于我们使用的是C#,所以希望这里也使用C#,关于C#如何实现可以参考http://1code.codeplex.com/wikipage?title=WinShell。
下面我们就在之前例子上在系统右键菜单中加入我们自己的菜单。首先下载参考中的ShellExt.zip工程,找到其中的ShellExtLib.cs和FileContextMenuExt.cs加到MyCustomAction中,ShellExtLib.cs主要把ShellExtension的C++接口映射为C#,FileContextMenuExt.cs是实现类,功能代码放到这里。在QueryContextMenu中加入菜单的生成代码,在InvokeCommand中加入消息响应代码,在Register和Unregister中分别加入菜单关联的注册代码。然后需要在Install函数中加入COM的注册代码,如下:
publicoverridevoid Install(IDictionary stateSaver)
{
base.Install(stateSaver);
strInstallPath = this.Context.Parameters["path"];
FileStream fs = newFileStream(strInstallPath+@"datahello.txt",FileMode.OpenOrCreate);
StreamWriter fw = newStreamWriter(fs);
fw.WriteLine("my test string");
fw.Close();
fs.Close();
//Shell Ext for context menu
// Call RegistrationServices.RegisterAssembly to register the classes in
// the current managed assembly to enable creation from COM.
RegistrationServices regService = newRegistrationServices();
regService.RegisterAssembly(this.GetType().Assembly,AssemblyRegistrationFlags.SetCodeBase);
}
有注册就需要卸载,我们重载一下Uninstall函数,代码如下:
publicoverridevoid Uninstall(IDictionary savedState)
{
base.Uninstall(savedState);
//Shell Ext
// Call RegistrationServices.UnregisterAssembly to unregister the classes
// in the current managed assembly.
RegistrationServices regService = newRegistrationServices();
regService.UnregisterAssembly(this.GetType().Assembly);
}
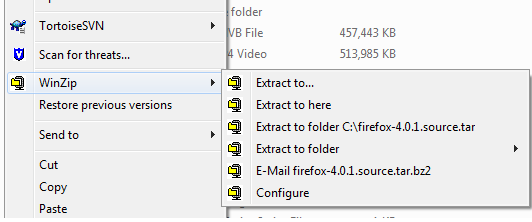
为了Uninstall被调用需要在MyInstaller工程的Custom Actions视图中的Uninstall加入一个Action与之前的Install相同。由于x64位系统注册需要一些特殊的处理,不过这个在ShellExt的例子中也已经实现了,只要把Fix64bitInstallUtilLib.js和InstallUtilLib.dll拷贝到MyInstaller目录,然后在工程属性的PostBuildEvent中加入"$(ProjectDir)Fix64bitInstallUtilLib.js" "$(BuiltOuputPath)" "$(ProjectDir)" ,编译并进行安装。则在.cs文件的右键菜单中加入了一项,如图:

这个例子只是给出了一个创建一级菜单的代码,像Winzip这种是一个Popupmenu,需要使用CreatePopupMenu API,在HelloWorld的例子中我已经引入了这个API,其他的就和Win32编程创建菜单相同了。
5定制安装界面
通过User Interface视图的Add Dialog我们可以看到系统为我们提供了一些安装过程中能够使用的对话框,如图:
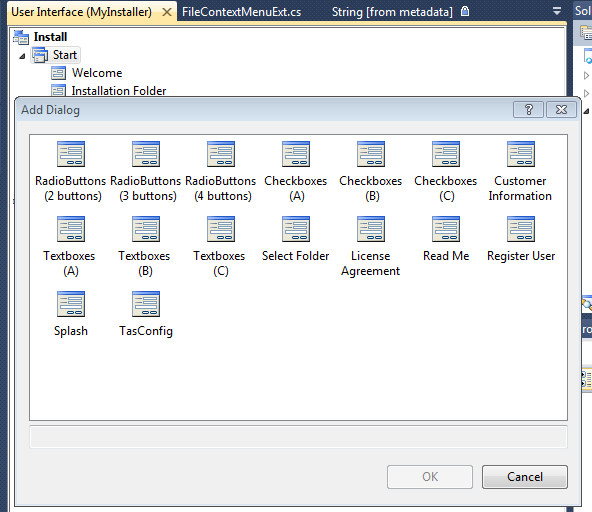
这些对话框比较有限,而且界面的元素都是固定的,有些时候我们需要定制一些安装界面,这个需求可以通过Orca这个工具来完成,可以通过Orca打开想应该Dialog的.wid文件进行修改,wid文件一般在VS的安装目录下,我的机器在如下目录中Microsoft Visual Studio 10.0Common7ToolsDeploymentVsdDialogs1033。使用Orca修改Dialog也不是很方便,容易出现问题,关于Orca这里就不介绍了,可以参考网上的其他文档。
6Launch Condition
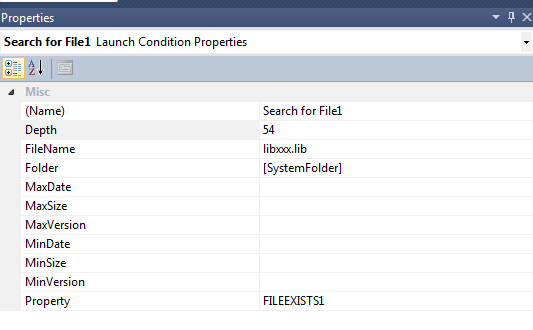
有些时候我们的软件需要依赖于其他的一些库或者其他的软件才可以运行,如果Installer不能够自动检测出来就需要我们手动的添加一些安装条件。例如我们的软件依赖于libxxx.lib文件才可以运行,如何检测这个文件在系统中是否存在哪?打开MyInstaller的Launch Conditions视图,在Search Target Machine中Add File Search,其属性设置如图:
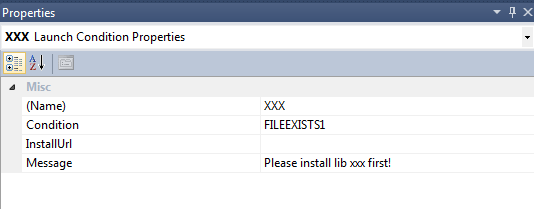
然后在Launch Conditions中加入一个XXX的Launch Condition,其属性设置如图:
就写到这里吧,虽然VS上自带的安装程序制作组件不十分强大,但是也能够满足我们日常的需要。
例子