前言
spring-boot 支持多种模版引擎包括:
1,FreeMarker
2,Groovy
3,Thymeleaf (Spring 官网使用这个)
4,Velocity
5,JSP (貌似Spring Boot官方不推荐,STS创建的项目会在src/main/resources 下有个templates 目录,这里就是让我们放模版文件的,然后并没有生成诸如 SpringMVC 中的webapp目录)
小项目
1. 导入依赖
<!-- web支持: 1、web mvc; 2、restful; 3、jackjson支持; 4、aop ... -->
<dependency>
    <groupId>org.springframework.boot</groupId>
     <artifactId>spring-boot-starter-web</artifactId>
</dependency>

<!-- FreeeMarker模板引擎所需依赖 -->
<dependency>
     <groupId>org.springframework.boot</groupId>
      <artifactId>spring-boot-starter-freemarker</artifactId>
</dependency>
2.配置 application.properties
# FreeeMarker 模板引擎配置

#指定HttpServletRequest的属性是否可以覆盖controller的model的同名项
spring.freemarker.allow-request-override=false
#是否开启template caching.
spring.freemarker.cache=false
#是否检查templates路径是否存在.
spring.freemarker.check-template-location=true
spring.freemarker.charset=UTF-8
spring.freemarker.content-type=text/html
# 设定所有request的属性在merge到模板的时候,是否要都添加到model中.
spring.freemarker.expose-request-attributes=false
# 设定所有HttpSession的属性在merge到模板的时候,是否要都添加到model中.
spring.freemarker.expose-session-attributes=false
#设定是否以springMacroRequestContext的形式暴露RequestContext给Spring’s macro library使用
spring.freemarker.expose-spring-macro-helpers=false
#spring.freemarker.request-context-attribute=
#spring.freemarker.settings.*=
#设定模板的前缀.
#spring.freemarker.prefix=
#设定模板的后缀.
spring.freemarker.suffix=.ftl
#设定模板的加载路径,多个以逗号分隔,默认: [“classpath:/templates/”]
spring.freemarker.template-loader-path=classpath:/templates/
#spring.freemarker.view-names= # whitelist of view names that can be resolved
3.模板页面(HTML或FTL)
<!DOCTYPE html>
<html xmlns="http://www.w3.org/1999/xhtml" xmlns:th="http://www.thymeleaf.org"
             xmlns:sec="http://www.thymeleaf.org/thymeleaf-extras-springsecurity3">
<head>
    <title>Hello World!</title>
</head>
<body>
    Hello : ${msg}
</body>
</html>
4.编写controller类,跳转页面
@Controller
public class WebController {
    @RequestMapping("/index")
    public String index(Model model){
        model.addAttribute("msg", "后台传的数据...");
        return "index";
    }
}

或

@RestController //@RestController=@Controller+@ResponseBody 官方推荐使用
public class WebController2 {

    @RequestMapping("/index2")
    public ModelAndView index(Model model){
        model.addAttribute("msg", "后台传的数据...");
        return new ModelAndView("index");
    }

}
5.编写启动类
@SpringBootApplication
public class WebApplication {
    public static void main(String[] args) {
        SpringApplication.run(WebApplication.class);
    }
}
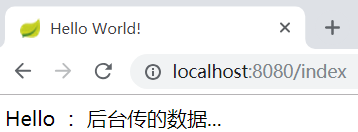
6.运行测试
项目结构

freemaker模板语法:http://freemarker.foofun.cn/index.html