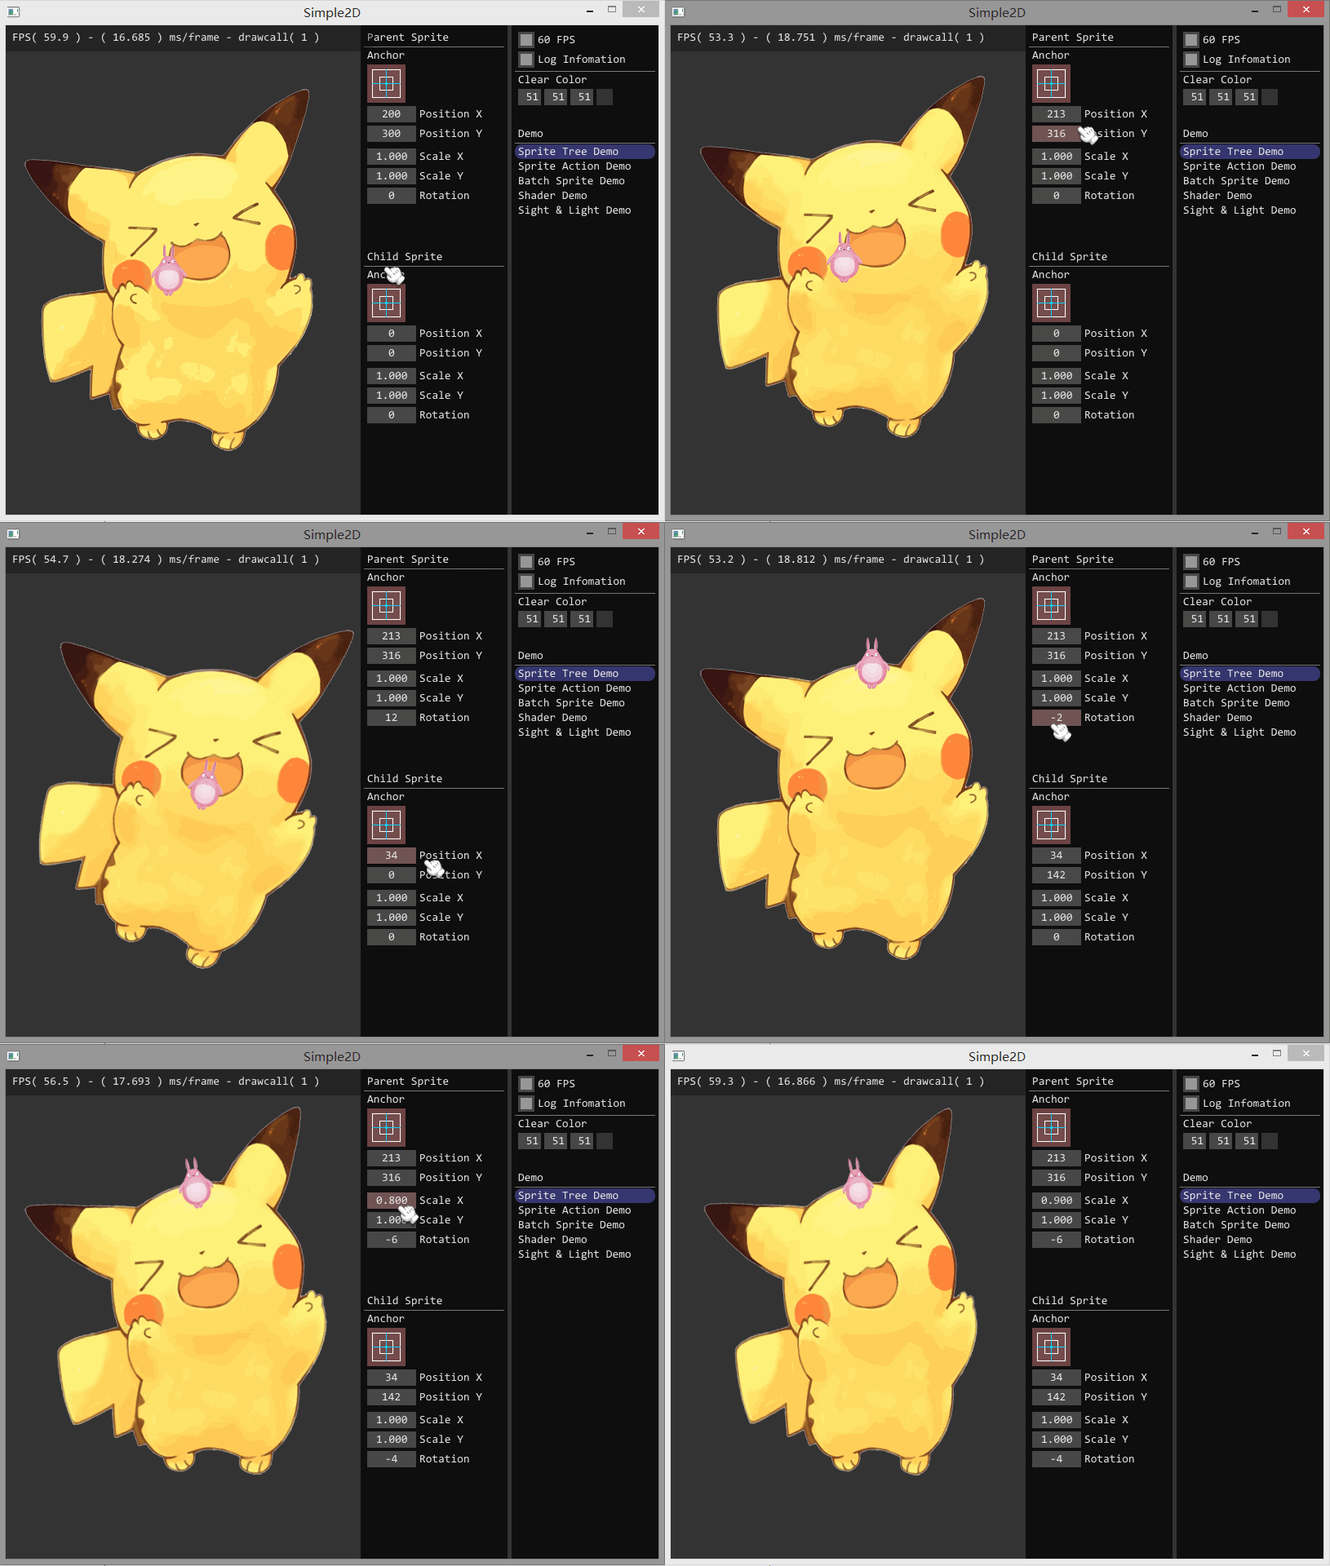
如果要开发游戏,单单使用 Painter 绘制图片会变得十分复杂。如果使用 Sprite 对象进行显示,可以简单地实现图片的位移、旋转和缩放,结合 Action 对象可以实现复杂的动画效果。最重要的是,Sprite 对象间可以存在父子关系,子 Sprite 的仿变换回受到父 Sprite 的影响。

实现
RectTransform 是节点对象,RectTransform 间可以通过 SetParent( ) 函数来组成结点树,使用 Visit( ) 函数来递归遍历子节点,再通过 Draw( ) 函数来执行渲染的操作,从而实现整颗渲染树的渲染。
    void RectTransform::Visit(GraphicsContext* gc)
    {
        if ( !bVisible ) return;

        this->UpdateTransform();
        this->Draw(gc);

        for ( auto& ele : vChildList ) {
            ele->Visit(gc);
        }
    }

    void RectTransform::Draw(GraphicsContext* gc)
    {
        // Nothing to do
    }
其中,RectTransform 有一个十分重要的属性:
Matrix4 mMatrix;
这是一个 4 x 4 的变换矩阵,用于实现精灵的位移、旋转和缩放变换。为什么不使用 3 个不同的属性来实现精灵的位移、旋转和缩放呢?因为精灵存在父子关系,如动图所示,小的那个精灵对象的位移、旋转和缩放是建立在大精灵的变换之上。使用矩阵就可以简单地将父精灵变换传递给子精灵:
    void RectTransform::UpdateTransform()
    {
        mMatrix = Matrix4::makeTransform(vPosition, Vec3(vScale.x, vScale.y, 1.0), fDegrees);
        if ( pParent ) {
            mMatrix = pParent->mMatrix * mMatrix;
        }
    }
在执行绘制操作前,会进行更新变换的操作,这样确保变换在渲染树中层层传递。
Sprite 的实现
Sprite 继承于 RectTransform,Sprite 只需重写 Draw( ) 函数即可。但由于还存在按钮精灵 ButtonSprite,所以将他们相同的渲染操作放到父类 RenderSprite 中,RenderSprite 只提供渲染操作:
void RenderSprite::RenderTexture(Texture2D* texture, Vec2& size, Matrix4& mat, Color& color, Anchor& anchor, GraphicsContext* gc)
    {
        static Vec2 blPos;
        float w0 = 0, h0 = 0, w1 = size.w, h1 = size.h;
        float w2 = w1 * 0.5f, h2 = h1 * 0.5f;

        switch ( anchor ) {
        case Anchor::Anchor_TopLeft:        blPos.set( w0, -h1); break;
        case Anchor::Anchot_TopCenter:      blPos.set(-w2, -h1); break;
        case Anchor::Anchor_TopRight:       blPos.set(-w1, -h1); break;
        case Anchor::Anchor_CenterLeft:     blPos.set( w0, -h2); break;
        case Anchor::Anchor_Center:         blPos.set(-w2, -h2); break;
        case Anchor::Anchor_CenterRight:    blPos.set(-w1, -h2); break;
        case Anchor::Anchor_BottomLeft:     blPos.set( w0,  h0); break;
        case Anchor::Anchor_BottomCenter:   blPos.set(-w2,  h0); break;
        case Anchor::Anchor_BottomRight:    blPos.set(-w1,  h0); break;
        }

        if ( pProgramEffect ) {
            /* 设置顶点数据 */
            vCustomTexrureVertices[0].position = mat * Vec3(blPos.x + w0, blPos.y + h0, 0);
            vCustomTexrureVertices[1].position = mat * Vec3(blPos.x + w0, blPos.y + h1, 0);
            vCustomTexrureVertices[2].position = mat * Vec3(blPos.x + w1, blPos.y + h1, 0);
            vCustomTexrureVertices[3].position = mat * Vec3(blPos.x + w1, blPos.y + h0, 0);

            vCustomTexrureVertices[0].texcoord = texture->uv[0];
            vCustomTexrureVertices[1].texcoord = texture->uv[1];
            vCustomTexrureVertices[2].texcoord = texture->uv[2];
            vCustomTexrureVertices[3].texcoord = texture->uv[3];

            vCustomTexrureVertices[0].color = color;
            vCustomTexrureVertices[1].color = color;
            vCustomTexrureVertices[2].color = color;
            vCustomTexrureVertices[3].color = color;

            pProgramEffect->GetUniform("Texture0")->SetTexture(texture->textureUnique->id);

            gc->SetProgramEffect(pProgramEffect);
            gc->SetBlendMode(SBM_AlphaTexture);
            gc->GetRenderer()->AppendRenderData(vCustomTexrureVertices, 4, vTextureIndices, 6, PrimType::PT_Triangles);
        }
        else {
            /* 设置顶点数据 */
            vTextureVertices[0].position = mat * Vec3(blPos.x + w0, blPos.y + h0, 0);
            vTextureVertices[1].position = mat * Vec3(blPos.x + w0, blPos.y + h1, 0);
            vTextureVertices[2].position = mat * Vec3(blPos.x + w1, blPos.y + h1, 0);
            vTextureVertices[3].position = mat * Vec3(blPos.x + w1, blPos.y + h0, 0);

            vTextureVertices[0].texcoord = texture->uv[0];
            vTextureVertices[1].texcoord = texture->uv[1];
            vTextureVertices[2].texcoord = texture->uv[2];
            vTextureVertices[3].texcoord = texture->uv[3];

            vTextureVertices[0].color = color;
            vTextureVertices[1].color = color;
            vTextureVertices[2].color = color;
            vTextureVertices[3].color = color;

            gc->SetProgram(SPT_Sprite);
            gc->SetBlendMode(SBM_AlphaTexture);
            gc->GetRenderer()->AppendRenderData(vTextureVertices, 4, vTextureIndices, 6, texture->textureUnique->id, PrimType::PT_Triangles);
        }
    }
计算出图片 4 个顶点,设置着色程序和混合,再将渲染的顶点数据传递给 Renderer 即可。Sprite 的 Draw( ) 函数只需简单的调用 RenderTexture( ) 函数即可:
    void Sprite::Draw(GraphicsContext* gc)
    {
        if ( pTexture == nullptr ) return;
        this->RenderTexture(pTexture, vSize, mMatrix, color, anchor, gc);
    }
ButtonSprite
除了普通的精灵,还需要一些控件精灵。如 ButtonSprite,它能实现按钮的功能,并添加到精灵渲染树中,实现游戏中的交互操作。ButtonSprite 继承于鼠标事件监听器 MouseEventListener,从而接受鼠标事件。但 ButtonSprite 接受到一个点击事件,它先判断点击坐标是否落在 ButtonSprite 的区域内。
思路是将光标坐标变换到坐标原点,在判断坐标是否在 ButtonSprite 大小的区域内:
    bool RectTransform::AccectEvent(int x, int y)
    {
        Vec3 pos(x, y, 0);

        pos = mMatrix.inverse() * pos;
        float hw = vSize.w * 0.5f;
        float hh = vSize.h * 0.5f;

        return (pos.x >= -hw && pos.x <= hw && pos.y >= -hh && pos.y <= hh);
    }
将坐标乘以变换矩阵的逆矩阵得到新的坐标,执行左边变换。如果按钮被点击了,通过信号对象传递点击信息:
Signal<void()> SigButtonClicked;
    void ButtonSprite::MouseReleased(const MouseEvent& event)
    {
        if ( bMousePressed ) {
            bMousePressed = false;

            /* 信号:按钮点击 */
            SigButtonClicked();
        }
    }
Signal-Slot 在前面的文章讲过,通过使用 Signal-Slot 可以实现 ButtonSprite 和其他对象的解耦。
源码下载:Simple2D-20.rar