isinstance和issubclass
isinstance(obj,cls)检查是否obj是否是类 cls 的对象
class Foo(object):
     pass

obj = Foo()

isinstance(obj, Foo)
issubclass(sub, super)检查sub类是否是 super 类的派生类
class Foo(object):
    pass

class Bar(Foo):
    pass

issubclass(Bar, Foo)
反射
1 什么是反射
反射的概念是由Smith在1982年首次提出的,主要是指程序可以访问、检测和修改它本身状态或行为的一种能力(自省)。这一概念的提出很快引发了计算机科学领域关于应用反射性的研究。它首先被程序语言的设计领域所采用,并在Lisp和面向对象方面取得了成绩。
2 python面向对象中的反射:通过字符串的形式操作对象相关的属性。python中的一切事物都是对象(都可以使用反射)
四个可以实现自省的函数
下列方法适用于类和对象(一切皆对象,类本身也是一个对象)


def hasattr(*args, **kwargs): # real signature unknown
    """
    Return whether the object has an attribute with the given name.

    This is done by calling getattr(obj, name) and catching AttributeError.
    """
    pass
def getattr(object, name, default=None): # known special case of getattr
    """
    getattr(object, name[, default]) -> value

    Get a named attribute from an object; getattr(x, 'y') is equivalent to x.y.
    When a default argument is given, it is returned when the attribute doesn't
    exist; without it, an exception is raised in that case.
    """
    pass

getattr
def setattr(x, y, v): # real signature unknown; restored from __doc__
    """
    Sets the named attribute on the given object to the specified value.

    setattr(x, 'y', v) is equivalent to ``x.y = v''
    """
    pass

setattr
def delattr(x, y): # real signature unknown; restored from __doc__
    """
    Deletes the named attribute from the given object.

    delattr(x, 'y') is equivalent to ``del x.y''
    """
    pass

delattr
 class Func(object):

     def __init__(self, name):
         self.name = name

     def say_name(self):
         print("细脖大头鬼--%s" % self.name)


 func = Func("房书安")

 # 检查是否有属性
 print(hasattr(func, 'name'))
 print(hasattr(func, 'say_name'))


 # 获取属性
 name = getattr(func, 'name')
 print(name)
 say_name = getattr(func, 'say_name')
 say_name()
 print(getattr(func, 'age','不存在'))

 # 设置属性
 setattr(func, 'age', 50)
 setattr(func, 'show_name', lambda self:self.name+'nb')
 print(func.__dict__)
 print(func.show_name(func))

 # 删除属性
 delattr(func, 'age')
 delattr(func, 'show_name')
 delattr(func, 'show_age')   #不存在就报错
 class Foo(object):

     staticField = "徐良"

     def __init__(self):
         self.name = '房书安'

     def func(self):
         return 'func'

     @staticmethod
     def bar():
         return 'bar'

 print(getattr(Foo, 'staticField'))
 print(getattr(Foo, 'func'))
 print(getattr(Foo, 'bar'))
 import sys


 def s1():
     print('s1')


 def s2():
     print('s2')


 this_module = sys.modules[__name__]

 hasattr(this_module, 's1')
 getattr(this_module, 's2')
导入其他模块,利用反射查找该模块是否存在某个方法
def test():
    print('from the test')


# 文件名字 module_test.py
import module_test as obj

#obj.test()

print(hasattr(obj,'test'))

getattr(obj,'test')()

# 当前文件:index.py
__str__和__repr__
改变对象的字符串显示__str__,__repr__
自定制格式化字符串__format__
format_dict={
    'nat':'{obj.name}-{obj.addr}-{obj.type}',#学校名-学校地址-学校类型
    'tna':'{obj.type}:{obj.name}:{obj.addr}',#学校类型:学校名:学校地址
    'tan':'{obj.type}/{obj.addr}/{obj.name}',#学校类型/学校地址/学校名
}
class School:
    def __init__(self,name,addr,type):
        self.name=name
        self.addr=addr
        self.type=type

    def __repr__(self):
        return 'School(%s,%s)' %(self.name,self.addr)
    def __str__(self):
        return '(%s,%s)' %(self.name,self.addr)

    def __format__(self, format_spec):
        # if format_spec
        if not format_spec or format_spec not in format_dict:
            format_spec='nat'
        fmt=format_dict[format_spec]
        return fmt.format(obj=self)

s1=School('oldboy1','北京','私立')
print('from repr: ',repr(s1))
print('from str: ',str(s1))
print(s1)

'''
str函数或者print函数--->obj.__str__()
repr或者交互式解释器--->obj.__repr__()
如果__str__没有被定义,那么就会使用__repr__来代替输出
注意:这俩方法的返回值必须是字符串,否则抛出异常
'''
print(format(s1,'nat'))
print(format(s1,'tna'))
print(format(s1,'tan'))
print(format(s1,'asfdasdffd'))
class B:

     def __str__(self):
         return 'str : class B'

     def __repr__(self):
         return 'repr : class B'


b=B()
print('%s'%b)
print('%r'%b)
item系列
__getitem__ 、__setitem__ 、__delitem__
class Foo:
    def __init__(self,name):
        self.name=name

    def __getitem__(self, item):
        print(self.__dict__[item])

    def __setitem__(self, key, value):
        self.__dict__[key]=value
    def __delitem__(self, key):
        print('del obj[key]时,我执行')
        self.__dict__.pop(key)
    def __delattr__(self, item):
        print('del obj.key时,我执行')
        self.__dict__.pop(item)

f1=Foo('nb')
f1['age']=18
f1['age1']=19
del f1.age1
del f1['age']
f1['name']='朱亮'
print(f1.__dict__)
__del__
析构方法,当对象在内存中被释放时,自动触发执行。
注:此方法一般无须定义,因为Python是一门高级语言,程序员在使用时无需关心内存的分配和释放,因为此工作都是交给Python解释器来执行,所以,析构函数的调用是由解释器在进行垃圾回收时自动触发执行的。
class Foo:

    def __del__(self):
        print('执行我啦')

f1=Foo()
del f1
print('------->')

#输出结果
执行我啦
------->
__new__
class A:
    def __init__(self):
        self.x = 1
        print('in init function')
    def __new__(cls, *args, **kwargs):
        print('in new function')
        return object.__new__(A)

a = A()
print(a.x)
__call__
对象后面加括号,触发执行。
注:构造方法的执行是由创建对象触发的,即:对象 = 类名() ;而对于 __call__ 方法的执行是由对象后加括号触发的,即:对象() 或者 类()()
class Foo:

    def __init__(self):
        pass

    def __call__(self, *args, **kwargs):

        print('__call__')


obj = Foo() # 执行 __init__
obj()       # 执行 __call__
with和__enter__, __exit__
class A:
    def __enter__(self):
        print('before')

    def __exit__(self, exc_type, exc_val, exc_tb):
        print('after')


with A() as a:
    print('123')
class A:
    def __init__(self):
        print('init')

    def __enter__(self):
        print('before')

    def __exit__(self, exc_type, exc_val, exc_tb):
        print('after')


with A() as a:
    print('123')
class Myfile:
    def __init__(self,path,mode='r',encoding = 'utf-8'):
        self.path = path
        self.mode = mode
        self.encoding = encoding

    def __enter__(self):
        self.f = open(self.path, mode=self.mode, encoding=self.encoding)
        return self.f

    def __exit__(self, exc_type, exc_val, exc_tb):
        self.f.close()


with Myfile('file',mode='w') as f:
    f.write('wahaha')
import  pickle
class MyPickledump:
    def __init__(self,path):
        self.path = path

    def __enter__(self):
        self.f = open(self.path, mode='ab')
        return self

    def dump(self,content):
        pickle.dump(content,self.f)

    def __exit__(self, exc_type, exc_val, exc_tb):
        self.f.close()

class Mypickleload:
    def __init__(self,path):
        self.path = path

    def __enter__(self):
        self.f = open(self.path, mode='rb')
        return self


    def __exit__(self, exc_type, exc_val, exc_tb):
        self.f.close()

    def load(self):
         return pickle.load(self.f)


    def loaditer(self):
        while True:
            try:
                yield  self.load()
            except EOFError:
                break


# with MyPickledump('file') as f:
#      f.dump({1,2,3,4})

with Mypickleload('file') as f:
    for item in f.loaditer():
        print(item)
import  pickle
class MyPickledump:
    def __init__(self,path):
        self.path = path

    def __enter__(self):
        self.f = open(self.path, mode='ab')
        return self

    def dump(self,content):
        pickle.dump(content,self.f)

    def __exit__(self, exc_type, exc_val, exc_tb):
        self.f.close()

class Mypickleload:
    def __init__(self,path):
        self.path = path

    def __enter__(self):
        self.f = open(self.path, mode='rb')
        return self


    def __exit__(self, exc_type, exc_val, exc_tb):
        self.f.close()

    def __iter__(self):
        while True:
            try:
                yield  pickle.load(self.f)
            except EOFError:
                break


# with MyPickledump('file') as f:
#      f.dump({1,2,3,4})

with Mypickleload('file') as f:
    for item in f:
        print(item)
__len__
class A:
    def __init__(self):
        self.a = 1
        self.b = 2

    def __len__(self):
        return len(self.__dict__)
a = A()
print(len(a))
__hash__
class A:
    def __init__(self):
        self.a = 1
        self.b = 2

    def __hash__(self):
        return hash(str(self.a)+str(self.b))
a = A()
print(hash(a))
__eq__
class A:
    def __init__(self):
        self.a = 1
        self.b = 2

    def __eq__(self,obj):
        if  self.a == obj.a and self.b == obj.b:
            return True
a = A()
b = A()
print(a == b)
class Person:
    def __init__(self,name,age,sex):
        self.name = name
        self.age = age
        self.sex = sex

    def __hash__(self):
        return hash(self.name+self.sex)

    def __eq__(self, other):
        if self.name == other.name and self.sex == other.sex:return True


p_lst = []
for i in range(84):
    p_lst.append(Person('zorro',i,'man'))

print(p_lst)
print(set(p_lst))
深拷贝、浅拷贝
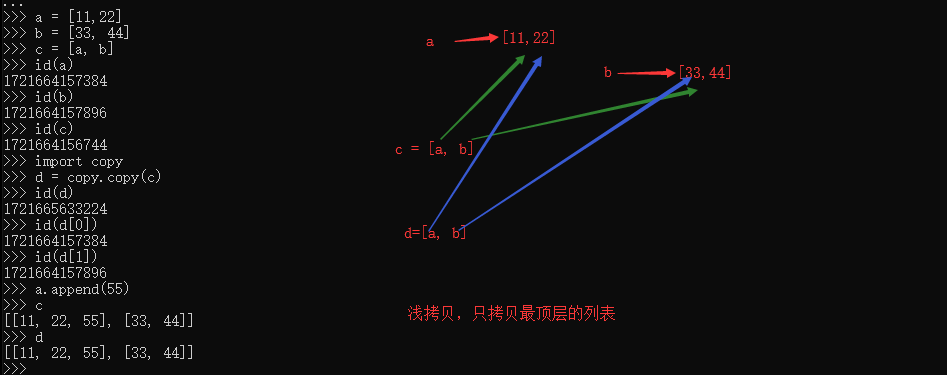
1. 浅拷贝
-
浅拷贝是对于一个对象的顶层拷贝
通俗的理解是:拷贝了引用,并没有拷贝内容

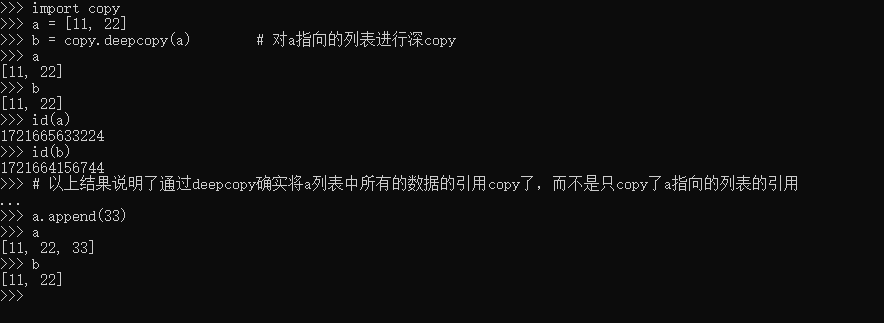
2. 深拷贝
-
深拷贝是对于一个对象所有层次的拷贝(递归)
进一步理解深拷贝

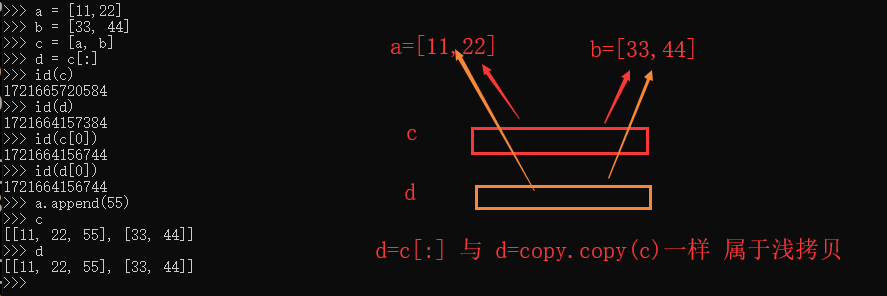
3. 拷贝的其他方式
-
分片表达式可以赋值一个序列
-
字典的copy方法可以拷贝一个字典

4. 注意点
浅拷贝对不可变类型和可变类型的copy不同
-
copy.copy对于可变类型,会进行浅拷贝
-
copy.copy对于不可变类型,不会拷贝,仅仅是指向

copy.copy和copy.deepcopy的区别
copy.copy

copy.deepcopy

元类
1. 类也是对象
在大多数编程语言中,类就是一组用来描述如何生成一个对象的代码段。在Python中这一点仍然成立:
>>> class MyClass(object):
... pass
...
>>> myclass = MyClass()
>>> print(myclass)
<__main__.MyClass object at 0x7f22c472e630>
但是,Python中的类还远不止如此。类同样也是一种对象。是的,没错,就是对象。只要你使用关键字class,Python解释器在执行的时候就会创建一个对象。
下面的代码段:
>>> class MyClass(object):
...     pass
...
将在内存中创建一个对象,名字就是MyClass。这个对象(类对象MyClass)拥有创建对象(实例对象)的能力。但是,它的本质仍然是一个对象,于是乎你可以对它做如下的操作:
- 你可以将它赋值给一个变量
- 你可以拷贝它
- 你可以为它增加属性
- 你可以将它作为函数参数进行传递
下面是示例:
>>> print(MyClass)
<class '__main__.MyClass'>
>>> def func(cls):    # 可以将类做为参数传给函数
...     print(cls)
...
>>> func(MyClass)
<class '__main__.MyClass'>
>>> MyClass.new_attribute = 'new_attr'   # 可以为类增加属性
>>> hasattr(MyClass, 'new_attribute')
True
>>> print(MyClass.new_attribute)
new_attr
>>> ObjectClass = MyClass   # 可以将类赋值给一个变量
>>> print(ObjectClass)
<class '__main__.MyClass'>
2. 动态地创建类
因为类也是对象,你可以在运行时动态的创建它们,就像其他任何对象一样。首先,你可以在函数中创建类,使用class关键字即可。
>>> def choose_class(name):
...     if name == 'foo':
...             class Foo(object):
...                     pass
...             return Foo    # 返回的是类,不是类的实例
...     else:
...             class Bar(object):
...                     pass
...             return Bar
...
>>> MyClass = choose_class('foo')
>>> print(MyClass)    # 函数返回的是类,不是类的实例
<class '__main__.choose_class.<locals>.Foo'>
>>> print(MyClass())    # 可以通过这个类创建类实例,也就是对象
<__main__.choose_class.<locals>.Foo object at 0x7f22c293ab00>
但这还不够动态,因为你仍然需要自己编写整个类的代码。由于类也是对象,所以它们必须是通过什么东西来生成的才对。
当你使用class关键字时,Python解释器自动创建这个对象。但就和Python中的大多数事情一样,Python仍然提供给你手动处理的方法。
还记得内建函数type吗?这个古老但强大的函数能够让你知道一个对象的类型是什么,就像这样:
>>> print(type(1))  # 数值的类型
<class 'int'>
>>> print(type('1'))   # 字符串的类型
<class 'str'>
>>> print(type(MyClass))   # 类的类型
<class 'type'>
>>> print(type(MyClass()))   # 实例对象的类型
<class '__main__.choose_class.<locals>.Foo'>
3. 使用type创建类
type还有一种完全不同的功能,动态的创建类。
type可以接受一个类的描述作为参数,然后返回一个类。(要知道,根据传入参数的不同,同一个函数拥有两种完全不同的用法是一件很傻的事情,但这在Python中是为了保持向后兼容性)
type可以像这样工作:
type(类名, 由父类名称组成的元组(针对继承的情况,可以为空),包含属性的字典(名称和值))
比如下面的代码:
>>> class Test:   #定义了一个Test类
...     pass
...
>>> Test()   # 创建了一个Test类的实例对象
<__main__.Test object at 0x7f22c293aba8>

#手动创建类
>>> Test2 = type("Test2",(),{})   # 定了一个Test2类
>>> Test2()   # 创建了一个Test2类的实例对象
<__main__.Test2 object at 0x7f22c293ac50>
4. 使用type创建带有属性的类
type 接受一个字典来为类定义属性,因此
>>> Foo = type("Foo",(),{"bar":True})
>>> class Foo:
相当于:
>>> class Foo(object):
...     bar = True
并且可以将Foo当成一个普通的类一样使用:
>>> print(Foo)
<class '__main__.Foo'>
>>> print(Foo.bar)
True
>>> f = Foo()
>>> print(f)
<__main__.Foo object at 0x7f22c293aa20>
>>> print(f.bar)
True
当然,你可以继承这个类,代码如下:
>>> FooChild = type("FooChild",(Foo,),{})
>>> print(FooChild)
<class '__main__.FooChild'>
>>> print(FooChild.bar)   # bar属性是由Foo继承而来
True
注意:
-
type的第2个参数,元组中是父类的名字,而不是字符串
-
添加的属性是类属性,并不是实例属性
5. 使用type创建带有方法的类
最终你会希望为你的类增加方法。只需要定义一个有着恰当签名的函数并将其作为属性赋值就可以了。
添加实例方法
>>> def echo_bar(self):
...     print(self.bar)
...
>>> FooChild = type("FooChild", (Foo,),{"echo_bar":echo_bar})   # 让FooChild类中的echo_bar属性,指向了上面定义的函数
>>> hasattr(Foo,"echo_bar")   # 判断Foo类中 是否有echo_bar这个属性
False
>>> hasattr(FooChild,"echo_bar")  # 判断FooChild类中 是否有echo_bar这个属性
True
>>> my_foo = FooChild()
>>> my_foo.echo_bar()
True
添加静态方法
>>> @staticmethod
... def test_static():
...     print("static method")
...
>>> FooChild = type("FooChild", (Foo,),{"echo_bar":echo_bar, "test_static":test_static})
>>> foochild = FooChild()
>>> foochild.test_static
<function test_static at 0x7f22c2940b70>
>>> foochild.test_static()
static method
添加类方法
>>> @classmethod
... def test_class(cls):
...     print(cls.bar)
...
>>> FooChild = type("FooChild", (Foo,),{"echo_bar":echo_bar, "test_static":test_static,"test_class":test_class})
>>> foochild = FooChild()
>>> foochild.test_class()
True
你可以看到,在Python中,类也是对象,你可以动态的创建类。这就是当你使用关键字class时Python在幕后做的事情,而这就是通过元类来实现的。
较为完整的使用type创建类的方式:
class A(object):
    num = 100

def print_b(self):
    print(self.num)

@staticmethod
def print_static():
    print("----haha-----")

@classmethod
def print_class(cls):
    print(cls.num)

B = type("B", (A,), {"print_b": print_b, "print_static": print_static, "print_class": print_class})
b = B()
b.print_b()
b.print_static()
b.print_class()
# 结果
# 100
# ----haha-----
# 100
6. 到底什么是元类
元类就是用来创建类的“东西”。你创建类就是为了创建类的实例对象,不是吗?但是我们已经学习到了Python中的类也是对象。
元类就是用来创建这些类(对象)的,元类就是类的类,你可以这样理解为:
MyClass = MetaClass() # 使用元类创建出一个对象,这个对象称为“类”
my_object = MyClass() # 使用“类”来创建出实例对象
你已经看到了type可以让你像这样做:
MyClass = type('MyClass', (), {})
这是因为函数type实际上是一个元类。type就是Python在背后用来创建所有类的元类。现在你想知道那为什么type会全部采用小写形式而不是Type呢?好吧,我猜这是为了和str保持一致性,str是用来创建字符串对象的类,而int是用来创建整数对象的类。type就是创建类对象的类。你可以通过检查__class__属性来看到这一点。Python中所有的东西,注意,我是指所有的东西——都是对象。这包括整数、字符串、函数以及类。它们全部都是对象,而且它们都是从一个类创建而来,这个类就是type。
>>> name = 'aaa'
>>> name.__class__
<class 'str'>
>>> age = 1
>>> age.__class__
<class 'int'>
>>> def func():
...     pass
...
>>> func.__class__
<class 'function'>
>>> class Foo(object):
...     pass
...
>>> Foo.__class__
<class 'type'>
>>> f= Foo()
>>> f.__class__
<class '__main__.Foo'>
现在,对于任何一个__class__的__class__属性又是什么呢?
>>> name.__class__.__class__
<class 'type'>
>>> age.__class__.__class__
<class 'type'>
>>> func.__class__.__class__
<class 'type'>
>>> f.__class__.__class__
<class 'type'>
因此,元类就是创建类这种对象的东西。type就是Python的内建元类,当然了,你也可以创建自己的元类。
7. __metaclass__属性
你可以在定义一个类的时候为其添加__metaclass__属性。
class Foo(object):
    __metaclass__ = something…
    ...省略...
如果你这么做了,Python就会用元类来创建类Foo。小心点,这里面有些技巧。你首先写下class Foo(object),但是类Foo还没有在内存中创建。Python会在类的定义中寻找__metaclass__属性,如果找到了,Python就会用它来创建类Foo,如果没有找到,就会用内建的type来创建这个类。把下面这段话反复读几次。当你写如下代码时 :
class Foo(Bar):
    pass
Python做了如下的操作:
- Foo中有__metaclass__这个属性吗?如果是,Python会通过__metaclass__创建一个名字为Foo的类(对象)
- 如果Python没有找到__metaclass__,它会继续在Bar(父类)中寻找__metaclass__属性,并尝试做和前面同样的操作。
- 如果Python在任何父类中都找不到__metaclass__,它就会在模块层次中去寻找__metaclass__,并尝试做同样的操作。
- 如果还是找不到__metaclass__,Python就会用内置的type来创建这个类对象。
现在的问题就是,你可以在__metaclass__中放置些什么代码呢?答案就是:可以创建一个类的东西。那么什么可以用来创建一个类呢?type,或者任何使用到type或者子类化type的东东都可以。
8. 自定义元类
元类的主要目的就是为了当创建类时能够自动地改变类。
假想一个很傻的例子,你决定在你的模块里所有的类的属性都应该是大写形式。有好几种方法可以办到,但其中一种就是通过在模块级别设定__metaclass__。采用这种方法,这个模块中的所有类都会通过这个元类来创建,我们只需要告诉元类把所有的属性都改成大写形式就万事大吉了。
幸运的是,__metaclass__实际上可以被任意调用,它并不需要是一个正式的类。所以,我们这里就先以一个简单的函数作为例子开始。
def upper_attr(class_name, class_parents, class_attr):

     #遍历属性字典,把不是__开头的属性名字变为大写
     new_attr = {}
     for name,value in class_attr.items():
         if not name.startswith("__"):
             new_attr[name.upper()] = value

     #调用type来创建一个类
     return type(class_name, class_parents, new_attr)

 class Foo(object, metaclass=upper_attr):
     bar = 'bip'

 print(hasattr(Foo, 'bar'))    # False
 print(hasattr(Foo, 'BAR'))    # True

 f = Foo()
 print(f.BAR)  # bip
现在让我们再做一次,这一次用一个真正的class来当做元类。
class UpperAttrMetaClass(type):
     # __new__ 是在__init__之前被调用的特殊方法
     # __new__是用来创建对象并返回之的方法
     # 而__init__只是用来将传入的参数初始化给对象
     # 你很少用到__new__,除非你希望能够控制对象的创建
     # 这里,创建的对象是类,我们希望能够自定义它,所以我们这里改写__new__
     # 如果你希望的话,你也可以在__init__中做些事情
     # 还有一些高级的用法会涉及到改写__call__特殊方法,但是我们这里不用
     def __new__(cls, class_name, class_parents, class_attr):
         # 遍历属性字典,把不是__开头的属性名字变为大写
         new_attr = {}
         for name, value in class_attr.items():
             if not name.startswith("__"):
                 new_attr[name.upper()] = value

         # 方法1:通过'type'来做类对象的创建
         return type(class_name, class_parents, new_attr)

         # 方法2:复用type.__new__方法
         # 这就是基本的OOP编程,没什么魔法
         # return type.__new__(cls, class_name, class_parents, new_attr)


 class Foo(object, metaclass=UpperAttrMetaClass):
     bar = 'bip'


 print(hasattr(Foo, 'bar'))
 # 输出: False
 print(hasattr(Foo, 'BAR'))
 # 输出:True

 f = Foo()
 print(f.BAR)
 # 输出:'bip'
就是这样,除此之外,关于元类真的没有别的可说的了。但就元类本身而言,它们其实是很简单的:
- 拦截类的创建
- 修改类
- 返回修改之后的类
究竟为什么要使用元类?
现在回到我们的大主题上来,究竟是为什么你会去使用这样一种容易出错且晦涩的特性?好吧,一般来说,你根本就用不上它:
“元类就是深度的魔法,99%的用户应该根本不必为此操心。如果你想搞清楚究竟是否需要用到元类,那么你就不需要它。那些实际用到元类的人都非常清楚地知道他们需要做什么,而且根本不需要解释为什么要用元类。” —— Python界的领袖 Tim Peters
原文引用:http://www.cnblogs.com/Eva-J/articles/7351812.html