iOS开发CoreAnimation解读之三——几种常用Layer的使用解析
一、CAEmitterLayer
CAEmitterLayer是CoreAnimation框架中的粒子发射层,在以前的一片博客中有详细的介绍和范例,这里不再重复,地址如下:
粒子效果的应用和火焰范例:http://my.oschina.net/u/2340880/blog/485095
二、CAGradientLayer
CAGradientLayer是用于色彩梯度展示的layer图层,通过CAGradientLayer,我们可以很轻松的创建出有过渡效果的色彩图。其中属性如下:
|
1
2
3
4
5
6
7
8
9
10
11
12
13
14
15
16
17
18
19
20
|
/*颜色数组,设置我们需要过的的颜色,必须是CGColor对象*/@property(nullable, copy) NSArray *colors;/*颜色开始进行过渡的位置这个数组中的元素是NSNumber类型,单调递增的,并且在0——1之间例如,如果我们设置两个颜色进行过渡,这个数组中写入0.5,则第一个颜色会在达到layer一半的时候开始向第二个颜色过渡*/@property(nullable, copy) NSArray<NSNumber *> *locations;/*下面两个参数用于设置渲染颜色的起点和终点 取值范围均为0——1默认起点为(0.5 ,0) 终点为(0.5 ,1),颜色的过渡范围就是沿y轴从上向下*/@property CGPoint startPoint;@property CGPoint endPoint;/*渲染风格 iOS中只支持一种默认的kCAGradientLayerAxial,我们无需手动设置*/@property(copy) NSString *type; |
用如下代码创建一个度过视图的效果:
|
1
2
3
4
5
6
7
8
|
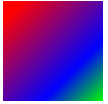
CAGradientLayer * layer = [CAGradientLayer layer]; layer.colors = @[(id)[UIColor redColor].CGColor,(id)[UIColor blueColor].CGColor,(id)[UIColor greenColor].CGColor]; layer.locations = @[@0.1,@0.7,@1]; layer.bounds = CGRectMake(0, 0, 100, 100); layer.position = CGPointMake(100, 100); layer.startPoint = CGPointMake(0, 0); layer.endPoint = CGPointMake(1, 1); [self.view.layer addSublayer:layer]; |
效果如下:
三、CAReplicatorLayer
CAReplocatorLayer是拷贝视图容器,我们可以通过它,将其中的子layer进行拷贝,并进行一些差异处理,其中常用属性方法如下:
|
1
2
3
4
5
6
7
8
9
10
11
12
13
14
15
16
|
//拷贝的次数@property NSInteger instanceCount;//是否开启景深效果@property BOOL preservesDepth;//当CAReplicatorLayer的子Layer层进行动画的时候,拷贝的副本执行动画的延时@property CFTimeInterval instanceDelay;//拷贝副本的3D变换@property CATransform3D instanceTransform;//拷贝副本的颜色变换@property(nullable) CGColorRef instanceColor;//每个拷贝副本的颜色偏移参数@property float instanceRedOffset;@property float instanceGreenOffset;@property float instanceBlueOffset;//每个拷贝副本的透明度偏移参数@property float instanceAlphaOffset; |
例如,通过拷贝一个色块,使其产生平移排列:
|
1
2
3
4
5
6
7
8
9
10
11
12
13
14
|
CAReplicatorLayer *reLayer = [CAReplicatorLayer layer]; reLayer.position = CGPointMake(0, 0); CALayer * layer= [CALayer layer]; [reLayer addSublayer:layer]; [self.view.layer addSublayer:reLayer]; layer.bounds = CGRectMake(0, 0, 20, 20); layer.position = CGPointMake(30, 100); layer.backgroundColor = [UIColor redColor].CGColor; //每个副本向右平移25px reLayer.instanceTransform=CATransform3DMakeTranslation(25, 0, 0); //如果进行动画,副本延时一秒执行 reLayer.instanceDelay = 1; //拷贝十个副本 reLayer.instanceCount = 10; |
效果如下:

四、CAShapeLayer
CAShapeLayer是图形layer层,我们可以自定义这个层的形状。先来看其中我们可以使用的属性和方法:
|
1
|
@property(nullable) CGPathRef path; |
path属性为CAShapeLayer设置一个边界路径,例如我们可以创建一个三角形的路径通过如下代码:
|
1
2
3
4
5
6
7
8
|
CAShapeLayer * layer = [CAShapeLayer layer]; layer.position=CGPointMake(0,0); CGMutablePathRef path = CGPathCreateMutable(); CGPathMoveToPoint(path, 0, 100, 100); CGPathAddLineToPoint(path, 0, 300, 100); CGPathAddLineToPoint(path, 0, 200, 200); CGPathAddLineToPoint(path, 0, 100, 100); layer.path=path; |
仅仅有路径,不能将我们想要的形状画出来,下面一些属性可以对图形的一些基础属性进行设置:
|
1
2
3
4
5
6
7
8
9
10
11
12
13
14
15
16
17
18
19
20
21
22
23
24
25
26
27
28
29
30
31
32
33
34
35
36
37
38
39
40
|
//设置图形的填充颜色@property(nullable) CGColorRef fillColor;/*设置图形的填充规则 选项如下:非零填充 NSString *const kCAFillRuleNonZero; 奇偶填充 NSString *const kCAFillRuleEvenOdd;*/@property(copy) NSString *fillRule;//设置线条颜色@property(nullable) CGColorRef strokeColor;//设置线条的起点与终点 0-1之间@property CGFloat strokeStart;@property CGFloat strokeEnd;//设置线条宽度@property CGFloat lineWidth;//设置两条线段相交时锐角斜面长度@property CGFloat miterLimit;/*设置线条首尾的外观可选参数如下无形状 NSString *const kCALineCapButt; 圆形 NSString *const kCALineCapRound; 方形 NSString *const kCALineCapSquare;*/@property(copy) NSString *lineCap;/*设置线段的链接方式棱角 NSString *const kCALineJoinMiter; 平滑 NSString *const kCALineJoinRound; 折线 NSString *const kCALineJoinBevel;*/@property(copy) NSString *lineJoin; |
修改一下上面的代码,如下:
|
1
2
3
4
5
6
7
8
9
10
11
12
13
14
15
16
17
|
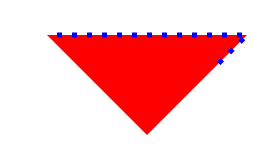
CAShapeLayer * layer = [CAShapeLayer layer]; layer.position=CGPointMake(0,0); CGMutablePathRef path = CGPathCreateMutable(); CGPathMoveToPoint(path, 0, 100, 100); CGPathAddLineToPoint(path, 0, 300, 100); CGPathAddLineToPoint(path, 0, 200, 200); CGPathAddLineToPoint(path, 0, 100, 100); layer.path=path; layer.fillColor= [UIColor redColor].CGColor; layer.fillRule = kCAFillRuleEvenOdd; layer.strokeColor = [UIColor blueColor].CGColor; layer.strokeStart =0; layer.strokeEnd =0.5; layer.lineWidth = 5; layer.miterLimit = 1; layer.lineJoin = kCALineJoinMiter; [self.view.layer addSublayer:layer]; |
效果如下:

除此之外,我们还可以设置边界的线条为虚线,通过下面两个属性:
|
1
2
3
4
5
6
7
|
//设置线段的宽度为5px 间距为10px /* 这个数组中还可以继续添加,会循环进行设置 例如 5 2 1 3 则第一条线段5px,间距2px,第二条线段1px 间距3px再开始第一条线段 */ layer.lineDashPattern = @[@05,@10]; //设置从哪个位置开始 layer.lineDashPhase =5; |
如下:
五、CATextLayer
CATextLayer可以进行文本的绘制,属性方法如下:
|
1
2
3
4
5
6
7
8
9
10
11
12
13
14
15
16
17
18
19
20
21
22
23
24
25
26
27
28
29
30
|
//渲染的文字字符串@property(nullable, copy) id string;//设置字体@property(nullable) CFTypeRef font;//设置字号@property CGFloat fontSize;//设置文字颜色@property(nullable) CGColorRef foregroundColor;//是否换行@property(getter=isWrapped) BOOL wrapped;/*设置截断模式 NSString * const kCATruncationNone; 截断前部分 NSString * const kCATruncationStart; 截断后部分 NSString * const kCATruncationEnd; 截断中间 NSString * const kCATruncationMiddle;*/@property(copy) NSString *truncationMode;/*设置文字对齐模式 NSString * const kCAAlignmentNatural; NSString * const kCAAlignmentLeft; NSString * const kCAAlignmentRight; NSString * const kCAAlignmentCenter; NSString * const kCAAlignmentJustified;*/@property(copy) NSString *alignmentMode; |