Unity 3-7 AssetBundle入门学习
任务1&2&3:课程介绍
AssetBundle -- 用于资源的更新
为了之后的xLua (Lua热更新的框架)打下基础
任务4&5:AssetBundle的定义和作用
AssetBundle的学习 -- 一手学习资源:UnityManual -> AssetBundles -> 教程式的文档
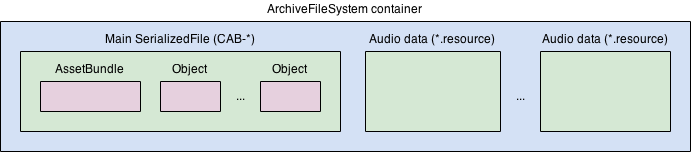
AssetBundle是一个压缩包(也可以认为是一个文件夹)
包含模型Model、贴图Texture、预制体Prefab、声音AudioClip、甚至整个场景
在游戏运行的时候可以被加载
这个压缩包被打包出来存在硬盘中,里面包含的文件可以分为两类:serialized file和resource files
serialized file:资源,如模型、预制体,被打碎放在一个对象中,最后统一被写进一个单独的文件
resource file:某些二进制资源,如图片、声音,被单独保存,方便快速加载
-- 一个单独的图片或声音就会被打包成一个.resource文件
压缩包可以使用LZMA和LZ4压缩算法,便于更快的进行网络传输 -- 区别见任务13
为什么会用到网络传输呢?
1. 把一些可以下载的资源放在AssetBundle中,而不放在app中,而在需要的时候从网上直接加载资源
-- 减少安装包的大小
安装包过大:影响用户体验,或导致用户不想下载
2. 方便更新
-- 对于某些模型,如果进行某些活动更新,用户不需要更新安装包
进入游戏后,检查资源更新,从服务器上下载模型并加载即可
第一次启动后,或之后有更新时,下载更新包到本地,之后就不用下载了
AssetBundle自身保存着互相的依赖关系
比如一个包是专门保存模型的,而另一个包是专门保存贴图的,那这两个包之间就会有依赖关系
AssetBundle在加载时,作为一个AssetBundle对象,对象中包含的内容就是AssetBundle压缩包中的内容
任务6:AssetBundle使用流程
https://docs.unity3d.com/Manual/AssetBundles-Workflow.html
1. 指定资源的AssetBundle属性

2. 构建AssetBundle包
AssetBundle包可以有多个,每个AssetBundle包中可以有多个文件
Unity会搜寻项目中的资源,如果资源被标记了需要打包,则会被打包到AssetBundle包中
3. 上传AssetBundle包
一般情况下都会上传到服务器
4. 加载AssetBundle包及其中的资源
启动游戏之后,游戏会在服务器上检查更新,将更新包下载到本地,加载上面的资源
任务7&8:打包AssetBundle
1. 指定资源的AssetBundle属性 -- 详见任务10~12
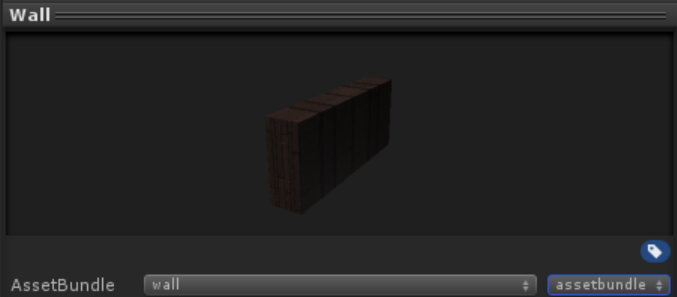
从AssetStore上搜索Material资源
创建一个Cube,拉伸成一个墙壁的形状,将mat资源附加上
制作成一个名为wall的prefab
修改wall prefab的AssetBundle标签,New -> Wall (不区分大小写)
前面也可以写成 aaa/bbb的格式,表示在aaa文件夹下生成名为bbb的assetbundle文件
比如:scene/wall
后缀写成assetbundle,不是必要的,随意填写都行
设置成相同的assetbundle属性的不同物品,会被打包到相同的assetbundle文件中
2. 使用Unity的API进行构建AssetBundle包 -- 详见任务13
这个API是只有在Editor模式下才运行的
创建Editor文件夹
新建CreateAssetBundles.cs脚本
using UnityEditor;
不继承自MonoBehaviour
BuildPipeline.BuildAssetBundles(string outputPath, BuildAssetBundleOptions option, BuildTarget platform);
string path; // path是以工程的根目录为基础的 -- 输出目录需要已存在,Unity不会自动创建路径
因此需要进行路径是否存在的判断
using System.IO;
if(!Directory.Exists(path)) {
Directory.CreateDirectory(path);
}
BuildAssetBundleOptions.None // 表示不去设置该选项 -- 选项解释详见任务13
BuildTarget.StandaloneWindows64 // 表示为了window64平台打包的 -- 不同平台之间的ab包不可以交叉使用
using UnityEditor;
using System.IO;

public class CreateAssetBundle {

    [MenuItem("Assets/BuildAssetBundles")]
    static void BuildAllAssetBundles() {
        string path = "AssetBundles";
        if (!Directory.Exists(path)){
            Directory.CreateDirectory(path);
        }
        BuildPipeline.BuildAssetBundles(path,
            BuildAssetBundleOptions.None, BuildTarget.StandaloneWindows64);
}}
[MenuItem("Assets/BuildAssetBundles")] // 表示这个方法在菜单栏Assets下创建子菜单BuildAssetBundles
Unity中,Assets -> 点击BuildAssetBundles,就会进行AssetBundle的打包了
Unity中的Project下没有任何变化,
在系统中打开工程根目录,会发现新建了一个AssetBundles文件夹
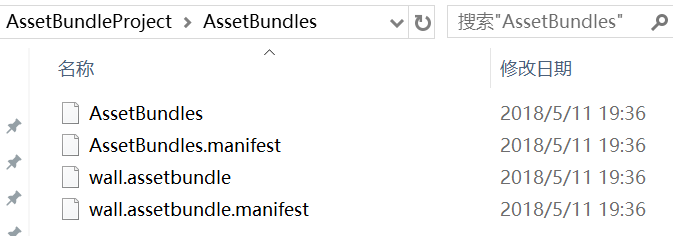
wall.assetbundle就是wall的prefab文件
wall.assetbundle.manifest记录了wall.assetbundle的依赖项
AssetBundles是为当前目录
AssetBundles.manifest当前目录生成了哪一些assetbundle文件
.manifest是文本文件,一个assetbundle文件对应一个manifest文件
记录了对应的assetbundle的依赖,详见任务14
如何删除不用的assetbundle名字呢
比如现在发现我们的assetbundle名写错了,重新生成一个assetbundle
但是设置assetbundle属性的菜单中,会发现原来的assetbundle名字没有被替换,依然存在
在设置资源的AssetBundle属性的地方,选择remove unused names
现在,在设置assetbundle属性的菜单里就找不到不用的assetbundle名了
任务9:AssetBundle的加载和使用
3. 上传AssetBundle包
因为在开发阶段,我们要重复对AssetBundle包进行修改,因此不会进行上传到服务器这一操作
开发阶段直接将AssetBundle包放在本地,再进行加载
4. 加载AssetBundle包 -- 详见任务16
这里先讲解加载本地的AssetBundle包
加载本地的AssetBundle包和加载服务器上的AssetBundle包所用的API是不同的
现在,将我们的场景下的物品和Project中的prefab清空
为了更清楚地看到物体是从AssetBundle中加载出来的
创建一个空物体,命名LoadAssetBundle
添加脚本LoadAssetBundleFromLocal.cs
在Start()中进行加载操作
AssetBundle.LoadFromFile("AssetBundles/scene/wall.assetbundle");
// 需要加后缀
返回值为AssetBundle类型的对象 -- 见任务4&5:
AssetBundle在加载时,作为一个AssetBundle对象,对象中包含的内容就是AssetBundle压缩包中的内容
AssetBundle assetBundle = ...;
GameObject wallPrefab = assetBundle.LoadAsset<GameObject>("Wall");
// 对象类型为GameObject,名为"Wall",将加载到的资源赋值给GameObject对象
// 这里的名字"Wall"不能乱写,需要和打包前的名字相同 -- Case-insensitive
Instantiate(wallPrefab);
另一种方法是assetBundle.LoadAllAssets();
返回的是Object[],
可以通过foreach将所有Object[]中包含的prefabs都实例化出来
任务10&11:AssetBundle的分组策略
任务12:依赖打包
之后进行每个阶段的详解
1. 资源的AssetBundle属性详解
AssetBundle的分组策略(仅供参考,需结合实际项目使用)
逻辑实体分组:
一个UI界面/ 所有UI界面 (这个界面里面的贴图和布局信息)一个包
一个角色/ 所有角色 (这个角色里面的模型和动画)一个包
所有的场景共享的部分 (所有共享的贴图和模型)一个包
类型分组:
所有声音资源 一个包
所有shader 一个包
所有模型 一个包
所有材质 一个包
所有动画 一个包 等等
按照使用分组:
在某一时间内使用的所有资源 一个包 -- 比如一个关卡中的所有资源
在一个场景中所需的所有资源 一个包
总结:
1. 把经常更新的资源放在一个单独的包中,跟不经常更新的包分离
-- 用户更新的时候可以减少下载量
2. 把需要同时加载的资源放在一个包中
-- 这些需要同时使用的资源,如果不在同一个包中,则需要加载多个包
3. 把其他包所共享的资源放在同一个包中
-- 比如:若有CubeWall和CapsuleWall共用了MaterialA,MaterialA中用了贴图TextureA
那么在打包CubeWall的时候,会将它所依赖的资源,如MaterialA和TextureA,和它打包到一起
对于CapsuleWall也是一样的,这样的话会导致MaterialA和TextureA被打包了多次
资源打包的重复会使得assetbundle包变大
如果将MaterialA和TextureA打包到同一个包中,
这两个wall prefab去引用这个资源包中的material和texture,即依赖于这个资源包
4. 如果对于一个同一个资源有两个版本,可以考虑通过后缀来区分
-- 这两个版本都会使用到,比如角色升级前和升级后的模型
5. 把一些需要同时加载的小资源打包成一个包
-- 如果同时使用,且资源很小,那么就放在一个包中吧
因为加载包也是需要时间的,在同一个包中,就一下子都加载出来了
注意是小资源
-- 任务12:依赖打包
以上述例子来解释

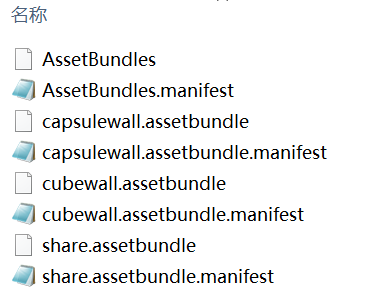
将共用的Material和Texture文件打入一个包,叫share
将CapsuleWall和CubeWall分别打入两个包,capsulewall和cubewall包
Unity会自动进行依赖控制
build asset bundle -->
查看assetbundle的大小为67.9kb
按原来的方式打包出来的大小将近两倍。
任务13:打包选项 -- AssetBundle的压缩方式
2. 构建AssetBundle包的详解
BuildPipeline.BuildAssetBundles(path, BuildAssetBundleOptions, BuildTarget);
BuildAssetBundleOptions: 有很多选项
None:使用LZMA算法压缩 -- 高压缩比,但是加载的时间更长
使用之前需要整体解压,假如包中有三个资源,其中一个资源是要用的,但是必须全部解压才能使用
一旦被解压,这个包会使用LZ4重新压缩,这个时候使用资源时就不需要整体解压了。
LZ4算法 -- 使用资源时不需要整体解压,使用什么资源就解压哪一个,加载速度快,但是压缩程度不大
即,在下载的时候使用LZMA算法--因为包小;之后会使用LZ4算法保存到本地--因为加载快
这个机制是Unity内置的优化策略
UncompressedAssetBundle:不压缩,包大,加载快
ChunkBasedCompression:使用LZ4算法压缩
压缩率没有LZMA高,但解压速度块,而且可以加载指定资源而不用整体解压
优点:可以获得跟不压缩相媲美的加载速度,而且又将包大小压缩了
实例对比:
使用None,AssetBundle大小为67.9KB
使用ChunkBasedCompression,AssetBundle大小为97.2KB
使用UncompressedAssetBundle,AssetBundle大小为151KB
任务14&15:Manifest文件详解 && 资源的依赖关系
以share.assetbundle.manifest为例
ManifestFileVersion: 0
CRC: 1445635609    -- CRC: 用于校验文件是否完整
Hashes:
  AssetFileHash:
    serializedVersion: 2
    Hash: c009e7bf6581a024ac7d30c2196142f6
  TypeTreeHash:
    serializedVersion: 2
    Hash: cc983a3149e5fb03ce027e70c7a1a559
HashAppended: 0
ClassTypes:
- Class: 21
  Script: {instanceID: 0}
- Class: 28
  Script: {instanceID: 0}
- Class: 48
  Script: {instanceID: 0}
Assets:    -- 包中包含的文件
- Assets/Materials/Wood texture floor_01/Wood texture floor_01.png
- Assets/Materials/Wood texture floor_01/Wood texture floor_01.mat
Dependencies: []    -- share包没有依赖其他包,因此为空
以capsulewall.assetbundle.manifest为例
ManifestFileVersion: 0
CRC: 429711530
Hashes:
  AssetFileHash:
    serializedVersion: 2
    Hash: e312559590875437e4b50f7f082675eb
  TypeTreeHash:
    serializedVersion: 2
    Hash: 32a31884022770668140c4ee94dc0ded
HashAppended: 0
ClassTypes:
- Class: 1
  Script: {instanceID: 0}
- Class: 4
  Script: {instanceID: 0}
- Class: 21
  Script: {instanceID: 0}
- Class: 23
  Script: {instanceID: 0}
- Class: 33
  Script: {instanceID: 0}
- Class: 43
  Script: {instanceID: 0}
- Class: 136
  Script: {instanceID: 0}
Assets:
- Assets/Prefabs/CapsuleWall.prefab
Dependencies:    -- 因为capsulewall依赖了share包中的材质和贴图,因此这里有了对share的依赖
- "D:/Programming/SikiUnityLearning/3-7AssetBundle/AssetBundleProject/AssetBundles/share.assetbundle"
对于资源的加载而言,如果一个资源有依赖,那么必须先去加载它的依赖,否则会出现资源 (比如贴图) 丢失的情况
就算当前Project中是存在那些材质资源的,也不行,需要加载匹配的依赖包中的资源才行
比如直接加载cubewall并实例化:

需要在加载cubewall之前加载share包 -- 不一定,详见下
AssetBundle sharedAssetBundle = AssetBundle.LoadFromFile("AssetBundles/share.assetbundle");
之后再加载cubewall .....
就可以得到完整的cubewall了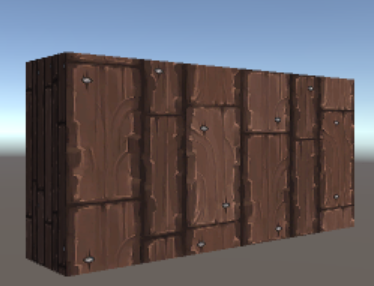
资源的依赖关系:
上面讲到假如MaterialA中使用到了TextureB,即MaterialA包依赖TextureB包;
被依赖的包TextureB必须先加载,才能进行加载MaterialA
其实不然:
正确的顺序为,包的加载并没有严格的先后顺序
只要保证在使用到MaterialA资源之前,TextureB的包被加载完成,就行
以上述cubewall的例子为例
在使用cubewall资源之前
即在GameObject wallPrefab = assetBundle.LoadAsset<GameObject>("cubewall");之前
加载share包即可
但是在测试过程中
同在Start()里,无论谁先谁后,都可以加载出带有mat的cubewall
很奇怪???和Documentation中说的不同?
Consider the following example, a Material in Bundle 1 references a Texture in
Bundle 2:

In this example, before loading the Material from Bundle 1, you would need to
 load Bundle 2 into memory. It does not matter which order you load Bundle 1
and Bundle 2, the important takeaway is that Bundle 2 is loaded before loading
 the Material from Bundle 1.
做个测试:
在Start()中load cubewall,并instantiate一个cubewall
这时,会出现material丢失的情况
但是在Update()中通过Input.GetKeyDown()按下按钮后进行load share包
在按下按键之前,material还是丢失的
但是按下按键之后,material就出现在被instantiate的cubewall上
嗯,很奇怪
这么做竟然可以,但是保险起见,还是按上面的先后顺序原则进行load吧
任务16&17:AssetBundle四种加载方式的前三种
AssetBundle的加载分为四种:
AssetBundle.LoadFromMemoryAsync() -- 从内存中异步进行加载
AssetBundle.LoadFromFile() -- 从本地进行加载
WWW.LoadFromCacheOrDownLoad() -- 从缓存中(本地)或服务器上加载
UnityWebRequest.DownloadHandlerAssetBundle() -- 之前用WWW方法,但更新后推荐用这个方法从服务器加载
什么情况下用哪个方法?
主要基于assetbundle是以什么形式提供的
AssetBundle.LoadFromMemoryAsync(byte[] binary, uint crc = 0);
将byte[]转换成AssetBundle对象
byte[] binary -- 如何得到byte[]呢?
可以通过http/tcp等协议得到
假如通过tcp协议下载得到了服务器端的assetbundle,这时得到的就是byte数组
直接使用LoadFromMemoryAsync()即可
或者也可以先保存到本地,再通过LoadFromFile()得到
也可以通过File.ReadAllBytes(path)得到
官方实例:
IEnumerator LoadFromMemoryAsync(string path) {
    AssetBundleCreateRequest createRequest=AssetBundle.LoadFromMemoryAsync(File.ReadAllBytes(path));
    yield return createRequest;
    AssetBundle bundle = createRequest.assetBundle;
    var prefab = bundle.LoadAsset<GameObject>("MyObject");
    Instantiate(prefab);
}
但这个实例的AssetBundle.LoadFromMemoryAsync(File.ReadAllBytes(path));
就是实现了LoadFromFile(path)的从本地文件读取包的情况
AssetBundleCreateRequest 表示做了一个异步请求
需要等待Load...()加载完成
实例:
using UnityEngine;
using System.IO;
using System.Collections;
public class LoadAssetBundleFromMemory : MonoBehaviour {

    IEnumerator Start () {

        // assetbundle的加载
        string path = "AssetBundles/cubewall.assetbundle";
        AssetBundleCreateRequest request = AssetBundle.LoadFromMemoryAsync(File.ReadAllBytes(path));
        // 异步方式的请求,需要等待Load完成
        yield return request;

        AssetBundle assetBundle = request.assetBundle;

        // assetbundle的使用
        GameObject wallPrefab = assetBundle.LoadAsset<GameObject>("cubewall");
        Instantiate(wallPrefab);
    }
}
LoadFromMemoryAsync()的变形
LoadFromMemory() -- 同步的方式
不需要进行yield暂停,因为同步的方式会等待Load的方法加载完才进行返回
使用方法和LoadFromFile相似 --
AssetBundle assetBundle = AssetBundle.LoadFromMemory(File.ReadAllBytes(path));
不需要进行yield return操作
void Start() {
    // assetbundle的加载
    string path = "AssetBundles/cubewall.assetbundle";
    AssetBundle assetBundle = AssetBundle.LoadFromMemory(File.ReadAllBytes(path));

    // assetbundle的使用
    GameObject wallPrefab = assetBundle.LoadAsset<GameObject>("cubewall");
    Instantiate(wallPrefab);
}
AssetBundle.LoadFromFile(string path)
从本地读取 -- 之前使用过
LoadFromFile()的变形
LoadFromFileAsync() -- 异步方式
Enumerator Start() {
    string path = "AssetBundles/cubewall.assetbundle";
    AssetBundleCreateRequest request = AssetBundle.LoadFromFileAsync(path);
    // 等待Load加载完毕
    yield return request;
    AssetBundle assetBundle = request.assetBundle;

    // 加载资源
    GameObject wallPrefab = assetBundle.LoadAsset<GameObject>("cubewall");
    Instantiate(wallPrefab);
}
WWW.LoadFromCacheOrDownload()
将文件从服务器下载到本地的缓存目录中
This API is useful for downloading AssetBundles from a remote server or loading local AssetBundles.
Loading an AssetBundle from a remote location will automatically cache the AssetBundle.
If the AssetBundle is compressed, a worker thread will spin up to decompress the bundle and write it to the cache.
-- LZMA压缩算法时 (BuildAssetBundleOptions.None)
Once a bundle has been decompressed and cached, it will load exactly list AssetBundle.LoadFromFile()
官方实例:
public class LoadFromCacheOrDownloadExample : MonoBehaviour {
    IEnumerator Start () {
        while (!Caching.ready)  // 等待Caching是否准备完成
            yield return null;  -- 表示暂停一帧
        // Cache准备完成,则开始进行下载
        // 5为版本号
        // 如果是全新版本,会全部下载;
        // 如果版本相同,会进行检查,如果已经下载了,会从cache中load
        // 如果没有下载,则会从服务端进行下载
        var www = WWW.LoadFromCacheOrDownload
            ("http://myserver.com/myassetBundle", 5);
        // 等待下载完成
        yield return www;
        if(!string.IsNullOrEmpty(www.error)) { -- 记得进行错误检测
            Debug.Log(www.error);
            yield return null;
        }
        var myLoadedAssetBundle = www.assetBundle;
        var asset = myLoadedAssetBundle.mainAsset;
    }
}
实例:
public class LoadAssetBundleFromCacheOrDownload : MonoBehaviour {
    IEnumerator Start() {
        while (!Caching.ready)  // 等待Caching是否准备完成
            yield return null;
        // 本地文件的前缀 file:// 或 file:///
        WWW www = WWW.LoadFromCacheOrDownload
            (@"file:///D:...AssetBundlescubewall.assetbundle", 1);
        // 等待下载完成
        yield return www;
        if (!string.IsNullOrEmpty(www.error)) {
            Debug.Log(www.error);
            yield return null;
        }
        AssetBundle assetBundle = www.assetBundle;
        // var asset = assetBundle.mainAsset;
        // Debug.Log(asset);
        GameObject wallPrefab = assetBundle.LoadAsset<GameObject>("cubewall");
        Instantiate(wallPrefab);
    }
}
如何从服务端下载,详见任务19
任务18&19:搭建简单Server服务器 && 从服务器端下载AssetBundle
通过NetBox2.exe搭建简单Server服务器
在素材文件夹中找到NetBox2.exe
使用的是http协议
创建页面index.html作为首页,随意写一个内容
此时打开NetBox2.exe就会跳转到index.html页面
本地的Server端就开启了
将AssetBundles文件夹拷贝到NetBox2.exe所在目录
NetBox2.exe所在目录可以视作服务器端
那么现在就可以通过Unity到Server端下载AssetBundle了
通过WWW.LoadFromCacheOrDownload()从服务器端下载
通过http协议可以访问刚才搭建的服务器
访问到服务器就相当于访问到根目录,再通过url得到assetbundle的位置
WWW www = WWW.LoadFromCacheOrDownload(@"http://localhost/cubewall.assetbundle", 1);
测试:
第一次:打开Server,运行Unity project,得到实例化后的cubewall
第二次:关闭Server,运行Unity project,依然能得到实例化后的cubewall
但是从浏览器中访问不到localhost了
第三次:关闭Server,修改WWW.LoadFromCacheOrDownload()的版本号为2
这次就在www.error处输出了404 Not Found
总结:第二次能得到结果的原因是,版本号相同的情况下,会进行检查,已经下载了,所以从cache目录load
第三次的版本号不同,因此需要到服务器端下载,但是Server端关闭,因此404 Not Found
任务20:使用UnityWebRequest下载AssetBundle -- 第四种
重点方法
取代了WWW.LoadFromCacheOrDownload(),并做了优化
官方实例:
IEnumerator InstantiateObject() {
    string uri ="file:///"+Application.dataPath+"/AssetBundles/"+assetBundleName;
    UnityWebRequest request = UnityWebRequest.GetAssetBundle(uri, 0);
    yield return request.SendWebRequest();
    AssetBundle bundle = DownloadHandlerAssetBundle.GetContent(request);
    GameObject cube = bundle.LoadAsset<GameObject>("Cube");
    GameObject sprite = bundle.LoadAsset<GameObject>("Sprite");
    Instantiate(cube);
    Instantiate(sprite);
}
1. using UnityEngine.Networking;
2. UnityWebRequest.GetAssetBundle(uri,0);
// uri可以是本地路径也可以是server路径
3. unityWebRequest.SendWebRequest()
// 开始进行下载
4. DownloadHandlerAssetBundle.GetContent(request);
// 取得内容,返回一个AssetBundle的对象
(request.DownloadHandler as DownloadHandlerAssetBundle).assetBundle
request中的DownloadHandler强转为DownloadHandlerAssetBundle类型,自带assetBundle
实例:
using UnityEngine.Networking;
public class LoadAssetBundleFromUnityWebRequest : MonoBehaviour {
    IEnumerator Start() {
        string uri = @"file:///D:...AssetBundlescubewall.assetbundle";
        UnityWebRequest request = UnityWebRequest.GetAssetBundle(uri);
        // 这个时候还没从服务器端下载
        // 调用了request.Send()之后,才会开始下载
        yield return request.SendWebRequest();

        // 得到AssetBundle -- 方法1
        AssetBundle assetBundle = DownloadHandlerAssetBundle.GetContent(request);
        // 得到AssetBundle -- 方法2
        // 因为DownloadHandler有很多类型,转换为DownloadHandlerAssetBundle类型
        AssetBundle assetBundle2 = (request.downloadHandler as
            DownloadHandlerAssetBundle).assetBundle;

        // 实例化
        GameObject wallPrefab = assetBundle.LoadAsset<GameObject>("cubewall");
        Instantiate(wallPrefab);
        GameObject wallPrefab2 = assetBundle2.LoadAsset<GameObject>("cubewall");
        Instantiate(wallPrefab2);
    }
}
总结:
1. 通过UnityWebRequest.GetAssetBundle(uri)指定uri
2. 通过request.SendWebRequest() 进行assetbundle下载
3. 取得AssetBundle
两个方法
a. DownloadHandlerAssetBundle.GetContent(request);
b. request.DownloadHandler...assetBundle
将GetAssetBundle(uri)的路径改为服务器端的地址
UnityWebRequest.GetAssetBundle(@"http://localhost/AssetBundles/cubewall.assetbundle");
任务21:从AssetBundle里面加载资源
上面讲解了如何从本地/服务器得到AssetBundle,这节讲述如何从得到的AssetBundle里得到所需资源
四种加载资源的方式:
loadedAssetBundle.LoadAsset<T>(assetName);
loadedAssetBundle.LoadAssetAsync<T>(assetName);
loadedAssetBundle.LoadAllAssets();
T objectFromBundle = bundleObject.LoadAsset<T>(assetName);
比如GameObject object = assetBundle.LoadAsset<GameObject>("prefabName");
-- 和之前使用的方法相同
还有一种方式 -- LoadAllAssets()
Unity.Object[] objectArray = assetBundle.LoadAllAssets();
可以得到该包中的指定的所有资源
比如:存入了一个prefab,该prefab所使用的material会自动打包进来,但是unity自动打包的
这时,通过LoadAllAssets()就不会得到这个material资源
上述两种方法对应的异步方法:
当加载的资源较大时就可以使用异步加载的方式
loadedAssetBundle.LoadAssetAsync<T>(assetName);
AssetBundleRequest request = loadedAssetBundle.LoadAssetAsync<GameObject>(assetName);
yield return request; // 等待加载完成
GameObject object = request.asset; // 取得加载到的资源
loadedAssetBundle.LoadAllAssetsAsync();
AssetBundleRequest request = loadedAssetBundle.LoadAllAssetsAsync();
yield return request; // 等待加载完成
Object[] objects = request.allAsset; // 取得加载到的资源
任务22:通过Manifest文件得到某个包的依赖
在任务15中,讲述了包之间的依赖关系

对于通过BuildPipeline.BuildAssetBundles(path, ...);
在path文件夹下存放那些assetbundle包
在这个path文件夹下,也会自动生成一个与文件夹名字相同的包
对于该包会有对应的一个manifest文件
接任务15,生成的AssetBundles.manifest的内容为
ManifestFileVersion: 0
CRC: 29988270
AssetBundleManifest:
  AssetBundleInfos:
    Info_0:
      Name: capsulewall.assetbundle
      Dependencies:
        Dependency_0: share.assetbundle
    Info_1:
      Name: cubewall.assetbundle
      Dependencies:
        Dependency_0: share.assetbundle
    Info_2:
      Name: share.assetbundle
      Dependencies: {}
包含了这个文件夹下所有的assetbundle包,和每个包所依赖的包的信息
比如这个文件夹下有capsulewall.assetbundle, cubewall.assetbundle, share.assetbundle
依赖关系是capsulewall包依赖share包,cubewall包依赖share包,share包没有依赖其他包
想要知道包之间的依赖关系,只需要在程序中得到AssetBundles文件即可 (不是AssetBundles.manifest)
得到AssetBundleManifest的方式和得到其他资源的方式一样,有很多种
AssetBundle assetBundle = AssetBundle.LoadFromFile(manifestFilePath); // 这里即AssetBundles的路径
AssetBundleManifest manifest = assetBundle.LoadAsset<AssetBundleManifest>("AssetBundleManifest");
得到的manifest对象,与AssetBundles.manifest文件内容是对应的,包含了所有资源的列表和依赖关系
// 如何得到一个包的依赖关系呢
string[] dependencies = manifest.GetAllDependencies("assetName"); // 比如"cubewall"
// 通过这些依赖着的包名,加载这些包即可
foreach(string dependency in dependencies) {
AssetBundle.LoadFromFile(Path.Combine(assetBundlePath, dependency));
}
实例,以任务15为例
public class LoadAssetBundleWithDependencies : MonoBehaviour {
  private void Start() {
    string path = "AssetBundles/";
    string assetBundleName = "CubeWall.assetbundle";
    // 得到AssetBundles文件
    AssetBundle manifestAssetBundle = AssetBundle.LoadFromFile(Path.Combine(path, "AssetBundles"));
    // 得到AssetBundles.manifest内容
    AssetBundleManifest manifest = manifestAssetBundle.LoadAsset<AssetBundleManifest>("AssetBundleManifest");
    // 通过manifest中存储的包名,得到某个assetbundle的依赖
    string[] dependencies = manifest.GetAllDependencies(assetBundleName);
    // 遍历依赖,并加载所有依赖
    foreach(string dependency in dependencies) {
      AssetBundle.LoadFromFile(Path.Combine(path, dependency));
    }
    // 加载assetbundle本dle
    AssetBundle assetBundle = AssetBundle.LoadFromFile(Path.Combine(path, assetBundleName));
    GameObject wallPrefab = assetBundle.LoadAsset<GameObject>("cubewall");
    Instantiate(wallPrefab);
}}
任务23:AssetBundle的卸载 Unload
卸载的优缺点:
减少内存使用
如果卸载不当,会导致丢失,比如卸载掉了某个正在运行的物体所依赖的资源时
Unity does not automatically unload Objects when they are removed from the active scene.
Asset cleanup is triggered at specific times, and it can also be triggered manually.
导致的问题: Improperly unloading an AssetBundle can bead to duplicating objects in memory or
other undesirable circumstances, such as missing textures;
assetBundle.Unload(bool)
-- unloads the header information of the assetBundle.
the bool arguments indicates whether to also unload all Objects instantiated from this assetBundle
Unload(true): unload the objects loaded from the assetBundle, even if they're being currently used in the active scene
-- this is what can cause textures or other things to go missing.
官方实例:assetbundle.Unload(true) 和assetbundle.Unload(false)的区别
MaterialM 在assetbundle中被加载
assetbundle.Unload(true):
Any instance of M in the active scene will also be unload and destroyed.
assetbundle.Unload(false):
break the chain of the current instances of M and assetbundle
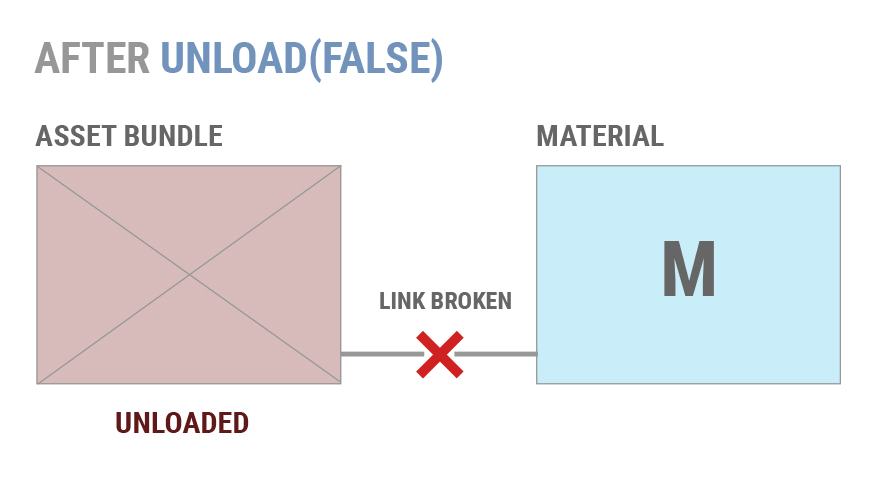
if assetbundle is reloaded later and M is loaded by assetbundle.LoadAsset()
unity will not re-link the existing copies of M to the newly loaded Material.
-- there will be two copies of M loaded.
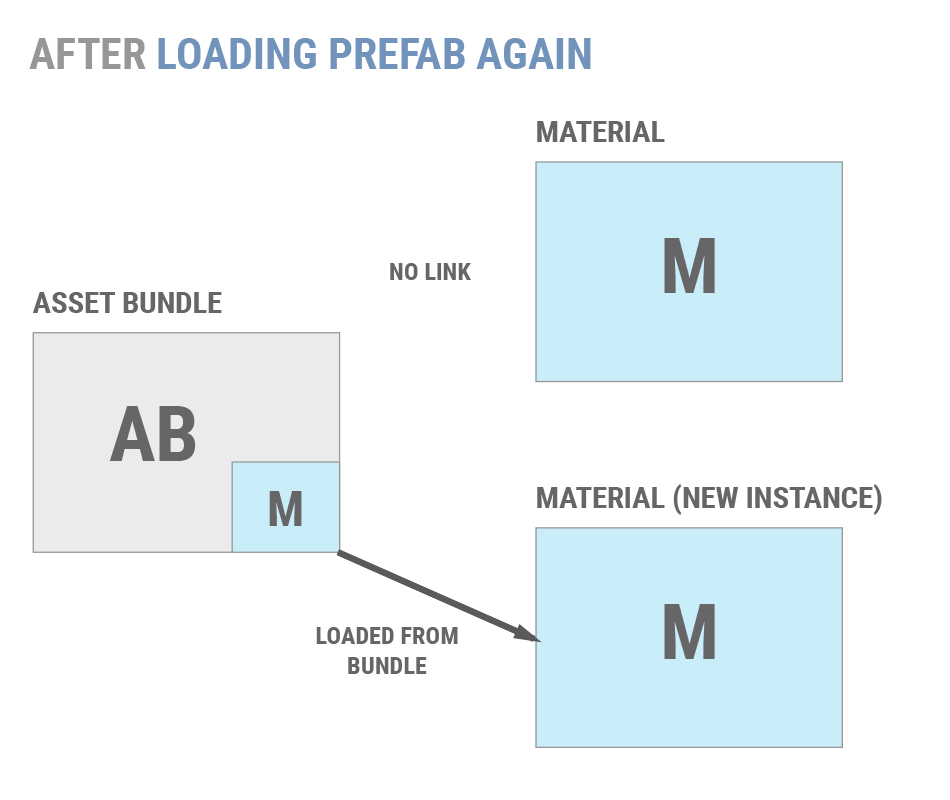
此时原来的M依旧被其他物体使用
如果它不再被使用了,就会导致M依然占用内存,而且通过Unload()也无法卸载(因为Unload是卸载ab包的)
因此:using AssetBundle.Unload(false) does not lead to an ideal situation.
Most projects should use AssetBundle.Unload(true) to keep from duplicating objects in memory.
Most projects should use AssetBundle.Unload(true) and adopt a method to ensure that Objects are not duplicated.
使用Unload(true)的两种思路:
1. Having well-defined points during the applications's lifetime at which transient Assetbundles are unloaded
比如不同关卡的切换时,或正在加载新场景时调用unload(true)
2. Maintaining reference-counts for individual Objects, and unload only when all of their constituent Object are unused.
监测资源的使用,当所有资源不被使用时可以调用unload(true)
使用Unload(false)后,unload未卸载的资源(如MaterialM)的两种思路:
1. Eliminate all references to an unwanted Object, both in the scene and in code. -- 比如把引用设置为null
After the is done, call Resources.UnloadUnusedAssets()
2. Load a scene non-additively. This will destroy all Objects in the current scene -- 使用非附加的方式切换场景时
and invoke Resources.UnloadUnusedAssets() automatically.
任务24:关于文件校验
从服务器传输过程中,可能会出现字节传输丢失或出错
所以需要在使用文件之前进行文件是否完整传输的校验
文件校验:
通过文件的内容进行生成校验值,校验值的生成通过算法
CRC MD5 SHA1
在服务器端生成校验值后,进行文件的传输(with生成的校验值);
客户端下载到文件后,使用相同算法进行校验值的生成,将两个校验值进行对比即可
上述三种校验算法的区别:
1. 算法不同:CRC为多项式除法;MD5和SHA1为替换、轮转等方法
2. 校验值的长度不同:CRC校验位的长度和其多项式有关系,一般为16或32位;MD5为128位;SHA1为160位
3. 校验值的称呼不同:CRC一般叫做CRC值;MD5和SHA1一般叫做哈希值或散列值
4. 检测能力不同:CRC的安全性跟多项式有很大关系,比MD5和SHA1差很多;
MD5安全性很高;SHA1安全性最高
5. 效率不同:CRC效率最高,和检测能力为逆相关
6. 用途不同:CRC一般用作通信数据的校验;MD5和SHA1一般用于安全领域,比如文件校验、数字签名等
任务25:AssetBundle中其他需要注意的问题
Patching with AssetBundle -- 打补丁 -- 更新游戏的一些资源
需要注意的点:
How to detect which assetbundles to replace.
A patching system requires two lists of information:
1. A list of the currently downloaded AssetBundles, and their versioning information
2. A list of the AssetBundles on the server, and their versioning information
依赖包重复的问题:
三种解决方式:
1. 将需要共享的资源打包到一起,即若两个资源依赖于同一个资源,则将这两个资源打包到一起
缺点:
这些资源不一定同时使用;
资源更新时如果有一个资源是经常更新的,则整个包都需要更新
2. 分割包,这些包不在同一时间使用
缺点:但是这种方法会导致assetbundle的大小变大
3. 将被依赖的资源(需要被共享的资源)打包到一个包中 -- 推荐方法(具体问题具体分析)
图集重复问题:Sprite Atlas Duplication
Texture Type为Sprite 2D and UI下有一个属性,Packing tag
Unity会自动将这些2D图片打包到图集中
如果Packing tag不指定,则会打包到同一个图集中
这样的结果是:
如果将贴图A打包到A包中,因为贴图A在图集中,则会将整个图集打包到A包中
如果将贴图B打包到B包中,因为贴图B也在图集中,那么整个图集也会打包到B包中
-- 图集重复问题
解决方法:
将属于同一个图集的图片打包到同一个包中
将图片分属于不同图集,通过修改图片的Packing Tag
任务26:AssetBundle Broswer Tool -- 第三方插件
Unity AssetBundle Broswer tool -- 浏览工具
用于清楚地显示BundleList、AssetList和对应的Details信息
https://github.com/Unity-Technologies/AssetBundles-Browser
在Release中下载,将Editor目录拖入Unity Project面板
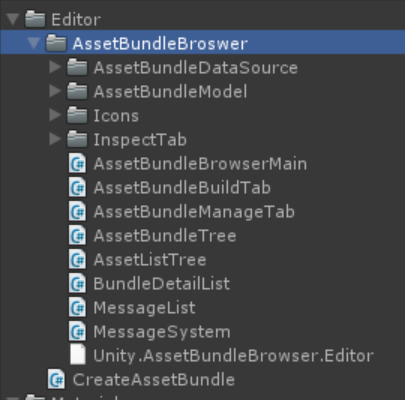
现在,在Window->AssetBundleBroswer就能打开浏览面板了

可以显示各个assetbundle,和assetbundle中的资源信息,之间的dependency等等
在Build选项卡中
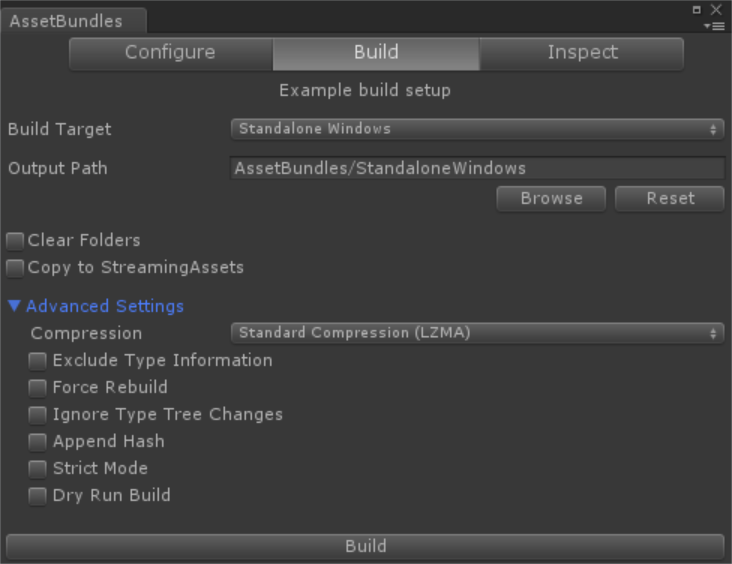
实现了BuildPipeline的那些parameter选项
Clear Folders -- 将之前生成的assetbundle文件删除,就不需要手动清空该文件夹了
StreamingAssets表示流资源,在build成安装包的时候,会把这个文件夹中的资源原封不动地放入安装包中
其他文件夹下的资源可能会自动进行压缩等操作
CopyToStreamingAssets选项将assetbundle拷贝到StreamingAssets文件夹下
为什么呢,这样做会加大安装包大小
如果assetbundle不放在StreamingAssets下,那么第一次加载的时候还是需要去下载这部分资源的
虽然安装包小,但是还是需要进行下载的。
那么,索性就将游戏一开始运行就必须使用的资源放入。
结果就是,玩家安装完游戏就不需要再进行下载更新包了,除非有更新文件
点击Build,就可以生成了