Mule 官方例子研究
一、编译导入Mule自带的例子
1.准备
安装Mule。这里就不介绍mule的安装了,请参考《Mule安装部署手册》。
2. 编译Mule自带例子中的Hello例子
使用命令行到目录:D:\app\mule3.1.1\examples\hello下,输入:mvn 即可。这里需要安装Maven;
3. 导入Eclipse工程
输入命令:mvn eclipse:eclipse 成功后,即可导入eclipse。
4.导入这个工程到eclipse
(1)选择:File > Import
(2)选择:展开“General” 选择“Existing Projects into Workspace”
(3)选择Browse,导入后,选择Finish。完成。
5.配置Elipse工程(build path)
(1)右击工程,选择“Build Path ->Configure Build”:
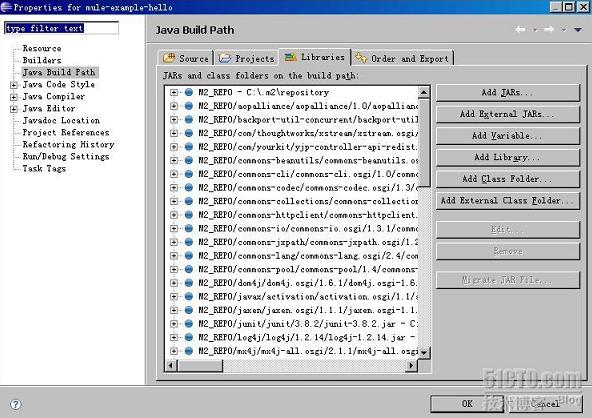
(2)选择“Libraries->Add Library”
(3)点击“User Library”,点击“Next”
(4)点击“User Libraries”,点击“New”
(5)输入:MULE_LIB,点击“OK”
(6)点击“Add JARs”,选择Mule主目录下的 \lib\mule,选择所有的jar包,点击“Open”
(7)点击“OK”,点击“Finish”
(8)点击“Add Variable”,点击“Configure Variables”,点击“New”
(9)输入:M2_REPO,选择一个目录。默认地,Maven会在刚才使用mvn命令编译时,
把下载的jar包放到:C:\Documents and Settings\Administrator\.m2\repository 目录下,Administrator是我的用户名,这里我设置的目录是C:\.m2\repository,你可以把那个目录下的所有copy到这个目录下。 点击“Folder”,选择C:\.m2\repository。
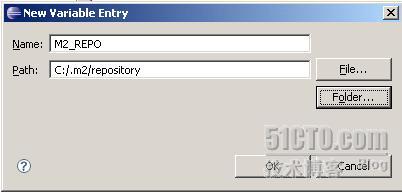
(10)点击“OK”,点击“yes”,点击“OK”。设置完成。
6.运行这个工程
(1)右击工程,选择“Run->Run Configurations”
(2)双击“Java Application”,把名字改为:Hello,选择main class为:org.mule.MuleServer。
如图:
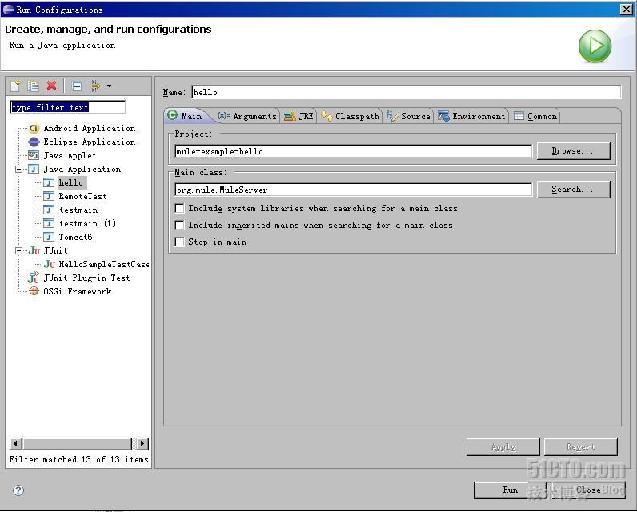
(3)在Arguments选项表中,在Program Arguments框中输入-config conf\hello-config.xml
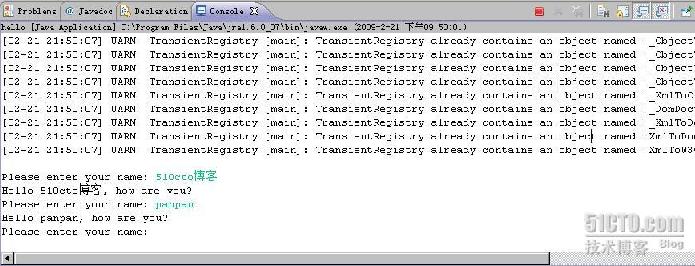
(4)点击“Apply”,“Run”。运行例子,如图:
备注:
运行“Run as Mule Server”报错“A Mule runtime distribution must be configured”的解决办法:在eclipse的classpath界面里面添加libray ;右键工程---->properties----->Java Build Path----->Libraries------>Add Library------>Mule Classpath
二、ECHO例子分析
2.1概述
这个演示了“如何通过使用一个简单的web service flow,让我们了解Mule ESB 组件;在这个例子中,这个组件被了解是通过使用CXF 的JAX-WS web Service.
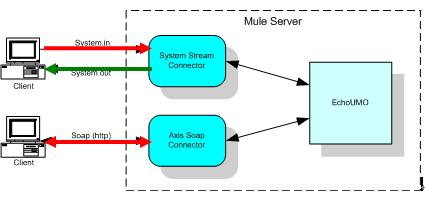
(上图描述了MULE2.X 的内容。System Stream Connector 和Axis Soap Connector已经被普通的http Connector替换,服务通过使用CXF被从新实现,用来处理Soap的请求和响应);
上图说明:
1、 通过两种方式接入(红色线):一个是System.in, 一个是Soap(http)方式
2、 每种接入都可以通过接入器(Connector)经过NMR(Normalized Message Router)规范化的消息路由转发后,进行输出,目前通过两种方式:System.out 和Soap(http)方式。
2.2运行应用
简单的拷贝预构建的档案资料(mule-example-echo.zip)到应用文件夹($MULE_HOME/apps),并启动mule。去通过浏览器访问web service 调用:
http://localhost:65082/services/EchoUMO/echo/text/hello
通过在控制台按“CTR-C”停止mule;
2.3编译例子
依靠你正在使用的编译工具(Ant or Maven) ,你能够通过简单的运行”ant” 或”mvn”去编译样例,这将编译样例的类文件,产生一个应用的zip文件,拷贝这个zip文件到 $MULE_HOME/apps.
2.4 The Echo 组件
Echo Service 是基于一个POJO 组件,该组件是使用JAX-WS 注解方式被注解,并作为一个web service 被暴露出来,该Web Service 是在MULE 使用基于流的配置之上的。组建的初始化如下:
public class Echo
{
public String echo(String string)
{
return string;
}
}
通过增加JAX-WS注解的方法,我们能把该类方法发布成一个web service, 并具体说明输入参数和响应是怎样被映射的。
@WebService
public class Echo
{
@WebResult(name="text")
public String echo(@WebParam(name="text") String string)
{
return string;
}
}
2.5配置流程(Configuring the Flow)
配置Service ,先添加<flow>元素到Mule XML 配置文件,并提供name 属性,用<component>元素具体指定服务组件的类;对于从Spring注册库引用的对象,应当使用内嵌的<spring-object>来代替;
<flow name="EchoFlow">
<component>
<singleton-object class="org.mule.example.echo.Echo" />
</component>
</flow>
类的属性必须是完全的合格的类路径名,名称属性对服务来说必须是唯一的名称。
2.6调用流程(Invoking the Flow)
当前流程是有效的,但是没有入口点,通过URL执行它,并不能得到反馈信息。首先必须为service配置一个端点endpoint, 以使它能被调用。当运行实例时,通过http发送一个request去调用EchoFlow,一个相应通过Http channel被返回。Mule Http Transport管理这个交互。
去配置这个流程,我们已经创建一个接入点<inbound-endpoint>,来实现请求相应request-response.下面是包括endpoint的EchoFlow配置:
<flow name="EchoFlow">
<inbound-endpoint address="http://localhost:65082/services/EchoUMO" exchange-pattern="request-response"/>
<component>
<singleton-object class="org.mule.example.echo.Echo" />
</component>
</flow>
如果现在去触发流程,将会得到一个响应,它将返回一个URL PATH 给你。然而EchoFlow仍不知道怎么去处理Web Service的调用,首先你需要去采用一个使用CXF的过滤器。
2.7暴露CXF类型Web Service (Exposing as a Web Service with CXF)
CXF已经内置了对GET requests 约定的支持,使用的是下面的句法:
http://host/service/OPERATION/PARAM_NAME/PARAM_VALUE
所以,可以通过输入下面的URL来运行该样例:
http://localhost:65082/services/EchoUMO/echo/text/hello
为了使CXF能够去处理消息, 像下面去更新EchoFlow
<flow name="EchoFlow">
<inbound-endpoint address="http://localhost:65082/services/EchoUMO" exchange-pattern="request-response"/>
<cxf:jaxws-service serviceClass="org.mule.example.echo.Echo"/>
<component>
<singleton-object class="org.mule.example.echo.Echo" />
</component>
</flow>
现在如果去触发URL,将会得到适当的响应消息。也可以去请求WSDL,它是组件运行需要的全部的配置信息。去看整体内的配置文件,打开目录” examples/echo/src/main/app/ directory under your Mule installation directory”下的mule-config.xml文件.
2.8添加Stdio端点(Adding a STDIO endpoint)
在MULE 之前的版本中,echo实例支持在命令行输入信息时的提示,当你输入一些信息时,你正通过System.in 提供输入数据调用服务,在那时你输入的数据经由Systme.out被不停的回应回来。MULE STDIO Transport管理这个交互。
去配置STDIO 支持该流程,你需要在你的配置文件中增加STDIO的命名空间,然后使用”one-way”交换模式详细制定inbound 和 outbound端点。
<flow name="EchoFlow">
<stdio:inbound-endpoint system="IN" exchange-pattern="one-way"/>
<component>
<singleton-object class="org.mule.example.echo.Echo" />
</component>
<stdio:outbound-endpoint system="OUT" exchange-pattern="one-way"/>
</flow>
<outbound>元素允许一个或多个outbound路由元素被配置去控制如何、哪里的消息被发送,一旦他们被组件处理时。在这个例子中,所有的消息被经由System.out发送。
最后,如果你想去覆默认被传输具体指定在inbound endpoint上配置,你可以去配置一个连接器。在这个例子中,让我们覆盖stdio 传输器默认的链接器,于是提醒用户输入下面的内容:
<stdio:connector name="SystemStreamConnector"
promptMessage="Please enter something: "
messageDelayTime="1000"/>
2.9增加多个接入点
有几个方法对流程增加多个接入点,如果他们是跟随统一个处理器链,你可以使用<composite-source>,像下面所示:
<flow name="EchoFlow">
<composite-source>
<stdio:inbound-endpoint system="IN" exchange-pattern="one-way"/>
<vm:inbound-endpoint path="echo" exchange-pattern="request-response"/>
</composite-source>
<component>
<singleton-object class="org.mule.example.echo.Echo" />
</component>
</flow>
然而,如果你有明确的端点消息处理器去应用,像CXF,一个选择是去使用复合流程,在复合流程中,你引用的一个流程是来自另外的一个流程中。这个方法,你可以中止流程通过端点。看下面的例子:
<flow name="EchoStdio">
<stdio:inbound-endpoint system="IN" exchange-pattern="one-way"/>
<flow-ref name="EchoComponent"/>
<stdio:outbound-endpoint system="OUT" exchange-pattern="one-way"/>
</flow>
<flow name="EchoComponent">
<component>
<singleton-object class="org.mule.example.echo.Echo" />
</component>
</flow>
<flow name="EchoWebService">
<inbound-endpoint address="http://localhost:65082/services/EchoUMO" exchange-pattern="request-response"/>
<cxf:jaxws-service serviceClass="org.mule.example.echo.Echo"/>
<flow-ref name="EchoComponent"/>
</flow>
EchoStdio 和EchoWebService 提供两种不同的接入点。他们都死通应用执行的EchoComponent。
2.10使用一个服务来配置(Configuring using a Service)
作为选择,流程能够使用一个服务来配置,去配置这个服务,你增加一个<service>元素到你的MULE XML 配置文件中,并提供名字属性。通过使用<component>元素具体制定服务组件的类。然后和之前的一样增加http 端点和消息处理器;
<model name="echoSample">
<service name="EchoUMO">
<inbound>
<inbound-endpoint address="http://localhost:65082/services/EchoUMO"
exchange-pattern="request-response">
<cxf:jaxws-service />
</inbound-endpoint>
</inbound>
<component>
<singleton-object class="org.mule.example.echo.Echo"/>
</component>
</service>
</model>
在服务配置中,对CXF来说ServiceClass是不需要的。这是因为在这个配置中,CXF是能够自动发现组件的。基于流的配置目前还不支持,所以serviceClass必须被明确的制定。
三、HelloWorld 例子分析
3.1 概述
该部分主要描述Hello World例子的配置和行为。
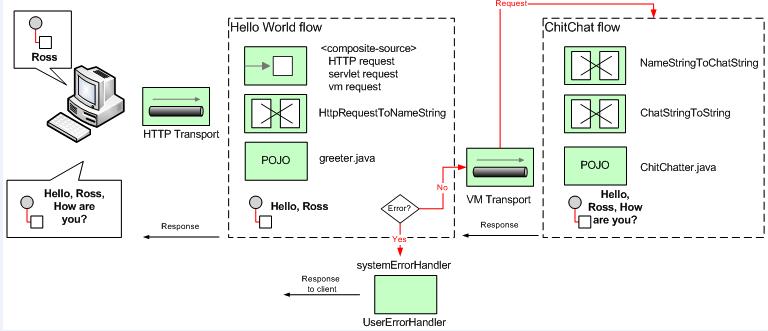
当我们在浏览器中输入预定义的地址 (http://localhost:8888/?name=Ross) 时 Mule解释输入值中“?name=”后的部分,进行验证,使greeeter.java 类去添加一些文本到字符串中,然后传递到另外一个flow,第二个flow继续添加文本,然后通过浏览器传回来;以上做的这些知识简单的方式,但是这个例子使用了flows和http传输去说明消息路由和转换器在Mule中的引用。
3.2运行应用
如果正在使用MULE IDE 环境,可以创建一个基于Hello World例子的工程,然后通过Eclipse来运行;
如果没有使用MULE IDE环境,简单的拷贝预构建的档案资料(mule-example-hello-3.0.0.zip)到应用文件夹($MULE_HOME/apps),并启动mule。去通过浏览器访问web service 调用:
http://localhost:8888/?name=Ross
通过在控制台按“CTR-C”停止mule;
3.3编译例子
同上
3.4如何工作的?
Hello World应用被配置在mule-config.xml中,这个文件存在于mule 根目录下的examples/hello/src/main/app. 该部分主要是通过配置和JAVA资源文件的调用实现的。
3.5资源文件
消息的文本是从hello-example-messages.properties文件中获得的,该文件存在于
Message text is taken from the hello-example-messages.properties file in the examples\hello\src\main\resources\messages文件夹, 以下是资源文件的内容:
1=, how are you?
2=Hello
3=Please enter your name:
4=Please provide a valid name with at least one character!
在同一个文件夹中,该属性文件有翻译的版本可以替换,例如你可以德语的字符串替换英语的字符串。
3.6类
Mule 配置文件唤起两个JAVA类去处理消息,首先是Greeter类,这个类用一个方法从LocalMessage类去推送字符串“hello”,字符串内容来自属性文件。Greeter类的方法 greet() 然后去追加人名。
public class Greeter
{
private String greeting = "";
public Greeter()
{
greeting = LocaleMessage.getGreetingPart1();
}
public Object greet(NameString person)
{
Object payload = person;
if (person.isValid())
{
person.setGreeting(greeting);
}
else
{
payload = new Exception(LocaleMessage.getInvalidUserNameError());
}
return payload;
}
}
第二个类是ChitChatter , 这个类实现附加字符串”,how are you?”.
public class ChitChatter
{
private String chitchat = "";
public ChitChatter()
{
chitchat = LocaleMessage.getGreetingPart2();
}
public void chat(ChatString string)
{
string.append(chitchat);
}
}
3.7 把类连接起来
在Hello World中,调用这些类的配置文件,在composite元素中组成了3个接入点,去接受HTTP、Servlet、和VM请求;
Hollo World flow 使用这个composite元素去获得在浏览器中输入的名字,调用greeter类,路由意外的错误去分离被调用的systemErorHandler中的handler.
<flow name="Hello World">
<composite-source>
<!-- Incoming HTTP requests -->
<inbound-endpoint address="http://localhost:8888" transformer-refs="HttpRequestToNameString" exchange-pattern="request-response">
<not-filter>
<wildcard-filter pattern="/favicon.ico"/>
</not-filter>
</inbound-endpoint>
<!-- Incoming Servlet requests -->
<inbound-endpoint address="servlet://name" transformer-refs="HttpRequestToNameString" exchange-pattern="request-response">
<not-filter>
<wildcard-filter pattern="/favicon.ico"/>
</not-filter>
</inbound-endpoint>
<!-- Incoming VM requests -->
<vm:inbound-endpoint path="greeter" transformer-refs="StringToNameString" exchange-pattern="request-response"/>
</composite-source>
...
</flow>
接入点元素使用http传输 接受接入的消息。在问候者受到消息之前,Transformer-refs属性指定接入转换器被调用。该转换器早先在配置文件被定义:
<custom-transformer name="HttpRequestToNameString" class="org.mule.example.hello.HttpRequestToNameString"/>
该转换器转换从Http Connector 收到的Http Request 为NameString 对象,该对象是类Greeter的Greet()方法预期的数据类型。当你指定逐渐的时候,可以不必指出一个具体类中的一个具体的方法—Mule 能决定基于消息数据类型的适合的方法。
Greeter类预决定对输入的用户“问候”后,消息被匹配在端点vm://chitchatter. 这是调ChitChat flow, 同时调用定制的转换器NameStringToChatString,转换NameString object为ChatString object.
<flow name="ChitChat">
<vm:inbound-endpoint path="chitchatter" transformer-refs="NameStringToChatString"
responseTransformer-refs="ChatStringToString" exchange-pattern="request-response"/>
<component class="org.mule.example.hello.ChitChatter"/>
</flow>
去更多的演示转换器,ChitChatter类期待一个ChatString对象,于是我们有了一个NameStringToChatString转换器,在组件接收到消息之前,去转换消息有效部分从NameString 为ChatString。消息被接收在vm://chitchatter上,这个端点是关于Greeter类分发它的消息。
消息被处理后,该消息被作为Http响应信息被发送,这个组件上的响应转换会记录。甚至认为没有接出提供者,再有一个转换器ChatStringToString,设置 Even though there is no outbound provider, there is one more transformer, ChatStringToString,它转换有效负载从ChatString 为 平常的string ,所以他能被Http 传输处理,在http响应中被显示。
注释:JAVA类没有任何的路由逻辑,他们是通过Mule的配置文件连接在一起的,能实现在JAVA类,WebService等之间传递消息
3.8 配置Servlet 传输
在Web容器中部署MULE是很常见的,使用Web Server 代替Mule Http Transport去管理Http connection。通过Servlet的方式调用Hello 服务,提交一个Web 表单,如下:
<form method="POST" action="/mule-examples/rest?endpoint=greeter">
<input type="text" name="payload"/>
<input type="submit" value="POST" />
</form>
使用Servlet传输,下面的端点能被添加到配置文件中 (注释: the REST endpoint currently only works on the servlet transport only since the HttpRequestToParameter transformer only supports servlets.):
<inbound-endpoint address="servlet://name" transformer-refs="HttpRequestToNameString" exchange-pattern="request-response">
<not-filter>
<wildcard-filter pattern="/favicon.ico"/>
</not-filter>
</inbound-endpoint>
<inbound-endpoint address="servlet://rest" transformer-refs="HttpRequestToParameter StringToNameString" responseTransformer-refs="PlainTextResponseTransformer" exchange-pattern="request
3.9 配置VM 传输
这个实例也演示在Mule 程序中如何连接服务、如何使用mule Client
<vm:inbound-endpoint path="greeter" transformer-refs="StringToNameString" exchange-pattern="request-response"/>
然后用Mule Client API 去调用服务:
MuleClient client = new MuleClient(muleContext);
client.send("vm://greeter", "Ross", null);
MuleMessage response = client.send("vm://greeter", "Ross", null);
System.out.println("response = " + response.getPayload());