一、背景:
使用MySQL5.6过程中,发现默认的加密插件为mysql_native_password。而sha256_password的安全程度要比mysql_native_password高,尝试切换为sha256_password。
二、配置过程:
资料:
1、从MySQL官网查询到服务器端sha256_password无需显式加载,可以在MySQL配置文件中配置使能。
官网见:https://dev.mysql.com/doc/refman/5.6/en/sha256-pluggable-authentication.html
[mysqld]
default-authentication-plugin=sha256_password
2、据官网描述,要启用插件,须通过ssl方式进行连接,也就是说需要配置相关证书。
实现过程:
1、下载MySQL安装包,https://dev.mysql.com/downloads/mysql/5.6.html#downloads
 】
】

2、安装MySQL
下载的的MySQL是zip格式的,解压到磁盘后,将my-default.ini另存为my.ini(此处看个人爱好,可不用),关于my.ini需要修改的地方如下:
1)basedir datadir port 需要根据自己使用情况配置。
2)配置默认启用的加密插件。
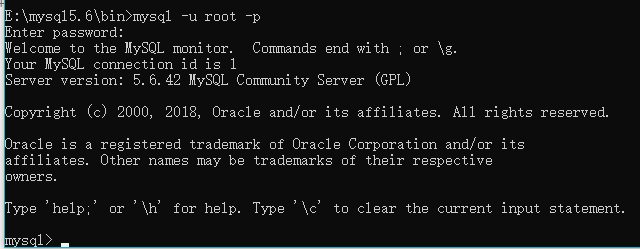
3、简单配置完mysql配置文件后,以管理员方式打开cmd,进入第二步解压后的xxxmyql/bin目录。
1)执行mysqld -install(tips:mysqld -remove 是卸载mysql),也可以执行服务名称及配置文件路径:mysqld install mysql5 --defaults-file="E:mysql5.6my.ini"

2)执行net start mysql5启动MySQL服务(我的服务名称为mysql5,上一步install时指定了服务名称,如果install时没指定默认就是MySQL)

3)输入mysql -uroot -p连接数据库。第一次进入没有密码,直接回车。
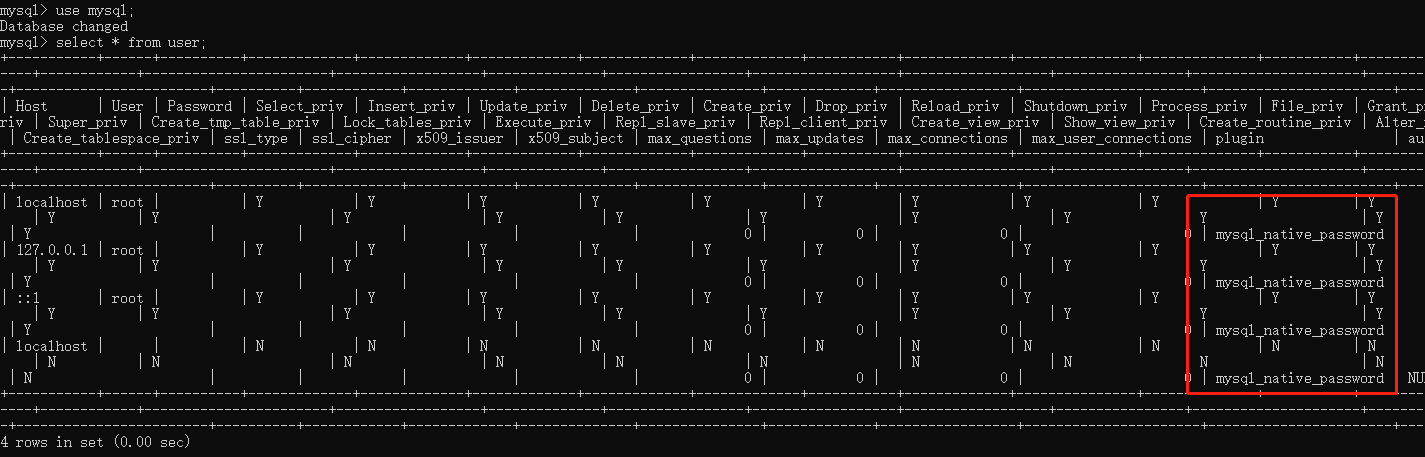
4)进入mysql数据库,查询user表的内容,发现默认使用的加密插件为mysql_native_password如下图。
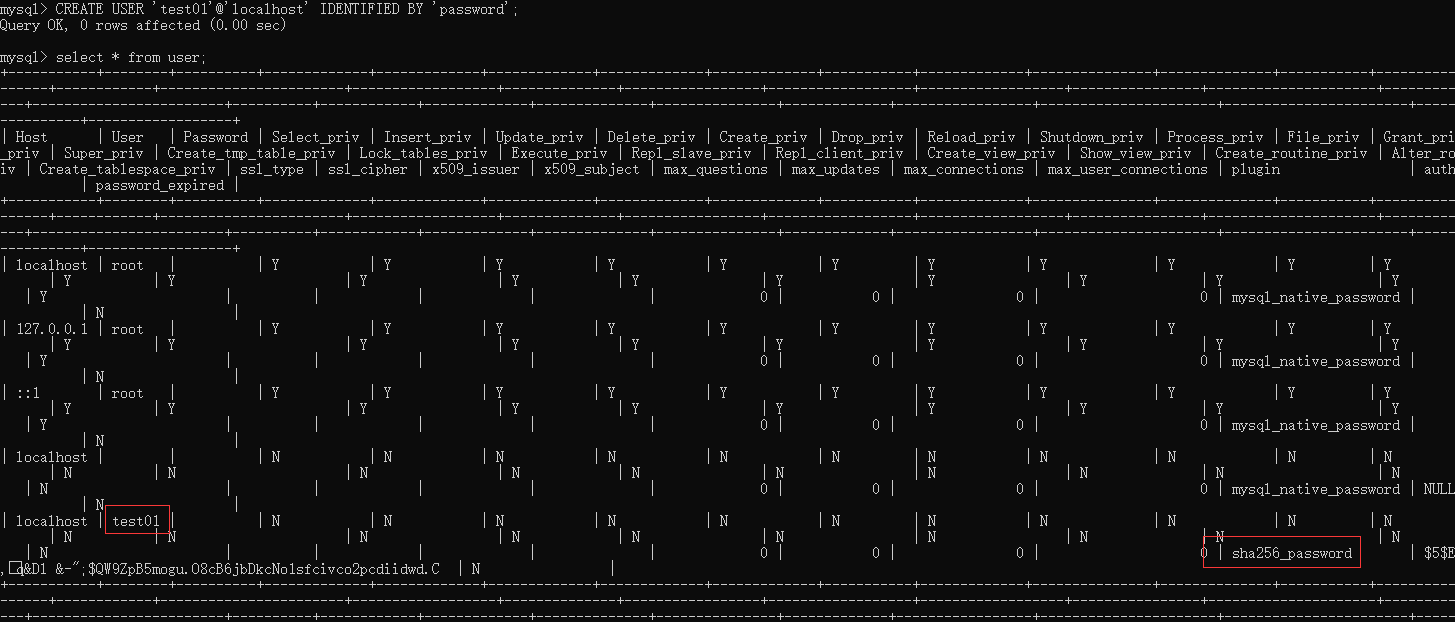
是不是my.ini配置的sha256_password没有生效呐?创建一个用户验证下插件是否生效。执行:CREATE USER 'test01'@'localhost' IDENTIFIED BY 'password';发现默认插件是生效了的。但是默认的root为啥不是sha256_password呢,我猜想(只是猜想)
可能是假如root用户默认为sha256_password,那么使用root连接的话,就需要配置相关证书,这样使MySQL的安装过程复杂且使用体验降低。
使用新创建的用户test01登录数据库,因为test01用户使用了sha256_password,此时是登录失败的,提示身份验证需要SSL加密。所以要使用了sha256_password插件的用户是需要通过SSL加密的,也就是需要证书的。

5)补充一点:安装完成后root用户是没有密码的,要设置密码可以执行mysqladmin -u root -p password,Enter password:直接回车,因为此时root时没有密码的,接着输入及确认输入自己的密码。至此MySQL的安装已经完成。

3.证书制作及使能
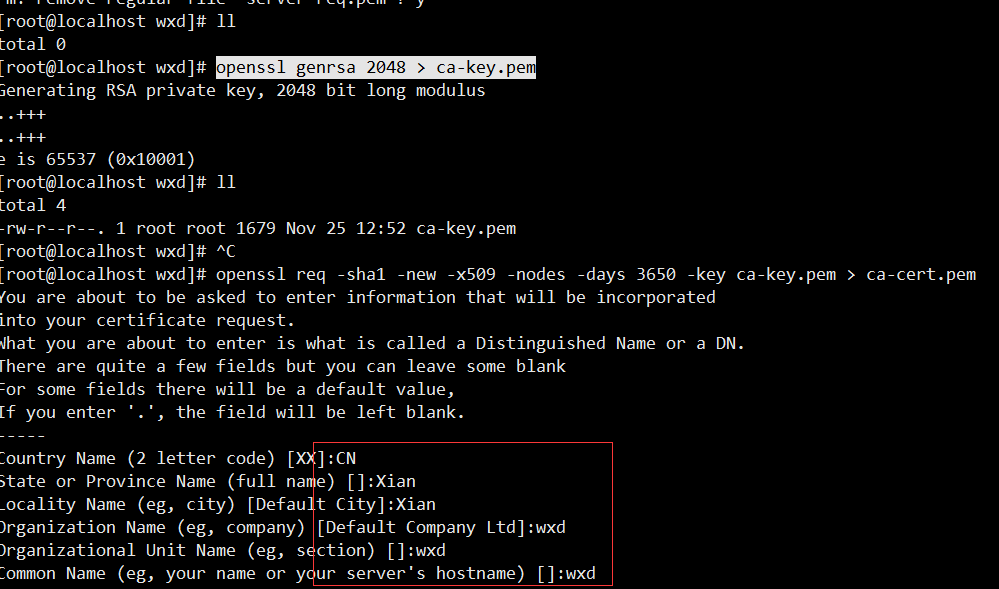
1)找一台安装openssl的Linux的虚拟机,制作证书:(参考:https://segmentfault.com/a/1190000007819751)
a 生成一个 CA 私钥:openssl genrsa 2048 > ca-key.pem
b 私钥生成一个新的数字证书:openssl req -sha1 -new -x509 -nodes -days 3650 -key ca-key.pem > ca-cert.pem,执行过程中需要填写一些内容,如国家、城市、邮箱等根据实际情况填写。
c 创建服务侧的私钥及数字证书:openssl req -sha1 -newkey rsa:2048 -days 3650 -nodes -keyout server-key.pem > server-req.pem
此时会填写一些内容如b步骤,其中有个密码可以直接回车。
d 将生成的私钥转换为 RSA 私钥文件格式:openssl rsa -in server-key.pem -out server-key.pem
e 使用CA 证书来生成一个服务器端的数字证书:openssl x509 -sha1 -req -in server-req.pem -days 3650 -CA ca-cert.pem -CAkey ca-key.pem -set_serial 01 > server-cert.pem
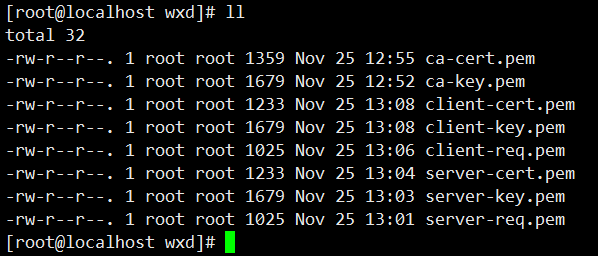
至此,服务端相关证书已创建成果,下面创建客户端证书。
f 为客户端生成一个私钥和证书:openssl req -sha1 -newkey rsa:2048 -days 3650 -nodes -keyout client-key.pem > client-req.pem 需要填写问题见步骤b
g 将生成的私钥转换为 RSA 私钥文件格式:openssl rsa -in client-key.pem -out client-key.pem
h 为客户端创建一个数字证书:openssl x509 -sha1 -req -in client-req.pem -days 3650 -CA ca-cert.pem -CAkey ca-key.pem -set_serial 01 > client-cert.pem
至此,客户端和服务端证书全部创建完毕,生产八个文件如下:
2)配置证书
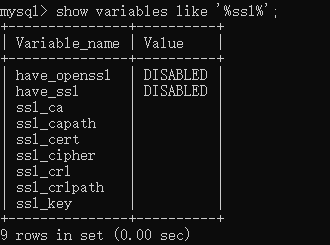
a 现在数据库中是没有开启SSL的,执行命令查看:show variables like '%ssl%';
b 开启SSL方法:证书使能,在MySQL的配置文件my.ini中指定服务端证书路径
ssl-ca=E:/mysql5.6/cert/ca-cert.pem
ssl-cert=E:/mysql5.6/cert/server-cert.pem
ssl-key=E:/mysql5.6/cert/server-key.pem
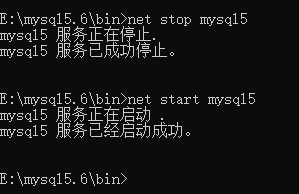
c 重启MySQL服务,执行net stop mysql5停止服务,再执行net startmysql5开启服务
d 再次执行show variables like '%ssl%'; 查看SSL已经开启了

至此MySQL安装及配置证书过程结束。
测试:
1、上面步骤中,在数据库中创建了以sha256_password加密的test01用户,密码为password。此时我们用一般的方式连接肯定会报错

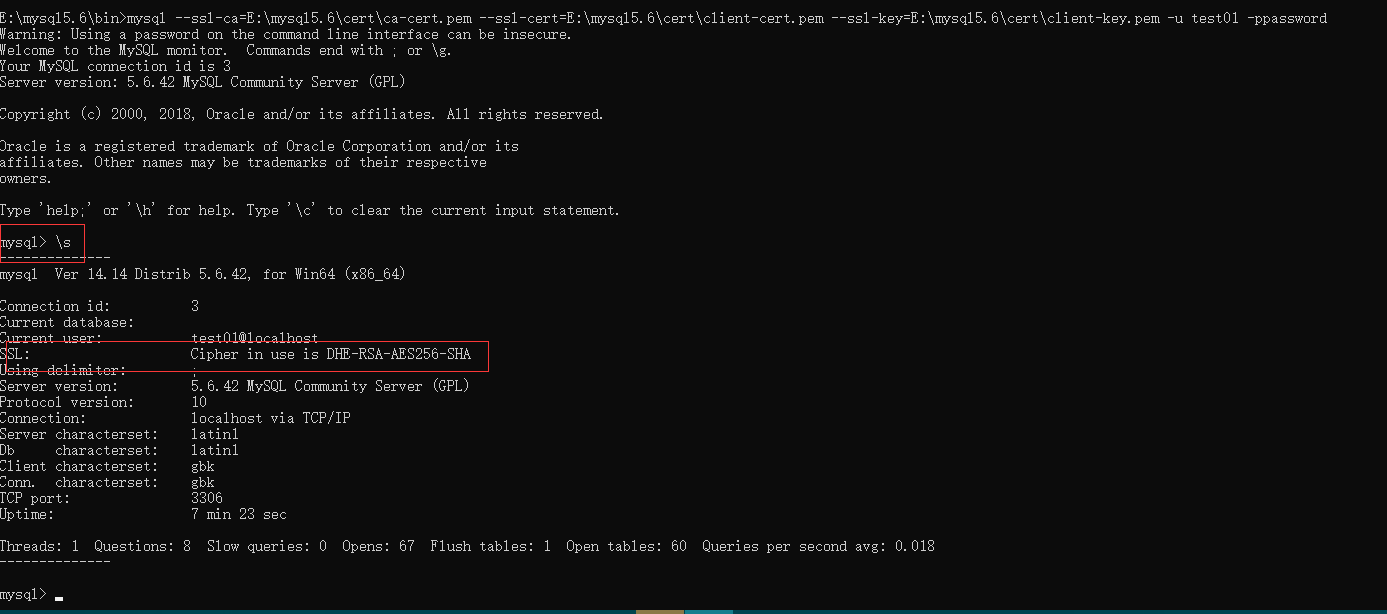
2、使用开启SSL、指定证书的方式连接就是成功的,且通过s 可以看出SSL信息,命令:mysql --ssl-ca=E:mysql5.6certca-cert.pem --ssl-cert=E:mysql5.6certclient-cert.pem --ssl-key=E:mysql5.6certclient-key.pem -u test01 -ppasswor
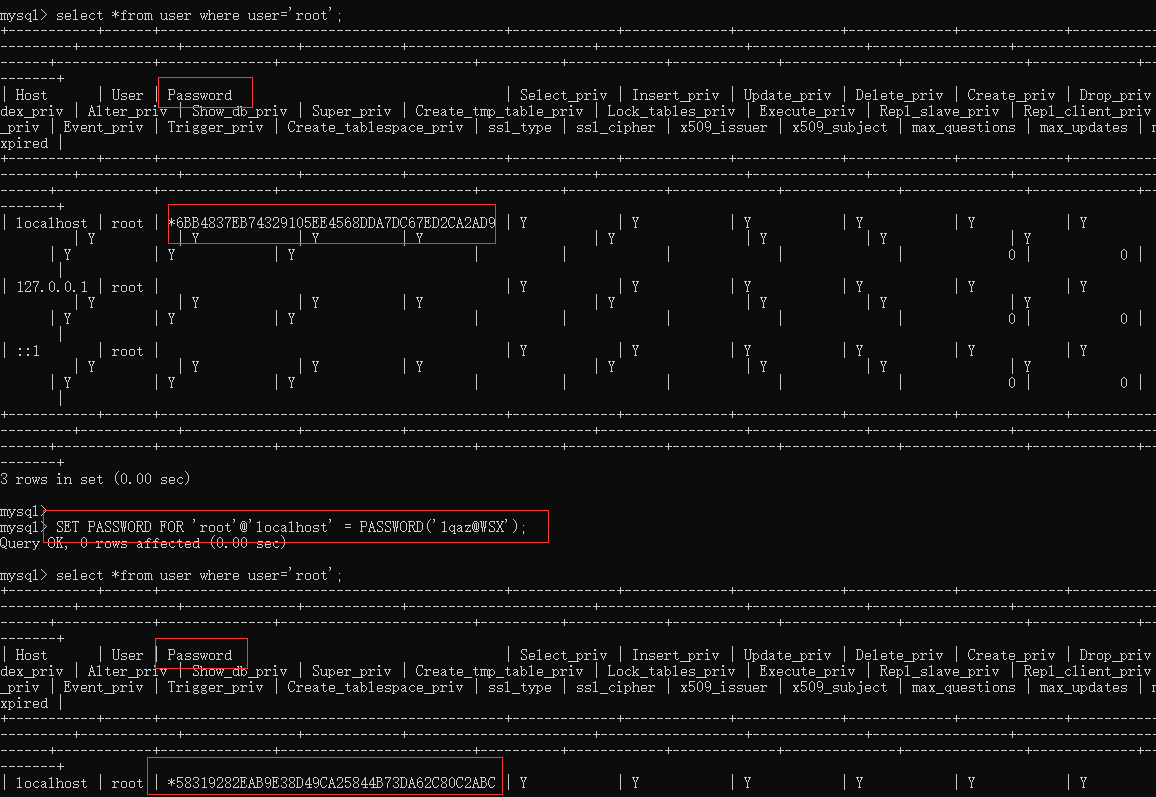
3、当前系统中的root用户还是mysql_native_password的加密方式,如果要想将root的加密方式修改的话执行:
use mysql;
update user set plugin='sha256_password' where user='root';
结果如下:

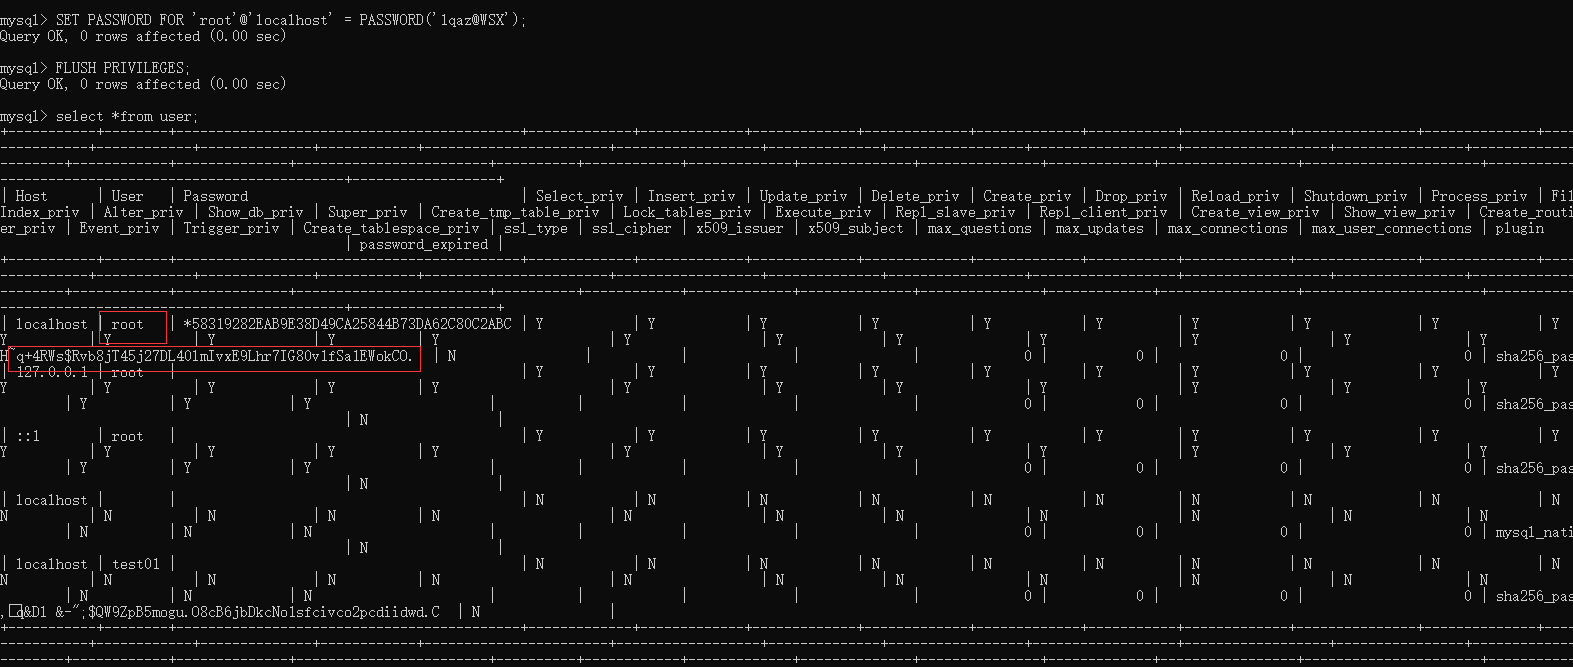
现在以root用户修改root用户的密码,执行:SET PASSWORD FOR 'root'@'localhost' = PASSWORD('1qaz@WSX');此时执行成功,再执行 FLUSH PRIVILEGES; password列已经被修改如下图,退出客户端重新连接为啥连不上了?
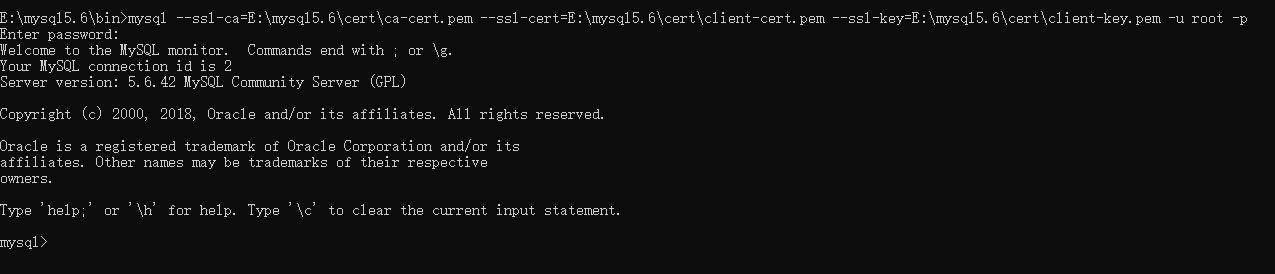
使用ssl方式连接失败了,但是使用空密码(直接回车)登录是成功的

这是为什么呢,通过分析之前使用sha256_password创建的test01用户发现:test01用户的passwor字段为空,authentication_string字段是有值的;而此时的root的password是有密文的,但authentication_string字段没有值。
所以我们能得出2点:
sha256_password加密的用户,密码其实是设置在authentication_string字段上的。
root登录时,修改密码插件后,执行SET PASSWORD FOR 'root'@'localhost'设置密码时,当前CMD的session没有实效,还是之前的加密插件在生效,修改的当然是password字段的值,而authentication_string字段的值依旧是空串。

最终使用空密码登录后再执行一次设置密码的命令,SET PASSWORD FOR 'root'@'localhost' = PASSWORD('1qaz@WSX'); FLUSH PRIVILEGES;再退出,使用root及新密码登录就是成功的了。
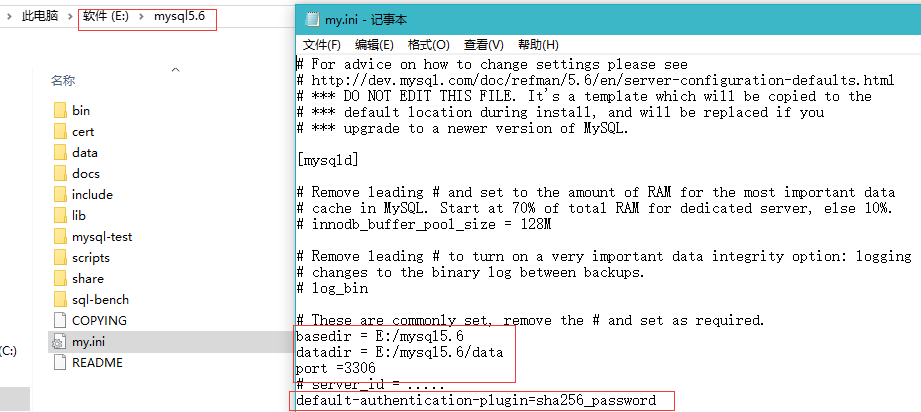
附上我的my.ini


# For advice on how to change settings please see
# http://dev.mysql.com/doc/refman/5.6/en/server-configuration-defaults.html
# *** DO NOT EDIT THIS FILE. It's a template which will be copied to the
# *** default location during install, and will be replaced if you
# *** upgrade to a newer version of MySQL.

[mysqld]

# Remove leading # and set to the amount of RAM for the most important data
# cache in MySQL. Start at 70% of total RAM for dedicated server, else 10%.
# innodb_buffer_pool_size = 128M

# Remove leading # to turn on a very important data integrity option: logging
# changes to the binary log between backups.
# log_bin

# These are commonly set, remove the # and set as required.
basedir = E:/mysql5.6
datadir = E:/mysql5.6/data
port =3306
# server_id = .....
default-authentication-plugin=sha256_password


ssl-ca=E:/mysql5.6/cert/ca-cert.pem
ssl-cert=E:/mysql5.6/cert/server-cert.pem
ssl-key=E:/mysql5.6/cert/server-key.pem

# Remove leading # to set options mainly useful for reporting servers.
# The server defaults are faster for transactions and fast SELECTs.
# Adjust sizes as needed, experiment to find the optimal values.
# join_buffer_size = 128M
# sort_buffer_size = 2M
# read_rnd_buffer_size = 2M

sql_mode=NO_ENGINE_SUBSTITUTION,STRICT_TRANS_TABLES