测试环境:
运行环境:ubuntu-20.04
内核版本:5.10.0
一、接口简介
在系统运行过程中,维护者可以通过控制 pr_debug 的开关来动态的配置某个模块中的调试信息是否输出,相对于 printk 来说,它显然是更加灵活。
二、使用方法
如内核 printk.h 文件中定义:
 1 /* If you are writing a driver, please use dev_dbg instead */
 2 #if defined(CONFIG_DYNAMIC_DEBUG) ||
 3     (defined(CONFIG_DYNAMIC_DEBUG_CORE) && defined(DYNAMIC_DEBUG_MODULE))
 4 #include <linux/dynamic_debug.h>
 5
 6 /**
 7  * pr_debug - Print a debug-level message conditionally
 8  * @fmt: format string
 9  * @...: arguments for the format string
10  *
11  * This macro expands to dynamic_pr_debug() if CONFIG_DYNAMIC_DEBUG is
12  * set. Otherwise, if DEBUG is defined, it's equivalent to a printk with
13  * KERN_DEBUG loglevel. If DEBUG is not defined it does nothing.
14  *
15  * It uses pr_fmt() to generate the format string (dynamic_pr_debug() uses
16  * pr_fmt() internally).
17  */
18 #define pr_debug(fmt, ...)
19     dynamic_pr_debug(fmt, ##__VA_ARGS__)
20 #elif defined(DEBUG)
21 #define pr_debug(fmt, ...)
22     printk(KERN_DEBUG pr_fmt(fmt), ##__VA_ARGS__)
23 #else
24 #define pr_debug(fmt, ...)
25     no_printk(KERN_DEBUG pr_fmt(fmt), ##__VA_ARGS__)
26 #endif
可以看到通过配置可以分别实现有三种功能:
1)只有当 CONFIG_DYNAMIC_DEBUG 等宏已定义时,动态输出功能才会真正的启用,其核心是靠 dynamic_pr_debug 来实现,大概是通过将描述信息插入到 section("__dyndbg") 段内来进一步实现;
2)在引用到 pr_debug 接口的某个文件或某个模块中,通过自定义一个 DEBUG 来配置它的第二种实现,这时候大家可以发现它就等同于 printk,很直观;
3)如果前两种配置都不成立,那么好了, pr_debug 将不会有任何的输出。
三、实例测试
测试源码:
【 pr_dbg.c 】
 1 #include <linux/kernel.h>
 2 #include <linux/module.h>
 3 #include <linux/init.h>
 4 #include <linux/timer.h>
 5 #include <linux/printk.h>
 6
 7 static struct timer_list timer = {0};
 8
 9 void timer_handler(struct timer_list *t)
10 {
11     pr_debug("pr_dbg: This is pr_init func.
");
12     mod_timer(&timer, jiffies+msecs_to_jiffies(5000));
13 }
14
15 static int pr_test_init(void)
16 {
17     timer_setup(&timer, timer_handler, 0);
18     timer.expires = jiffies + 5 * HZ;
19     add_timer(&timer);
20
21     return 0;
22 }
23
24 static int pr_init(void)
25 {
26     pr_test_init();
27     printk("pr_init exec finished.
");
28
29     return 0;
30 }
31
32 static void pr_exit(void)
33 {
34     del_timer(&timer);
35 }
36
37 module_init(pr_init);
38 module_exit(pr_exit);
39 MODULE_LICENSE("GPL");
40 MODULE_AUTHOR("Zackary.Liu");
【 Makefile 】 :
 1 kernel_path := /root/github/linux
 2
 3 all:
 4         make -C ${kernel_path} M=`pwd` modules
 5 #KCFLAGS=-DDEBUG
 6
 7 clean:
 8         make -C ${kernel_path} M=`pwd` clean
 9
10 obj-m += pr_dbg.o
1)先测试第二种配置吧,比较简单一些,如上面说过的只要定义一个 DEBUG 即可以实现,那么我们直接就在 Makefile 中加入好,
将编译指令改为: make -C ${kernel_path} M=`pwd` modules KCFLAGS+=-DDEBUG 即可。
将模块编译好并安装,可以看到有 pr_dbg: This is pr_init func. 信息输出。
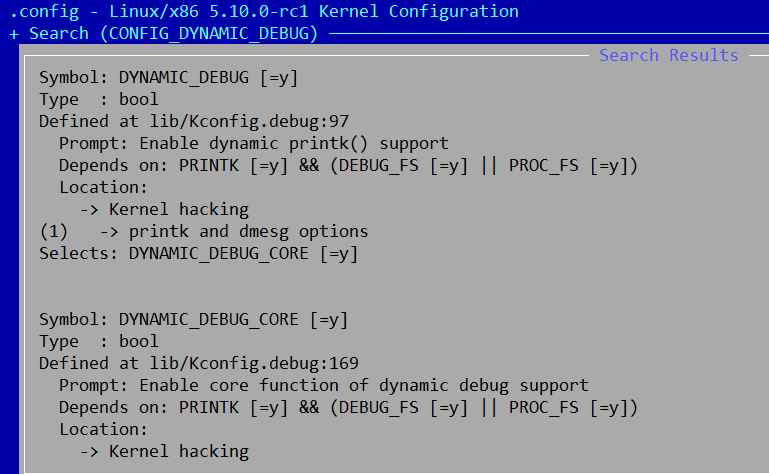
2)配置为动态输出,首先需要打开内核相关配置,并编译替换为新内核:
借助 debugfs 下的 control 接口,写入相应的指令即可控制动态输出的开关,开关默认是关闭的:
/* 先查找对应信息 */
/ # cat /sys/kernel/debug/dynamic_debug/control | grep pr_dbg
/root/kernel_modules/01-dev_dbg/pr_dbg.c:11 [pr_dbg]timer_handler =_ "pr_dbg: This is pr_init func.�12"
/* 打开信息输出开关 */
/ # echo "file pr_dbg.c +p" > /sys/kernel/debug/dynamic_debug/control
大家有没有想过,如果动态动态输出的宏与 DEBUG 宏都定义了,那么会产生什么效果呢?
对应源码的话不难发现,走的还是动态输出的流程,只不过默认就是输出调试信息了。
四、原理分析
动态输出原理分析,暂时留白。