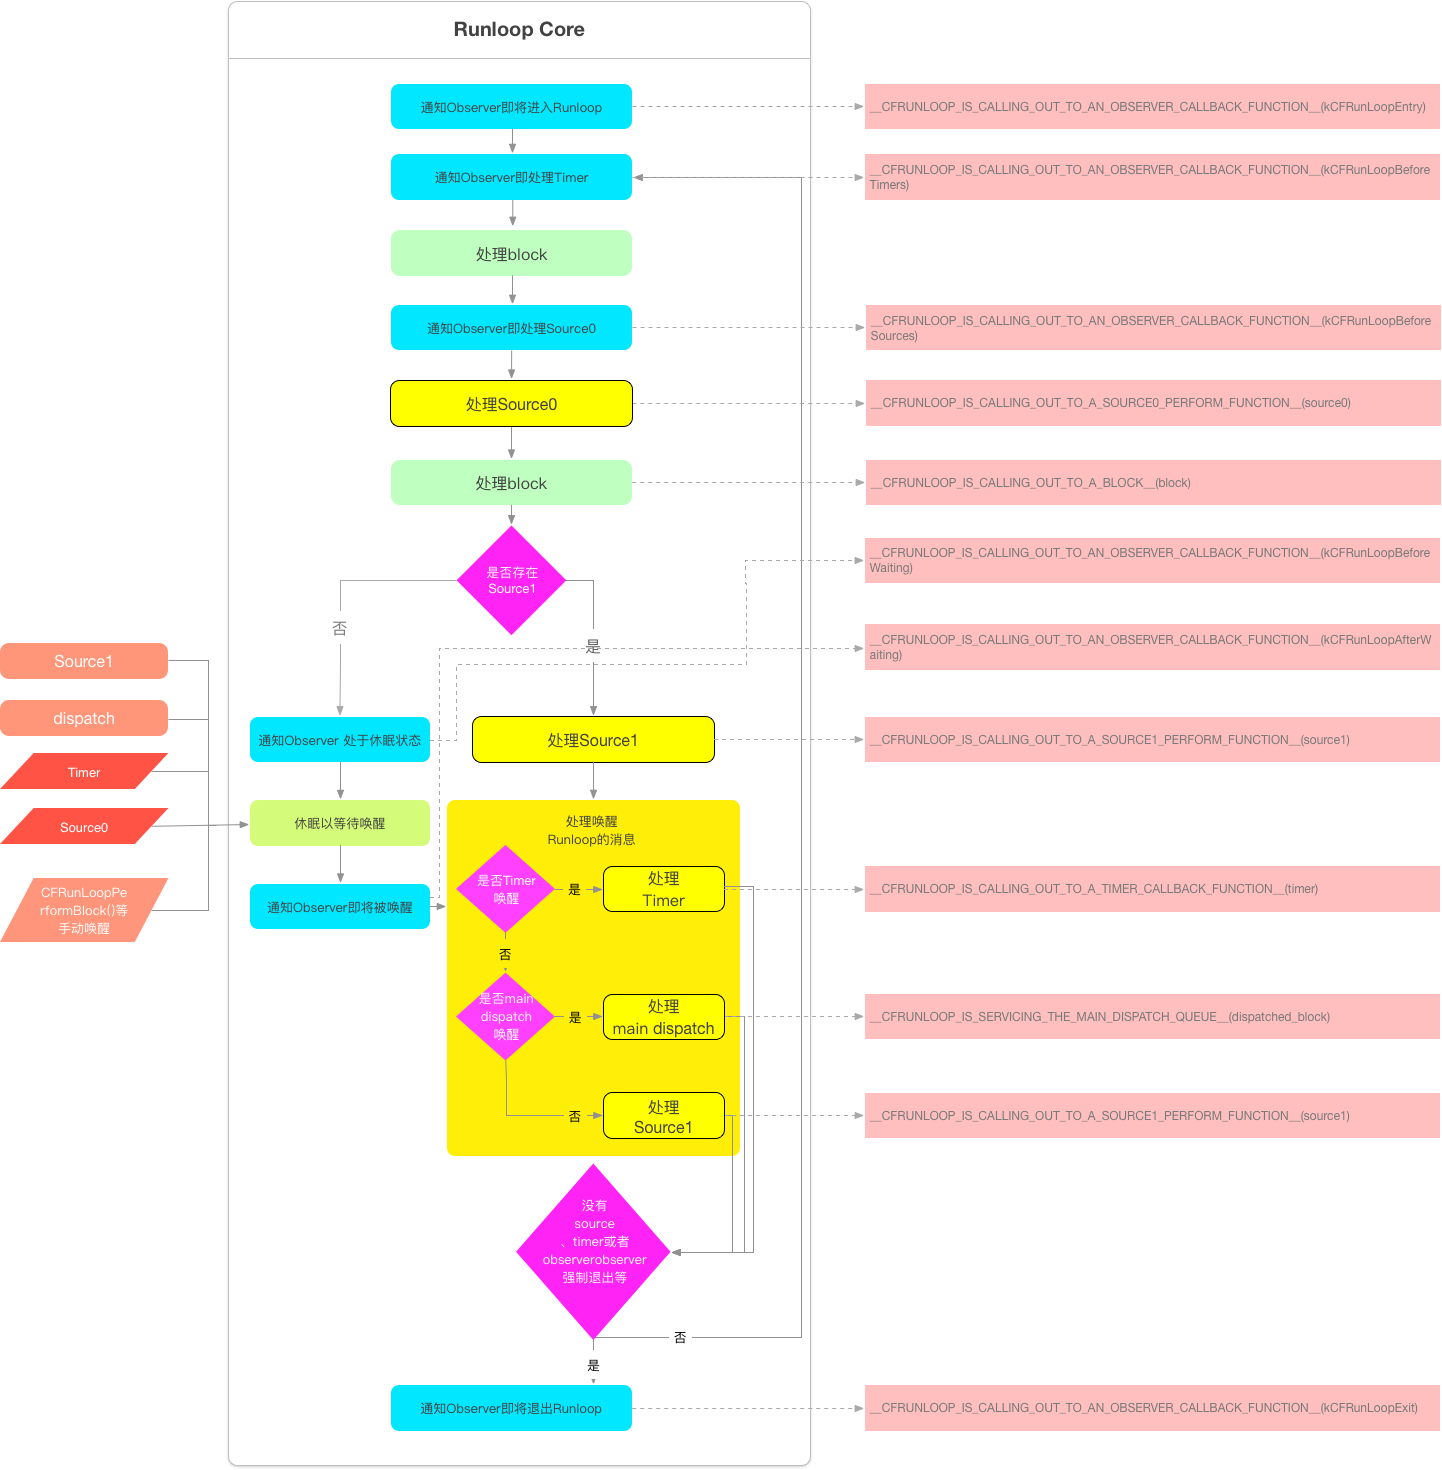
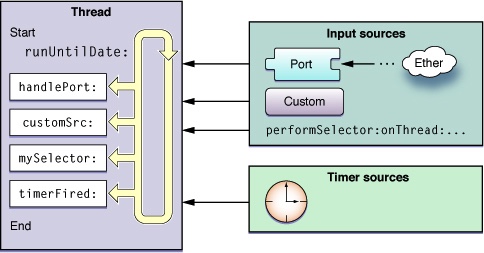
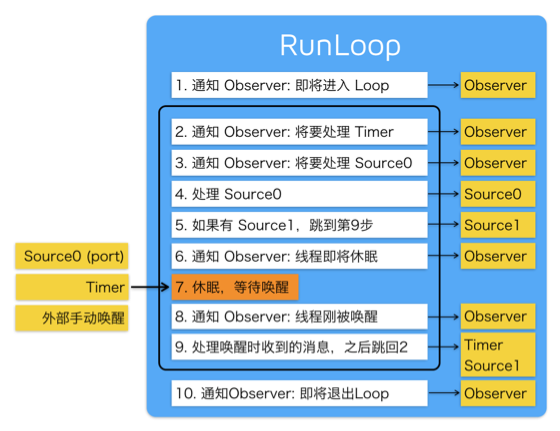
runloop运行流程图


系统默认注册了5个Mode:
kCFRunLoopDefaultMode:App的默认Mode,通常主线程是在这个Mode下运行

UITrackingRunLoopMode:界面跟踪 Mode,用于 ScrollView 追踪触摸滑动,保证界面滑动时不受其他 Mode 影响

UIInitializationRunLoopMode: 在刚启动 App 时第进入的第一个 Mode,启动完成后就不再使用

GSEventReceiveRunLoopMode: 接受系统事件的内部 Mode,通常用不到

kCFRunLoopCommonModes: 这是一个占位用的Mode,不是一种真正的Mode
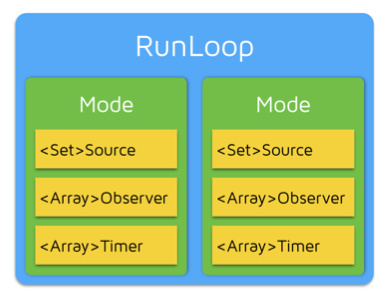
CFRunLoopModeRef代表RunLoop的运行模式
一个 RunLoop 包含若干个 Mode,每个Mode又包含若干个Source/Timer/Observer

每次RunLoop启动时,只能指定其中一个 Mode,这个Mode被称作 CurrentMode

如果需要切换Mode,只能退出Loop,再重新指定一个Mode进入

这样做主要是为了分隔开不同组的Source/Timer/Observer,让其互不影响
定时器
    dispatch_after(dispatch_time(DISPATCH_TIME_NOW, (int64_t)(2 * NSEC_PER_SEC)), dispatch_get_main_queue(), ^{
//         定时器可以运行
        NSTimer *timer = [NSTimer timerWithTimeInterval:2 target:self selector:@selector(run) userInfo:nil repeats:YES];

        [[NSRunLoop currentRunLoop] addTimer:timer forMode:NSRunLoopCommonModes];
    });

    dispatch_after(dispatch_time(DISPATCH_TIME_NOW, (int64_t)(2 * NSEC_PER_SEC)), dispatch_get_global_queue(DISPATCH_QUEUE_PRIORITY_DEFAULT, 0), ^{
//         定时器无法运行
        NSTimer *timer = [NSTimer timerWithTimeInterval:2 target:self selector:@selector(run) userInfo:nil repeats:YES];

        [[NSRunLoop currentRunLoop] addTimer:timer forMode:NSRunLoopCommonModes];
    });

    dispatch_async(dispatch_get_global_queue(DISPATCH_QUEUE_PRIORITY_DEFAULT, 0), ^{
        NSTimer *timer = [NSTimer timerWithTimeInterval:2 target:self selector:@selector(run) userInfo:nil repeats:YES];
//         定时器无法运行
        [[NSRunLoop currentRunLoop] addTimer:timer forMode:NSRunLoopCommonModes];
    });

    dispatch_async(dispatch_get_main_queue(), ^{
        NSTimer *timer = [NSTimer timerWithTimeInterval:2 target:self selector:@selector(run) userInfo:nil repeats:YES];
//         定时器可以运行
        [[NSRunLoop currentRunLoop] addTimer:timer forMode:NSRunLoopCommonModes];

    });
结论:如果定时器在主线程中开启,可以正常运行;定时器在子线程中开启,无法正常运行; 如果对应线程没有 RunLoop 该方法也会失效,也就是说currentRunloop中 没有timer,没有source,也没有OBServer,添加 [NSRunLoop currentRunLoop] run]试试; 主线程中能够运行是因为timer添加到runloop中后,主线程runloop默认是启动的,子线程中的runloop添加的timer,runloop需要手动启动.
Runloop要启动要素:1.runloop中要有timer | source | observer其中一个条件 2.runloop得自己启动
常驻线程
实例:开启一个线程,不让线程退出,这个线程一直在接受任务的处理,当一有任务,线程就接受处理,没有任务就休眠
- (void)viewDidLoad {
    [super viewDidLoad];

    self.thread = [[HJThread alloc] initWithTarget:self selector:@selector(invoke) object:nil];
    [self.thread start];
}

- (void)invoke
{
  @autoreleasepool{
    NSLog(@"******invoke*****%@", [NSThread currentThread]);
   // 添加一个port让runloop可以运行循环
    [[NSRunLoop currentRunLoop] addPort:[NSPort port] forMode:NSDefaultRunLoopMode];
    [[NSRunLoop currentRunLoop] run];
  }
    NSLog(@"************");
}

- (void)touchInvoke
{
    NSLog(@"*********touchInvoke*********%@", [NSThread currentThread]);

    NSLog(@"%@", [NSRunLoop currentRunLoop]);
}

// 屏幕点击
- (void)touchesBegan:(NSSet *)touches withEvent:(UIEvent *)event
{
    [self performSelector:@selector(touchInvoke) onThread:self.thread withObject:nil waitUntilDone:NO];
}
注意:经测试子线程虽然在defaultMode,但是拖动UIScrollView时并不会阻塞当前子线程的runloop defalutMode,因为拖动的view是在主线程的模式UITrackingMode,2个线程的模式互不干扰
停止runloop
1.需要保存当前runloop
2.使用CF函数开启运行runloop
3.使用CF函数停止runloop
#import "ViewController.h"

@interface ViewController () <NSURLConnectionDataDelegate>
/** runLoop */
@property (nonatomic, assign) CFRunLoopRef runLoop;
@end

@implementation ViewController

- (void)viewDidLoad {
    [super viewDidLoad];

    // 如果在子线程中使用NSURLConnection发送请求是不会有效果,因为子线程的runloop没有启动,子线程runloop默认是不启动的
    dispatch_async(dispatch_get_global_queue(0, 0), ^{
        NSURLConnection *conn = [NSURLConnection connectionWithRequest:[NSURLRequest requestWithURL:[NSURL URLWithString:@"http://www.baidu.com/images/234234324limgAB/2342lkjasdf3kkkkk.jpg"]] delegate:self];
        // 决定代理方法在哪个队列中执行
        [conn setDelegateQueue:[[NSOperationQueue alloc] init]];

        // 启动子线程的runLoop
//        [[NSRunLoop currentRunLoop] run];

        // 保存当前runloop
        self.runLoop = CFRunLoopGetCurrent();

        // 启动runLoop
        CFRunLoopRun();
    });
}

#pragma mark - <NSURLConnectionDataDelegate>
- (void)connection:(NSURLConnection *)connection didReceiveResponse:(NSURLResponse *)response
{
    NSLog(@"didReceiveResponse******%@", [NSThread currentThread]);
}

- (void)connection:(NSURLConnection *)connection didReceiveData:(NSData *)data
{

    NSLog(@"didReceiveData******%@", [NSThread currentThread]);
}

- (void)connectionDidFinishLoading:(NSURLConnection *)connection
{
    NSLog(@"connectionDidFinishLoading******%@", [NSThread currentThread]);

    // 停止RunLoop
    CFRunLoopStop(self.runLoop);
}

@end
定时器自动调度
//     任务自动调度,无需手动fire
    [NSTimer scheduledTimerWithTimeInterval:2 target:self selector:@selector(run) userInfo:nil repeats:YES];

    ------------------2种方式等价------------------

//    任务自动调度,无需手动fire
    NSTimer *timer = [NSTimer timerWithTimeInterval:3 target:self selector:@selector(run) userInfo:nil repeats:YES];
    //         定时器可以运行
    [[NSRunLoop currentRunLoop] addTimer:timer forMode:NSRunLoopCommonModes];
监听runloop运行循环的事件状态变化,可以用以拦截一些事件的处理
typedef CF_OPTIONS(CFOptionFlags, CFRunLoopActivity) {
    kCFRunLoopEntry = (1UL << 0),        // : 即将到 runloop
    kCFRunLoopBeforeTimers = (1UL << 1), // : 即将处理 timer 之前
    kCFRunLoopBeforeSources = (1UL << 2),// : 即将处理 source 之前
    kCFRunLoopBeforeWaiting = (1UL << 5),// : 即将休眠
    kCFRunLoopAfterWaiting = (1UL << 6), // : 休眠之后
    kCFRunLoopExit = (1UL << 7),         // : 退出
    kCFRunLoopAllActivities = 0x0FFFFFFFU// : 所有的活动
};
- (IBAction)btnClick:(id)sender {
    NSLog(@"btnDidClick*****");
}

- (void)viewDidLoad {
    [super viewDidLoad];

  // 监听runloop状态变化
    [self observer];
}

- (void)observer
{
    // 创建observer
    CFRunLoopObserverRef observer = CFRunLoopObserverCreateWithHandler(CFAllocatorGetDefault(), kCFRunLoopAllActivities, YES, 0, ^(CFRunLoopObserverRef observer, CFRunLoopActivity activity) {
        NSLog(@"****监听到RunLoop状态发生改变**%zd", activity);
    });

    // 添加观察者:监听RunLoop的状态
    CFRunLoopAddObserver(CFRunLoopGetCurrent(), observer, kCFRunLoopDefaultMode);

    // 释放Observer
    CFRelease(observer);
}
Autorelease Pool
为啥OC程序的Main函数使用autorelease pool包括了,从运行循环中也可以解释,运行循环中不断的在接受和处理事件,中间的会产生很多的变量和资源,产生的这些变量和资源会放到自动释放池中,因runloop一直没有退出,那么变量就可能没有被释放,但是加上了autorelease pool后,在runloop进入休眠前时,autorelease pool就会释放临时变量和资源,这样内存就可以得到管理; runloop重新运行时就又会创建一个自动释放池
自动释放池会再在Runloop休眠前(beforeWait)释放,又会紧接着创建一个新的自动释放池,用以下次唤醒时使用
Runloop应用:
.NSTimer
.ImageView显示
.PerformSelecor 可以给线程发送消息
.常驻线程,开启一个常驻线程,让线程不销毁,等待其他线程发送消息,然后处理任务和事件
>在子线程中开启一个定时器
>在子线程中进行一些长期监控,语音通话,或是传输数据等业务场景
.自动释放池
.可以添加Observer监听Runloop的状态,这样可以拦截一些事件处理,比如过滤器功能等.
.可以让某些事件(行为,任务)在特定的模式下执行
总结:
>运行循环,跑圈. 可以查看源码里面内部是一个do while循环,循环内部不断处理任务和事件(source,timer,observer)
>创建开启运行要素最少得要有source(消息源,source0,source1),timer中的一个条件
>一个线程对应一个Runloop(底层是通过字典保存Runloop,线程作为key,Runloop作为value),主线程的Runloop默认已经开启,子线程的Runloop的手动启动,通过调用[runloop run]方法启动
>Runloop只能选择一个Mode模式启动,如果当前模式Mode没有任何Source(消息源),timer,Runloop就会直接退出
>当kCFRunLoopEntry会创建新的释放池用以Runloop被唤醒时使用,自动释放池在runloop即将进入休眠时(kCFRunLoopBeforeWaiting)释放或kCFRunLoopExit退出时,自动释放池释放
>子线程runloop默认是不启动的,如果子线程runloop需要手动启动
可以参考文献: