CoreData简介
CoreData是一门功能强大的数据持久化技术,位于SQLite数据库之上,它避免了SQL的复杂性,能让我们以更自然的方式与数据库进行交互。CoreData提供数据--OC对象映射关系来实现数据与对象管理,这样无需任何SQL语句就能操作他们。CoreData数据持久化框架是Cocoa API的一部分,⾸次在iOS5 版本的系统中出现,它允许按照实体-属性-值模型组织数据,并以XML、⼆进制文件或者SQLite数据⽂件的格式持久化数据.
CoreData与SQLite进行对比
SQLite
1、基于C接口,需要使用SQL语句,代码繁琐
2、在处理大量数据时,表关系更直观
3、在OC中不是可视化,不易理解
CoreData
1、可视化,且具有undo/redo能力
2、可以实现多种文件格式:
    * NSSQLiteStoreType
    * NSBinaryStoreType
    * NSInMemoryStoreType
    * NSXMLStoreTyp
3、苹果官方API支持,与iOS结合更紧密
CoreData核心类与结构
NSManagedObjectContext(数据上下文)
- 对象管理上下文,负责数据的实际操作(重要)
- 作用:插入数据,查询数据,删除数据,更新数据
NSPersistentStoreCoordinator(持久化存储助理)
- 相当于数据库的连接器
- 作用:设置数据存储的名字,位置,存储方式,和存储时机
NSManagedObjectModel(数据模型)
- 数据库所有表格或数据结构,包含各实体的定义信息
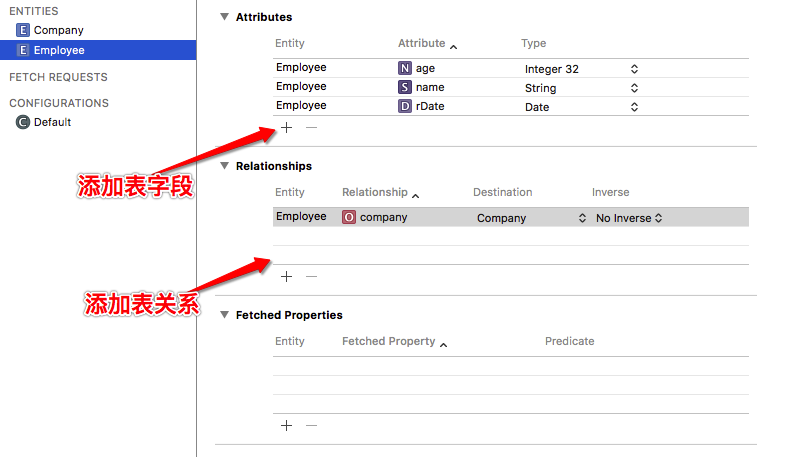
- 作用:添加实体的属性,建立属性之间的关系
- 操作方法:视图编辑器,或代码
NSManagedObject(被管理的数据记录)
- 数据库中的表格记录
NSEntityDescription(实体结构)
- 相当于表格结构
NSFetchRequest(数据请求)
- 相当于查询语句
后缀为.xcdatamodeld的包
- 里面是.xcdatamodel文件,用数据模型编辑器编辑
- 编译后为.momd或.mom文件
各类之间关系图
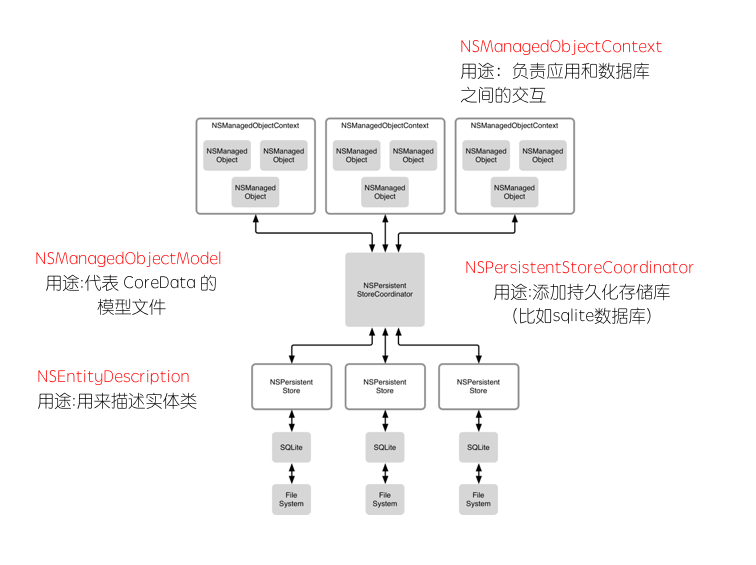
依赖关系

基本使用
.项目添加CoreData
图1.

图2.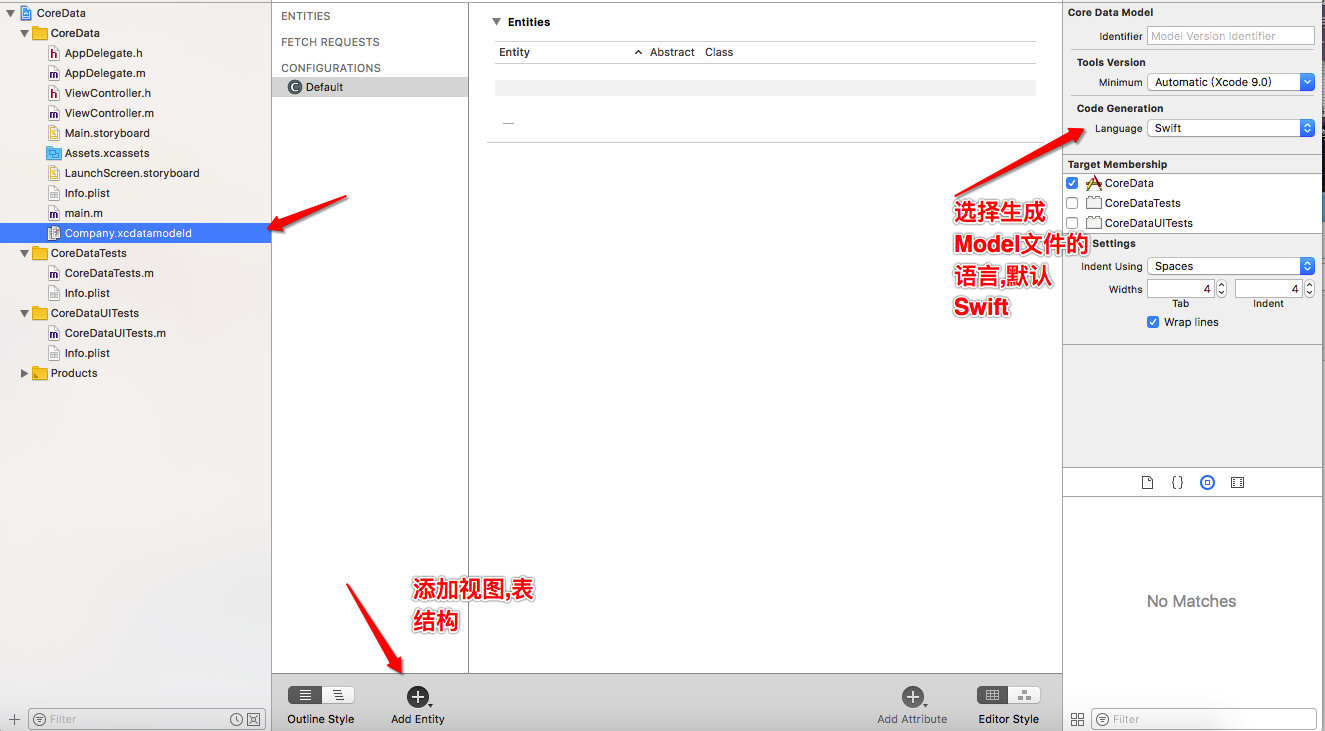
图3.
创建完实体Model后,就可以生成实体类
图4.

图5.

此消息是提示项目是OC项目,但是生成model实体类是使用Swift语言,需要建立桥接,一般采用办法是使用在上图3中把Swift修改为Objective-C.
生成实体类后编译可能会有此错误:


选中表实体修改属性codegen为Manual/None,默认是Class Definition
做完以上步骤后保证项目正常编译Success后继续下面操作.
创建模型对象和上下文
@interface ViewController ()

@property (nonatomic, strong) NSManagedObjectContext *context;

@end

@implementation ViewController

- (void)viewDidLoad {
    [super viewDidLoad];

    //1、创建模型对象
    //获取模型路径
    NSURL *modelURL = [[NSBundle mainBundle] URLForResource:@"Company" withExtension:@"momd"];
    //根据模型文件创建模型对象
    NSManagedObjectModel *model = [[NSManagedObjectModel alloc] initWithContentsOfURL:modelURL];


    //2、创建持久化助理
    //利用模型对象创建助理对象
    NSPersistentStoreCoordinator *store = [[NSPersistentStoreCoordinator alloc] initWithManagedObjectModel:model];

    //数据库的名称和路径
    NSString *docStr = [NSSearchPathForDirectoriesInDomains(NSDocumentDirectory, NSUserDomainMask, YES) lastObject];
    NSString *sqlPath = [docStr stringByAppendingPathComponent:@"mySqlite.sqlite"];
    NSLog(@"path = %@", sqlPath);
    NSURL *sqlUrl = [NSURL fileURLWithPath:sqlPath];

    //设置数据库相关信息
    [store addPersistentStoreWithType:NSSQLiteStoreType configuration:nil URL:sqlUrl options:nil error:nil];

    //3、创建上下文
    NSManagedObjectContext *context = [[NSManagedObjectContext alloc] initWithConcurrencyType:NSMainQueueConcurrencyType];

    //关联持久化助理
    [context setPersistentStoreCoordinator:store];

    _context = context;

}
保存记录:
- (IBAction)add:(UIButton *)sender {
    Employee *employee = [[Employee alloc] initWithContext:self.context];
    employee.name = @"张三";
    employee.age = 28;
    employee.rDate = [NSDate date];

    Company *company = [[Company alloc] initWithContext:self.context];
    company.name = @"A公司";
    company.address = @"深圳";
    employee.company = company;

    [self.context save:NULL];
}
使用NSEntityDescription进行ManagedObject
NSEntityDescription *employeeDesc = [NSEntityDescription entityForName:NSStringFromClass([Employee class]) inManagedObjectContext:self.context];
    Employee *employee = [[Employee alloc] initWithEntity:employeeDesc insertIntoManagedObjectContext:self.context];
    employee.name = @"李四";
    employee.age = 28;
    employee.rDate = [NSDate date];

    NSEntityDescription *companyDesc = [NSEntityDescription entityForName:NSStringFromClass([Company class]) inManagedObjectContext:self.context];
    Company *company = [[Company alloc] initWithEntity:companyDesc insertIntoManagedObjectContext:self.context];
    company.name = @"B公司";
    company.address = @"香港";
    employee.company = company;

    [self.context save:NULL];
修改记录:
self.employee.age = 29;
[self.context save:NULL];
删除记录:
[self.context deleteObject:self.employee];
[self.context save:NULL];
查询记录:
//查询数据
    NSFetchRequest *fetchRequest = [[NSFetchRequest alloc] init];
    NSEntityDescription *entity = [NSEntityDescription entityForName:NSStringFromClass([Employee class]) inManagedObjectContext:self.context];
    [fetchRequest setEntity:entity];
    // Specify criteria for filtering which objects to fetch
    //谓词搜索
    //    NSPredicate *predicate = [NSPredicate predicateWithFormat:@"age = 28", ];
    //    [fetchRequest setPredicate:predicate];
    // Specify how the fetched objects should be sorted
    //排序方法(这里为按照年龄升序排列)
    NSSortDescriptor *sortDescriptor = [[NSSortDescriptor alloc] initWithKey:@"age" ascending:YES];
    [fetchRequest setSortDescriptors:[NSArray arrayWithObjects:sortDescriptor, nil]];

    NSError *error = nil;
    NSArray *fetchedObjects = [self.context executeFetchRequest:fetchRequest error:&error];
    if (fetchedObjects == nil) {
        NSLog(@"数据查询错误%@",error);
    }else{
        //结果集
//        for (NSManagedObject *employee in fetchedObjects){
//            NSLog(@"%@",[employee valueForKey:@"name"]);
//        }
        for (Employee *employee in fetchedObjects){
            NSLog(@"%@-%d-%@-%@-%@",employee.name,employee.age,employee.rDate,employee.company.name,employee.company.address);
        }
    }
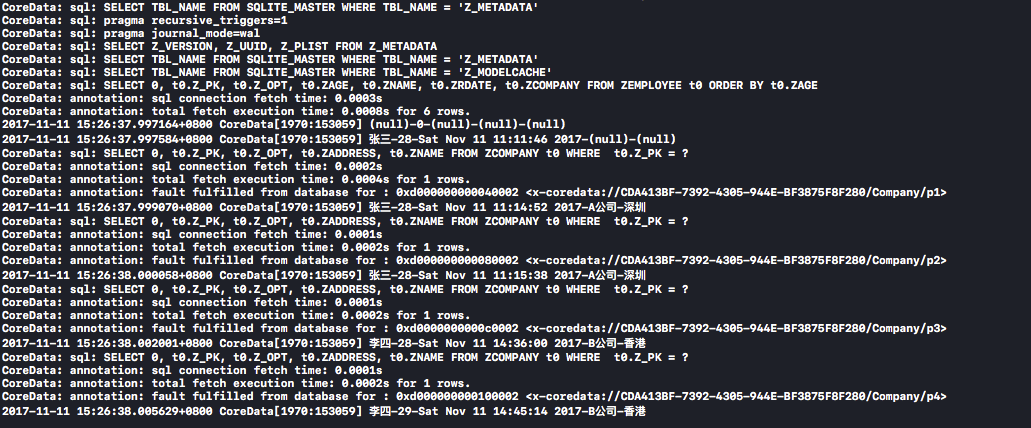
Xcode控制台显示CoreData 执行的sql
通过以下方式可以打开控制台sql输入,进入项目Edit Scheme
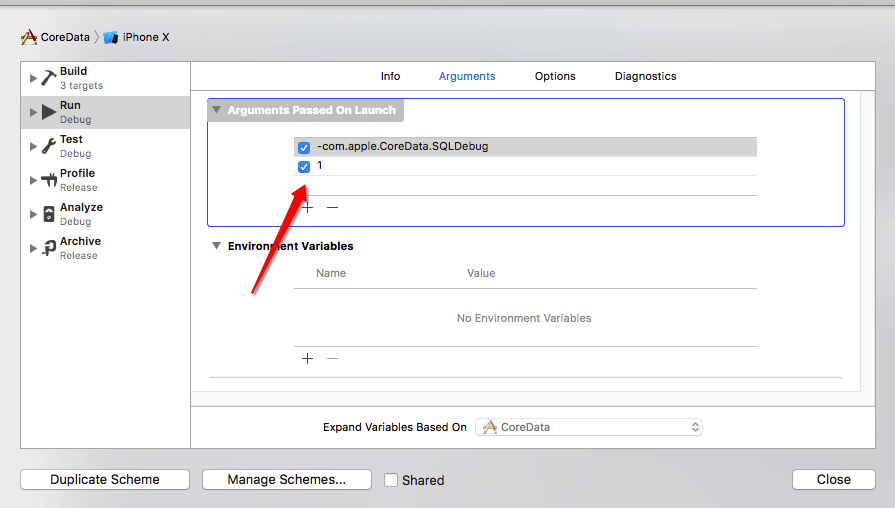
添加2个参数 1. 输入"-com.apple.CoreData.SQLDebug" 2.添加"1"
输入后重新运行项目,就可以看到控制台sql输出信息.
