环境:Centos7、JDK1.8(已经安装成功)、MySQL5.7(已经安装成功)、Git
步骤:
  1.下载Git源码
  2.移除旧版本
  3.安装&配置
1.下载Git源码
手动下载下来在上传到服务器上面,当然也可以通过wget直接下载到服务器上。这里使用wget直接下载git到服务器上。
2.移除旧版本git
Centos7自带git x.x.x.x版本,安装新版本之前需要使用yum remove git卸载(安装后卸载也可以)。
|
#可能输入git --version显示'bash: git: 未找到命令...' 则接着往下执行即可 [root@Git ~]# git --version ## 查看自带的版本 git version 1.8.3.1 [root@Git ~]# yum remove git ## 移除原来的版本 |
3.安装&配置
(1).安装依赖包
安装依赖包的时候首先需要配置yum源,如果配置了则请忽略。https://www.cnblogs.com/HOsystem/p/14033644.html
|
[root@Git ~]# yum install curl-devel expat-devel gettext-devel openssl-devel zlib-devel -y [root@Git ~]# yum install gcc-c++ perl-ExtUtils-MakeMaker -y |
(2).下载&解压
|
#进入到src中,把git源码包下载到该地方 [root@Git src]# cd /usr/src
#通过wget下载git-2.7.3版本源码,若wget不存在,则通过yum install wget安装wget [root@Git src]# wget https://www.kernel.org/pub/software/scm/git/git-2.7.3.tar.gz
#解压下载源码包 [root@Git src]# tar -zxvf git-2.7.3.tar.gz |

(3).编译安装
|
#进入解压的git目录 [root@Git src]# cd git-2.7.3
#若出现错误,接着往下看 执行yum install autoconf -y [root@Git src]# make configure
[root@Git src]# ./configure --prefix=/usr/git ##配置目录
[root@Git src]# make profix=/usr/git
[root@Git src]# make install |
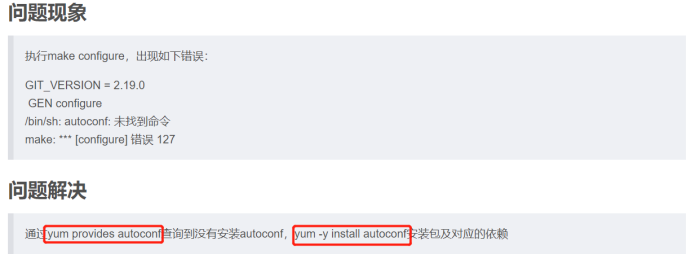
问题:'make configure'出现错误'/bin/sh:autoconf:未找到命令'
解决方法:
执行'yum install autoconf -y'.
|
[root@Git src]# yum install autoconf -y |
(4).环境变量
|
[root@Git ~]# echo "export PATH=$PATH:/usr/git/bin" >> /etc/profile [root@Git ~]# source /etc/profile |
(5).检查版本
|
#若显示git version 1.8.3.1,则未remove成功。接着往下看解决方法 [root@Git git-2.7.3]# git --version git version 2.7.3 |
问题:输入'git --verison'若显示git version 1.8.3.1,则未remove成功.只需要重新执行以下即可。

|
[root@localhost git-2.7.3]# yum remove git [root@localhost git-2.7.3]# echo "export PATH=$PATH:/usr/git/bin" >> /etc/profile [root@localhost git-2.7.3]# source /etc/profile [root@localhost git-2.7.3]# git --version git version 2.7.3 |