目录:
前言
此次是深鸿会深大小组(Zzt_01-23)学习完HarmonyOS后,自行开发的第一个demo——黑白翻棋,详细讲述了黑白翻棋的编写思路,内含详细解释,同时也欢迎与各位感兴趣的读者一起学习HarmonyOS开发,相互交流、共同进步。
概述
本个demo将从零开始完成鸿蒙小游戏APP在可穿戴设备上的编译,此处以运动手表为例,在项目中我们所使用到的软件为DevEco Studio,下载地址为:DevEco Studio下载,在项目中我们要实现的内容为黑白翻棋APP的开发。
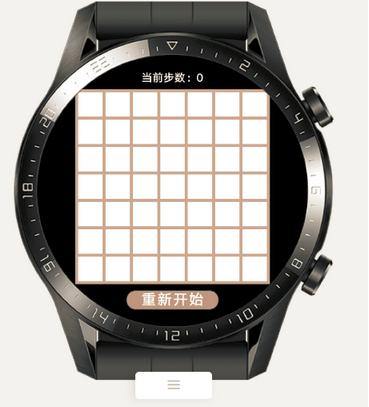
1、在初始界面中显示7*7的棋盘,棋盘中黑白色块为随意打乱的,棋盘上面显示游戏翻转的次数,棋盘下方显示一个“重新开始”的按钮,为用户提供重新开始改游戏。
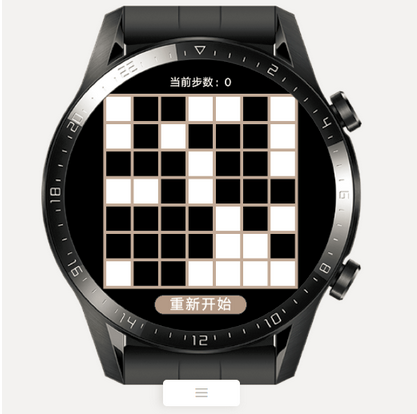
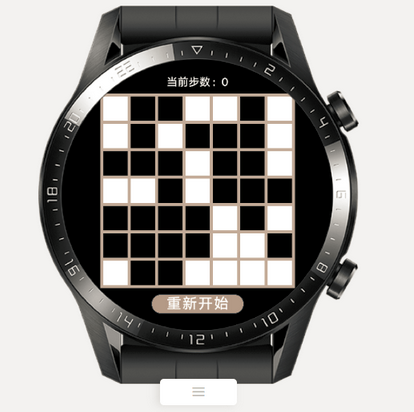
2、 点击7*7棋盘中任一色块,其上下左右四个色块也会跟着一起变色(在边缘的色块则只会改变其中若干个色块的颜色),棋盘上方的当前步数则会相应依次增加。

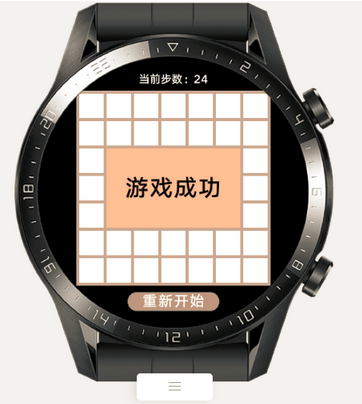
3、 经过若干次点击后,当所有的色块都为白色时,则会弹出游戏成功界面,此时再点击棋盘,不会有任何变化,点击“重新开始”的按钮时则会重新返回步骤1界面所示。
正文
创建项目文件
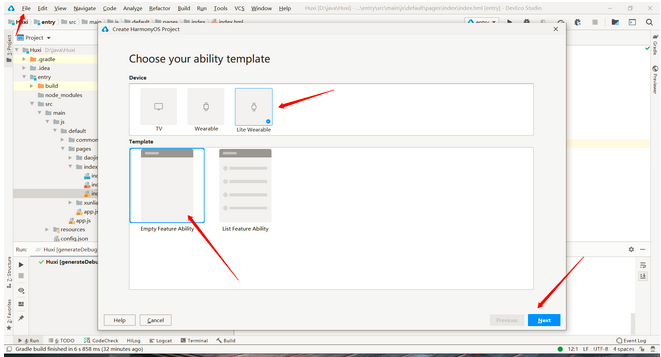
DevEco Studio下载成功后,点击左上角的File,点击New,再选择New Project,选择Lite Wearable选项,选择默认的模板,然后选择保存路径,将文件命名为MyGame(文件名不能出现中文或者特殊字符,否则将无法成功创建项目文件),如图所示。

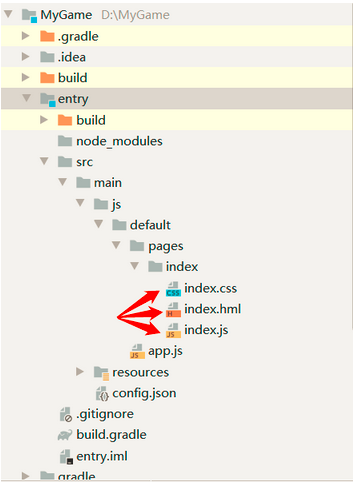
主要编写的文件为index.css、index.hml和index.js,打开路径如图所示,index.hml用于描述页面中包含哪些组件,index.css用于描述页面中的组件都长什么样,index.js用于描述页面中的组件是如何进行交互的。
实现开始界面的布局
首先我们要先在运动手表上画出一个7*7的棋盘,色块颜色先设定为全是白色,棋盘上方显示“当前步数:0”,棋盘下方有一个“重新开始”的按钮,如图所示:
首先在index.hml文件中创建一个基础容器div类名为container,在此容器中间添加一个文字组件text类名为steps,并且写上显示的固定部分”当前步数:”,为动态变换部分赋予一个名为currentSteps的变量,再添加一个画布组件canvas类名为canvas,增加一个引用属性ref,以便在此画布上画出7*7表格,最后添加一个普通按钮,类名为bit,并赋值“重新开始”
<div class="container" >
<text class="steps">
当前步数:{{currentSteps}}
</text>
<canvas class="canvas" ref="canvas" ></canvas>
<input type="button" value="重新开始" class="bit" />
</div>
在index.css编写刚才添加组件的样式,首先编写container的样式,flex-direction为容器主轴方向,选择column(垂直方向从上到下),justify-content为容器当前行的主轴对齐格式,选择center(项目位于容器的中心),align-items为容器当前行的交叉轴对齐格式,选择center(元素在交叉轴居中),width、height分别为容器以像素为单位的宽度和高度,都设定为450px;编写steps的样式,font-size为设置文本的尺寸,设定为18px,text-align为设置文本的文本对齐方式,选择center(文本居中对齐),width、height分别设定为300px和20px,letter-spacing为设置文本的字符间距,设定为0px,margin-top为设置上外边距,设定为10px;编写canvas的样式,width、height都设定为320px,background-color为设置背景颜色,设定为#BBADA0;编写bit的样式,width、height分别设定为150px和30px,background-color设定为#AD9D8F,font-size设定为24px,margin-top设定为10px
.container {
flex-direction: column;
justify-content: center;
align-items: center;
450px;
height:450px;
}
.steps {
font-size: 18px;
text-align:center;
300px;
height:20px;
letter-spacing:0px;
margin-top:10px;
}
.canvas{
320px;
height:320px;
background-color: #BBADA0;
}
.bit{
150px;
height:30px;
background-color:#AD9D8F;
font-size:24px;
margin-top:10px;
}
在index.js编写描述页面中的组件是如何进行交互的,首先在data函数中为当前步数赋值为0
data: {
currentSteps: 0,
}
在文件开头定义一个全局变量量context,创建一个onReady()函数,用于定义2d绘画工具
    var context;

    onReady(){
            context=this.$refs.canvas.getContext('2d');
        }
用0表示白色,1代表黑色,这样我们就能定义一个用0和1表示键,颜色表示值的字典COLORS,并且定义全局常量边长SIDELEN为40,间距MARGIN为5,定义一个全局变量的二维数组grids,其中的值全为0
    var grids=[[0, 0, 0, 0, 0, 0, 0],
               [0, 0, 0, 0, 0, 0, 0],
               [0, 0, 0, 0, 0, 0, 0],
               [0, 0, 0, 0, 0, 0, 0],
               [0, 0, 0, 0, 0, 0, 0],
               [0, 0, 0, 0, 0, 0, 0],
               [0, 0, 0, 0, 0, 0, 0],
               [0, 0, 0, 0, 0, 0, 0]];

    const SIDELEN=40;
    const MARGIN=5;

    const COLORS = {
        "0": "#FFFFFF",
        "1": "#000000"
    }
创建drawGrids()函数,先将grids的值利用toString()函数全部转化为字符串,fillStyle表社画图的背景颜色,引用字典即可,fillRect表示画矩形的大小,其中有四个参数,第一个参数指定矩形左上角的x坐标,第二参数指定矩形左上角的y坐标,第三个参数指定矩形的高度,第四个参数指定矩形的宽度,最后创建onShow()调用drawGrids()函数即可
    onShow(){
            this.drawGrids();
        },
        drawGrids(){
            for (let row = 0 ;row < 7 ;row++){
                for (let column = 0; column < 7;column++){
                    let gridStr = grids[row][column].toString();

                    context.fillStyle = COLORS[gridStr];
                    let leftTopX = column * (MARGIN + SIDELEN) + MARGIN;
                    let leftTopY = row * (MARGIN + SIDELEN) + MARGIN;
                    context.fillRect(leftTopX, leftTopY, SIDELEN, SIDELEN);
                }
            }
        }
运行即可得出开始界面布局了。
实现题目的随机生成和色块的翻转
其次我们要先在运动手表上随机生成一个色块被打乱的7*7的棋盘,并且点击棋盘中任一色块,其上下左右四个色块也会跟着一起变色(在边缘的色块则只会改变其中若干个色块的颜色),棋盘上方的当前步数则会相应依次增加,如图所示:

1、为了使点击任意一个色块时能得到其对应的二维数组的下标,我们需要给每个色块添加一个按钮button,并增加一个点击事件click,分别给这些按钮设定一个类名和点击按钮所调用的函数然后为了使按钮显示在棋盘格子的上方,需要添加一个栈stack类名设定位stack,使画布先进栈,按钮后进栈,这样就能达到预期效果了,index.hml代码如下:
<div class="container" >
    <text class="steps">
        当前步数:{{currentSteps}}
    </text>
    <stack class="stack">
        <canvas class="canvas" ref="canvas" ></canvas>

        <input type="button" class="bitgrid1"  onclick="getgrid1"/>
        <input type="button" class="bitgrid2"  onclick="getgrid2"/>
        <input type="button" class="bitgrid3"  onclick="getgrid3"/>
        <input type="button" class="bitgrid4"  onclick="getgrid4"/>
        <input type="button" class="bitgrid5"  onclick="getgrid5"/>
        <input type="button" class="bitgrid6"  onclick="getgrid6"/>
        <input type="button" class="bitgrid7"  onclick="getgrid7"/>
        <input type="button" class="bitgrid8"  onclick="getgrid8"/>
        <input type="button" class="bitgrid9"  onclick="getgrid9"/>
        <input type="button" class="bitgrid10"  onclick="getgrid10"/>
        <input type="button" class="bitgrid11"  onclick="getgrid11"/>
        <input type="button" class="bitgrid12"  onclick="getgrid12"/>
        <input type="button" class="bitgrid13"  onclick="getgrid13"/>
        <input type="button" class="bitgrid14"  onclick="getgrid14"/>
        <input type="button" class="bitgrid15"  onclick="getgrid15"/>
        <input type="button" class="bitgrid16"  onclick="getgrid16"/>
        <input type="button" class="bitgrid17"  onclick="getgrid17"/>
        <input type="button" class="bitgrid18"  onclick="getgrid18"/>
        <input type="button" class="bitgrid19"  onclick="getgrid19"/>
        <input type="button" class="bitgrid20"  onclick="getgrid20"/>
        <input type="button" class="bitgrid21"  onclick="getgrid21"/>
        <input type="button" class="bitgrid22"  onclick="getgrid22"/>
        <input type="button" class="bitgrid23"  onclick="getgrid23"/>
        <input type="button" class="bitgrid24"  onclick="getgrid24"/>
        <input type="button" class="bitgrid25"  onclick="getgrid25"/>
        <input type="button" class="bitgrid26"  onclick="getgrid26"/>
        <input type="button" class="bitgrid27"  onclick="getgrid27"/>
        <input type="button" class="bitgrid28"  onclick="getgrid28"/>
        <input type="button" class="bitgrid29"  onclick="getgrid29"/>
        <input type="button" class="bitgrid30"  onclick="getgrid30"/>
        <input type="button" class="bitgrid31"  onclick="getgrid31"/>
        <input type="button" class="bitgrid32"  onclick="getgrid32"/>
        <input type="button" class="bitgrid33"  onclick="getgrid33"/>
        <input type="button" class="bitgrid34"  onclick="getgrid34"/>
        <input type="button" class="bitgrid35"  onclick="getgrid35"/>
        <input type="button" class="bitgrid36"  onclick="getgrid36"/>
        <input type="button" class="bitgrid37"  onclick="getgrid37"/>
        <input type="button" class="bitgrid38"  onclick="getgrid38"/>
        <input type="button" class="bitgrid39"  onclick="getgrid39"/>
        <input type="button" class="bitgrid40"  onclick="getgrid40"/>
        <input type="button" class="bitgrid41"  onclick="getgrid41"/>
        <input type="button" class="bitgrid42"  onclick="getgrid42"/>
        <input type="button" class="bitgrid43"  onclick="getgrid43"/>
        <input type="button" class="bitgrid44"  onclick="getgrid44"/>
        <input type="button" class="bitgrid45"  onclick="getgrid45"/>
        <input type="button" class="bitgrid46"  onclick="getgrid46"/>
        <input type="button" class="bitgrid47"  onclick="getgrid47"/>
        <input type="button" class="bitgrid48"  onclick="getgrid48"/>
        <input type="button" class="bitgrid49"  onclick="getgrid49"/>
    </stack>
    <input type="button" value="重新开始" class="bit" />
</div>
2、编写stack的样式,width、height都设定为320px,margin-top设定为10px;分别编写每个按钮的样式,left为指示距边界框左上角的以像素为单位的水平坐标,top为指示距边界框左上角的以像素为单位的垂直坐标,border-color为设置边框颜色,transparent指透明颜色
作者:wx5fa5fef168fd0
想了解更多内容,请访问: 51CTO和华为官方战略合作共建的鸿蒙技术社区https://harmonyos.51cto.com