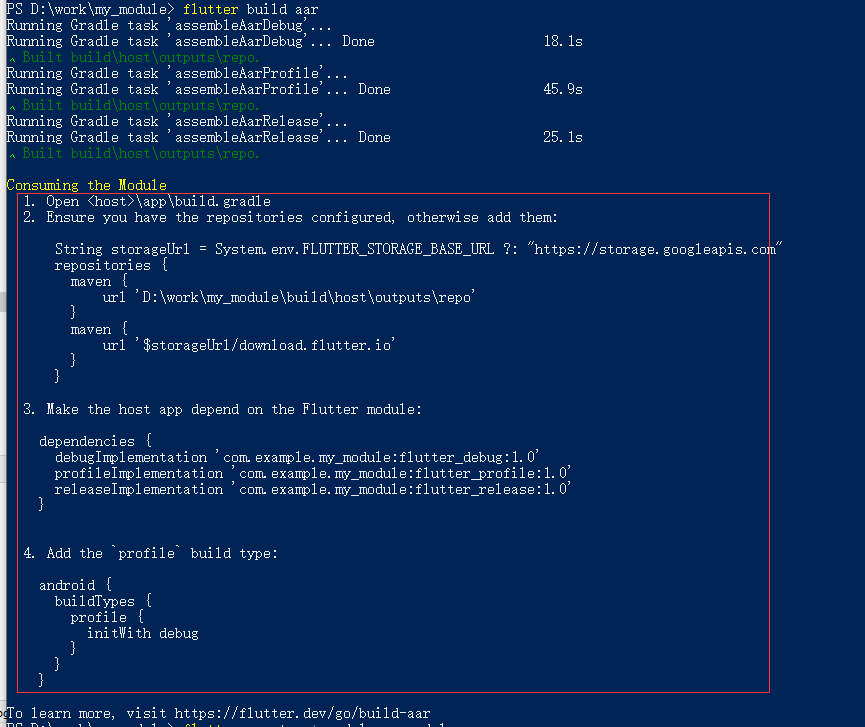
1.创建一个flutter模块项目:
flutter create -t module my_module
2.编译模块代码成aar文件:
cd my_module
flutter build aar
注意:编译完的shell窗口不要关闭,这里输出日志有后续要写入build.gradle的配置过程

3.my_module实际上也是一个flutter工程,可以用vscode直接打开开发flutter项目
4,新建一个android工程, android studio=》File->New->New Project...->Empty Activity,

5,修改android工程gradle一样的版本号和flutter模块下的gradle版本一致,我这里的是
build.gradle的
classpath 'com.android.tools.build:gradle:3.5.0'
和
gradle-wrapper.properties的
distributionUrl=https\://services.gradle.org/distributions/gradle-5.6.2-all.zip
6.按照上面第一步的shell里的配置过程,添加依赖到项目build.gradle里:
plugins {
    id 'com.android.application'
}
apply plugin: 'com.android.application'

android {
    compileSdkVersion 29

    defaultConfig {
        applicationId "com.example.myapplication"
        minSdkVersion 16
        targetSdkVersion 29
        versionCode 1
        versionName "1.0"

        testInstrumentationRunner "androidx.test.runner.AndroidJUnitRunner"
    }

    buildTypes {
        profile {
            initWith debug
        }
        release {
            minifyEnabled false
            proguardFiles getDefaultProguardFile('proguard-android-optimize.txt'), 'proguard-rules.pro'
        }
    }
    compileOptions {
        sourceCompatibility JavaVersion.VERSION_1_8
        targetCompatibility JavaVersion.VERSION_1_8
    }
}

String storageUrl = System.env.FLUTTER_STORAGE_BASE_URL ?: "https://storage.flutter-io.cn"
repositories {
    google()
    mavenCentral()
    jcenter() // Warning: this repository is going to shut down soon
    maven {
        url 'D:\\work\\my_module\\build\\host\\outputs\\repo'
    }
    maven {
        url '$storageUrl/download.flutter.io'
    }


    maven {
        url 'http://download.flutter.io'
    }
}


dependencies {
    implementation 'androidx.appcompat:appcompat:1.2.0'
    implementation 'com.google.android.material:material:1.3.0'
    implementation 'androidx.constraintlayout:constraintlayout:2.0.4'
    testImplementation 'junit:junit:4.+'
    androidTestImplementation 'androidx.test.ext:junit:1.1.2'
    androidTestImplementation 'androidx.test.espresso:espresso-core:3.3.0'

    debugImplementation 'com.example.my_module:flutter_debug:1.0'
    profileImplementation 'com.example.my_module:flutter_profile:1.0'
    releaseImplementation 'com.example.my_module:flutter_release:1.0'
}
7.启动app,打开工程AndroidManifest.xml文件,添加FlutterActivity,
<activity
            android:name="io.flutter.embedding.android.FlutterActivity"
            android:theme="@style/LaunchTheme"
            android:configChanges="orientation|keyboardHidden|keyboard|screenSize|locale|layoutDirection|fontScale|screenLayout|density|uiMode"
            android:hardwareAccelerated="true"
            android:windowSoftInputMode="adjustResize"
            />
点击按钮切换flutter界面,
默认入口main.dart方法:
 TextView button = (TextView) findViewById(R.id.aaa);
        button.setOnClickListener(new View.OnClickListener() {
            @Override
            public void onClick(View v) {
                startActivity(
                        FlutterActivity.createDefaultIntent(MainActivity.this)
                );
            }
        });
指定route方法:
myButton.addOnClickListener(new OnClickListener() {
  @Override
  public void onClick(View v) {
    startActivity(
      FlutterActivity
        .withNewEngine()
        .initialRoute("/my_route")
        .build(currentActivity)
      );
  }
});
转载请注明出处,from博客园HemJohn