最近要学太多东西了,学得太浅容易忘记,所以决定拿个实际项目练手,近期会整理笔记上传
1. Spring Security
进入Spring官网的Security可以看到下面这样一个简介:
Spring Security是一个功能强大且高度可定制的身份认证和访问控制框架,它是用于保护基于Spring的应用程序的实际标准。Spring Security是一个框架,致力于为Java应用程序提供身份认证和授权。与所有Spring项目一样,Spring Security的真正强大之处在于可以轻松扩展以满足自定义要求
特点
- 全面可扩展的身份认证与授权
- 防止攻击,跨站请求
- Servlet API集成
- 与SpringMVC可选集成
以前我们用拦截器或过滤器来做身份认证和权限等功能,类比Spring Security,其底层是一组过滤器链FilterChain,所以学好基础有助于框架的学习
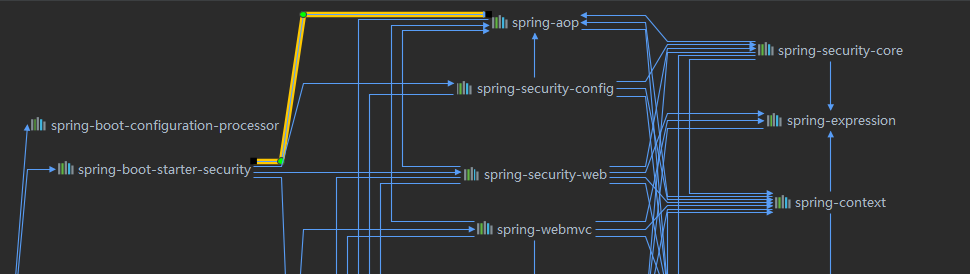
通过pom.xml的依赖关系知道Spring Security是依赖于AOP的,有切面编程的成分,即不需要修改我们原有的代码
总的来说:Spring Security是提供身份认证与授权功能的框架
2. HelloWorld
Spring Security各版本更新变化挺大的,所以列出使用的版本。笔者使用SpringBoot 2.2.5.RELEASE,也就是 Spring Security 5.2.2.RELEASE
2.1 导包
导入了最基本的依赖
 <dependency>
     <groupId>org.springframework.boot</groupId>
     <artifactId>spring-boot-starter-web</artifactId>
</dependency>
<dependency>
    <groupId>org.springframework.boot</groupId>
    <artifactId>spring-boot-starter-security</artifactId>
</dependency>
2.2 启动项目
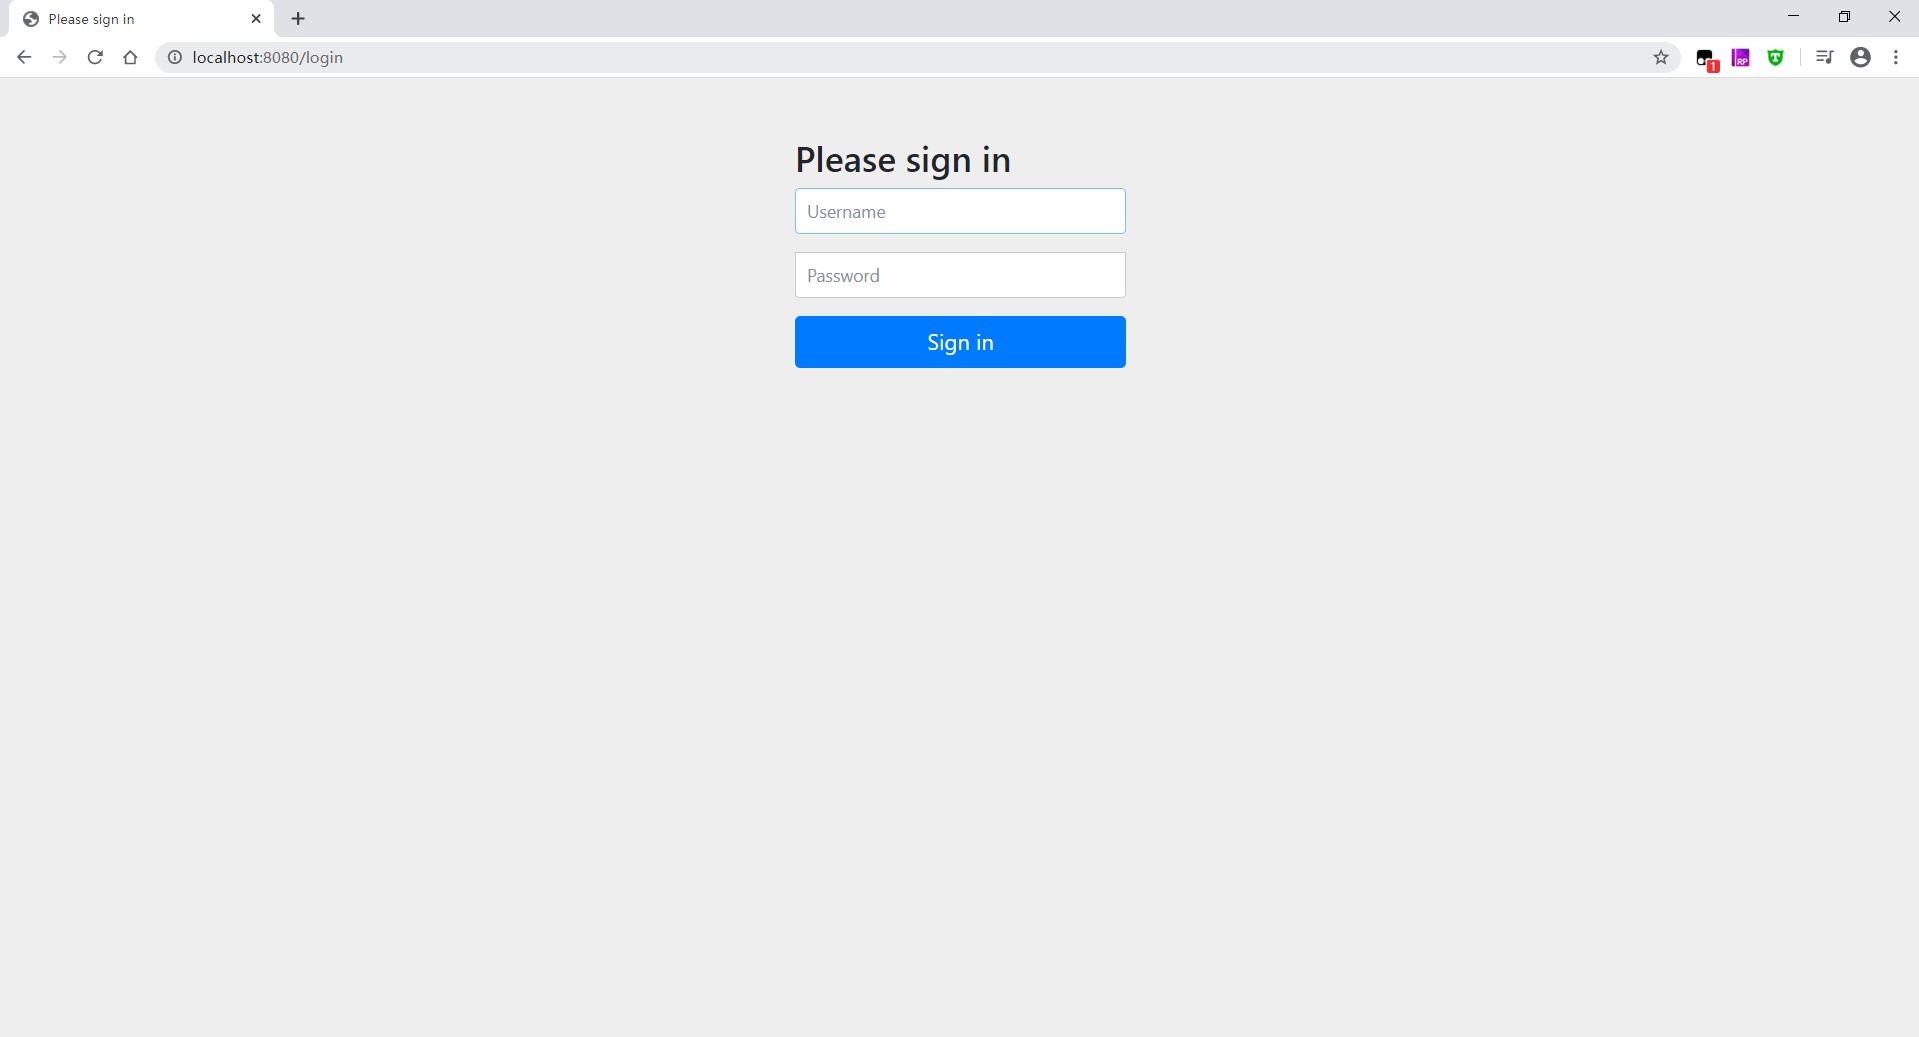
直接启动Springboot项目然后打开,就会看到有登录页面了(Spring Security自带的)表示Spring Security运行正常,当然我们什么也没有配置,到这里就是HelloWorl的过程了
3. 身份认证
这里我们新建几个页面,其中index全体人员可以访问,page1-3只有对应权限的人可以访问,admin可以访问所有的页面
3.1 新建配置类SecurityConfig
用注解配置,里面的方法会注释说明
@EnableWebSecurity
public class SecurityConfig extends WebSecurityConfigurerAdapter {  // 使用了适配器模式
    @Override
    // 参数我们使用Http,因为现在我们使用的是http
    // 下面的方式调用可以是链式调用
    // 其中方法做简要解释,其实看英文就大概知道什么意思了
    protected void configure(HttpSecurity http) throws Exception {
        http.authorizeRequests()  // 表示http要请求授权
                .antMatchers("/").permitAll()  // 匹配地址"/",所有人都可访问
                .antMatchers("/page1**").hasRole("page1VIP")  // 访问对应地址,需要角色"page1VIP"
                .antMatchers("/page2**").hasRole("page2VIP")  // 而角色属于权限和数据库方面知识
                .antMatchers("/page3**").hasRole("page3VIP")
            	.and() // 将上面的配置合并下面的配置
            	.formLogin()  // 打开自带的登录页面
            	.and()
            	.rememberMe() // 记住我功能
        		.and()
                .logout();  // 注销
    }

    @Override
    // 为了简便而不使用数据库,直接在内存构造一些用户数据
    protected void configure(AuthenticationManagerBuilder auth) throws Exception {
        // 新版本需要密码编码,因为用户信息写死在代码中会被反编译获取
        auth.inMemoryAuthentication()
            .passwordEncoder(new BCryptPasswordEncoder())  // 添加密码编码
                .withUser("admin")  // 添加用户名
                .password(new BCryptPasswordEncoder().encode("admin")) // 添加用户密码,加了编码
                .roles("page1VIP", "page2VIP","page3VIP")  // 给予权限
                .and()  // 将上面的配置合并下面的配置
            	.withUser("page1")
                .password(new BCryptPasswordEncoder().encode("page1"))
                .roles("page1VIP");
    }
}
- 没有权限则会自动跳转登录页,登陆后返回刚才的页面
- 该类需要继承WebSecurityConfigurerAdapter并重写里面的方法才能实现定制配置
- @EnableWebSecurity表示开启配置类,内部有各种组合注解属于Springboot原理
3.2 认证授权测试
- 主页谁都可以访问
- 状态码403表示无权访问
- 记住我功能是加了cookie(remember)实现
- 注销即删除了相应的cookie
4. 自定义配置
我们不满足于Security提供的页面及其传参地址,那么就需要自定义
4.1 查看默认配置
.and().formLogin这个是提供默认登录表单的,我们点进去看原码,注意看其上的注释注释注释,这里截取部分
@Override
protected void configure(HttpSecurity http) throws Exception {
    http.authorizeRequests().antMatchers("/**").hasRole("USER")
    .and().formLogin()
	.usernameParameter("username") // default is username,默认的用户名接参name
    .passwordParameter("password) // default is password,默认的密码接参name
	.loginPage("authentication/login") // default is /login with an HTTP get,默认的登录页地址
	.failureUrl("authentication/login?failed") // default is /login?error,默认登录失败跳转地址
	.loginProcessingUrl("/authentication/login/process");// default is /login with an HTTP post
                       // 默认的登录处理url,即传表单的地址
}
看过一个方法的注释,我们就可以举一反三,各个函数都可通过注释来了解其有什么可定制的功能
4.2 修改默认配置
此时可以添加自定义的登录页面和注销提交地址,那么其配置可改成如下
@Override
protected void configure(HttpSecurity http) throws Exception {
    http.authorizeRequests()
        .antMatchers("/").permitAll()
        .antMatchers("/page1**").hasRole("page1VIP")
        .antMatchers("/page2**").hasRole("page2VIP")
        .antMatchers("/page3**").hasRole("page3VIP")

        .and()
        .formLogin()
        .loginPage("/login.html")  // 自定义了一个登录页
        .usernameParameter("user")
        .passwordParameter("pwd")
        .loginProcessingUrl("/login")  // 表单提交的地址

        .and()
        .rememberMe().rememberMeParameter("remember") // 记住我传参名

        .and()
        .logout().logoutUrl("/logout").logoutSuccessUrl("/index.html")   // 注销提交地址和返回页面

        .and().csrf().disable(); // 防止csrf的,不然get、post都不能访问
}
主页和登录页的传参名和提交地址
<!doctype html>
<html lang="en">
<head>
    <title>主页</title>
</head>
<body>
    <a href="/login.html">登录</a>
    <a href="/logout">注销</a>
    <h1>这里是主页</h1>
    <a href="page1.html">page1</a>
    <a href="page2.html">page2</a>
    <a href="page3.html">page3</a>
</body>
</html>


<!doctype html>
<html lang="en">
<head>
    <title>登录页</title>
</head>
<body>
    <h1>自定义的登录页</h1>
    <form action="/login" method="post">
        <input type="text" name="user" placeholder="username">
        <input type="text" name="pwd" placeholder="password">
        <input type="checkbox" name="remember"> 记住我
        <input type="submit" value="提交">
    </form>
</body>
</html>
4.3 自定义测试
至此基本的身份验证和授权功能已经完成配置,算是入门了把,往后会有深入配置的笔记
5. 后期补充
http.authorizeRequests()
.antMatchers("/","/login.html").permitAll()  // 匹配地址"/","/login.html",别忘记登录页要排除
.anyRequest().authenticated()  // 表示登录后,其余地址都能访问
参考
https://docs.spring.io/spring-security/site/docs/5.2.3.RELEASE/reference/htmlsingle/![]