|
这个作业属于哪个课程 |
<https://edu.cnblogs.com/campus/zswxy/software-engineering-2017-1> |
|
这个作业要求在哪里 |
<https://edu.cnblogs.com/campus/zswxy/software-engineering-2017-1/homework/10619> |
|
这个作业的目标 |
<需要在网页页面上呈现树形结构形式的师门树> |
|
作业正文 |
|
|
其他参考文献 |
Baidu |
一、博客链接及Github项目地址:
Github项目地址:https://github.com/HuyJe/20177064-20177593
|
学号 |
姓名 |
博客链接 |
|
20177604 |
资煌 |
|
|
20177593 |
胡雨婕 |
二、具体分工:
20177604 资煌:主要负责UI设计、编写代码、归纳总结
20177593 胡雨婕:主要负责项目思路要点、测试、归纳总结、博客撰写
三、PSP表格:
|
PSP2.1 |
Personal Software Process Stages |
预估耗时(小时) |
实际耗时(小时) |
|
Planning |
计划 |
0.5 |
0.5 |
|
Estimate |
估计这个任务需要多少时间 |
0.5 |
0.5 |
|
Development |
开发 |
2 |
3 |
|
Analysis |
需求分析 (包括学习新技术) |
10 |
15 |
|
Design Spec |
生成设计文档 |
2 |
2 |
|
Design Review |
设计复审 |
2 |
1.5 |
|
Coding Standard |
代码规范 (为目前的开发制定合适的规范) |
1 |
0.8 |
|
Design |
具体设计 |
2 |
2.5 |
|
Coding |
具体编码 |
15 |
18 |
|
Code Review |
代码复审 |
1 |
1.5 |
|
Test |
测试(自我测试,修改代码,提交修改) |
1 |
2 |
|
Reporting |
报告 |
1 |
1 |
|
Test Repor |
测试报告 |
1 |
1.5 |
|
Size Measurement |
计算工作量 |
0.5 |
0.5 |
|
Postmortem & Process Improvement Plan |
事后总结, 并提出过程改进计划 |
1 |
0.5 |
|
合计 |
40.5 |
45.8 |
四、解题思路描述与设计实现说明:
解题思路描述:
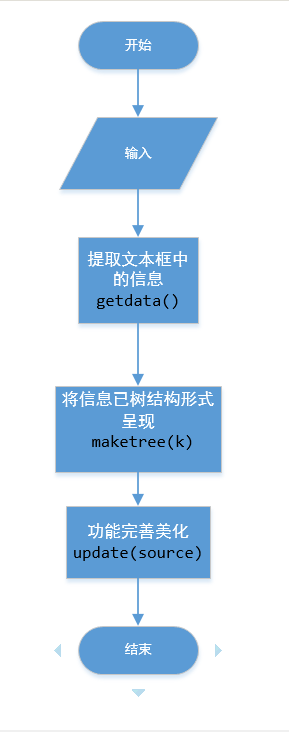
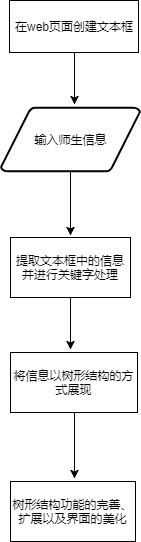
分析题目的需求:首先我们需要在web页面提供一个文本框,然后在文本框中输入给定的师生信息,再把师生信息以树形结构的形式展现出来,内部主要有处理文本框返回值的函数以及生成树的函数。因此可知我们可以初步得到代码的组织与内部实现设计如下图所示:
设计实现说明:
1、创建支持多行输入的文本框以及点击按钮
<div class="Div">

        <p>请输入:</p>

        <textarea id="text" rows="10" cols="50" ></textarea>

        <button href="javascript:;" onclick="getdata()" class="button">生成家族树</button>

        <input type=button value=重置 onclick="location.reload()" class="button_right">

</div>
说明:textarea标签用来定义多行的文本输入控件,其中的文本区可以容纳无限数量的文本,可以通过 cols 和 rows 属性来规定 textarea 的尺寸;button标签用来定义一个按钮,在 button 元素的内部,可以放置内容,onclick的属性由元素上的鼠标点击触发。
2、处理输入的信息
function getdata() {

            var text = $("#text").val(); //获取id为text的textarea的全部内容

            var text1 = text.split("

");//针对多组数据输入的情况,以“

"为关键字进行分组,调用split函数进行分割

            for (var k = 0; k < text1.length; k++) { //text1.length用于得到分组的数量

                var arry = text1[k].split("
");//针对每一组数据,以“
"为关键字进行分组,得到每条导师和学生的信息

                var teacher = {

                        name: '',

                        children: []

                    }

                for (var ii = 0; ii < arry.length; ii++) {

                    var newarr = arry[ii].split(":");//针对每条导师和学生的信息,以“:”为关键字进行分组,可得到身份标签和身份信息

                    var type = [];

                    var type1 = [];

                    var a1 = newarr[0]; //获取身份标签,如导师、2016级博士生等,保存在a1变量

                    if (ii != 0) {

                        type1.name = a1;

                    }

                    var a2 = newarr[1];//获取身份信息,如天一、王二、吴五等,保存在a2变量

                    var a3 = a2.split("、");//针对每组身份信息,以“、”为关键字进行切分,得到每个人的名字信息

                    for (var j = 0; j < a3.length; j++) { //a3.length用于得到每条身份信息里名字的数量
                        var student = {};
                        if (ii == 0) {
                            teacher.name = a3[j];
                        }

                        if (ii != 0) {

                            student.name = a3[j];
                            type.push(student);
                       }
                    }
                    if (ii != 0) {

                        type1.children = type;
                        teacher.children.push(type1);
                    }
                }
                treeData[k] = [];

                treeData[k] = teacher;

                maketree(k);

            }
        }
说明:获取文本域中的信息内容后,用.val()方法来处理表单元素的值,获取id为text的文本域中的全部内容,并存储在text变量中。根据关键字的标志信息来切分文本内容,以“ "为标志来切分成单组的,以”:“为标志进行切分身份标签和名字信息,以”、“标志进行切分多个名字。在切分之后,将相应的信息存储到相应的变量中,详细实现过程可以参考上面的代码注释。
3、将信息以树结构呈现
这是整个项目的关键点和难点,说白了就是核心部分。我们的能力有限,于是查阅了大量的资料。然后我们知道了d3.js库。d3.js是基于数据操作文档的js库,集强力可视化组建与数据驱动型的dom操作手法于一身。本质上是js,在数据可视化方面,d3将生成可视化的步骤精简到了几个简单的函数。最终我们决定用d3.js库来实现我们的树形结构。
首先引入d3.js的链接:
<script src="js/d3.v3.min.js"></script>
以下是生成树形结构和实现节点缩放功能的主要代码:
function maketree(k) {

            var margin = {

                    top: 20,

                    right: 120,

                    bottom: 20,

                    left: 120

                },

                width = 960 - margin.right - margin.left,

                height = 500 - margin.top - margin.bottom;


            var i = 0,

                duration = 750, //过渡延迟时间

                root;


            var tree = d3.layout.tree() //创建一个树布局

                .size([height, width]);


            var diagonal = d3.svg.diagonal()

                .projection(function(d) {

                    return [d.y, d.x];

                }); //创建新的斜线生成器


            //声明与定义画布属性

            var svg = d3.select("body").append("svg")

                .attr("width", width + margin.right + margin.left)

                .attr("height", height + margin.top + margin.bottom)

                .append("g")

                .attr("transform", "translate(" + margin.left + "," + margin.top + ")");


            root = treeData[k]; //treeData为上边定义的节点属性

            root.x0 = height / 2;

            root.y0 = 0;


            update(root);


            function update(source) {

                // Compute the new tree layout.计算新树图的布局

                var nodes = tree.nodes(root).reverse(),

                    links = tree.links(nodes);


                // Normalize for fixed-depth.设置y坐标点,每层占180px

                nodes.forEach(function(d) {

                    d.y = d.depth * 180;

                });


                // Update the nodes…每个node对应一个group

                var node = svg.selectAll("g.node")

                    .data(nodes, function(d) {

                        return d.id || (d.id = ++i);

                    }); //data():绑定一个数组到选择集上,数组的各项值分别与选择集的各元素绑定


                // Enter any new nodes at the parent's previous position.新增节点数据集,设置位置

                var nodeEnter = node.enter().append("g") //在 svg 中添加一个g,g是 svg 中的一个属性,是 group 的意思,它表示一组什么东西,如一组 lines , rects ,circles 其实坐标轴就是由这些东西构成的。

                    .attr("class", "node") //attr设置html属性,style设置css属性

                    .attr("transform", function(d) {

                        return "translate(" + source.y0 + "," + source.x0 + ")";

                    })

                    .on("click", click);


                //添加连接点---此处设置的是圆圈过渡时候的效果(颜色)

                // nodeEnter.append("circle")

                //   .attr("r", 1e-6)

                //   .style("fill", function(d) { return d._children ? "lightsteelblue" : "#357CAE"; });//d 代表数据,也就是与某元素绑定的数据。

                nodeEnter.append("rect")

                    .attr("x", -23)

                    .attr("y", -10)

                    .attr("width", 70)

                    .attr("height", 21)

                    .attr("rx", 10)

                    .style("fill", "#0073aa"); //d 代表数据,也就是与某元素绑定的数据。


                nodeEnter.append("text")

                    .attr("x", function(d) {

                        return d.children || d._children ? 13 : 13;

                    })

                    .attr("dy", "10")

                    .attr("text-anchor", "middle")

                    .text(function(d) {

                        return d.name;

                    })

                    .style("fill", "white")

                    .style("fill-opacity", 1);

                // Transition nodes to their new position.将节点过渡到一个新的位置-----主要是针对节点过渡过程中的过渡效果

                //node就是保留的数据集,为原来数据的图形添加过渡动画。首先是整个组的位置

                var nodeUpdate = node.transition() //开始一个动画过渡

                    .duration(duration) //过渡延迟时间,此处主要设置的是圆圈节点随斜线的过渡延迟

                    .attr("transform", function(d) {

                        return "translate(" + d.y + "," + d.x + ")";

                    });

                nodeUpdate.select("rect")

                    .attr("x", -23)

                    .attr("y", -10)

                    .attr("width", 70)

                    .attr("height", 21)

                    .attr("rx", 10)

                    .style("fill", "#0073aa");


                nodeUpdate.select("text")

                    .attr("text-anchor", "middle")

                    .style("fill-opacity", 1);


                // Transition exiting nodes to the parent's new position.过渡现有的节点到父母的新位置。

                //最后处理消失的数据,添加消失动画

                var nodeExit = node.exit().transition()

                    .duration(duration)

                    .attr("transform", function(d) {

                        return "translate(" + source.y + "," + source.x + ")";

                    })

                    .remove();


                nodeExit.select("circle")

                    .attr("r", 1e-6);


                nodeExit.select("text")

                    .attr("text-anchor", "middle")

                    .style("fill-opacity", 1e-6);


                // Update the links…线操作相关

                //再处理连线集合

                var link = svg.selectAll("path.link")

                    .data(links, function(d) {

                        return d.target.id;

                    });


                // Enter any new links at the parent's previous position.

                //添加新的连线

                link.enter().insert("path", "g")

                    .attr("class", "link")

                    .attr("d", function(d) {

                        var o = {

                            x: source.x0,

                            y: source.y0

                        };

                        return diagonal({

                            source: o,

                            target: o

                        }); //diagonal - 生成一个二维贝塞尔连接器, 用于节点连接图.

                    })

                    .attr('marker-end', 'url(#arrow)');


                // Transition links to their new position.将斜线过渡到新的位置

                //保留的连线添加过渡动画

                link.transition()

                    .duration(duration)

                    .attr("d", diagonal);


                // Transition exiting nodes to the parent's new position.过渡现有的斜线到父母的新位置。

                //消失的连线添加过渡动画

                link.exit().transition()

                    .duration(duration)

                    .attr("d", function(d) {

                        var o = {

                            x: source.x,

                            y: source.y

                        };

                        return diagonal({

                            source: o,

                            target: o

                        });

                    })

                    .remove();


                // Stash the old positions for transition.将旧的斜线过渡效果隐藏

                nodes.forEach(function(d) {

                    d.x0 = d.x;

                    d.y0 = d.y;

                });

            }


            //定义一个将某节点折叠的函数

            // Toggle children on click.切换子节点事件

            function click(d) {

                if (d.children) {

                    d._children = d.children;

                    d.children = null;

                } else {

                    d.children = d._children;

                    d._children = null;

                }

                update(d);

            }

        }
五、 附加特点设计与展示
设计的创意独到之处,这个设计的意义:
1、在页面文本框的边上添加了一个重置按钮,考虑到用户可能输错数据或者在实现一组家族树后想要继续输入数据的需求,可以比较快捷地进行更改。
2、在页面上插入了一些背景图片来进行美化界面。
实现思路:
自己一顿瞎倒腾
有价值的代码片段:
重置按钮实现
<input type=button value=重置 onclick="location.reload()" class="button_right">
界面美化
@charset "UTF-8";

body{

    background-image: url(image/壁纸。7.jpg);

    background-size:100%;

    background-attachment:fixd;


}

p{

    font-size:20px;

    font-family:黑体,楷体,华文行楷;

    color:#008B8B;

}

.Div{

    background-size: 100% 100%;

    background-attachment: fixed;


}

.node {

    cursor: auto;

}


.node rect {

    fill: #0073aa;

    stroke: #0073aa;

    stroke- 5px;

}


.node text {

    font: 12px "黑体", sans-serif;

}


.link {

    fill: none;

    stroke: rgb(0, 0, 159);

    stroke- 2px;

}

//光标移动//

.menu_text:hover{

    cursor:pointer;

}
实现成果展示:
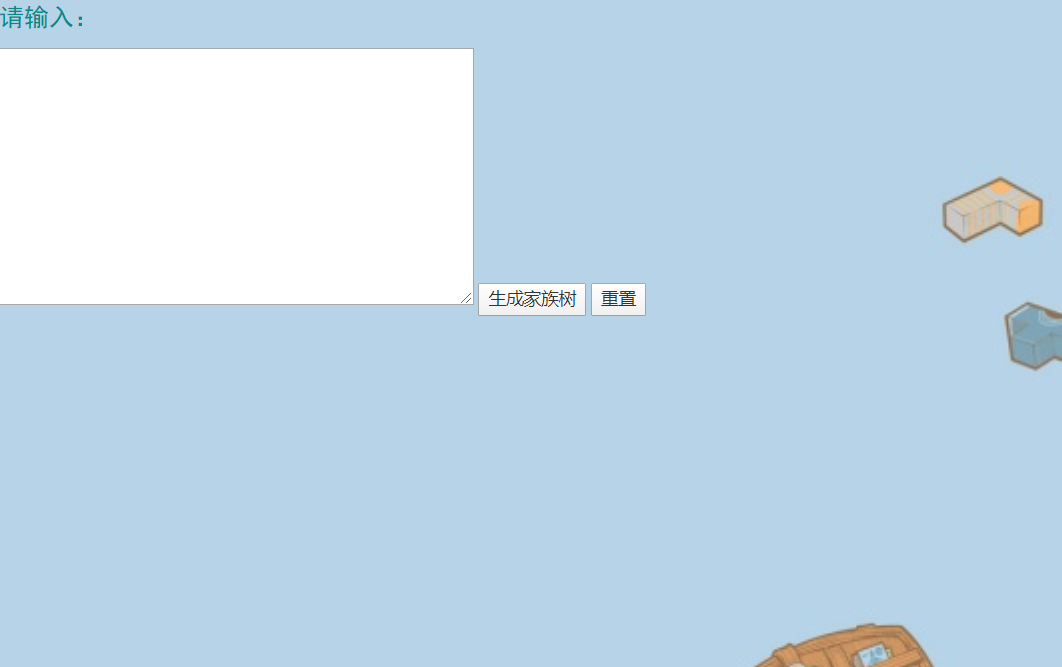
1、 初始页面
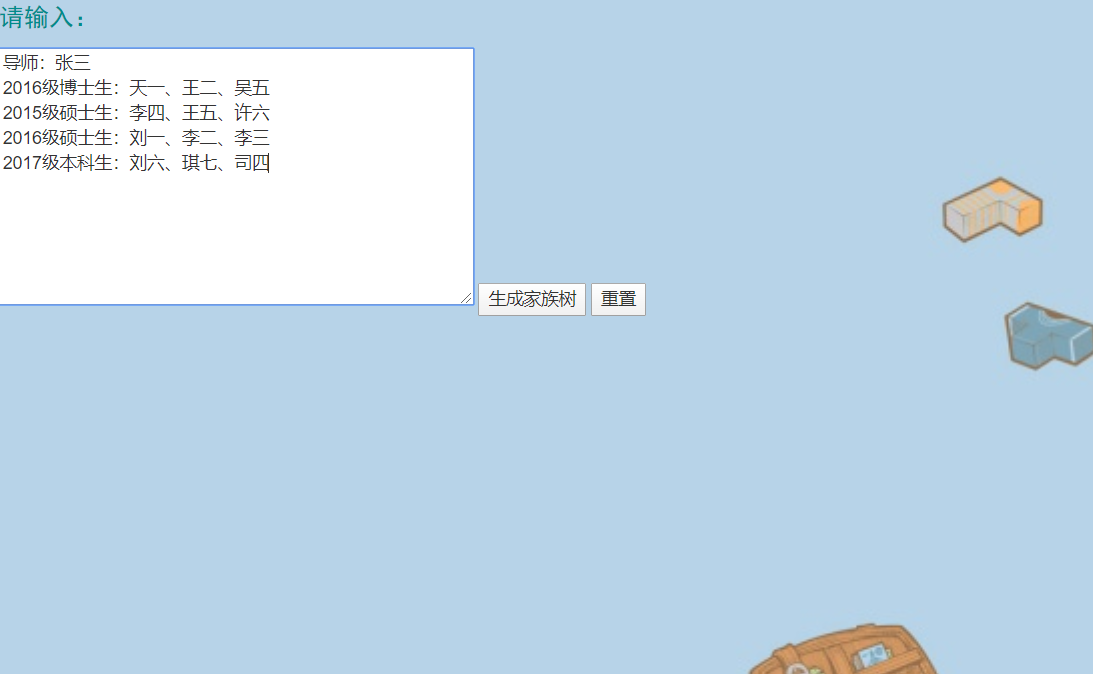
2、 输入师生信息
3、 生成单师门树

4、 生成多师门树

六、 在博客中给出目录说明和使用说明
目录组织:
目录说明:
家族树
- bootstrap:bootstrap框架文件
- images:插入的图片
- js:html文件中需要导入的一些js文件
- Tree:html文件
- Style:css样式
使用说明:
- fork完别人的代码后,自己的账号下也有了这个项目,然后将其clone到自己的电脑,通过git clone 命令
- 使用时直接用Chrome打开Tree.html文件即可。
- 在出现的文本框输入数据,点击生成家族树按钮,将会在下方生成一棵以导师为根节点的树,然后点击重置按钮可以刷新页面重新输入。
七、 单元测试
八、 贴出Github的代码签入记录

九、 遇到的代码模块异常或结对困难及解决方法
1、问题描述:进行单元测试时卡住,不知道如何下手
做过哪些尝试:查看网上的一些教程,自己进行脚本编写单元测试
是否解决:未解决
1、问题描述:在多组师生信息的输入时,不知道以什么为关键字为标志信息,一直无法正确进行切分,提取出每组的师生信息
做过哪些尝试:百度、查资料、问同学朋友、编写代码尝试
是否解决:已解决
十、 评价你的队友
资煌评价胡雨婕:
1、值得学习的地方:条理清晰,行动迅速
2、需要改进的地方:完美
胡雨婕评价资煌:
1、值得学习的地方:主动积极,动手能力强
2、需要改进的地方:完美
自评表
|
项目 |
博客评分 |
程序评分 |
总分 |
||||||||||||
|
连接 |
分工 |
PSP |
思路说明 |
特点展示 |
目录使用说明 |
单元测试 |
代码签入记录 |
困难解决 |
互评 |
正确性 |
美观性 |
方便 |
附加特点 |
||
|
分数 |
1 |
1 |
1 |
20 |
8 |
4 |
1 |
4 |
2 |
15 |
13 |
6 |
5 |
81 |
|