一、定义
外观模式(Facade) : 为子系统中的一组接口提供一个一致的界面,此模式定义了一个高层接口,这个接口使得这一子系统更加容易使用。
外观模式结构图:
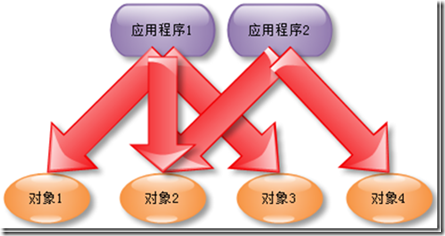
未用外观模式时的情景,如下图1-1所示:

图 1-1
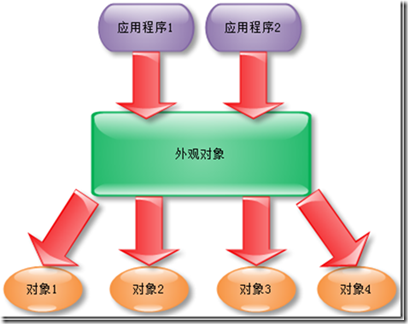
使用外观模式时的情景,如下图1-2所示:

图 1-2
通过外观模式来组织细粒度的服务的调用,外观服务提供给外部应用程序可以使用的服务,而具体的调用细粒度的过程则被外观服务给封装起来,当然这个过程就是封装变化的部分,而将变化的部分与应用程序进行隔离,无疑对程序的易用性和可维护性都是很大的提高。
二、实例展示
子系统1:
1 public class SubSystem1 {
2     public void method(){
3         System.out.println("子系统1中类1的方法");
4     }
5 }
子系统2:
1 public class SubSystem2 {
2     public void method(){
3         System.out.println("子系统2中的方法");
4     }
5 }
子系统3:
1 public class SubSystem3 {
2     public void method(){
3         System.out.println("子系统3中的方法");
4     }
5 }
外观类:
 1 public class Facade {
 2     private SubSystem1 sub1 = new SubSystem1();
 3     private SubSystem2 sub2 = new SubSystem2();
 4     private SubSystem3 sub3 = new SubSystem3();
 5     public void facadeMethod1(){
 6        sub1.method();
 7        sub2.method();
 8    }
 9     public void facadeMethod2(){
10       sub1.method1();
11       sub2.method2();
12       sub3.method3();
13     }
14 }
测试类:
1 public class ClientTest {
2
3     public static void main(String[] args) {
4         Facade faceTest = new Facade();
5         faceTest.facadeMethod1();
6         faceTest.facadeMethod2();
7     }
8 }
三、使用场景
1、在设计初期阶段,应该要有意识地将不同的两个层分离,比如经典的三层架构,就需要考虑在数据访问层和业务逻辑层、业务逻辑层和表示层的层与层之间建立外观模式,这样可以为复杂的子系统提供一个简单的接口,使得耦合性大大降低。
2、在开发阶段,子系统往往因为不同的重构演化而变得越来越复杂,大多数的模式使用时也会产生很多很小的类,这本是好事,但也给外部调用它们的用户程序带来了麻烦,增加外观模式可以提供一些简单的接口,减少它们之间的依赖。
3、在维护一个遗留的大型系统时,可能这个系统已经非常难以维护和扩展了,但因为它包含了非常重要的功能,新的需求开发必须要依赖它。此时用外观模式是非常合适和必要的。可以为新系统开发一个外观类,来提供设计粗糙或高度复杂的遗留代码的比较清晰简单的接口,让系统与外观对象交互,外观对象或外观类与遗留代码交互所有复杂的工作。
四、使用总结
1、外观模式优点:
1) 外观模式对调用者(客户端或浏览器)屏蔽了子系统组件,减少了调用者所需处理的对象数目,使得子系统使用起来更加容易。通过引入外观模式,客户端代码将变得很简单,与之关联的对象也很少。
2) 它实现了子系统与客户端之间的松耦合关系,这使得子系统的变化不会影响到调用它的客户端,只需要调整外观类即可。
3) 一个子系统的修改对其他子系统没有任何影响,而且子系统内部变化也不会影响到外观对象。
2、外观模式缺点:
1) 不能很好地限制客户端直接使用子系统类,如果对客户端访问子系统类做太多的限制则减少了可变性和灵活性。
2) 如果设计不当,增加新的子系统可能需要修改外观类的源代码,违背了开闭原则。
五、典型应用
1、spring jdbc中的外观模式
查看 org.springframework.jdbc.support.JdbcUtils
1 public abstract class JdbcUtils {
2 public static void closeConnection(Connection con) {
3 if (con != null) {
4 try {
5 con.close();
6 }catch (SQLException ex) {
7 logger.debug("Could not close JDBC Connection", ex);
8 }catch (Throwable ex) {// We don't trust the JDBC driver: It might throw RuntimeException or Error.
9 logger.debug("Unexpected exception on closing JDBC Connection", ex);
10 }
11 }
12 }
13 public static Object getResultSetValue(ResultSet rs, int index, Class<?> requiredType) throws SQLException {
14 if (requiredType == null) {
15 return getResultSetValue(rs, index);
16 }
17 Object value = null;
18 boolean wasNullCheck = false;
19 // Explicitly extract typed value, as far as possible.
20 if (String.class.equals(requiredType)) {
21 value = rs.getString(index);
22 }else if (boolean.class.equals(requiredType) || Boolean.class.equals(requiredType)) {
23 value = rs.getBoolean(index);
24 wasNullCheck = true;
25 }else if (byte.class.equals(requiredType) || Byte.class.equals(requiredType)) {
26 value = rs.getByte(index);
27 wasNullCheck = true;
28 }else if (short.class.equals(requiredType) || Short.class.equals(requiredType)) {
29 value = rs.getShort(index);
30 wasNullCheck = true;
31 }else if (int.class.equals(requiredType) || Integer.class.equals(requiredType)) {
32 value = rs.getInt(index);
33 wasNullCheck = true;
34 }else if (long.class.equals(requiredType) || Long.class.equals(requiredType)) {
35 value = rs.getLong(index);
36 wasNullCheck = true;
37 }else if (float.class.equals(requiredType) || Float.class.equals(requiredType)) {
38 value = rs.getFloat(index);
39 wasNullCheck = true;
40 }else if (double.class.equals(requiredType) || Double.class.equals(requiredType) ||
41 Number.class.equals(requiredType)) {
42 value = rs.getDouble(index);
43 wasNullCheck = true;
44 }else if (byte[].class.equals(requiredType)) {
45 value = rs.getBytes(index);
46 }else if (java.sql.Date.class.equals(requiredType)) {
47 value = rs.getDate(index);
48 }else if (java.sql.Time.class.equals(requiredType)) {
49 value = rs.getTime(index);
50 }else if (java.sql.Timestamp.class.equals(requiredType) || java.util.Date.class.equals(requiredType)) {
51 value = rs.getTimestamp(index);
52 }else if (BigDecimal.class.equals(requiredType)) {
53 value = rs.getBigDecimal(index);
54 }else if (Blob.class.equals(requiredType)) {
55 value = rs.getBlob(index);
56 }else if (Clob.class.equals(requiredType)) {
57 value = rs.getClob(index);
58 }else {
59 // Some unknown type desired -> rely on getObject.
60 value = getResultSetValue(rs, index);
61 }
62 if (wasNullCheck && value != null && rs.wasNull()) {
63 value = null;
64 }
65 return value;
66 }
67 // ...省略...
68 }
该工具类主要是对原生的 jdbc 进行了封装。
2、Mybatis中的外观模式
1 public class Configuration {
2 public Executor newExecutor(Transaction transaction, ExecutorType executorType) {
3 executorType = executorType == null ? defaultExecutorType : executorType;
4 executorType = executorType == null ? ExecutorType.SIMPLE : executorType;
5 Executor executor;
6 if (ExecutorType.BATCH == executorType) {
7 executor = new BatchExecutor(this, transaction);
8 } else if (ExecutorType.REUSE == executorType) {
9 executor = new ReuseExecutor(this, transaction);
10 } else {
11 executor = new SimpleExecutor(this, transaction);
12 }
13 if (cacheEnabled) {
14 executor = new CachingExecutor(executor);
15 }
16 executor = (Executor) interceptorChain.pluginAll(executor);
17 return executor;
18 }
19 public ResultSetHandler newResultSetHandler(Executor executor, MappedStatement mappedStatement, RowBounds rowBounds, ParameterHandler parameterHandler,
ResultHandler resultHandler, BoundSql boundSql) {
20 ResultSetHandler resultSetHandler = new DefaultResultSetHandler(executor, mappedStatement, parameterHandler, resultHandler, boundSql, rowBounds);
21 resultSetHandler = (ResultSetHandler) interceptorChain.pluginAll(resultSetHandler);
22 return resultSetHandler;
23 }
24 // ...省略...
25 }
该类主要对一些创建对象的操作进行封装
3、Tomcat 中的外观模式
Tomcat 源码中大量使用了很多外观模式
org.apache.catalina.connector.Request 和 org.apache.catalina.connector.RequestFacade 这两个类都实现了 HttpServletRequest 接口
在 Request 中调用 getRequest() 实际获取的是 RequestFacade 的对象
1 protected RequestFacade facade = null;
2 public HttpServletRequest getRequest() {
3 if (facade == null) {
4 facade = new RequestFacade(this);
5 }
6 return facade;
7}
该类主要对一些创建对象的操作进行封装
在 RequestFacade 中再对认为是子系统的操作进行封装
1 public class RequestFacade implements HttpServletRequest {
2 protected Request request = null;
3 @Override
4 public Object getAttribute(String name) {
5 if (request == null) {
6 throw new IllegalStateException(sm.getString("requestFacade.nullRequest"));
7 }
8 return request.getAttribute(name);
9 }
10 // ...省略...
11 }
参考:
1、https://www.cnblogs.com/hegezhou_hot/archive/2010/12/06/1897398.html
2、https://blog.csdn.net/wwwdc1012/article/details/82729516