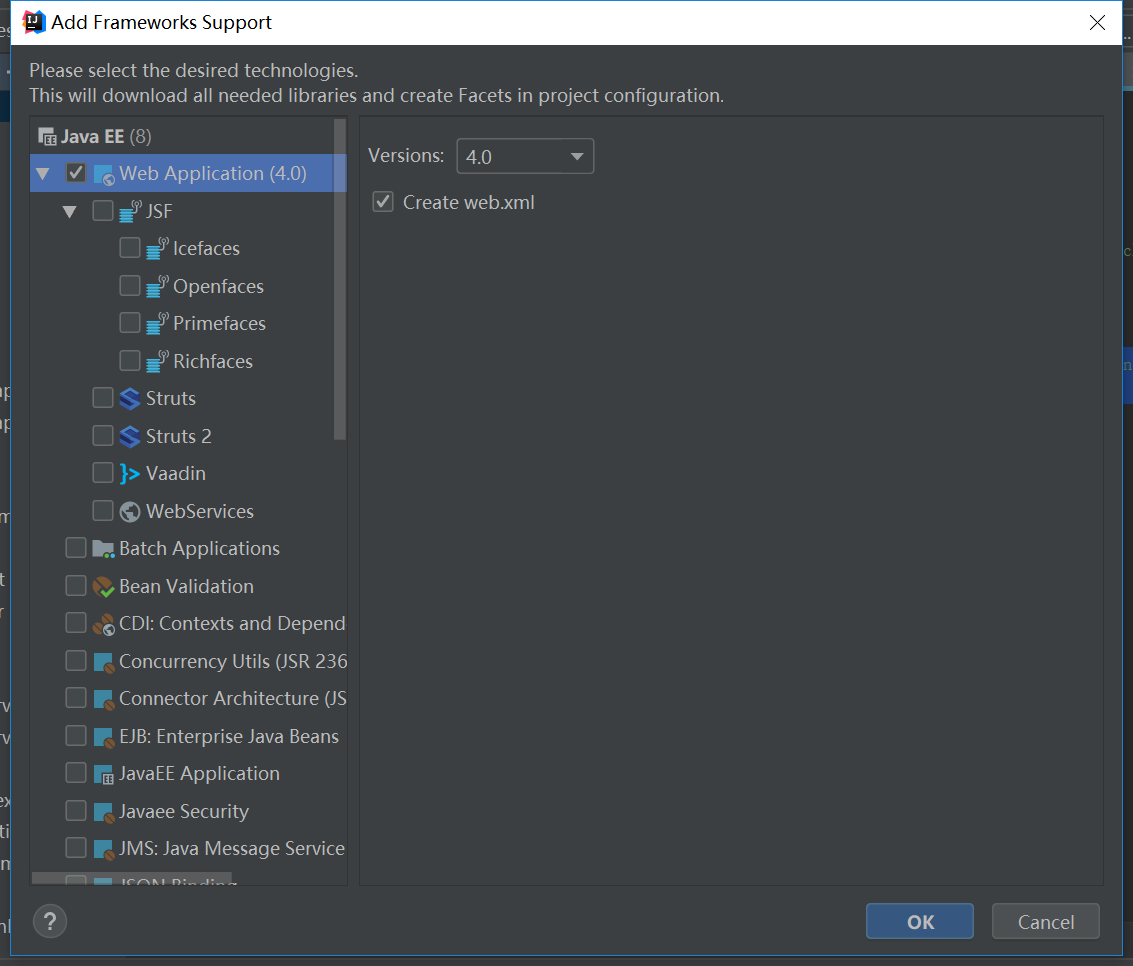
刚学完Mybatis,Spring,SpringMVC
尝试进行一个整合开发,记录一下搭建流程
1.环境与开发工具
IDEA
MySQL 8.0.16
Tomcat 9.0.21
Maven 3.6.1
2.项目准备
1.创建一个maven工程

2.依赖注入
    <dependencies>
        <dependency>
            <groupId>junit</groupId>
            <artifactId>junit</artifactId>
            <version>4.12</version>
        </dependency>
        <dependency>
            <groupId>mysql</groupId>
            <artifactId>mysql-connector-java</artifactId>
            <version>8.0.16</version>
        </dependency>
        <dependency>
            <groupId>com.alibaba</groupId>
            <artifactId>druid</artifactId>
            <version>1.2.1</version>
        </dependency>
        <dependency>
            <groupId>javax.servlet</groupId>
            <artifactId>servlet-api</artifactId>
            <version>2.5</version>
        </dependency>
        <dependency>
            <groupId>javax.servlet.jsp</groupId>
            <artifactId>jsp-api</artifactId>
            <version>2.2</version>
        </dependency>
        <dependency>
            <groupId>org.mybatis</groupId>
            <artifactId>mybatis</artifactId>
            <version>3.5.2</version>
        </dependency>
        <dependency>
            <groupId>org.mybatis</groupId>
            <artifactId>mybatis-spring</artifactId>
            <version>2.0.2</version>
        </dependency>
        <dependency>
            <groupId>org.springframework</groupId>
            <artifactId>spring-webmvc</artifactId>
            <version>5.2.8.RELEASE</version>
        </dependency>
        <dependency>
            <groupId>org.springframework</groupId>
            <artifactId>spring-jdbc</artifactId>
            <version>5.2.8.RELEASE</version>
        </dependency>
    </dependencies>
3.配置静态资源导出
    <build>
        <resources>
            <resource>
                <directory>src/main/java</directory>
                <includes>
                    <include>**/*.properties</include>
                    <include>**/*.xml</include>
                </includes>
                <filtering>false</filtering>
            </resource>
            <resource>
                <directory>src/main/resources</directory>
                <includes>
                    <include>**/*.properties</include>
                    <include>**/*.xml</include>
                </includes>
                <filtering>false</filtering>
            </resource>
        </resources>
    </build>
4.连接数据库

这里可能连接失败报错[08001] Could not create connection to database server. Attempted reconnect 3 times. Giving up.
是因为系统默认的时区与IDEA连接数据库的时区 (MySQL默认时区为UTC) 不一致
按照格林威治的时间,我们属于东八区时间,领先UTC八个小时,所以说存在8小时的时差,需要修改
MySQL 8.0以上才存在此问题,如使用的是MySQL 5.7可以忽略
3.编写配置文件
1.applicationContext.xml
<?xml version="1.0" encoding="UTF-8" ?>
<beans xmlns="http://www.springframework.org/schema/beans"
       xmlns:xsi="http://www.w3.org/2001/XMLSchema-instance"
       xsi:schemaLocation="http://www.springframework.org/schema/beans
       http://www.springframework.org/schema/beans/spring-beans.xsd">

    <import resource="classpath:spring-dao.xml"/>
    <import resource="classpath:spring-service.xml"/>
    <import resource="classpath:spring-mvc.xml"/>

</beans>
2.mybatis-config.xml
<?xml version="1.0" encoding="UTF-8" ?>
<!DOCTYPE configuration
        PUBLIC "-//mybatis.org//DTD Config 3.0//EN"
        "http://mybatis.org/dtd/mybatis-3-config.dtd">
<configuration>

    <typeAliases>
        <package name="xxx.pojo"/>
    </typeAliases>

    <mappers>
        <mapper class="xxx.dao.xxxMapper"/>
    </mappers>

</configuration>
3.database.properties
4.编写Mybatis层
1.与数据表对应的简单实体类(pojo)
2.与各实体类对应的Mapper接口(dao)
3.各接口的实现类(service)
5.Spring整合dao层
1.关联数据库配置文件(database.properties)
<context:property-placeholder location="classpath:database.properties"/>
2.连接池
    <bean id="dataSource" class="com.alibaba.druid.pool.DruidDataSource">
        <property name="driver" value="${jdbc.driver}"/>
        <property name="url" value="${jdbc.url}"/>
        <property name="username" value="${jdbc.username}"/>
        <property name="password" value="${jdbc.password}"/>
    </bean>
这里使用的是Druid,也可以使用c3p0、dbcp等
3.sqlSessionFactory
    <bean id="sqlSessionFactory" class="org.mybatis.spring.SqlSessionFactoryBean">
        <property name="dataSource" ref="dataSource"/>
        <property name="configLocation" value="classpath:mybatis-config.xml"/>
    </bean>
4.配置dao接口扫描包,动态实现dao接口注入到Spring容器
    <bean class="org.mybatis.spring.mapper.MapperScannerConfigurer">
        <property name="sqlSessionFactoryBeanName" value="sqlSessionFactory"/>
        <property name="basePackage" value="com.initial.dao"/>
    </bean>
6.Spring整合Service层
1.扫描service下的包
<context:component-scan base-package="com.initial.service"/>
2.将业务类注入Spring(可注解实现)
3.声明式事务配置
    <bean id="transactionManager" class="org.springframework.jdbc.datasource.DataSourceTransactionManager">
        <property name="dataSource" ref="dataSource"/>
    </bean>
7.整合SpringMVC
1.给maven项目增加web支持

2.在web.xml配置DispathcherServlet
    <servlet>
        <servlet-name>spring-mvc</servlet-name>
        <servlet-class>org.springframework.web.servlet.DispatcherServlet</servlet-class>
        <init-param>
            <param-name>contextConfigLocation</param-name>
            <param-value>classpath:applicationContext.xml</param-value>
        </init-param>
        <load-on-startup>1</load-on-startup>
    </servlet>
    <servlet-mapping>
        <servlet-name>spring-mvc</servlet-name>
        <url-pattern>/</url-pattern>
    </servlet-mapping>
3.配置乱码过滤
    <filter>
        <filter-name>encodingFilter</filter-name>
        <filter-class>org.springframework.web.filter.CharacterEncodingFilter</filter-class>
        <init-param>
            <param-name>encoding</param-name>
            <param-value>utf-8</param-value>
        </init-param>
    </filter>
    <filter-mapping>
        <filter-name>encodingFilter</filter-name>
        <url-pattern>/*</url-pattern>
    </filter-mapping>
注意:/和/*的区别,前者不会扫描.jsp文件,后者会。所以过滤器这里需要写/*,而DispathcherServlet核心分发器是/。
4.设置session过期时间
    <session-config>
        <session-timeout>15</session-timeout>
    </session-config>
5.配置spring-mvc.xml(处理器映射器、处理器适配器、视图解析器)
其中,处理器映射器和处理器适配器在使用了注解驱动的情况下可以省略
    <!--注解驱动-->
    <mvc:annotation-driven/>
    <!--静态资源过滤-->
    <mvc:default-servlet-handler/>
    <!--扫描controller-->
    <context:component-scan base-package="com.initial.controller"/>
    <!--视图解析器-->
    <bean class="org.springframework.web.servlet.view.InternalResourceViewResolver">
        <property name="prefix" value="/WEB-INF/jsp/"/>
        <property name="suffix" value=".jsp"/>
    </bean>