NIO-FileChannel源码分析
目录
NIO-概览
NIO-Buffer
NIO-Channel
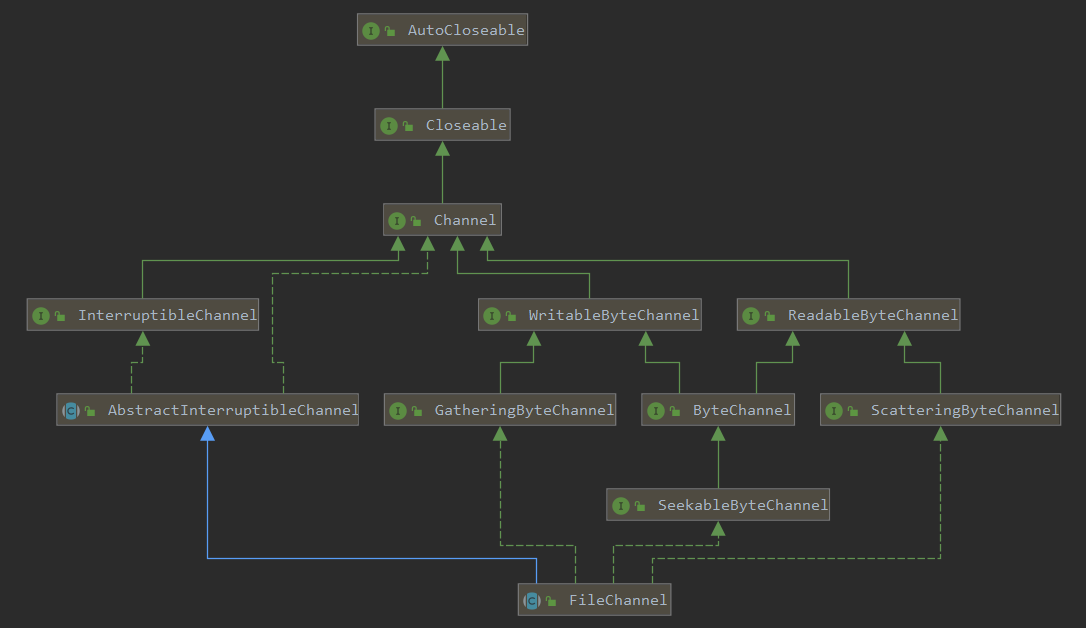
NIO-Channel接口分析
NIO-SocketChannel源码分析
NIO-FileChannel源码分析
NIO-Selector源码分析
NIO-WindowsSelectorImpl源码分析
NIO-EPollSelectorIpml源码分析
前言
本来是想学习Netty的,但是Netty是一个NIO框架,因此在学习netty之前,还是先梳理一下NIO的知识。通过剖析源码理解NIO的设计原理。
本系列文章针对的是JDK1.8.0.161的源码。
上一篇对SocketChannel的源码进行了分析,本篇继续对FileChannel的源码进行解析。
RandomAccessFile
我们可以通过使用RandomAccessFile读写数据。也可以通过FileInputStream读数据或通过FileOutputStream写数据。但实际这三个类内部实际是一样的,我们就以RandomAccessFile为例子说明FileChannelImpl的实现。
接口
RandomAccessFile实现了DataInput和DataOutput两个接口,即数据输入和输出接口。
public class RandomAccessFile implements DataOutput, DataInput, Closeable {

}
DataInput定义了一些基本的读取方法
- 读取指定长度的字节数据
- 读取数据并转换为基元类型。
- 读取一行数据。读取到
- 用UTF-8编码读取一个string
public interface DataInput {
    void readFully(byte b[]) throws IOException;
    void readFully(byte b[], int off, int len) throws IOException;
    int skipBytes(int n) throws IOException;
    XXX readXXX() throws IOException;
    String readLine() throws IOException;
    String readUTF() throws IOException;
}
DataOutput定义了一些基本的写方法
- 写入指定长度字节数据到文件。
- 将基元类型写入文件。
- 使用UTF-8编码写入一个string到文件。
public interface DataOutput {
    void write(int b) throws IOException;
    void write(byte b[]) throws IOException;
    void write(byte b[], int off, int len) throws IOException;
    void writeXXX(XXX v) throws IOException;
    void writeUTF(String s) throws IOException;
}
创建实例
在创建RandomAccessFile我们需要传入两个参数:第一个是文件路径,第二个是文件访问方式。
public RandomAccessFile(String name, String mode)
    throws FileNotFoundException
{
    this(name != null ? new File(name) : null, mode);
}

public RandomAccessFile(File file, String mode)
    throws FileNotFoundException
{
    //File用于检查文件路径是否有效
    String name = (file != null ? file.getPath() : null);
    int imode = -1;
    //判断文件访问方式
    if (mode.equals("r"))
        imode = O_RDONLY;
    else if (mode.startsWith("rw")) {
        imode = O_RDWR;
        rw = true;
        if (mode.length() > 2) {
            if (mode.equals("rws"))
                imode |= O_SYNC;
            else if (mode.equals("rwd"))
                imode |= O_DSYNC;
            else
                imode = -1;
        }
    }
    if (imode < 0)
        throw new IllegalArgumentException("Illegal mode "" + mode + "" must be one of "r", "rw", "rws", or "rwd"");
    //检查读写权限
    SecurityManager security = System.getSecurityManager();
    if (security != null) {
        security.checkRead(name);
        if (rw) {
            security.checkWrite(name);
        }
    }
    if (name == null) {
        throw new NullPointerException();
    }
    if (file.isInvalid()) {
        throw new FileNotFoundException("Invalid file path");
    }
    fd = new FileDescriptor();
    fd.attach(this);
    path = name;
    open(name, imode);
}
- 首先会创建一个File对象,用于检查文件路径是否合法。目前仅检查文件路径是否含有
Nul(/u0000)。 - 检查文件操作方式,文件有四种操作方式
| 模式 | 说明 |
|---|---|
| r | 以只读方式打开。调用结果对象的任何 write 方法都将导致抛出 IOException。 |
| rw | 打开以便读取和写入。如果该文件尚不存在,则尝试创建该文件。 |
| rwd | 打开以便读取和写入,这点和rw的操作完全一致,但是只会在cache满或者调用RandomAccessFile.close()的时候才会执行内容同步操作。 |
| rws | 在"rwd"的基础上对内容同步的要求更加严苛,每write修改一个byte都会直接修改到磁盘中。 |
- 创建
SecurityManager检查读写文件权限 - 创建文件描述符
- 打开文件
获取文件通道
通过getChannel可以获取文件通道,进行文件读写。
public final FileChannel getChannel() {
    synchronized (this) {
        if (channel == null) {
            channel = FileChannelImpl.open(fd, path, true, rw, this);
        }
        return channel;
    }
}
通过FileChannelImpl.open创建一个FileChannelImpl实例。
FileChannelImpl
创建
在FileDispatcherImpl静态构造函数中会调用IOUtil.load(),在上一章详细介绍过。
static {
    IOUtil.load();
}
private FileChannelImpl(FileDescriptor fd, String path, boolean readable, boolean writable, boolean append, Object parent)
{
    this.fd = fd;
    this.readable = readable;
    this.writable = writable;
    this.append = append;
    this.parent = parent;
    this.path = path;
    //创建nd用于调用native方法进行读写
    this.nd = new FileDispatcherImpl(append);
}
写文件
public int write(ByteBuffer src) throws IOException {
    ensureOpen();
    if (!writable)
        throw new NonWritableChannelException();
    synchronized (positionLock) {
        int n = 0;
        int ti = -1;
        try {
            begin();
            //将当前线程加入到线程集合中,当Channel关闭时,可以发送信号给线程,避免线程被I/O阻塞住
            ti = threads.add();
            if (!isOpen())
                return 0;
            do {
                //写数据
                n = IOUtil.write(fd, src, -1, nd);
            } while ((n == IOStatus.INTERRUPTED) && isOpen());
            return IOStatus.normalize(n);
        } finally {
            //I/O完成移除线程
            threads.remove(ti);
            end(n > 0);
            assert IOStatus.check(n);
        }
    }
}
- 首先校验一些必要的状态,如文件是否打开,是否可写等。
- 调用
begin开始I/O操作 - 将当前线程加入到线程集合中。
- 调用IOUtil.write将buffer数据写入到文件中
- I/O完成调用
end收尾工作 - 将线程移除线程集合中
关于begin和end操作可以看《NIO-Channel接口分析》
threads是一个NativeThreadSet类型,它用于存放native线程的唯一token。
class NativeThreadSet {
    private long[] elts;
    ...
    int add() {
        long th = NativeThread.current();
        ...
        //数组不够长会先扩容
        ...
        for (int i = start; i < elts.length; i++) {
            //未使用过,则设置当前的线程token值
            if (elts[i] == 0) {
                elts[i] = th;
                used++;
                return i;
            }
        }
        ...
    }

    void remove(int i) {
        synchronized (this) {
            //清空
            elts[i] = 0;
            used--;
            //当调用了signalAndWait等待时会设置为true。此时会激活每个线程,并清理,每个线程都会被移除。当全部移除后激活调用signalAndWait的线程
            if (used == 0 && waitingToEmpty)
            //通知
                notifyAll();
        }
    }
    //通知并等待
    synchronized void signalAndWait() {
        boolean interrupted = false;
        while (used > 0) {
            int u = used;
            int n = elts.length;
            for (int i = 0; i < n; i++) {
                long th = elts[i];
                ...
                //激活线程
                NativeThread.signal(th);
                ...
            }
            //是否等待所有线程被移除
            waitingToEmpty = true;
            try {
                //等待线程被清理,所有线程被移除时会激活。最多等待50ms,防止线程被阻塞。
                wait(50);
            } catch (InterruptedException e) {
                interrupted = true;
            } finally {
                waitingToEmpty = false;
            }
        }
        //线程中断则调用中断处理操作
        if (interrupted)
            Thread.currentThread().interrupt();
    }
}
native线程被定义为NativeThread类型的对象,主要由于在linux等操作系统当线程被I/O操作阻塞时,channel释放并不会激活该线程,因此需要通过一种通知的机制,在channel关闭时对线程进行通知,以便激活线程。
threads.add();会获取当前native的线程token,并加入待NativeThreadSet的token数组中(若数组长度不够,则会进行扩容。)
在上一章详细将结果IOUtil.write这里就不重复说明了
读文件
和写文件步骤类似,调用IOUtil.read读取数据
public int read(ByteBuffer dst) throws IOException {
    ...
    n = IOUtil.read(fd, dst, -1, nd);
    ...
}
修改起始位置
public FileChannel position(long newPosition) throws IOException {
    ...
    p  = position0(fd, newPosition);
    ...
}
获取文件长度
public long size() throws IOException {
    ...
    s = nd.size(fd);
    ...
}
截取长度
截取文件的长度,超过的文件内容会被删除。
public FileChannel truncate(long newSize) throws IOException {

    ...
    int rv = -1;
    long p = -1;
    int ti = -1;
    ...
    // 获取当前长度
    long size  = nd.size(fd);
    ...
    // 获取当前位置
    p = position0(fd, -1);
    ...
    // 若当前长度大于截取的长度,则截取
    if (newSize < size) {
        ...
        rv = nd.truncate(fd, newSize);
        ...
    }
    //若当前位置大于截取的长度则修改当前位置
    if (p > newSize)
        p = newSize;
    ...
    rv = (int)position0(fd, p);
    ...
}
写入磁盘
写文件若没有采用直接缓冲区,则会先写入到页缓冲区中,通过force可以将尚未写入磁盘的数据强制写道磁盘上。
public void force(boolean metaData) throws IOException {
    ...
    rv = nd.force(fd, metaData);
    ...
}
通道之间数据传输
若需要将一个通道的数据写入到另一个通道,则可以使用transferTo或transferFrom
transferTo
若当前通道是FileChannel,则可以将当前通道数据通过transferTo写入到其他通道
public long transferTo(long position, long count, WritableByteChannel target) throws IOException
{
    ...
    //当前文件大小
    long sz = size();
    if (position > sz)
        return 0;
    int icount = (int)Math.min(count, Integer.MAX_VALUE);
    //可传大小修正
    if ((sz - position) < icount)
        icount = (int)(sz - position);
    long n;
    // 若内核支持则使用直接传输
    if ((n = transferToDirectly(position, icount, target)) >= 0)
        return n;
    // 尝试内存映射文件传输
    if ((n = transferToTrustedChannel(position, icount, target)) >= 0)
        return n;
    // 慢速传输
    return transferToArbitraryChannel(position, icount, target);
}
通常情况下我们要将一个通道的数据传到另一个通道。举个例子,从一个文件读取数据通过socket通道进行发送。比如通过http协议读取服务器上的一个静态文件。

- 文件从硬盘读取(拷贝)页缓冲区
- 从页缓冲区读取(拷贝)数据到用户缓冲区
- 用户缓冲区的数据写入(拷贝)到socket内核缓冲区,最终再将socket内核缓冲区的数据写入(拷贝)到网卡中。
可以看到这中间发生了四次内存拷贝。
当我们通过transferTo在通道之间数据传输时,若内核支持,则会使用零拷贝的方式传输数据。
通过零拷贝技术可以避免将数据拷贝到用户空间中。

直接传输
若底层硬件支持的话可以将读取到的内核缓冲区的文件描述符加到socket缓冲区中,就可以省去了内核中将数据拷贝到socket缓冲区这一个内存拷贝动作。
使用直接传输时,只能从文件通道传输到网络通道。

private long transferToDirectly(long position, int icount, WritableByteChannel target) throws IOException
{
    if (!transferSupported)
        return IOStatus.UNSUPPORTED;
    //做一些校验,当前和目标通道是否都支持直接传输
    ...
    targetFD = ((SelChImpl)target).getFD();
    ...
    int thisFDVal = IOUtil.fdVal(fd);
    int targetFDVal = IOUtil.fdVal(targetFD);
    //调用native方法直接传输,若不支持会返回不支持的错误码
    n = transferTo0(thisFDVal, position, icount, targetFDVal);
    ...
}
windows不支持
transferTo0
以linux为例,linux会调用sendfile64在两个文件描述符之间传递数据。
Java_sun_nio_ch_FileChannelImpl_transferTo0(JNIEnv *env, jobject this,
                                            jint srcFD,
                                            jlong position, jlong count,
                                            jint dstFD)
{
#if defined(__linux__)
    off64_t offset = (off64_t)position;
    jlong n = sendfile64(dstFD, srcFD, &offset, (size_t)count);
    ...
    return n;
#elif defined (__solaris__)
...
#elif defined(__APPLE__)
...
#elif defined(_AIX)
...
#else
    return IOS_UNSUPPORTED_CASE;
#endif
}
sendfile64只支持将文件传输到socket
内存映射文件
若内核不支持上述方式则会尝试使用mmap(内存映射文件)的方式传输。

应用程序调用mmap(),磁盘上的数据会通过DMA被拷贝的页缓冲区,接着操作系统会把这段页缓冲区与应用程序共享,这样就不需要把页缓冲区的内容复制到用户空间了。应用程序再调用write(),操作系统直接将页缓冲区的内容拷贝到socket缓冲区中,这一切都发生在内核空间,最后,socket缓冲区再把数据发到网卡去。
private long transferToTrustedChannel(long position, long count, WritableByteChannel target) throws IOException
{
    ...
    //内存映射文件
    MappedByteBuffer dbb = map(MapMode.READ_ONLY, position, size);
    //有个bug,若在内存映射文件写入到目标通道时,关闭了channel,并不能中断此次写操作。
    int n = target.write(dbb);
    ...
    unmap(dbb);
    ...
}
MapMode有三种方式,只读(READ_ONLY)、可读写(READ_WRITE)、写时复制(PRIVATE)。
当多个进程的虚拟内存映射到同一块物理内存时,若不采用写时复制,则由于共用一块物理内存,会相互影响。当使用了写时复制的技术后,一旦一个进程要修改页面时,就会复制一个副本,因此不会影响其他进程。

map(MapMode.READ_ONLY, position, size);
public MappedByteBuffer map(MapMode mode, long position, long size) throws IOException
{
    //一些基本校验
    ...
    //获取文件大小
    long filesize = nd.size(fd);
    ...
    //根据文件大小设置文件描述符的结束未知
    rv = nd.truncate(fd, position + size);
    ...
    int pagePosition = (int)(position % allocationGranularity);
    long mapPosition = position - pagePosition;
    long mapSize = size + pagePosition;
    //调用native进行映射,若此时发生内存溢出,则强制回收一次GC,并重新尝试映射,若还是发生内存溢出则抛出异常
    ...
    addr = map0(imode, mapPosition, mapSize);
    ...
    //创建一个内存映射的文件描述符,指向当前的native文件描述符
    FileDescriptor mfd = nd.duplicateForMapping(fd);

    int isize = (int)size;
    //Unmapper是卸载内存映射文件用的
    Unmapper um = new Unmapper(addr, mapSize, isize, mfd);
    if ((!writable) || (imode == MAP_RO)) {
        return Util.newMappedByteBufferR(isize, addr + pagePosition, mfd, um);
    } else {
        //创建一个MappedByteBuffer
        return Util.newMappedByteBuffer(isize, addr + pagePosition, mfd, um);
    }
    ...
}
Unmapper适用于卸载内存映射文件用的。它实现了Runnable接口,以便于线程可以执行移除内存映射以及一些清理工作。
private static class Unmapper implements Runnable
{
    ...
    public void run() {
        if (address == 0)
            return;
        //移除内存映射
        unmap0(address, size);
        address = 0;
        ...
        // 关闭文件描述符
        nd.close(fd);
        ...
    }
那么什么时候会进行清理呢,我们可以看到实际通过Util.newMappedByteBuffer创建了一个MapperByteBuffer,并将Unmapper对象进行传递。
接下来看如何创建MapperByteBuffer
static MappedByteBuffer newMappedByteBuffer(int size, long addr, FileDescriptor fd, Runnable unmapper)
{
    MappedByteBuffer dbb;
    if (directByteBufferConstructor == null)
        initDBBConstructor();
    try {
        dbb = (MappedByteBuffer)directByteBufferConstructor.newInstance(
            new Object[] { new Integer(size), new Long(addr), fd, unmapper });
    } catch (InstantiationException |
                IllegalAccessException |
                InvocationTargetException e) {
        throw new InternalError(e);
    }
    return dbb;
}
首先通过directByteBufferConstructor创建一个MapperByteBuffer,从命名可以看出来这是一个DirectByteBuffer构造器。
通过反射获取了DirectByteBuffer的构造函数。
private static void initDBBConstructor() {
    ...
    Class<?> cl = Class.forName("java.nio.DirectByteBuffer");
    Constructor<?> ctor = cl.getDeclaredConstructor(
        new Class<?>[] { int.class, long.class, FileDescriptor.class, Runnable.class });
    ctor.setAccessible(true);
    directByteBufferConstructor = ctor;
    ...
}
构造函数传递的第五个参数为Unmapper对象,它被传递到了Cleaner中,由此可知,当MapperByteBuffer被释放时,Cleaner可以保证内存映射被卸载。
protected DirectByteBuffer(int cap, long addr, FileDescriptor fd, Runnable unmapper)
{
    super(-1, 0, cap, cap, fd);
    address = addr;
    cleaner = Cleaner.create(this, unmapper);
    att = null;
}
当内存映射完成时,就可以通过write进行数据传输,传输完成通过ummap卸载内存映射。
private static void unmap(MappedByteBuffer bb) {
    Cleaner cl = ((DirectBuffer)bb).cleaner();
    if (cl != null)
        cl.clean();
}
常规传输
常规传输需要多次内存拷贝以及在用户模式和内核模式切换。
private long transferToArbitraryChannel(long position, int icount, WritableByteChannel target) throws IOException
{
    ...
    //获取临时直接缓冲区
    ByteBuffer bb = Util.getTemporaryDirectBuffer(c);
    ...
    //读到bb中
    int nr = read(bb, pos);
    ...
    //转换为读模式
    bb.flip();
    //写入到目标通道
    int nw = target.write(bb);
    ...
    //释放临时直接缓冲区
    Util.releaseTemporaryDirectBuffer(bb);
}
transferFrom
若要将其他通道的数据传输到文件通道中,可以通过transferFrom传输。
若原通道是文件,则可以通过内存映射文件的方式提高性能。否则使用常规传输方式,需要将数据拷贝到用户空间。
public long transferFrom(ReadableByteChannel src, long position, long count) throws IOException
{
    ...
    if (src instanceof FileChannelImpl)
        return transferFromFileChannel((FileChannelImpl)src, position, count);

    return transferFromArbitraryChannel(src, position, count);
}
内存映射文件
private long transferFromFileChannel(FileChannelImpl src, long position, long count) throws IOException
{
    ...
    MappedByteBuffer bb = src.map(MapMode.READ_ONLY, p, size);
    //写入到文件
    long n = write(bb, position);
    ...
    //释放内存映射
    unmap(bb);
    ...
}
常规传输
private long transferFromArbitraryChannel(ReadableByteChannel src, long position, long count) throws IOException
{
    int c = (int)Math.min(count, TRANSFER_SIZE);
    //获取临时直接缓冲区
    ByteBuffer bb = Util.getTemporaryDirectBuffer(c);
    ...
    //将src写入到临时直接缓存
    int nr = src.read(bb);
    ...
    //转换为读模式
    bb.flip();
    //写入到文件
    int nw = write(bb, pos);
    ...
    //释放临时直接缓冲区
    Util.releaseTemporaryDirectBuffer(bb);
}
文件锁
在NIO中引入了FileLock实现文件锁,可以实现文件进程锁。它支持独占锁和共享锁。
使用独占锁时,只允许一个线程独占文件,其他线程必须等待独占的线程释放文件锁后才可以占用。使用共享锁时只支持读模式共享文件占用。关于文件锁的使用可以看下《JAVA 文件锁 FileLock》
public FileLock lock(long position, long size, boolean shared) throws IOException
{
    ...
    //写模式不能共享锁
    if (shared && !readable)
        throw new NonReadableChannelException();
    //读模式不能独占锁
    if (!shared && !writable)
        throw new NonWritableChannelException();
    //创建一个文件锁实例
    FileLockImpl fli = new FileLockImpl(this, position, size, shared);
    //获取文件锁表
    FileLockTable flt = fileLockTable();
    flt.add(fli);
    boolean completed = false;
    int ti = -1;
    try {
        ...
        //调用native方法加锁
        n = nd.lock(fd, true, position, size, shared);
        if (isOpen()) {
            //部分操作系统不支持共享锁,若获取到的是独占锁,则更新当前FileLockImpl为独占锁
            if (n == FileDispatcher.RET_EX_LOCK) {
                //若获取到锁,则重新获取一个非共享锁实例
                FileLockImpl fli2 = new FileLockImpl(this, position, size, false);
                flt.replace(fli, fli2);
                fli = fli2;
            }
            completed = true;
        }
    } finally {
        if (!completed)
            //加锁失败,移除锁
            flt.remove(fli);
        threads.remove(ti);
        ...
    }
    return fli;
}
关闭
关闭文件通道时需要释放所有锁和文件流
protected void implCloseChannel() throws IOException {
    // 释放文件锁
    if (fileLockTable != null) {
        for (FileLock fl: fileLockTable.removeAll()) {
            synchronized (fl) {
                if (fl.isValid()) {
                    //释放锁
                    nd.release(fd, fl.position(), fl.size());
                    ((FileLockImpl)fl).invalidate();
                }
            }
        }
    }
    // 通知当前通道所有被阻塞线程
    threads.signalAndWait();
    if (parent != null) {
        ((java.io.Closeable)parent).close();
    } else {
        nd.close(fd);
    }
}
在创建channel的时候会将RandomAccessFile、FileInputStream或FileOutputStream等对象设置为channel的parent。从而使得channel关闭的时候可以释放parent资源。
((java.io.Closeable)parent).close();
public void close() throws IOException {
    synchronized (closeLock) {
        if (closed) {
            return;
        }
        closed = true;
    }
    if (channel != null) {
        channel.close();
    }
    //关闭文件描述符
    fd.closeAll(new Closeable() {
        public void close() throws IOException {
            close0();
        }
    });
}
关闭FileDescriptor时会关闭RandomAccessFile、FileInputStream或FileOutputStream等资源。在创建RandomAccessFile时会通过FileDescriptor.attach将RandomAccessFile添加到FileDescriptor的otherParents中
synchronized void closeAll(Closeable releaser) throws IOException {
    if (!closed) {
        closed = true;
        IOException ioe = null;
        //在try执行完后调用releaser的close方法
        try (Closeable c = releaser) {
            //在创建RandomAccessFile时会把RandomAccessFile对象添加到otherParents中
            if (otherParents != null) {
                for (Closeable referent : otherParents) {
                    ...
                    referent.close();
                    ...
            }
        }
        ...
    }
}
总结
本篇对文件通道常用的操作源码进行解析,对linux下的零拷贝进行简要说明。
相关文献
- 史上最强Java NIO入门:担心从入门到放弃的,请读这篇!
- Java NIO系列教程
- 浅析Linux中的零拷贝技术
- Linux系统编程——内存映射与写时复制
- 支撑百万并发的“零拷贝”技术,你了解吗?
- java NIO之MappedByteBuffer
- JAVA 文件锁 FileLock
微信扫一扫二维码关注订阅号杰哥技术分享
出处:https://www.cnblogs.com/Jack-Blog/p/12078767.html
作者:杰哥很忙
本文使用「CC BY 4.0」创作共享协议。欢迎转载,请在明显位置给出出处及链接。
