1.web.xml中加入shiro的过滤器:


<!-- Spring -->
    <!-- 配置Spring配置文件路径 -->
    <context-param>
        <param-name>contextConfigLocation</param-name>
        <param-value>
      classpath*:spring/applicationContext.xml
      classpath*:spring/spring-shiro.xml
    </param-value>
    </context-param>
    <!-- 配置Spring上下文监听器 -->
    <listener>
        <listener-class>org.springframework.web.context.ContextLoaderListener</listener-class>
    </listener>
    <!-- Spring -->

<filter>
        <filter-name>shiroFilter</filter-name>
        <filter-class>org.springframework.web.filter.DelegatingFilterProxy</filter-class>
        <init-param>
            <param-name>targetFilterLifecycle</param-name>
            <param-value>true</param-value>
        </init-param>
    </filter>
    <filter-mapping>
        <filter-name>shiroFilter</filter-name>
        <url-pattern>/*</url-pattern>
    </filter-mapping>
2.创建shiro的配置文件spring-shiro.xml
<?xml version="1.0" encoding="UTF-8"?>
<beans xmlns="http://www.springframework.org/schema/beans"
    xmlns:xsi="http://www.w3.org/2001/XMLSchema-instance"
    xsi:schemaLocation="http://www.springframework.org/schema/beans http://www.springframework.org/schema/beans/spring-beans-3.1.xsd">

    <!-- 配置进行授权和认证的 Realm -->
    <bean id="myRealm" class="com.wdcloud.wdMaptail.entity.myRealm"/>

    <!-- 配置 Shiro 的 SecurityManager Bean. -->
    <bean id="securityManager" class="org.apache.shiro.web.mgt.DefaultWebSecurityManager">
        <property name="cacheManager" ref="cacheManager" />
        <property name="realm" ref="myRealm" />
        <!-- <property name="sessionMode" value="native"/> -->
    </bean>

    <!-- 启用shrio授权注解拦截方式 -->
    <bean id="shiroFilter" class="org.apache.shiro.spring.web.ShiroFilterFactoryBean">
        <!-- 装配 securityManager -->
        <property name="securityManager" ref="securityManager" />
        <!-- 配置登陆页面 -->
        <property name="loginUrl" value="/index.jsp" />
        <!-- 登陆成功后的一面 -->
        <property name="successUrl" value="/jsp/success.jsp" />
        <!-- 授权失败页面 -->
        <property name="unauthorizedUrl" value="/jsp/unauthorized.jsp" />
        <!-- 具体配置需要拦截哪些 URL, 以及访问对应的 URL 时使用 Shiro 的什么 Filter 进行拦截. -->
        <property name="filterChainDefinitions">
            <value>
                /test/dologin.do = anon
                <!-- /test/save.do请求之允许有save权限的用户访问 -->
                /test/save.do = perms[save]
                /index.jsp=anon
                /jsp/success.jsp=anon
                /jsp/fail.jsp=anon
                /jsp/user.jsp = roles[user]
                /jsp/admin.jsp = roles[admin]
                /logout = logout
                <!--拦截非静态资源的所有请求-->
                /** = authc
            </value>
        </property>
    </bean>

    <!-- 配置缓存管理器 -->
    <bean id="cacheManager" class="org.apache.shiro.cache.ehcache.EhCacheManager">
        <!-- 指定 ehcache 的配置文件 -->
        <property name="cacheManagerConfigFile" value="classpath:spring/ehcache-shiro.xml" />
    </bean>

    <!-- 配置 Bean 后置处理器: 会自动的调用和 Spring 整合后各个组件的生命周期方法. -->
    <bean id="lifecycleBeanPostProcessor" class="org.apache.shiro.spring.LifecycleBeanPostProcessor" />
</beans>
shiro权限管理过滤器解释:
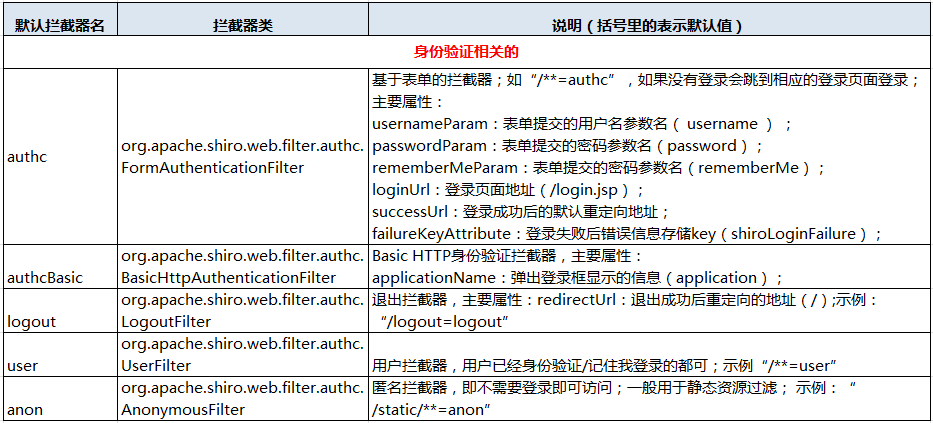
默认过滤器(10个)
anon -- org.apache.shiro.web.filter.authc.AnonymousFilter
authc -- org.apache.shiro.web.filter.authc.FormAuthenticationFilter
authcBasic -- org.apache.shiro.web.filter.authc.BasicHttpAuthenticationFilter
perms -- org.apache.shiro.web.filter.authz.PermissionsAuthorizationFilter
port -- org.apache.shiro.web.filter.authz.PortFilter
rest -- org.apache.shiro.web.filter.authz.HttpMethodPermissionFilter
roles -- org.apache.shiro.web.filter.authz.RolesAuthorizationFilter
ssl -- org.apache.shiro.web.filter.authz.SslFilter
user -- org.apache.shiro.web.filter.authc.UserFilter
logout -- org.apache.shiro.web.filter.authc.LogoutFilter


anon:例子/admins/**=anon 没有参数,表示可以匿名使用。
authc:例如/admins/user/**=authc表示需要认证(登录)才能使用,没有参数
roles:例子/admins/user/**=roles[admin],参数可以写多个,多个时必须加上引号,并且参数之间用逗号分割,当有多个参数时,例如admins/user/**=roles["admin,guest"],每个参数通过才算通过,相当于hasAllRoles()方法。
perms:例子/admins/user/**=perms[user:add:*],参数可以写多个,多个时必须加上引号,并且参数之间用逗号分割,例如/admins/user/**=perms["user:add:*,user:modify:*"],当有多个参数时必须每个参数都通过才通过,想当于isPermitedAll()方法。
rest:例子/admins/user/**=rest[user],根据请求的方法,相当于/admins/user/**=perms[user:method] ,其中method为post,get,delete等。
port:例子/admins/user/**=port[8081],当请求的url的端口不是8081是跳转到schemal://serverName:8081?queryString,其中schmal是协议http或https等,serverName是你访问的host,8081是url配置里port的端口,queryString是你访问的url里的?后面的参数。
authcBasic:例如/admins/user/**=authcBasic没有参数表示httpBasic认证
ssl:例子/admins/user/**=ssl没有参数,表示安全的url请求,协议为https
user:例如/admins/user/**=user没有参数表示必须存在用户,当登入操作时不做检查
3.创建shiro的缓存配置文件ehcache-shiro.xml
<ehcache updateCheck="false" name="shiroCache">

    <defaultCache
            maxElementsInMemory="10000"
            eternal="false"
            timeToIdleSeconds="120"
            timeToLiveSeconds="120"
            overflowToDisk="false"
            diskPersistent="false"
            diskExpiryThreadIntervalSeconds="120"
            />
</ehcache>
4.创建shiro的realm类
public class myRealm extends AuthorizingRealm {
    @Autowired
    private UserServiceImpl userService;

    /**
     * 授权查询回调函数, 进行鉴权但缓存中无用户的授权信息时调用,负责在应用程序中决定用户的访问控制的方法
     */
    @Override
    protected AuthorizationInfo doGetAuthorizationInfo(PrincipalCollection principals) {

        String username = (String) principals.getPrimaryPrincipal();
        SimpleAuthorizationInfo authorizationInfo = new SimpleAuthorizationInfo();
        // 根据用户名查询当前用户拥有的角色
        Set<String> roleNames = userService.findRolesByUsername(username);
        // 将角色名称提供给info
        authorizationInfo.setRoles(roleNames);

        // 根据用户名查询当前用户权限
        Set<String> permissionNames = userService.findPermissionsByUsername(username);
        // 将权限名称提供给info
        authorizationInfo.setStringPermissions(permissionNames);

        return authorizationInfo;
    }

    /**
     * 认证回调函数,登录信息和用户验证信息验证
     */
    @Override
    protected AuthenticationInfo doGetAuthenticationInfo(AuthenticationToken token) throws AuthenticationException {
        String username = (String) token.getPrincipal();
        User user = userService.findUserByUsername(username);
        if (user == null) {
            // 用户名不存在抛出异常
            throw new UnknownAccountException();
        }

        SimpleAuthenticationInfo authenticationInfo = new SimpleAuthenticationInfo(user.getUsername(),
                user.getPassword(), getName());
        return authenticationInfo;

    }

}
5.创建登陆controller
@Controller
@RequestMapping("/test")
public class LoginAction {
    @Autowired
    private UserServiceImpl userService;

    @RequestMapping("/dologin.do")
    public String dologin(@Validated User user, Model model) {
        String info = loginUser(user);
        if (!"SUCC".equals(info)) {
            model.addAttribute("failMsg", "用户不存在或密码错误!");
            return "/jsp/fail";
        } else {
            model.addAttribute("successMsg", "登陆成功!");// 返回到页面说夹带的参数
            model.addAttribute("name", user.getUsername());
            return "/jsp/success";// 返回的页面
        }
    }

    @RequestMapping("/logout.do")
    public void logout(HttpServletRequest request, HttpServletResponse response) throws IOException {
        Subject subject = SecurityUtils.getSubject();
        if (subject != null) {
            try {
                subject.logout();
            } catch (Exception ex) {
            }
        }
        response.sendRedirect("/wdMaptail/index.jsp");
    }

    // 用于方法权限测试
    @RequestMapping(value = "/save.do", method = RequestMethod.GET)
    public void save(HttpServletRequest request, HttpServletResponse response) {
        System.out.println("拥有save权限的用户才能访问");
    }

    private String loginUser(User user) {
        if (isRelogin(user)) { // 判断是否已登录
            return "SUCC";
        }

        return shiroLogin(user); // 调用shiro的登陆验证
    }

    private boolean isRelogin(User user) {
        Subject us = SecurityUtils.getSubject();
        if (us.isAuthenticated()) {
            return true; // 参数未改变,无需重新登录,默认为已经登录成功
        }
        return false; // 需要重新登陆
    }

    private String shiroLogin(User user) {
        // 组装token,包括客户公司名称、简称、客户编号、用户名称;密码
        UsernamePasswordToken token = new UsernamePasswordToken(user.getUsername(), user.getPassword());
        token.setRememberMe(true);

        // shiro登陆验证
        try {
            SecurityUtils.getSubject().login(token);
        } catch (UnknownAccountException ex) {
            return "用户不存在或者密码错误!";
        } catch (IncorrectCredentialsException ex) {
            return "用户不存在或者密码错误!";
        } catch (AuthenticationException ex) {
            return ex.getMessage(); // 自定义报错信息
        } catch (Exception ex) {
            ex.printStackTrace();
            return "内部错误,请重试!";
        }
        return "SUCC";
    }

}
6.再贴一个登陆成功后的页面代码,以为里面有Shiro的标签来控制页面的显示,其他页面和dao层代码这里就不写了。
<%@ page language="java" contentType="text/html; charset=UTF-8"
    pageEncoding="UTF-8"%>
<%@ taglib prefix="shiro" uri="http://shiro.apache.org/tags" %>
<!DOCTYPE html PUBLIC "-//W3C//DTD HTML 4.01 Transitional//EN" "http://www.w3.org/TR/html4/loose.dtd">
<html>
<head>
<meta http-equiv="Content-Type" content="text/html; charset=UTF-8">
<title>Insert title here</title>
</head>
<body>
    ${successMsg } Welcome!
    <shiro:principal />
    <br>
    <br>

    <shiro:hasAnyRoles name="user">
        <a href="/WEB-INF/jsp/user.jsp">User Page</a>
    </shiro:hasAnyRoles>

    <br>
    <br>

    <shiro:hasAnyRoles name="admin">
        <a href="/WEB-INF/jsp/admin.jsp">Admin Page</a>
    </shiro:hasAnyRoles>

    <br>
    <br>
    <a href="../test/logout.do">Logout</a>
</body>
</html>
shiro标签解释:
<shiro:authenticated> 登录之后
<shiro:notAuthenticated> 不在登录状态时
<shiro:guest> 用户在没有RememberMe时
<shiro:user> 用户在RememberMe时
<shiro:hasAnyRoles name="abc,123" > 在有abc或者123角色时
<shiro:hasRole name="abc"> 拥有角色abc
<shiro:lacksRole name="abc"> 没有角色abc
<shiro:hasPermission name="abc"> 拥有权限abc
<shiro:lacksPermission name="abc"> 没有权限abc
<shiro:principal> 显示用户登录名
7.如果在数据库中对密码使用md5加密,想要使用shiro验证的话,需要在realm中添加属性credentialsMatcher,shiro中使用md5加密:
<bean id="jdbcRealm" class="com.java.shiro.realms.ShiroRealm">
        <property name="credentialsMatcher">
            <bean class="org.apache.shiro.authc.credential.HashedCredentialsMatcher">
                <property name="hashAlgorithmName" value="MD5"></property> <!-- 加密算法的名称 -->
                <property name="hashIterations" value="1024"></property> <!-- 配置加密的次数 -->
            </bean>
        </property>
    </bean>
springboot中添加credentialsMatcher:
/**
     * 密码匹配凭证管理器
     * @return
     */
    @Bean(name = "hashedCredentialsMatcher")
    public HashedCredentialsMatcher hashedCredentialsMatcher() {
        HashedCredentialsMatcher hashedCredentialsMatcher = new HashedCredentialsMatcher();
        hashedCredentialsMatcher.setHashAlgorithmName("MD5");// 散列算法:这里使用MD5算法;
        hashedCredentialsMatcher.setHashIterations(1024);// 散列的次数,比如散列两次,相当于md5(md5(""));
        return hashedCredentialsMatcher;
    }

@Bean(name="myRealm")
    public MyRealm myRealm(HashedCredentialsMatcher hashedCredentialsMatcher,EhCacheManager ehCacheManager) {
        MyRealm myRealm = new MyRealm();
        myRealm.setCacheManager(ehCacheManager);
        myRealm.setCredentialsMatcher(hashedCredentialsMatcher);
        return myRealm;
    }
参考: