一、前言
在前面的几篇文章中已经总结了 Shiro的一些概念等理论知识,所以本文开始实战。
二、项目背景
由于主要注重 Shiro 的一些配置,所以搭建项目环境、创建数据库表、编写domain、dao、service、controller等代码就省略了,有需要的小伙伴可在文末进行下载。
(一)技术选型
JDK8 + Maven 3.6.3 + SpringBoot 2.4.1 + Shiro 1.4.0 + Redis 3.1.0
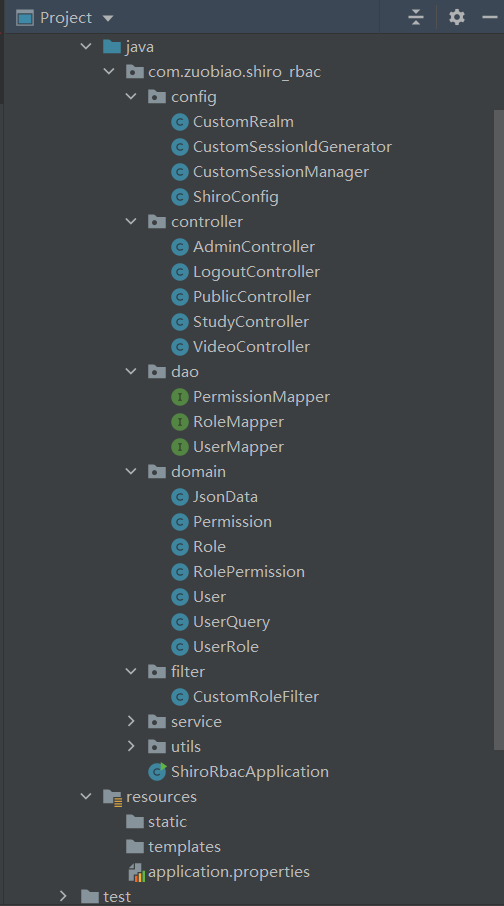
(二)项目结构
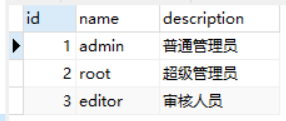
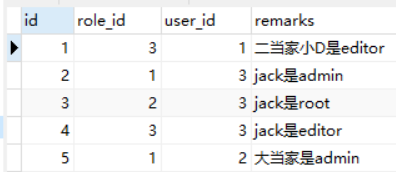
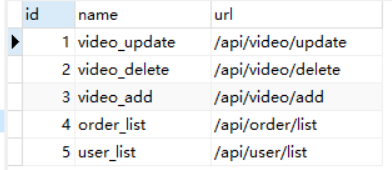
(三)数据库表
1)user 表

2)role 表
3)user_role 表
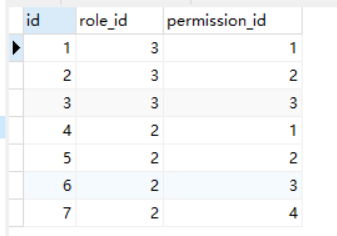
4)permission 表
5)role_permission 表
三、大致步骤
1)自定义 Realm
2)配置 ShiroFilterFactoryBean
3)自定义 SessionManager
四、自定义 Realm
在 Shiro【自定义Realm实战】中有总结过如何自定义 Realm。
此处直接贴出具体实现代码:
/**
 * 从数据库中查询账号和权限相关的数据
 */
public class CustomRealm extends AuthorizingRealm {

    @Autowired
    private UserService userService;

    /**
     * 认证
     * @param authenticationToken
     * @return
     * @throws AuthenticationException
     */
    @Override
    protected AuthenticationInfo doGetAuthenticationInfo(AuthenticationToken authenticationToken) throws AuthenticationException {
        System.out.println("认证开始");

        // 获取用户输入的账号
        String username = (String)authenticationToken.getPrincipal();

        // 根据账号从数据库中查询用户相关信息
        User userDb = userService.findAllUserInfoByUsername(username);

        // 若账号不存在(密码不存在其实也是反映账号不存在)则直接返回null
        String pwd = userDb.getPassword();
        if(pwd == null || "".equals(pwd)){
            return null;
        }

        // 将数据库中查询出来的数据封装到 SimpleAuthenticationInfo 对象中返回
        // 真正的认证过程是由 shiro 自动帮我们进行的,可以从源码中看到的。
        // 我们要做的其实就只是将数据从数据库中查询出来并封装到对象中返回
        return new SimpleAuthenticationInfo(username, pwd, this.getClass().getName());
    }

    /**
     * 授权
     * @param principalCollection
     * @return
     */
    @Override
    protected AuthorizationInfo doGetAuthorizationInfo(PrincipalCollection principalCollection) {
        System.out.println("授权开始");

        // 获取用户输入的账号
        String username = (String)principalCollection.getPrimaryPrincipal();

        // 根据账号从数据库中查询用户相关信息
        User userDb = userService.findAllUserInfoByUsername(username);

        // 以下的操作是查询并封装用户和权限相关信息
        Set<String> stringRoleList = new HashSet<>();
        Set<String> stringPermissionList = new HashSet<>();
        List<Role> roleList = userDb.getRoleList();
        for (Role role : roleList) {
            stringRoleList.add(role.getName());
            for (Permission permission : role.getPermissionList()) {
                if (permission != null){
                    stringPermissionList.add(permission.getName());
                }
            }
        }

        // 将数据库中查询出来的数据封装到 SimpleAuthorizationInfo 对象中返回
        SimpleAuthorizationInfo simpleAuthorizationInfo = new SimpleAuthorizationInfo();
        simpleAuthorizationInfo.setRoles(stringRoleList);
        simpleAuthorizationInfo.setStringPermissions(stringPermissionList);
        return simpleAuthorizationInfo;
    }
}
五、配置 ShiroFilterFactoryBean
在 Shiro【重要概念总结】中有总结到,Shiro 实现权限控制的方式有三种。
我们在该项目中使用的是第一种方式:JavaConfig 的方式。
(一)需要配置的内容
1)ShiroFilterFactoryBean
2)SecurityManager
3)Realm
4)HashedCredentialsMatcher
5)SessionManager
(二)具体实现代码
@Configuration
public class ShiroConfig {

    @Bean
    public ShiroFilterFactoryBean getShiroFilterFactoryBean(SecurityManager securityManager){
        System.out.println("ShiroFilterFactoryBean加载...");
        ShiroFilterFactoryBean shiroFilterFactoryBean = new ShiroFilterFactoryBean();

        // 1.设置SecurityManager
        shiroFilterFactoryBean.setSecurityManager(securityManager);

        /**
         * 设置一些特殊功能的接口路径
         */
        // 2.1 如果访问某个接口,需要登录却没登录,则调用此接口(如果不是前后端分离,则跳转页面)
        shiroFilterFactoryBean.setLoginUrl("/pub/need_login");

        // 2.2.登录成功,跳转url(如果前后端分离,则可以跳转指定页面)
        shiroFilterFactoryBean.setSuccessUrl("/");

        // 2.3 访问没有权限的接口,则会调用此接口
        shiroFilterFactoryBean.setUnauthorizedUrl("/pub/not_permit");

        /**
         * 设置拦截路径:对访问路径指定拦截器
         * 注意点:
         * 1. 一定要使用 LinkedHashMap 来保存相关拦截器
         * 2. 在 Shiro 中,拦截器的执行顺序和设置的顺序保持一致,所以,兜底的拦截一定要放在最后面
         * 3. 所有默认的 Filter都在 DefaultFilter 枚举类中
         */
        Map<String, String> filterChainDefinitionMap = new LinkedHashMap<>();

        // 3.1 退出过滤器
        filterChainDefinitionMap.put("/logout", "logout");

        // 3.2 匿名过滤器(匿名可以访问,也是就游客模式)
        filterChainDefinitionMap.put("/pub/**", "anon");

        // 3.3 登录拦截器(登录用户才可以访问)
        filterChainDefinitionMap.put("/authc/**", "authc");

        // 3.4 角色拦截器(指定角色才可以访问)
        // 此处使用的是admin角色来练习。
        // roles:拦截器的名字;
        // admin:数据库中保存的角色名称,所以一定要和数据库中的值一样,
        // 然后这个是会从数据库中查询后保存到Realm对象中的
        filterChainDefinitionMap.put("/admin/**", "roles[admin,root]");

        // 3.5 权限拦截器(具有权限的用户才可以访问)
        filterChainDefinitionMap.put("/video/update", "perms[video_update]");

        // 3.6 用于兜底的拦截(过滤链是顺序执行,从上而下,一般将/** 放到最下面)
        // 此处使用什么类型的拦截器需要看需求,此处使用登录拦截器来练习
        filterChainDefinitionMap.put("/**", "authc");

        shiroFilterFactoryBean.setFilterChainDefinitionMap(filterChainDefinitionMap);
        return shiroFilterFactoryBean;
    }

    /**
     * 在 SecurityManager 中需要设置如下两个:
     * 1. Realm
     * 2. SessionManager
     * @return
     */
    @Bean
    public SecurityManager getSecurityManager(){
        DefaultWebSecurityManager securityManager = new DefaultWebSecurityManager();

        //如果不是前后端分离,则不必设置下面的sessionManager
        securityManager.setSessionManager(getSessionManager());

        //设置realm(推荐放到最后,不然某些情况会不生效)
        securityManager.setRealm(getRealm());
        return securityManager;
    }

    @Bean
    public Realm getRealm(){
        CustomRealm customRealm = new CustomRealm();
        // 一个Bean中需要调用另外一个Bean,则需要调用方法
        customRealm.setCredentialsMatcher(hashedCredentialsMatcher());
        return customRealm;
    }

    @Bean
    public HashedCredentialsMatcher hashedCredentialsMatcher(){
        HashedCredentialsMatcher credentialsMatcher = new HashedCredentialsMatcher();
        credentialsMatcher.setHashAlgorithmName("md5");
        // 使用指定加密算法进行双重加密
        credentialsMatcher.setHashIterations(2);
        return credentialsMatcher;
    }

    @Bean
    public SessionManager getSessionManager(){
        CustomSessionManager sessionManager = new CustomSessionManager();

        // 设置 session 过期时间,单位为毫秒,默认时间为30分钟
        // 假设设为过期时间为30分钟,那么如果用户在登录状态下,有30分钟没有执行任何操作
        // 则 session 就会过期。如果在过期之前有执行操作,那么就会重新计时
       sessionManager.setGlobalSessionTimeout(1000*60*2);
        return sessionManager;
    }
}
CustomSessionManager 的代码如下:
/**
 * SessionManager的实现类有以下 3 种:
     * DefaultSessionManager: 默认实现,常用于javase
     * ServletContainerSessionManager:  web环境
     * DefaultWebSessionManager:常用于自定义实现
 */
public class CustomSessionManager extends DefaultWebSessionManager {

    /**
     * 对应前端中需要携带的请求头的名称
     */
    private static final String AUTHORIZATION = "sessionId";

    public CustomSessionManager(){
        super();
    }

    @Override
    protected Serializable getSessionId(ServletRequest request, ServletResponse response) {
        // 从前端请求头中获取传递过来的sessionId
        String sessionId = WebUtils.toHttp(request).getHeader(AUTHORIZATION);

        if(sessionId != null){
            request.setAttribute(ShiroHttpServletRequest.REFERENCED_SESSION_ID_SOURCE, ShiroHttpServletRequest.COOKIE_SESSION_ID_SOURCE);

            // 会自动将前端传递过来的 sessionId 和 服务端保存的 sessionId 进行判断
            request.setAttribute(ShiroHttpServletRequest.REFERENCED_SESSION_ID, sessionId);

            request.setAttribute(ShiroHttpServletRequest.REFERENCED_SESSION_ID_IS_VALID, Boolean.TRUE);
            return sessionId;
        }else {
            return super.getSessionId(request,response);
        }
    }
}
六、测试
只需要针对配置类中配置好的拦截路径,对Controller中的接口进行测试即可。
七、项目源代码
链接: https://pan.baidu.com/s/1fKGMSvEmXBItHD6U_pduhg 提取码: jhwy
八、总结
本文只是总结了 Shiro 中一些最最基本的配置,在Shiro【实战进阶】中有总结通过整合 Redis 实现缓存和会话管理。
Java新手,若有错误,欢迎指正!