配置MySQL5.7基于GTID的双主复制
一、 安装前规划
1.1 大体架构规划如下
|
Master1/Slave 192.168.9.71:3306 |
|
Master2/Slave 192.168.9.72:3306 |
数据库搭建过程请参考《mysql5.7部署文档》
二、 双主复制搭建
2.1 创建同步用户repl(master上)
grant replication slave on *.* to 'repl'@'%' identified by '123456';
flush privileges;
注:其中'repl'@'%'部分可以修改为'repl'@'xxx.xxx.xxx.*'或'repl'@'xxx.xxx.xxx.xxx'的形式,出于安全目的用以限制网段或IP访问(其中xxx为具体IP)
2.2 Master1 my.cnf添加同步参数
server_id=1
log-bin = /mysql/3306/binlog/bin.log #binlog存放路径,需要根据实际情况修改
log_bin_index = /mysql/3306/binlog/bin.index
max-binlog-size=209715200
expire-logs-days = 7
sync-binlog = 1
binlog_format="ROW"
log_bin_trust_function_creators = 1
binlog_cache_size = 2097152
上诉参数数据库搭建过程已经配置。
# replication settings #
gtid_mode = on
enforce_gtid_consistency = 1
log_slave_updates
master_info_repository = TABLE
relay_log_info_repository = TABLE
relay_log = /mysql/3306/binlog/relay.log
relay_log_index = /mysql/3306/binlog/relay_log.index
relay_log_purge = 1
relay_log_recovery = 1
report-port = 3306
report-host = 192.168.9.71
slave-rows-search-algorithms = 'INDEX_SCAN,HASH_SCAN'
# new replication settings #
slave-parallel-type = LOGICAL_CLOCK
slave-parallel-workers = 8
slave_preserve_commit_order=1
slave_transaction_retries=128
# auto-increment #
auto-increment-increment = 2
auto-increment-offset = 1
2.3 Master2 my.cnf添加同步参数
server_id=2
log-bin = /mysql/3306/binlog/bin.log #binlog存放路径,需要根据实际情况修改
log_bin_index = /mysql/3306/binlog/bin.index
max-binlog-size=209715200
expire-logs-days = 7
sync-binlog = 1
binlog_format="ROW"
log_bin_trust_function_creators = 1
binlog_cache_size = 2097152
上诉参数数据库搭建过程已经配置。
# replication settings #
gtid_mode = on
enforce_gtid_consistency = 1
log_slave_updates
master_info_repository = TABLE
relay_log_info_repository = TABLE
relay_log = /mysql/3306/binlog/relay.log
relay_log_index = /mysql/3306/binlog/relay_log.index
relay_log_purge = 1
relay_log_recovery = 1
report-port = 3306
report-host = 192.168.9.72
slave-rows-search-algorithms = 'INDEX_SCAN,HASH_SCAN'
# new replication settings #
slave-parallel-type = LOGICAL_CLOCK
slave-parallel-workers = 8
slave_preserve_commit_order=1
slave_transaction_retries=128
# auto-increment #
auto-increment-increment = 2
auto-increment-offset = 2
注:
1) 以上添加参数如已在my.cnf文件里则无需添加,其中主库server_id的数字不能和备库server_id相同,
一般一主一从架构中,备库server_id默认设为2即可
2) log-slave-updates参数用来控制slave库是否把replication的event也写进binlog,如果是M->S1->S2的级联同步架构,则S1(第一个slave库)需要打开binlog和把log-slave-updates参数设为1
3) auto_increment_increment 控制列中的值的增量值,也就是步长。
4) auto_increment_offset 确定AUTO_INCREMENT列值的起点,也就是初始值。
在主主同步配置时,需要将两台服务器的:
auto_increment_offset 分别配置为1和2。这是序号,第一台从1开始,第二台就是2,以此类推.....
auto_increment_increment 增长量都配置为2
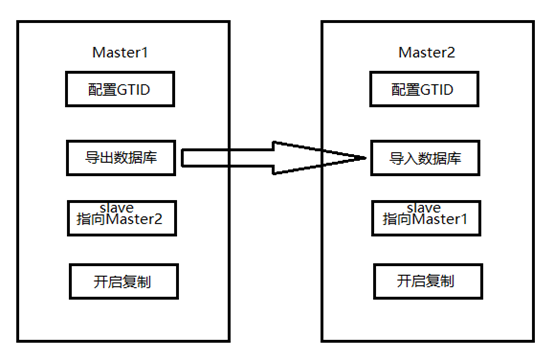
2.4 Master1备份与Master2导入
2.4.1 mysqldump备份
Master1备份:
mysqldump -uroot -p --single-transaction --default-character-set=utf8 --master-data=2 --flush-logs --triggers --routines --events --all-databases > allDB.`hostname`_`date +"%Y%m%d%H%M"`.sql
Master2导入:
mysql> reset master;
Query OK, 0 rows affected (0.01 sec)
mysql -uroot -p < allDB.`hostname`_`date +"%Y%m%d%H%M"`.sql
2.4.2 配置同步
Master1配置同步参数
CHANGE MASTER TO
MASTER_HOST = '192.168.9.72',
MASTER_PORT = 3306,
MASTER_USER = 'repl',
MASTER_PASSWORD = '123456',
MASTER_AUTO_POSITION = 1;
Master2配置同步参数
CHANGE MASTER TO
MASTER_HOST = '192.168.9.71',
MASTER_PORT = 3306,
MASTER_USER = 'repl',
MASTER_PASSWORD = '123456',
MASTER_AUTO_POSITION = 1;
注:
master_host参数配置主库IP地址
master_port参数配置主库端口号
master_user参数配置主库的同步用户名
master_password参数配置主库同步用户的密码
2.4.3 开启同步并查看状态(两台主机分别执行)
mysql> start slave ;
Query OK, 0 rows affected (0.04 sec)
mysql> show slave statusG;
*************************** 1. row ***************************
Slave_IO_State: Waiting for master to send event
Master_Host: 192.168.9.71
Master_User: repl
Master_Port: 3306
Connect_Retry: 60
Master_Log_File: bin.000004
Read_Master_Log_Pos: 194
Relay_Log_File: relay.000002
Relay_Log_Pos: 355
Relay_Master_Log_File: bin.000004
Slave_IO_Running: Yes
Slave_SQL_Running: Yes
Replicate_Do_DB:
Replicate_Ignore_DB:
Replicate_Do_Table:
Replicate_Ignore_Table:
Replicate_Wild_Do_Table:
Replicate_Wild_Ignore_Table:
Last_Errno: 0
Last_Error:
Skip_Counter: 0
Exec_Master_Log_Pos: 194
Relay_Log_Space: 552
Until_Condition: None
Until_Log_File:
Until_Log_Pos: 0
Master_SSL_Allowed: No
Master_SSL_CA_File:
Master_SSL_CA_Path:
Master_SSL_Cert:
Master_SSL_Cipher:
Master_SSL_Key:
Seconds_Behind_Master: 0
Master_SSL_Verify_Server_Cert: No
Last_IO_Errno: 0
Last_IO_Error:
Last_SQL_Errno: 0
Last_SQL_Error:
Replicate_Ignore_Server_Ids:
Master_Server_Id: 1
Master_UUID: 15c4b75c-cd03-11e9-be6b-080027364db6
Master_Info_File: mysql.slave_master_info
SQL_Delay: 0
SQL_Remaining_Delay: NULL
Slave_SQL_Running_State: Slave has read all relay log; waiting for more updates
Master_Retry_Count: 86400
Master_Bind:
Last_IO_Error_Timestamp:
Last_SQL_Error_Timestamp:
Master_SSL_Crl:
Master_SSL_Crlpath:
Retrieved_Gtid_Set:
Executed_Gtid_Set: 15c4b75c-cd03-11e9-be6b-080027364db6:1-231665
Auto_Position: 1
Replicate_Rewrite_DB:
Channel_Name:
Master_TLS_Version:
1 row in set (0.00 sec)
ERROR:
No query specified
三、 使用Keepalived实现故障转移
3.1 Keepalived安装
1、下载安装包
|
http://www.keepalived.org/download.html Keepalived for Linux - Version 2.0.18 |
2、编译安装Keepalived
|
tar -zxvf keepalived-2.0.18.tar.gz cd keepalived-2.0.18 ./configure --prefix=/usr/local/keepalived make && make install |
3、将Keepalived注册为系统服务
|
cp /usr/local/keepalived/sbin/keepalived /usr/sbin/ cp /usr/local/keepalived/etc/sysconfig/keepalived /etc/sysconfig/ mkdir -p /etc/keepalived cp /usr/local/keepalived/etc/keepalived/keepalived.conf /etc/keepalived/keepalived.conf cp /mysql/keepalived-2.0.18/keepalived/etc/init.d/keepalived /etc/init.d/keepalived |
3.2 Keepalived配置,实现故障转移
备注:Keepalived使用vip 192.168.9.73实现故障转移。
Master1:/etc/keepalived/keepalived.conf
|
! Configuration File for keepalived global_defs { notification_email { figo@live.cn } notification_email_from luwenju@live.cn smtp_server 127.0.0.1 smtp_connect_timeout 30 router_id MySQL-ha script_user root enable_script_security }
vrrp_instance VI_1 { state BACKUP interface eth1 virtual_router_id 51 priority 100 advert_int 1 nopreempt authentication { auth_type PASS auth_pass 1111 } virtual_ipaddress { 192.168.9.73 } }
virtual_server 192.168.9.73 3306 { delay_loop 2 lb_algo wrr lb_kind DR persistence_timeout 60 protocol TCP real_server 192.168.9.71 3306 { weight 3 notify_down /usr/local/MySQL.sh TCP_CHECK { connect_timeout 10 nb_get_retry 3 delay_before_retry 3 connect_port 3306 } } } |
Master2:/etc/keepalived/keepalived.conf
|
! Configuration File for keepalived global_defs { notification_email { figo@live.cn } notification_email_from luwenju@live.cn smtp_server 127.0.0.1 smtp_connect_timeout 30 router_id MySQL-ha script_user root enable_script_security }
vrrp_instance VI_1 { state BACKUP interface eth1 virtual_router_id 51 priority 90 advert_int 1 # nopreempt authentication { auth_type PASS auth_pass 1111 } virtual_ipaddress { 192.168.9.73 } }
virtual_server 192.168.9.73 3306 { delay_loop 2 lb_algo wrr lb_kind DR persistence_timeout 60 protocol TCP real_server 192.168.9.72 3306 { weight 3 notify_down /usr/local/MySQL.sh TCP_CHECK { connect_timeout 10 nb_get_retry 3 delay_before_retry 3 connect_port 3306 } } } |
3.3 Keepalived依赖脚本
MySQL.sh 当mysql服务down时,执行此脚本,杀死keepalived实现切换
check_Mysql_KeepAlived.sh 是为了检查mysqld进程是否存活的脚本,当发现连接不上mysql,自动把keepalived进程杀死,让VIP进行漂移。或者mysqld存活时自动启动未启动的keepalived进程
|
[root@oracle12c local]# cat /usr/local/MySQL.sh #!/bin/sh pkill keepalived [root@oracle12c local]# cat /usr/local/check_Mysql_KeepAlived.sh #!/bin/bash log_dir=/mysql/check_log check_time=`date "+%Y-%m-%d %H:%M:%S"` log_time=`date +%F` log=$log_dir/check_${log_time}.log . /root/.bash_profile count=1 while true do mysql -uroot -p12345678 -S /var/lib/mysql/mysql.sock -e "show status;" > /dev/null 2>&1 i=$? ps aux | grep mysqld | grep -v grep > /dev/null 2>&1 j=$? if [ $i = 0 ] && [ $j = 0 ] then ps aux|grep keepalived|grep -v grep > /dev/null 2>&1 k=$? if [ $k = 1 ] then /etc/init.d/keepalived start > /dev/null 2>&1 echo "$check_time,service mysqld is running,keepalived not active,start keepalived.">>$log exit 0 else echo "$check_time,services are running.">>$log exit 0 fi else if [ $i = 1 ] && [ $j = 0 ] then exit 0 else if [ $count -gt 5 ] then ps aux|grep keepalived|grep -v grep > /dev/null 2>&1 rlk=$? if [ $rlk = 0 ] then pkill keepalived > /dev/null 2>&1 echo "$check_time,service mysqld is not active,keepalived shoud be closed.">>$log break else echo "$check_time,services are not active.">>$log break fi fi let count++ continue fi fi done |
脚本部署完毕后,修改部分内容,赋执行权限并配置定时任务
|
chmod +x /usr/local/check_Mysql_KeepAlived.sh chmod +x /usr/local/MySQL.sh crontab -e */1 * * * * /usr/local/check_Mysql_KeepAlived.sh |
3.4 故障转移测试
开启Keepslave进程
|
service keepalived start service keepalived status |
检查状态
|
tail -f /var/log/messages ip a |
先在服务器端授权远程连接:
|
mysql> grant all privileges on *.* to 'root'@'%' identified by '123456'; mysql> flush privileges; |
然后在第三台服务器上用vip连接数据库:
|
mysql -uroot -p -h 192.168.9.73 mysql> show variables like '%host%'; +-------------------------------+--------+ | Variable_name | Value | +-------------------------------+--------+ | host_cache_size | 653 | | hostname | mysql4 | | performance_schema_hosts_size | 100 | | report_host | | +-------------------------------+--------+ |
如果停止当前连接节点mysql4 mysql服务:
|
service mysqld stop Shutting down MySQL.............[ OK ] |
过一会儿查看目标连接:
|
mysql> show variables like '%host%'; +-------------------------------+--------+ | Variable_name | Value | +-------------------------------+--------+ | host_cache_size | 653 | | hostname | mysql3 | | performance_schema_hosts_size | 100 | | report_host | | +-------------------------------+--------+ 4 rows in set (0.00 sec) |
此时再开启mysql4上的mysql服务:
|
service mysqld start Starting MySQL...[ OK ] |
再次在客户端查看连接:
|
mysql> show variables like '%host%'; +-------------------------------+--------+ | Variable_name | Value | +-------------------------------+--------+ | host_cache_size | 653 | | hostname | mysql3 | | performance_schema_hosts_size | 100 | | report_host | | +-------------------------------+--------+ 4 rows in set (0.00 sec) |
四、 附录
4.1 keepalived.conf参数详解
global_defs {
notification_email {
figo@live.cn
}
notification_email_from figo@live.cn
smtp_server 127.0.0.1
smtp_connect_timeout 30
router_id MySQL-ha #标识,双主相同
}
vrrp_instance VI_1 {
state BACKUP #两台都设置BACKUP
interface eth0
virtual_router_id 51 #主备相同
priority 100 #优先级,backup设置90
advert_int 1
nopreempt #不主动抢占资源,只在master这台优先级高的设置,backup不设置
authentication {
auth_type PASS
auth_pass 1111
}
virtual_ipaddress {
192.168.9.57
}
}
virtual_server 192.168.9.57 3306 {
delay_loop 2
lb_algo wrr #LVS算法
lb_kind DR #LVS模式
persistence_timeout 60 #同一IP的连接60秒内被分配到同一台真实服务器
protocol TCP
real_server 192.168.9.55 3306 { #检测本地mysql,backup也要写检测本地mysql
weight 3
notify_down /usr/local/MySQL.sh #当mysq服down时,执行此脚本,杀死keepalived实现切换
TCP_CHECK {
connect_timeout 10
nb_get_retry 3 #连接超时
delay_before_retry 3 #重试次数
connect_port 3306 #重试间隔时间
}
}
}
4.2 遗留问题
1、 Keepalived脑裂问题解决思路。
2、 开启GTID双主同步后备份恢复注意事项。