Zabbix是一个基于WEB界面的提供分布式系统监视以及网络监视功能的企业级的开源解决方案。

一、系统环境
Centos7

LAMP

Zabbix-server
二、关闭Selinux
sed -i "s/SELINUX=enforcing/SELINUX=disabled/g" /etc/selinux/config
更改selinux需要重启系统(reboot或init 6重启)才会生效!
三、暂时关闭防火墙
systemctl stop firewalld #关闭防火墙
四、搭建LAMP环境
本次安装使用yum安装
1、安装软件包和依赖包
yum -y install wget net-snmp-devel OpenIPMI-devel httpd openssl-devel java lrzsz fping-devel libcurl-devel perl-DBI pcre-devel libxml2 libxml2-devel mysql-devel gcc php php-bcmath php-gd php-xml php-mbstring php-ldap php-mysql.x86_64 php-pear php-xmlrpc net-tools wget vim-enhanced
2、安装yum源
wget -P /etc/yum.repos.d http://mirrors.aliyun.com/repo/Centos-7.repo
3、安装http、mariadb、php
yum -y install mariadb mariadb-server php php-mysql httpd
4、启动程序
http:
systemctl start httpd
systemctl enable httpd
mariadb:
systemctl start mariadb
systemctl enable mariadb
使用netstat -lntp查看端口启动情况(80和3306端口)
5、配置http支持PHP
编辑配置文件httpd.conf
vi /etc/httpd/conf/httpd.conf
DirectoryIndex index.html index.php  #添加index.php
:wq  #保存退出

编辑php测试页面:
cd /var/www/html/
vi index.php
<?php
$servername = "localhost";
$username = "zabbix";
$password = "zabbix";
// 创建连接
$conn = new mysqli($servername, $username, $password);
// 检测连接
if ($conn->connect_error) {
die("连接mariadb失败!!: " . $conn->connect_error);
}
echo "连接mariadb成功!!";
phpinfo();
php?>
重启httpd服务器:systemctl restart httpd
6、配置mariadb数据库
设置root密码
grant all privileges on *.* to 'root'@'localhost' identified by 'withub';
grant all privileges on *.* to 'root'@'%' identified by 'withub';
创建zabbix数据库
mysql -uroot -pwithub
create database zabbix default character set utf8 collate utf8_bin;
创建zabbix数据库用户
grant all privileges on zabbix.* to 'zabbix'@'localhost' identified by 'zabbix';
grant all privileges on zabbix.* to 'zabbix'@'%' identified by 'zabbix';
flush privileges;  #刷新数据库
测试zabbix用户登录数据库
mysql -uzabbix -pzabbix
show databases;  #查看数据库
quit  #退出数据库
浏览器访问http://IP/index.php访问!
五、安装zabbix server3.0
1、安装zabbix3.0需要的EPEL源和YUM源
rpm -ivh http://mirrors.aliyun.com/epel/7/x86_64/e/epel-release-7-6.noarch.rpm
rpm -ivh http://repo.zabbix.com/zabbix/3.0/rhel/7/x86_64/zabbix-release-3.0-1.el7.noarch.rpm
2、安装zabbix3.0软件
yum -y install zabbix-server-mysql zabbix-web-mysql zabbix-get
通过安装完成可能看到目前的zabbix-server的版本号
3、zabbix相关配置
cd /usr/share/doc/zabbix-server-mysql-3.0.2/
导入zabbix数据库
zcat create.sql.gz | mysql -uroot -pwithub zabbix
修改zabbix sever的配置文件
vim /etc/zabbix/zabbix_server.conf
LogFile=/var/log/zabbix/zabbix_server.log
LogFileSize=0
PidFile=/var/run/zabbix/zabbix_server.pid
DBHost=localhost
DBName=zabbix
DBUser=zabbix
DBPassword=zabbix
SNMPTrapperFile=/var/log/snmptrap/snmptrap.log
Timeout=4
AlertScriptsPath=/usr/lib/zabbix/alertscripts
ExternalScripts=/usr/lib/zabbix/externalscripts
LogSlowQueries=3000
上述配置文件中,我们只需要关注 DBHost、DBName、DBUser、DBPassword 几项即可。这几项是配置zabbix server连接mysql数据库的参数。
修改httpd中zabbix.conf参数
vim /etc/httpd/conf.d/zabbix.conf
Alias /zabbix /usr/share/zabbix
<Directory “/usr/share/zabbix”>
Options FollowSymLinks
AllowOverride None
Require all granted
<IfModule mod_php5.c>
php_value max_execution_time 300
php_value memory_limit 128M
php_value post_max_size 16M
php_value upload_max_filesize 2M
php_value max_input_time 300
php_value always_populate_raw_post_data -1
php_value date.timezone Asia/Chongqing  #这行改为目前参数,时区
</IfModule>
</Directory>
4、启动zabbix-server
systemctl start zabbix-server
systemctl enable zabbix-server
5、问题解决,启动报错
Centos7 中 gnutls.x86_64 (gnutls.x86_64 3.3.8-14.el7_2 ) 版本过高,需要降级 3.1.18-8.el7(1.20)
解决办法:
1. 下载gnutls-3.1.18-8.el7.x86_64.rpm
2. 降级gnutls
rpm -Uvh --force  gnutls-3.1.18-8.el7.x86_64.rpm    即可
重启httpd:systemctl restart httpd
重启zabbix-server:systemctl restart zabbix-server
六、登录http://IP/zabbix/配置

Nest step
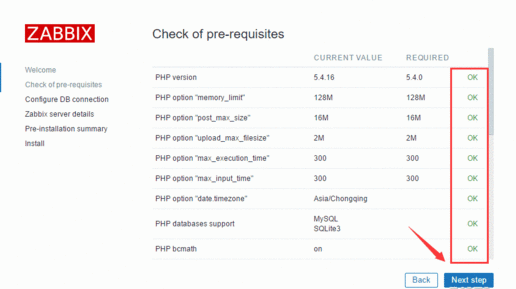
Nest step(核对是否符合安装需求)
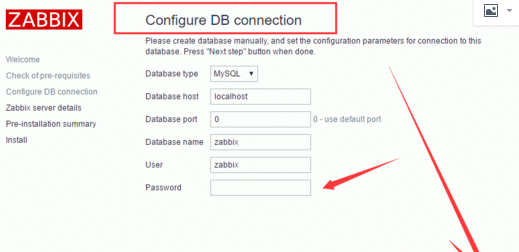
配置数据库连接,Nest step
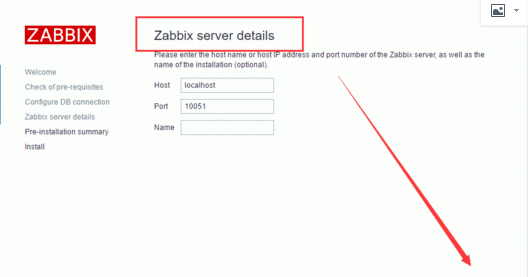
Nest step
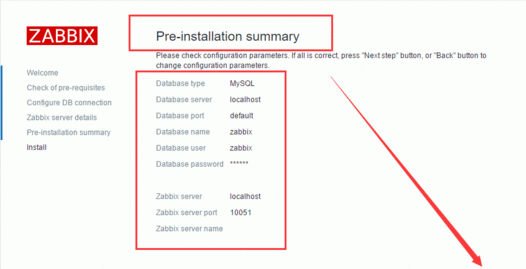
Nest step
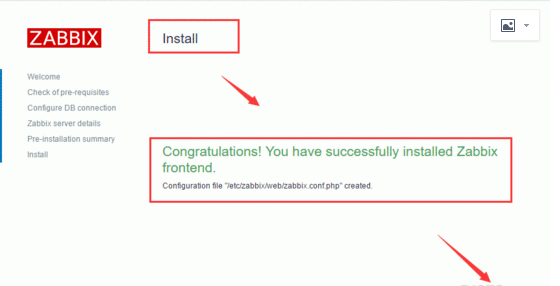
Finish
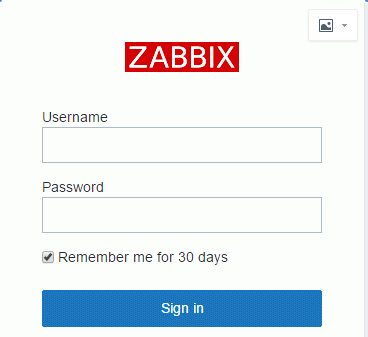
初始默认用户名Admin,密码zabbix,然后点击sign in
完成!
先熟悉界面环境,接下来给大家分享如何监控一台服务器。