JDK中已经内置了Webservice发布,不过要用Tomcat等Web服务器发布WebService,还需要用第三方Webservice框架。Axis2和CXF是目前最流行的Webservice框架,这两个框架各有优点,不过都属于重量级框架。 JAX-WS RI是JAX WebService参考实现。相对于Axis2和CXF,JAX-WS RI是一个轻量级的框架。虽然是个轻量级框架,JAX-WS RI也提供了在Web服务器中发布Webservice的功能。官网地址https://jax-ws.java.net/。下面用JAX-WS RI在Tomcat中发布WebService。
服务端
1、新建一个Maven Web项目,在项目中添加JAX-WS RI引用,pom.xml配置文件如下:

 1 <?xml version="1.0" encoding="UTF-8"?>
 2 <project xmlns="http://maven.apache.org/POM/4.0.0"
 3          xmlns:xsi="http://www.w3.org/2001/XMLSchema-instance"
 4          xsi:schemaLocation="http://maven.apache.org/POM/4.0.0 http://maven.apache.org/xsd/maven-4.0.0.xsd">
 5     <modelVersion>4.0.0</modelVersion>
 6
 7     <groupId>top.jimc</groupId>
 8     <artifactId>wsi</artifactId>
 9     <version>1.0-SNAPSHOT</version>
10     <packaging>war</packaging>
11
12     <properties>
13         <junit.version>4.12</junit.version>
14         <jaxws-rt.version>2.2.10</jaxws-rt.version>
15     </properties>
16
17     <dependencies>
18         <!-- junit -->
19         <dependency>
20             <groupId>junit</groupId>
21             <artifactId>junit</artifactId>
22             <version>${junit.version}</version>
23             <scope>test</scope>
24         </dependency>
25
26         <!-- JAXWS-RI -->
27         <dependency>
28             <groupId>com.sun.xml.ws</groupId>
29             <artifactId>jaxws-rt</artifactId>
30             <version>${jaxws-rt.version}</version>
31         </dependency>
32     </dependencies>
33
34     <build>
35         <plugins>
36             <!-- 配置控制jdk版本的插件 -->
37             <plugin>
38                 <groupId>org.apache.maven.plugins</groupId>
39                 <artifactId>maven-compiler-plugin</artifactId>
40                 <version>3.7.0</version>
41                 <configuration>
42                     <source>1.8</source>
43                     <target>1.8</target>
44                     <encoding>utf-8</encoding>
45                 </configuration>
46             </plugin>
47         </plugins>
48     </build>
49
50 </project>
2、创建服务接口:

 1 package top.jimc.wsi.api;
 2
 3 import top.jimc.wsi.entity.Person;
 4
 5 import javax.jws.WebService;
 6 import java.util.Date;
 7
 8 /**
 9  * WebService接口
10  * @author Jimc.
11  * @since 2018/8/31.
12  */
13 @WebService(name = "helloWSoap", targetNamespace = "http://wsi.jimc.top/api/hello")
14 public interface HelloWService {
15
16     /**
17      * 两个整数相加
18      *
19      * @param x
20      * @param y
21      * @return 相加后的值
22      */
23     Integer add(Integer x, Integer y);
24
25     /**
26      * 返回当前时间
27      *
28      * @return
29      */
30     Date now();
31
32     /**
33      * 获取复杂类型
34      * @param name 用户姓名
35      * @param age 用户年龄
36      * @return 返回用户类
37      */
38     Person getPerson(String name, Integer age);
39
40 }
3、服务中用到的复杂类型(实体)Person:

 1 package top.jimc.wsi.entity;
 2
 3 import java.io.Serializable;
 4
 5 /**
 6  * @author Jimc.
 7  * @since 2018/8/31.
 8  */
 9 public class Person implements Serializable {
10     private static final long serialVersionUID = -7211227224542440039L;
11
12     private String name;
13     private Integer age;
14
15     public String getName() {
16         return name;
17     }
18     public void setName(String name) {
19         this.name = name;
20     }
21     public Integer getAge() {
22         return age;
23     }
24     public void setAge(Integer age) {
25         this.age = age;
26     }
27 }
4、创建服务接口实现类:

 1 package top.jimc.wsi.api.impl;
 2
 3 import top.jimc.wsi.api.HelloWService;
 4 import top.jimc.wsi.entity.Person;
 5
 6 import javax.jws.WebService;
 7 import java.util.Date;
 8
 9 /**
10  * WebService接口实现
11  * @author Jimc.
12  * @since 2018/8/31.
13  */
14 @WebService(endpointInterface = "top.jimc.wsi.api.HelloWService",
15             portName = "HelloWSoap",
16             serviceName = "HelloWService",
17             targetNamespace = "http://wsi.jimc.top/api/hello")
18 public class HelloWServiceImpl implements HelloWService {
19
20     @Override
21     public Integer add(Integer x, Integer y) {
22         return x + y;
23     }
24
25     @Override
26     public Date now() {
27         return new Date();
28     }
29
30     @Override
31     public Person getPerson(String name, Integer age) {
32         Person person = new Person();
33         person.setName(name);
34         person.setAge(age);
35         return person;
36     }
37 }
5、在WEB-INF中创建WebService配置文件sun-jaxws.xml,配置文件中一个WebService对应一个Endpoint:

1 <?xml version="1.0" encoding="UTF-8"?>
2 <endpoints xmlns="http://java.sun.com/xml/ns/jax-ws/ri/runtime" version="2.0">
3     <endpoint name="hello" implementation="top.jimc.wsi.api.impl.HelloWServiceImpl" url-pattern="/api/hello"/>
4 </endpoints>
6、在web.xml中添加WSServlet,如果Web项目使用Servlet 3.0则不需要以下配置:

 1 <?xml version="1.0" encoding="UTF-8"?>
 2 <web-app xmlns="http://xmlns.jcp.org/xml/ns/javaee"
 3          xmlns:xsi="http://www.w3.org/2001/XMLSchema-instance"
 4          xsi:schemaLocation="http://xmlns.jcp.org/xml/ns/javaee http://xmlns.jcp.org/xml/ns/javaee/web-app_3_1.xsd"
 5          version="3.1">
 6
 7     <!-- Servlet 3.0或者以上不需要配置 -->
 8     <servlet>
 9         <servlet-name>jaxws</servlet-name>
10         <servlet-class>com.sun.xml.ws.transport.http.servlet.WSServlet</servlet-class>
11         <load-on-startup>1</load-on-startup>
12     </servlet>
13     <servlet-mapping>
14         <servlet-name>jaxws</servlet-name>
15         <url-pattern>/api/hello</url-pattern>
16     </servlet-mapping>
17 </web-app>
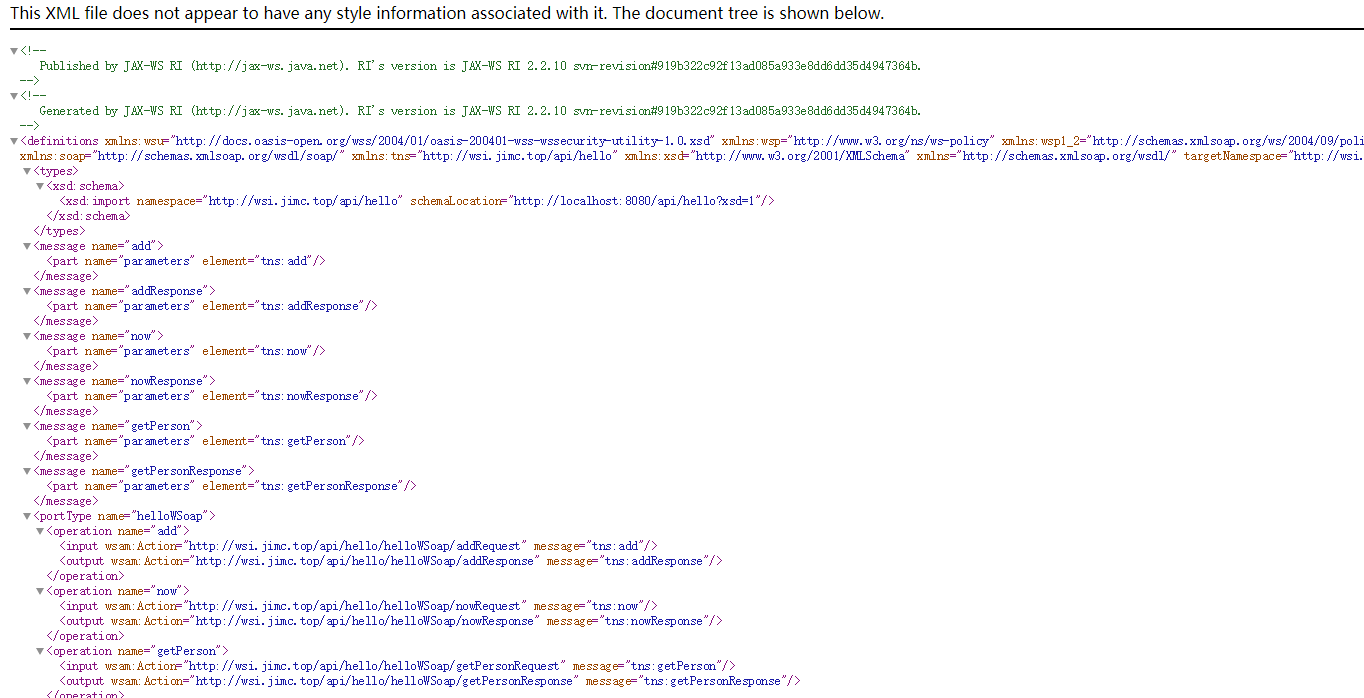
7、启动tomcat,查看效果:
地址栏输入:http://localhost:8080/api/hello?wsdl

出现上面的画面,说明接口已成功发布。
8、其他webservice服务发布的方式:
除了上面的服务发布方式以外,最常用的发布方式可以通过下面的代码来发布

/**
 * 手动发布服务
 */
public static void main(String[] args) {
    /*
     * 参数1:服务的发布地址
     * 参数2:服务的实现者
     */
    Endpoint.publish("http://127.0.0.1:8080/api/hello", new HelloWServiceImpl());

}
客户端
1、wsimport.exe工具详解:

 1 用法: wsimport [options] <WSDL_URI>
 2
 3 其中 [options] 包括:
 4   -b <path>                 指定 jaxws/jaxb 绑定文件或附加模式
 5                             (每个 <path> 都必须具有自己的 -b)
 6   -B<jaxbOption>            将此选项传递给 JAXB 模式编译器
 7   -catalog <file>           指定用于解析外部实体引用的目录文件
 8                             支持 TR9401, XCatalog 和 OASIS XML 目录格式。
 9   -d <directory>            指定放置生成的输出文件的位置
10   -encoding <encoding>      指定源文件所使用的字符编码
11   -extension                允许供应商扩展 - 不按规范
12                             指定功能。使用扩展可能会
13                             导致应用程序不可移植或
14                             无法与其他实现进行互操作
15   -help                     显示帮助
16   -httpproxy:<host>:<port>  指定 HTTP 代理服务器 (端口默认为 8080)
17   -keep                     保留生成的文件
18   -p <pkg>                  指定目标程序包
19   -quiet                    隐藏 wsimport 输出
20   -s <directory>            指定放置生成的源文件的位置
21   -target <version>         按给定的 JAXWS 规范版本生成代码
22                             默认为 2.2, 接受的值为 2.0, 2.1 和 2.2
23                             例如, 2.0 将为 JAXWS 2.0 规范生成兼容的代码
24   -verbose                  有关编译器在执行什么操作的输出消息
25   -version                  输出版本信息
26   -wsdllocation <location>  @WebServiceClient.wsdlLocation 值
27   -clientjar <jarfile>      创建生成的 Artifact 的 jar 文件以及
28                             调用 Web 服务所需的 WSDL 元数据。
29   -generateJWS              生成存根 JWS 实现文件
30   -implDestDir <directory>  指定生成 JWS 实现文件的位置
31   -implServiceName <name>   生成的 JWS 实现的服务名的本地部分
32   -implPortName <name>      生成的 JWS 实现的端口名的本地部分
33
34 扩展:
35   -XadditionalHeaders              映射标头不绑定到请求或响应消息不绑定到
36                                    Java 方法参数
37   -Xauthfile                       用于传送以下格式的授权信息的文件:
38                                    http://username:password@example.org/stock?wsdl
39   -Xdebug                          输出调试信息
40   -Xno-addressing-databinding      允许 W3C EndpointReferenceType 到 Java 的绑定
41
42   -Xnocompile                      不编译生成的 Java 文件
43   -XdisableAuthenticator           禁用由 JAX-WS RI 使用的验证程序,
44                                    将忽略 -Xauthfile 选项 (如果设置)
45   -XdisableSSLHostnameVerification 在提取 wsdl 时禁用 SSL 主机名
46                                    验证
47
48 示例:
49   wsimport stock.wsdl -b stock.xml -b stock.xjb
50   wsimport -d generated http://example.org/stock?wsdl
2、生成java类,并把生成的类添加到客户端相应的package下:
wsimport -encoding utf-8 -p top.jimc.wst -s E:CodeProjectswspwstsrcmainjava http://localhost:8080/api/hello?wsdl
3、调用接口

 1 import org.junit.Test;
 2 import top.jimc.wst.HelloWService;
 3 import top.jimc.wst.HelloWSoap;
 4
 5 /**
 6  * @author Jimc.
 7  * @since 2018/8/31.
 8  */
 9 public class WSTest {
10
11
12     /**
13      * 调用
14      */
15     @Test
16     public void helloTest() {
17         HelloWService helloWService = new HelloWService();
18         HelloWSoap hello = helloWService.getHelloWSoap();
19         System.out.println(hello.add(8, 9));
20         System.out.println(hello.now());
21         System.out.println(hello.getPerson("John", 22));
22     }
23 }
