为了使用MyBatis功能,Spring配置文件中提供了两个bean,除了之前分析的sqlSessionFactoryBean类型的bean以外,还有一个是MapperFactoryBean类型的bean。
对于单独使用MyBatis的时候调用数据库接口的方式是:
UserMapper userMapper = sqlSession.getMapper(UserMapper.class);
而在这一过程中,其实是MyBatis在获取映射的过程中根据配置信息为UserMapper类型动态创建了代理类。而对于Spring的创建方式:
UserMapper userMapper = (UserMapper)context.getBean("userMapper");
Spring中获取的名为userMapper的bean,其实是与单独使用MyBatis完成了一样的功能,那么我们可以推断,在bean的创建过程中一定使用了MyBatis中的原生方法sqlSession.getMapper(UserMapper.class)进行了再一次封装。结合配置文件,我们把分析目标转向org.mybatis.Spring.mapper.MapperFactoryBean,初步推测其中的逻辑应该在此类中实现,同样,还是先来看一下MapperFactoryBean的类图:
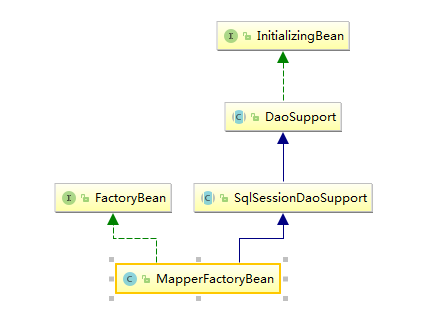
在实现的接口中有两个比较重要的接口:InitializingBean和FactoryBean。我们的分析还是从bean的初始化开始。
1.MapperFactoryBean的初始化
因为实现了InitializingBean接口,Spring会保证在bean初始化时首先调用afterPropertiesSet方法来完成其初始化逻辑。追踪父类,发现afterPropertiesSet方法是在DaoSupport类中实现,代码如下:
public final void afterPropertiesSet() throws IllegalArgumentException, BeanInitializationException {
        this.checkDaoConfig();

        try {
            this.initDao();
        } catch (Exception var2) {
            throw new BeanInitializationException("Initialization of DAO failed", var2);
        }
    }
从函数的名称推测,MapperFactoryBean的初始化包括对DAO配置的验证以及对DAO的初始工作,其中的initDao方法时模板方法,设计为留给子类做进一步的逻辑处理。checkDaoConfig才是我们分析的重点:
protected void checkDaoConfig() {
        super.checkDaoConfig();
        Assert.notNull(this.mapperInterface, "Property 'mapperInterface' is required");
        Configuration configuration = this.getSqlSession().getConfiguration();
        if (this.addToConfig && !configuration.hasMapper(this.mapperInterface)) {
            try {
                configuration.addMapper(this.mapperInterface);
            } catch (Exception var6) {
                this.logger.error("Error while adding the mapper '" + this.mapperInterface + "' to configuration.", var6);
                throw new IllegalArgumentException(var6);
            } finally {
                ErrorContext.instance().reset();
            }
        }

    }
super.checkDaoConfig();:在SqlSessionDaoSupport类中实现,代码如下:
protected void checkDaoConfig() {
        Assert.notNull(this.sqlSession, "Property 'sqlSessionFactory' or 'sqlSessionTemplate' are required");
    }
结合代码我们了解到对于DAO配置的验证,Spring做了以下几个方面的工作:
❤ 父类中对于sqlSession不为空的验证;
sqlSession作为根据接口创建映射器代理的接触类一定不可以为空,而sqlSession的初始化工作是在设定其sqlSessionFactory属性时完成的。
public void setSqlSessionFactory(SqlSessionFactory sqlSessionFactory) {
        if (!this.externalSqlSession) {
            this.sqlSession = new SqlSessionTemplate(sqlSessionFactory);
        }

    }
也就是说,对于下面的配置如果忽略了对于sqlSessionFactory属性的设置,那么在此时就会被检测出来。
<bean id="userMapper" class="org.mybatis.Spring.mapper.MapperFactoryBean">
    <property name="mapperInterface" value="test.mybatis.dao.UserMapper"/>
    <property name="sqlSessionFactory" ref = "sqlSessionFactory"/>
</bean>
❤ 映射接口的验证;
接口是映射的基础,sqlSession会根据接口动态创建相应的代理类,所以接口必不可少。
❤ 映射文件存在性验证;
对于函数的前半部分的验证我们都很容易理解,无非是对配置文件中的属性是否存在做验证,但是后半部分完成了什么方面的验证呢?
在MyBatis实现过程中并没有手动调用configuration.addMapper方法,而是在映射文件读取过程中一旦解析到如<mapper namespace="Mapper.UserMapper">,便会自动进行类型映射的注册。那么,Spring中为什么会把这个功能单独拿出来放在验证里呢?这里是不是多此一举呢?
在上面的函数中,configuration.addMapper(this.mapperInterface)其实就是将UserMapper注册到映射类型中,如果你可以保证这个接口一定存在对应的映射文件,那么其实这个验证并没有必要。但是,由于这个是我们自行决定的配置,无法保证这里配置的接口一定存在对应的映射文件,所以这里非常有必要进行验证。在执行此代码的时候,MyBatis会检查嵌入的映射接口是否存在对应的映射文件,如果没有抛出异常,Spring正是用这种方式来完成接口对应的映射文件存在性验证。
2.获取MapperFactoryBean的实例
由于MapperFactoryBean实现了FactoryBean接口,所以当通过getBean方法获取对应实例的时候其实是获取该类的getObject函数返回的实例。
public T getObject() throws Exception {
        return this.getSqlSession().getMapper(this.mapperInterface);
    }
这段代码正是我们在提供MyBatis独立使用的时候的一个代码调用,Spring通过FactoryBean进行了封装。
3.MapperScannerConfigurer
我们在applicationContext.xml中配置了UserMapper供需要时使用。但如果需要用到的映射器较多的话,采用这种配置方式就会很低效。为了解决这个问题,我们可以使用MapperScannerConfigurer,让它扫描特定的包,自动帮我们成批的创建映射器。这样一来,就能大大减少配置的工作量。
  <!-- 配置扫描Dao接口包,动态实现Dao接口,注入到spring容器中 -->
    <bean class="org.mybatis.spring.mapper.MapperScannerConfigurer">
        <!-- 注入sqlSessionFactory -->
        <property name="sqlSessionFactoryBeanName" value="sqlSessionFactory"/>
        <!-- 给出需要扫描Dao接口包 -->
        <property name="basePackage" value="com.joe.dao"/>
    </bean>
在上面的配置中,我们屏蔽掉了最原始的代码而增加了MapperScannerConfigurer的配置,basePackage属性是让你为映射器接口文件设置基本的包路径,可以使用分号或逗号作为分隔符设置多于一个的包路径。每个映射器将会在指定的包路径中递归地被搜索到。被发现的映射器将会使用Spring对自动侦测组件默认的命名策略来命名。也就是说,如果没有发现注解,它就会使用映射器的非大写的非完全限定类名。但是如果发现了@Component或JSR-330@Named注解,它就会获取名称。
通过上面的配置,Spring就会帮助我们对com.joe.dao下面的所有接口进行自动的注入,而不需要为每个接口重复在Spring的配置文件中进行声明了。那么这个功能又是如何做到的呢?MapperScannerConfigurer中又有那些核心的操作呢?同样,我们先来看一下类图:

我们又看到了接口InitializingBean,来看它的afterPropertiesSet方法:
public void afterPropertiesSet() throws Exception {
        Assert.notNull(this.basePackage, "Property 'basePackage' is required");
    }
afterPropertiesSet方法除了一句对basePackage属性的验证代码外并木有太多的逻辑实现。所以转而分析其他的接口。
BeanDefinitionRegistryPostProcessor与BeanFactoryPostProcessor这两个接口,Spring在初始化的过程中同样会保证这两个接口的调用。
首先查看MapperScannerConfigurer类中对于BeanFactoryPostProcessor接口的实现:
public void postProcessBeanFactory(ConfigurableListableBeanFactory beanFactory) {
    }
木有任何逻辑,说明我们找错了,继续,查看MapperScannerConfigurer类中对于BeanDefinitionRegistryPostProcessor接口的实现:
public void postProcessBeanDefinitionRegistry(BeanDefinitionRegistry registry) {
        if (this.processPropertyPlaceHolders) {
            this.processPropertyPlaceHolders();
        }

        ClassPathMapperScanner scanner = new ClassPathMapperScanner(registry);
        scanner.setAddToConfig(this.addToConfig);
        scanner.setAnnotationClass(this.annotationClass);
        scanner.setMarkerInterface(this.markerInterface);
        scanner.setSqlSessionFactory(this.sqlSessionFactory);
        scanner.setSqlSessionTemplate(this.sqlSessionTemplate);
        scanner.setSqlSessionFactoryBeanName(this.sqlSessionFactoryBeanName);
        scanner.setSqlSessionTemplateBeanName(this.sqlSessionTemplateBeanName);
        scanner.setResourceLoader(this.applicationContext);
        scanner.setBeanNameGenerator(this.nameGenerator);
        scanner.registerFilters();
        scanner.scan(StringUtils.tokenizeToStringArray(this.basePackage, ",;
"));
    }
这次找对了,大致看一下代码实现,正是完成了对指定路径扫描的逻辑。那么我们就以此为入口,详细的分析MapperScannerConfigurer所提供的逻辑实现。
1.processPropertyPlaceHolders属性的处理
首先,难题就是processPropertyPlaceHolders属性的处理。我们通过processPropertyPlaceHolders函数来反推此属性所代表的功能。
rivate void processPropertyPlaceHolders() {
        Map<String, PropertyResourceConfigurer> prcs = this.applicationContext.getBeansOfType(PropertyResourceConfigurer.class);
        if (!prcs.isEmpty() && this.applicationContext instanceof ConfigurableApplicationContext) {
            BeanDefinition mapperScannerBean = ((ConfigurableApplicationContext)this.applicationContext).getBeanFactory().getBeanDefinition(this.beanName);
            DefaultListableBeanFactory factory = new DefaultListableBeanFactory();
            factory.registerBeanDefinition(this.beanName, mapperScannerBean);
            Iterator var4 = prcs.values().iterator();

            while(var4.hasNext()) {
                PropertyResourceConfigurer prc = (PropertyResourceConfigurer)var4.next();
                prc.postProcessBeanFactory(factory);
            }

            PropertyValues values = mapperScannerBean.getPropertyValues();
            this.basePackage = this.updatePropertyValue("basePackage", values);
            this.sqlSessionFactoryBeanName = this.updatePropertyValue("sqlSessionFactoryBeanName", values);
            this.sqlSessionTemplateBeanName = this.updatePropertyValue("sqlSessionTemplateBeanName", values);
        }

    }
从此函数中可以看出,BeanDefinitionRegistries会在应用启动的时候调用,并且会早于BeanFactoryPostProcessors的调用,这就意味着PropertyResourceConfigurers还没有被加载所有对于属性文件的引用将会失效。为了避免这种情况的发生,此方法手动地找出定义的 PropertyResourceConfigurers并进行提前调用以保证对于属性的引用可以正常工作。
这个函数所做的事情:
(1)找到所有已经注册的PropertyResourceConfigurers类型的bean。
(2)模拟Spring中的环境来用处理器。这里通过使用new DefaultListableBeanFactory来模拟Spring中的环境(完成处理器的调用后便失效),将映射的bean,也就是MapperScannerConfigurer类型的bean注册到环境中进行后处理器的调用,处理器PropertyResourceConfigurers调用完成的功能,即找出所有bean中应用属性文件的变量并替换。也就是说,在处理器调用后,模拟环境中模拟的MapperScannerConfigurer类型的bean如果有引入属性文件中的属性那么已经被替换了,这时,再将模拟bean中的相关的属性提取出来应用在真实的bean中。
2.根据配置属性生成过滤器
在PostProcessBeanDefinitionRegistry方法中可以看到,配置中支持很多属性的设定,但是,我们感兴趣或者说影响扫描结果的并不多,属性设置后通过scanner.registerFilters()代码中生成对应的过滤器来控制扫描结果。
 1  public void registerFilters() {
 2         boolean acceptAllInterfaces = true;
 3         if (this.annotationClass != null) {
 4             this.addIncludeFilter(new AnnotationTypeFilter(this.annotationClass));
 5             acceptAllInterfaces = false;
 6         }
 7
 8         if (this.markerInterface != null) {
 9             this.addIncludeFilter(new AssignableTypeFilter(this.markerInterface) {
10                 protected boolean matchClassName(String className) {
11                     return false;
12                 }
13             });
14             acceptAllInterfaces = false;
15         }
16
17         if (acceptAllInterfaces) {
18             this.addIncludeFilter(new TypeFilter() {
19                 public boolean match(MetadataReader metadataReader, MetadataReaderFactory metadataReaderFactory) throws IOException {
20                     return true;
21                 }
22             });
23         }
24
25         this.addExcludeFilter(new TypeFilter() {
26             public boolean match(MetadataReader metadataReader, MetadataReaderFactory metadataReaderFactory) throws IOException {
27                 String className = metadataReader.getClassMetadata().getClassName();
28                 return className.endsWith("package-info");
29             }
30         });
31     }
上述代码是根据之前的属性的配置生成了对应的过滤器。
(1)annotationClass属性的处理(3~6行)。
如果annotationClass不为空,表示用户设置了此属性,那么就要根据此属性生成过滤器以保证达到用户想要的效果,而封装此属性的过滤器就是AnnotationTypeFilter。AnnotationTypeFilter保证在扫描对应Java文件时只接受标记为注解annotationClass的接口。
(2)makerInterface属性处理(8~15行)。
如果makerInterface不为空,表示用户设置了此属性,那么就要根据此属性生成过滤器以保证达到用户想要的结果,而封装此属性的过滤器就是实现AssignableTypeFilter接口的局部类,表示扫描过程中只有makerInterface接口的接口才会被接受。
(3)全局默认处理(17~23行)。
在上面的两个属性中国如果存在其中任何属性,acceptAllInterfaces的值将会改变,但是如果用户没有设置以上两个属性,那么,Spring会为我们增加一个默认的过滤器实现TypeFilter接口的局部类,旨在接收所有接口文件。
(4)package-info.java处理(25~30行)。
对于名为package-info的Java文件,默认不作为逻辑实现接口,将其排除掉,使用TypeFilter接口的局部类实现match方法。
从上面的函数中我们看出,控制扫描文件Spring通过不同的过滤器完成,这些定义的过滤器记录在了includeFilter和excludeFilter属性中。
public void addIncludeFilter(TypeFilter includeFilter) {
        this.includeFilters.add(includeFilter);
    }
public void addExcludeFilter(TypeFilter excludeFilter) {
        this.excludeFilters.add(0, excludeFilter);
    }
3.扫描Java文件
设置了相关属性以及生成了对应的过滤器后便可以进行文件的扫描了,扫描工作是由ClassPathMapperScanner类型的实例scanner中的scan方法完成的。
public int scan(String... basePackages) {
        int beanCountAtScanStart = this.registry.getBeanDefinitionCount();

        doScan(basePackages);

        // 如果配置了includeAnnotationConfig,则注册对应注解的处理器以保证注解功能的正常使用
        if (this.includeAnnotationConfig) {
            AnnotationConfigUtils.registerAnnotationConfigProcessors(this.registry);
        }

        return (this.registry.getBeanDefinitionCount() - beanCountAtScanStart);
    }
scan是个全局方法,扫描工作委托给了doScan方法,同时,还包括了includeAnnotationConfig属性的处理,AnnotationConfigUtils.registerAnnotationConfigProcessors(this.registry)代码主要是完成对于注解处理器的简单注册,比如 AutowireAnnotationBeanPostProcessor、RequiredAnnotationBeanPostProcessor等,这里就不再赘述,我们的重点是研究文件的扫描功能的研究。
protected Set<BeanDefinitionHolder> doScan(String... basePackages) {
        Assert.notEmpty(basePackages, "At least one base package must be specified");
        Set<BeanDefinitionHolder> beanDefinitions = new LinkedHashSet<>();
        for (String basePackage : basePackages) {
            //扫描basePackage路径下的java文件
            Set<BeanDefinition> candidates = findCandidateComponents(basePackage);
            for (BeanDefinition candidate : candidates) {
                //解析scope属性
                ScopeMetadata scopeMetadata = this.scopeMetadataResolver.resolveScopeMetadata(candidate);
                candidate.setScope(scopeMetadata.getScopeName());
                String beanName = this.beanNameGenerator.generateBeanName(candidate, this.registry);
                if (candidate instanceof AbstractBeanDefinition) {
                    postProcessBeanDefinition((AbstractBeanDefinition) candidate, beanName);
                }
                if (candidate instanceof AnnotatedBeanDefinition) {
                    //如果是AnnotatedBeanDefinition类型的bean,需要检测下常用注释如:Lazy、Primary。
                    AnnotationConfigUtils.processCommonDefinitionAnnotations((AnnotatedBeanDefinition) candidate);
                }
                //检测当前bean是否注册
                if (checkCandidate(beanName, candidate)) {
                    BeanDefinitionHolder definitionHolder = new BeanDefinitionHolder(candidate, beanName);
                    //如果当前bean是用于生成代理的bean那么需要进一步处理
                    definitionHolder =
                            AnnotationConfigUtils.applyScopedProxyMode(scopeMetadata, definitionHolder, this.registry);
                    beanDefinitions.add(definitionHolder);
                    registerBeanDefinition(definitionHolder, this.registry);
                }
            }
        }
        return beanDefinitions;
    }
来看一下findCandidateComponents方法:
public Set<BeanDefinition> findCandidateComponents(String basePackage) {
        if (this.componentsIndex != null && indexSupportsIncludeFilters()) {
            return addCandidateComponentsFromIndex(this.componentsIndex, basePackage);
        }
        else {
            return scanCandidateComponents(basePackage);
        }
    }
private Set<BeanDefinition> scanCandidateComponents(String basePackage) {
        Set<BeanDefinition> candidates = new LinkedHashSet<>();
        try {
            String packageSearchPath = ResourcePatternResolver.CLASSPATH_ALL_URL_PREFIX +
                    resolveBasePackage(basePackage) + '/' + this.resourcePattern;
            Resource[] resources = getResourcePatternResolver().getResources(packageSearchPath);
            boolean traceEnabled = logger.isTraceEnabled();
            boolean debugEnabled = logger.isDebugEnabled();
            for (Resource resource : resources) {
                if (traceEnabled) {
                    logger.trace("Scanning " + resource);
                }
                if (resource.isReadable()) {
                    try {
                        MetadataReader metadataReader = getMetadataReaderFactory().getMetadataReader(resource);
                        if (isCandidateComponent(metadataReader)) {
                            ScannedGenericBeanDefinition sbd = new ScannedGenericBeanDefinition(metadataReader);
                            sbd.setResource(resource);
                            sbd.setSource(resource);
                            if (isCandidateComponent(sbd)) {
                                if (debugEnabled) {
                                    logger.debug("Identified candidate component class: " + resource);
                                }
                                candidates.add(sbd);
                            }
                            else {
                                if (debugEnabled) {
                                    logger.debug("Ignored because not a concrete top-level class: " + resource);
                                }
                            }
                        }
                        else {
                            if (traceEnabled) {
                                logger.trace("Ignored because not matching any filter: " + resource);
                            }
                        }
                    }
                    catch (Throwable ex) {
                        throw new BeanDefinitionStoreException(
                                "Failed to read candidate component class: " + resource, ex);
                    }
                }
                else {
                    if (traceEnabled) {
                        logger.trace("Ignored because not readable: " + resource);
                    }
                }
            }
        }
        catch (IOException ex) {
            throw new BeanDefinitionStoreException("I/O failure during classpath scanning", ex);
        }
        return candidates;
    }
findCandidateComponents方法根据传入的包路径信息结合类文件路径拼接成文件的绝对路径,同时完成了对文件的扫描过程并根据对应的文件生成对应的bean,使用ScannedGenericBeanDefinition类型的bean承载信息,bean中只是记录了resource和source信息。这里我们更感兴趣的是isCandidateComponent这句代码用于判断当前扫描的文件是否符合要求,而我们之前注册的一些过滤信息也正是在此时派上用场的。
protected boolean isCandidateComponent(MetadataReader metadataReader) throws IOException {
        for (TypeFilter tf : this.excludeFilters) {
            if (tf.match(metadataReader, getMetadataReaderFactory())) {
                return false;
            }
        }
        for (TypeFilter tf : this.includeFilters) {
            if (tf.match(metadataReader, getMetadataReaderFactory())) {
                return isConditionMatch(metadataReader);
            }
        }
        return false;
    }
我们看到了之前加入过滤器的两个属性excludeFilters、includeFilters,并且知道对应的文件是否符合要求是根据过滤器中的match方法所返回的信息来判断的,当然用户可以实现并注册满足自己业务逻辑的过滤器来控制扫描的结果,metedataReader中有你过滤所需要的全部文件信息。至此,我们完成了文件的扫描过程的分析。
参考:《Spring源码深度解析》 郝佳 编著: