尽管消息接收可以使用消息监听的方式替代模板方法,但是发送的时候是无法代替的,在Spring中必须要使用JmsTemplate提供的方法来进行发送操作,可见JmsTemplate类的重要性,那么我们对于整合消息服务的分析就从JmsTemplate开始。
JmsTemplate
在上一篇文章中,我们看到了Spring采用了与JDBC等一贯的套路,为我们提供了JmsTemplate来封装常用操作。下面看一下它的类图:
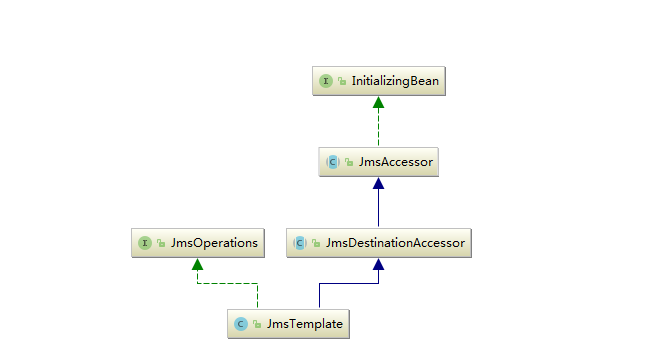
提取我们感兴趣的接口InitializingBean,接口方法的实现是在JmsAccessor类中,如下:
public void afterPropertiesSet() {
        if (getConnectionFactory() == null) {
            throw new IllegalArgumentException("Property 'connectionFactory' is required");
        }
    }
发现函数中只是一个验证功能,并没有逻辑实现。所以丢掉这里,转向实例代码分析。首先以发送为例,在Spring中发送消息可以通过JmsTemplate中提供的方法来实现。
public void send(final Destination destination, final MessageCreator messageCreator) throws JmsException {
        execute(session -> {
            doSend(session, destination, messageCreator);
            return null;
        }, false);
    }
这个函数的风格不得不让我们回想起JdbcTemplate的类实现风格,极为相似,都是提取一个公共的方法作为最底层、最通用的功能实现,然后又通过回调函数的不同来区分个性化的功能。
我们首先查看通用代码的抽取实现。
1.通用代码抽取
public <T> T execute(SessionCallback<T> action, boolean startConnection) throws JmsException {
        Assert.notNull(action, "Callback object must not be null");
        Connection conToClose = null;
        Session sessionToClose = null;
        try {
            Session sessionToUse = ConnectionFactoryUtils.doGetTransactionalSession(
                    obtainConnectionFactory(), this.transactionalResourceFactory, startConnection);
            if (sessionToUse == null) {
                //创建connection
                conToClose = createConnection();
                //创建session
                sessionToClose = createSession(conToClose);
                //是否开启向服务器推送连接信息,只有接收消息时需要,发送时不需要
                if (startConnection) {
                    conToClose.start();
                }
                sessionToUse = sessionToClose;
            }
            if (logger.isDebugEnabled()) {
                logger.debug("Executing callback on JMS Session: " + sessionToUse);
            }
            //调用回调函数
            return action.doInJms(sessionToUse);
        }
        catch (JMSException ex) {
            throw convertJmsAccessException(ex);
        }
        finally {
            //关闭session
            JmsUtils.closeSession(sessionToClose);
            //释放连接
            ConnectionFactoryUtils.releaseConnection(conToClose, getConnectionFactory(), startConnection);
        }
    }
上述代码封装了connection以及session的创建操作。在准备工作结束后,调用回调函数将程序引入用户自定义实现的个性化处理。
2.发送消息的实现
有了基类的辅助实现,使得Spring更加专注于个性的处理,也就是说Spring使用execute方法中封装了冗余代码,而将个性化的代码实现放在了回调函数doInJms中。在发送消息的功能中回调函数通过局部类实现。
execute(session -> {
            doSend(session, destination, messageCreator);
            return null;
        }, false);
此时的发送逻辑已经完全转向了doSend方法,这样使整个功能实现变得更加清晰了。
protected void doSend(Session session, Destination destination, MessageCreator messageCreator)
            throws JMSException {

        Assert.notNull(messageCreator, "MessageCreator must not be null");
        MessageProducer producer = createProducer(session, destination);
        try {
            Message message = messageCreator.createMessage(session);
            if (logger.isDebugEnabled()) {
                logger.debug("Sending created message: " + message);
            }
            doSend(producer, message);
            // Check commit - avoid commit call within a JTA transaction.
            if (session.getTransacted() && isSessionLocallyTransacted(session)) {
                // Transacted session created by this template -> commit.
                JmsUtils.commitIfNecessary(session);
            }
        }
        finally {
            JmsUtils.closeMessageProducer(producer);
        }
    }
在发送消息还是遵循着消息发送的规则,比如根据Destination创建MessageProducer、创建Message,并使用MessageProducer实例来发送消息。
3.接收消息
我们通常使用JmsTemplate.receive(destination)来接收简单的消息,那么这个功能Spring是如何封装的呢?
public Message receive(Destination destination) throws JmsException {
        return receiveSelected(destination, null);
    }
public Message receiveSelected(final Destination destination, @Nullable final String messageSelector) throws JmsException {
        return execute(session -> doReceive(session, destination, messageSelector), true);
    }
protected Message doReceive(Session session, Destination destination, @Nullable String messageSelector)
            throws JMSException {

        return doReceive(session, createConsumer(session, destination, messageSelector));
    }
protected Message doReceive(Session session, MessageConsumer consumer) throws JMSException {
        try {
            // Use transaction timeout (if available).
            long timeout = getReceiveTimeout();
            ConnectionFactory connectionFactory = getConnectionFactory();
            JmsResourceHolder resourceHolder = null;
            if (connectionFactory != null) {
                resourceHolder = (JmsResourceHolder) TransactionSynchronizationManager.getResource(connectionFactory);
            }
            if (resourceHolder != null && resourceHolder.hasTimeout()) {
                timeout = Math.min(timeout, resourceHolder.getTimeToLiveInMillis());
            }
            Message message = receiveFromConsumer(consumer, timeout);
            if (session.getTransacted()) {
                // Commit necessary - but avoid commit call within a JTA transaction.
                if (isSessionLocallyTransacted(session)) {
                    // Transacted session created by this template -> commit.
                    JmsUtils.commitIfNecessary(session);
                }
            }
            else if (isClientAcknowledge(session)) {
                // Manually acknowledge message, if any.
                if (message != null) {
                    message.acknowledge();
                }
            }
            return message;
        }
        finally {
            JmsUtils.closeMessageConsumer(consumer);
        }
    }
实现的套路还是和发送差不多,同样还是使用execute函数来封装多余的操作,而最终的目的还是通过consumer.receive()来接收消息,其中的过程就是对于MessageConsumer的创建以及一些辅助操作。
参考:《Spring源码深度解析》 郝佳 编著: