Axios使用及源码解析
简介
axios 是一个用于浏览器和Node.js上的基于 Promise 的http网络库。
大纲
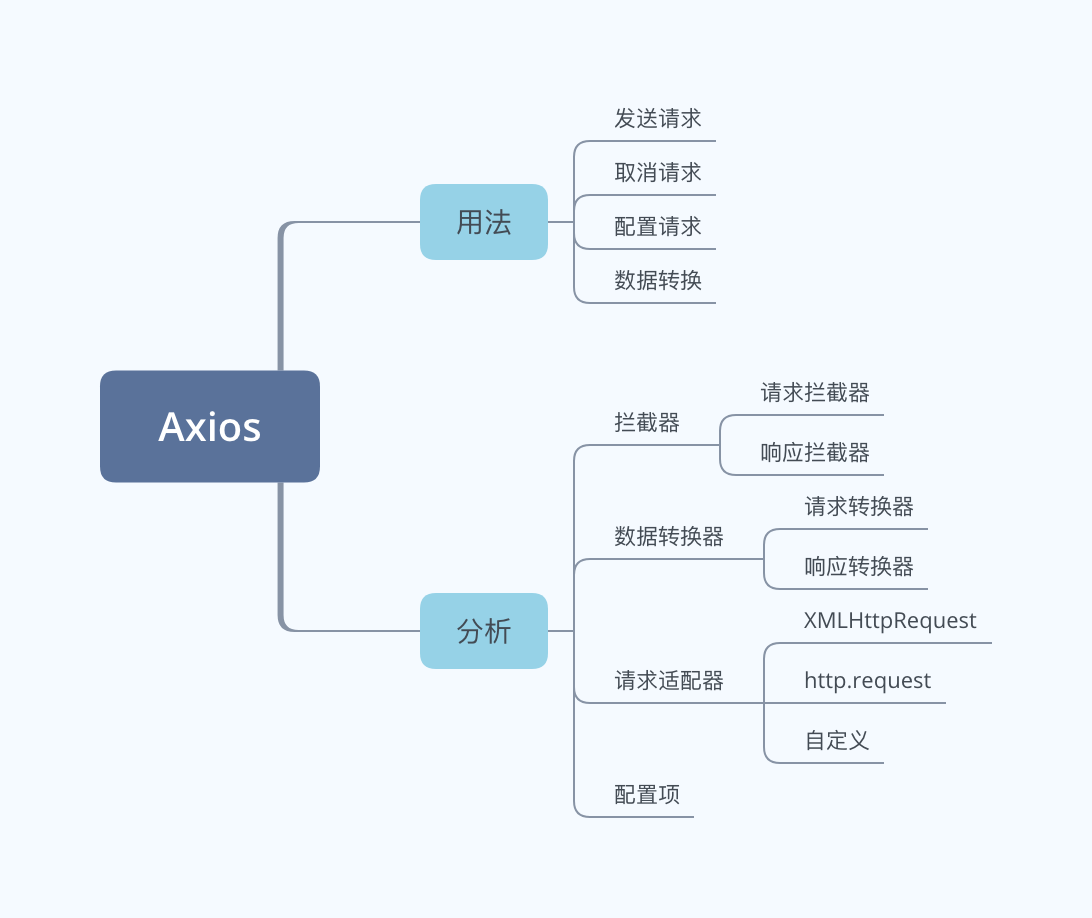
使用方式
安装:
npm install axios
使用:
//引入axios
const axios = require('axios');
import axios from 'axios';
axios的四种使用方式
1. axios(config)
直接将相关配置包括请求url作为参数传入到axios方法中
axios({
    url: 'https://jsonplaceholder.typicode.com/todos/1',
    method: 'get'
}).then(response => {
    console.log(response.data)
}).catch(error => {
    console.log(error)
});
2. axios(url[, config])
还是使用axios方法,但是第一个参数传入请求url,第二个参数传入其他配置参数。
axios('https://jsonplaceholder.typicode.com/todos/1', {
    method: 'get'
}).then(response => {
    console.log(response.data)
}).catch(error => {
    console.log(error)
});
3. axios[method](url[, config])
使用axios暴露出来的get,post,delete,put等请求方法,参数设置同第2种 axios(url[, config])
axios.get('https://jsonplaceholder.typicode.com/todos/1', {
    timeout: 1000
}).then(response => {
    console.log(response.data)
}).catch(error => {
    console.log(error);
});
4. axios.request(config)
使用axios暴露出来的request方法,参数设置同第1种axios(config)
axios.request({
    url: 'https://jsonplaceholder.typicode.com/todos/1',
    timeout: 1000
}).then(response => {
    console.log(response.data)
}).catch(error => {
    console.log(error)
});
请求配置
在上一步的发起请求的方法中,我们都能看到config这个配置参数,通过设置这个参数的值,可以达到配置请求的目的。在axios中,config是沟通调用方和网络库的桥梁,
常用的配置项如下所示:
{
  // `url` 是用于请求的服务器 URL,相对路径/绝对路径
 url: '/api/users',

 // `method` 是创建请求时使用的http方法,包括get, post, put, delete等
 method: 'get', // default

 // `baseURL` 将自动加在 `url` 前面,除非 `url` 是一个绝对 URL。
 // 它可以通过设置一个 `baseURL` 便于为 axios 实例的方法传递相对 URL
 baseURL: 'https://some-domain.com/api/',

 // `transformRequest` 允许在向服务器发送前,修改请求数据
 // 只能用在 'PUT', 'POST' 和 'PATCH' 这几个请求方法
 // 后面数组中的函数必须返回一个字符串,或 ArrayBuffer,或 Stream
 transformRequest: [function (data, headers) {
   // 对 data 进行任意转换处理
   return data;
 }],

 // `transformResponse` 在传递给 then/catch 前,允许修改响应数据
 transformResponse: [function (data) {
   // 对 data 进行任意转换处理
   return data;
 }],

 // `headers` 是即将被发送的自定义请求头
 headers: {'X-Requested-With': 'XMLHttpRequest'},

 // `params` 是即将与请求一起发送的 URL 参数
 // 必须是一个无格式对象(plain object)或 URLSearchParams 对象
 params: {
   name: 'John'
 },

  // `paramsSerializer` 是一个负责 `params` 序列化的函数
 // (e.g. https://www.npmjs.com/package/qs, http://api.jquery.com/jquery.param/)
 paramsSerializer: function(params) {
   return Qs.stringify(params, {arrayFormat: 'brackets'})
 },

 // `data` 是作为请求主体被发送的数据
 // 只适用于这些请求方法 'PUT', 'POST', 和 'PATCH'
 // 在没有设置 `transformRequest` 时,必须是以下类型之一:
 // - string, plain object, ArrayBuffer, ArrayBufferView, URLSearchParams
 // - 浏览器专属:FormData, File, Blob
 // - Node 专属: Stream
 data: {
   firstName: 'John'
 },

 // `timeout` 指定请求超时的毫秒数(0 表示无超时时间)
 // 如果请求花费了超过 `timeout` 的时间,请求将被中断
 timeout: 1000,

 // `adapter` 允许自定义处理请求,以使测试更轻松
 // 返回一个 promise 并应用一个有效的响应 (查阅 [response docs](#response-api)).
 adapter: function (config) {
   /* ... */
 },

// `auth` 表示应该使用 HTTP 基础验证,并提供凭据
 // 这将设置一个 `Authorization` 头,覆写掉现有的任意使用 `headers` 设置的自定义 `Authorization`头
 auth: {
   username: 'janedoe',
   password: 's00pers3cret'
 },

  // `responseType` 表示服务器响应的数据类型,可以是 'arraybuffer', 'blob', 'document', 'json', 'text', 'stream'
 responseType: 'json', // default

 // `responseEncoding` 表示用于响应数据的解码方式
 responseEncoding: 'utf8', // default

 // `validateStatus` 定义对于给定的HTTP 响应状态码是 resolve 或 reject  promise 。如果 `validateStatus` 返回 `true` (或者设置为 `null` 或 `undefined`),promise 将被 resolve; 否则,promise 将被 rejecte
 validateStatus: function (status) {
   return status >= 200 && status < 300; // default
 },

 // `cancelToken` 指定用于取消请求的 cancel token
 cancelToken: new CancelToken(function (cancel) {
 }),
 ...
}
拦截器
拦截器,类似于中间件的概念,是axios的核心功能之一,主要是分为两种:请求拦截器和响应拦截器。有了拦截器,我们能在网络请求之前,对网络请求配置做处理。在返回数据之前,对返回数据做处理。
中间件,拦截器:
一般用于对一个目标方法的前置或后置切片操作,可以将一些额外的脏逻辑写到其他的文件中管理,提高目标方法的简洁性。
使用方式:
//请求拦截器
const requestInterceptor = axios.default.interceptors.request.use((config) => {
   //在请求发送前,对请求配置(AxiosRequestConfig)做一些处理
   return config;
}, (error) => {
   return Promise.reject(error);
});

//移除之前添加的拦截器
axios.default.interceptors.request.eject(requestInterceptor);

//响应拦截器
axios.default.interceptors.response.use((response) => {
   //对请求响应数据做一些处理
   return response;
}, (error) => {
   return Promise.reject(error);
});
取消请求
支持取消请求也是axios的一个核心功能,在配置中实现一个cancelToken的参数就能取消。
//取消请求
const cancelToken = axios.CancelToken;
const source = cancelToken.source();

axios.get('https://jsonplaceholder.typicode.com/todos/1', {
   cancelToken: source.token
}).then(response => {
   console.log(response.data);
}).catch(error => {
   if(axios.isCancel(error)) {
       console.log(error.message);
   } else {
       console.log(error)
   }
});

source.cancel('canceled by user');
默认配置
请求配置可以在每个请求中单独设置,也可以在defaults中为全局设置。
//默认baseUrl
axios.defaults.baseUrl = 'https://jsonplaceholder.typicode.com';
//默认超时时间
axios.defaults.timeout = 3000;
//默认Authorization头
axios.defaults.headers.common['Authorization'] = 'AUTH_TOKEN';
数据转换
请求数据转换
axios.defaults.transformRequest.push((data, headers)=>{
    //处理请求的data
    return data;
});
返回数据转换
axios.defaults.transformResponse.push((data, headers)=>{
    //处理返回的data
    return data;
});
源码解析
源码分析基于0.19.2版本
首先看下源码的目录结构:
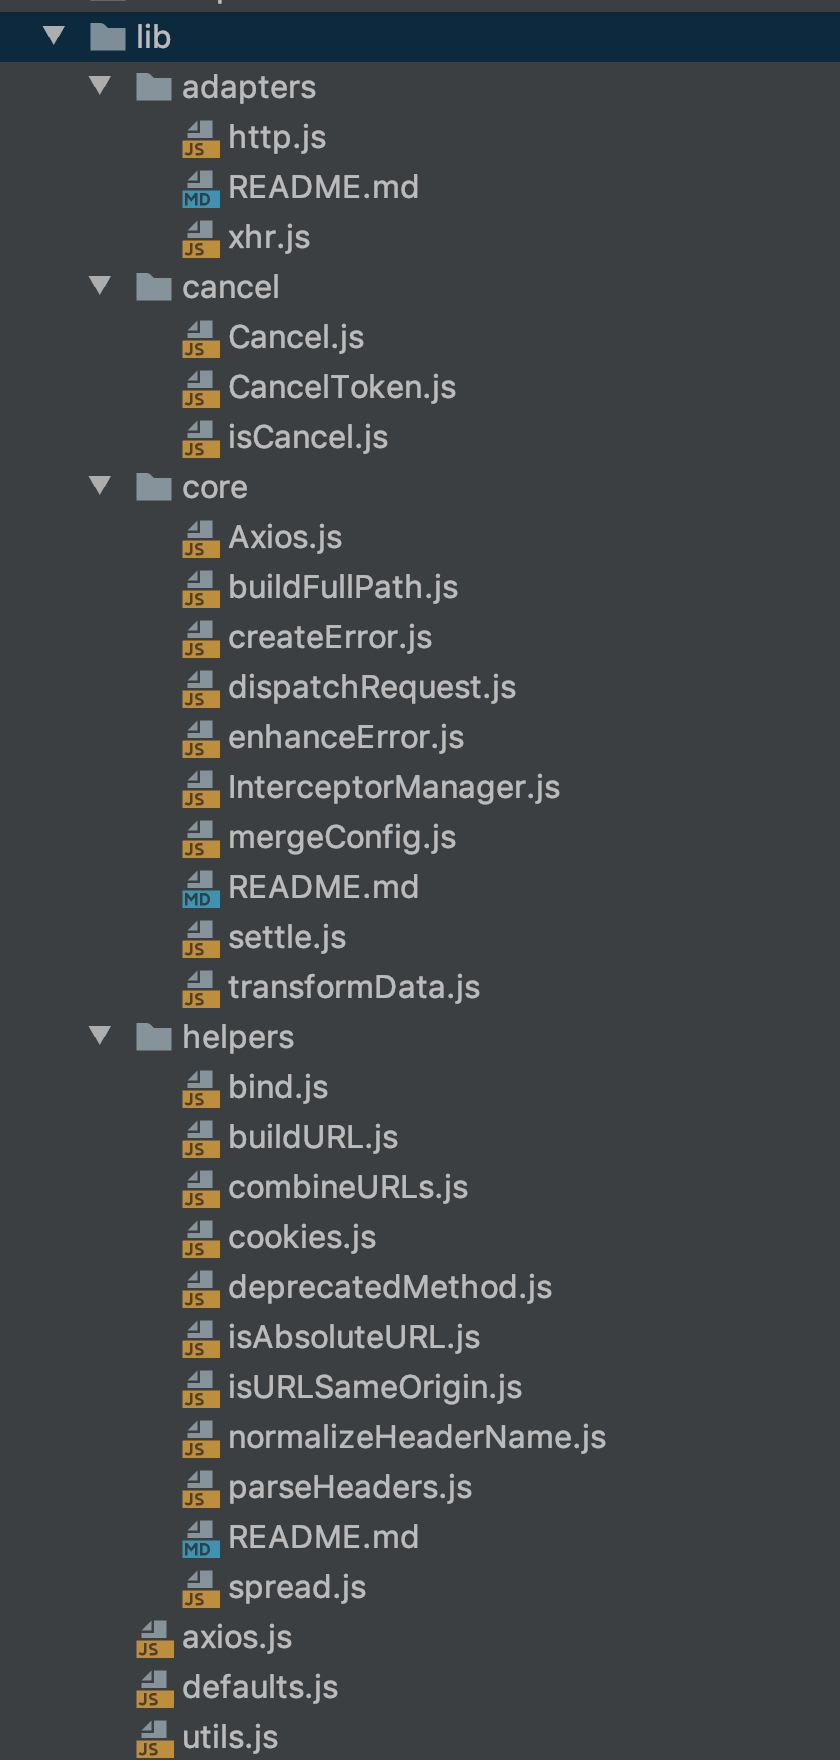
可以看到依次可以分为以下几个部分:
- adapters: 主要是网络请求适配器部分的源码,包括浏览器端的xhr和nodejs端的http。
- cancel: 主要是取消请求的cancel和cancelToken相关类。
- core: axios的核心功能,重点类有以下几个: Axios, dispatchRequest和InterceptorManager。剩余的主要是一些辅助的方法。
  ├── /core/
│ │ ├── Axios.js               # 定义Axios类
│ │ ├── dispatchRequest.js     # 用来调用适配器方法发送http请求
│ │ ├── InterceptorManager.js  # 拦截器构造函数
- helper : 帮助类
- axios: 定义axios库的接口和默认实例
- defaults: 默认配置
- utils: 工具方法
请求分析
首先从axios的几种请求方式来入手,我们从axios库中导入的axios对象。找到源码axios.js类,可以看到创建的默认axios对象。
//axios.js

function createInstance(defaultConfig) {
  var context = new Axios(defaultConfig);//创建Axios实例

  //将context绑定到Axios的request方法上
  //也可以这样实现:var instance = Axios.prototype.request.bind(context);
  //instance指向了request方法,并且上下文是实例context
  //所以我们能直接以axios(url, {config})的方式来发送请求。本质上还是调用的request方法
  var instance = bind(Axios.prototype.request, context);

  // Copy axios.prototype to instance
  //把Axios.prototype上的方法拓展到instance上,同时上下文是context,也就是this指向context
  //所以我们能以axios.get/post的方式发送请求
  utils.extend(instance, Axios.prototype, context);

  //将context上的属性和方法拓展到instance上
  //所以我们以axios.defaults,axios.interceptors能获取到拦截器和默认属性
  // Copy context to instance
  utils.extend(instance, context);

  return instance;
}

// Create the default instance to be exported
var axios = createInstance(defaults);

module.exports = axios;
从以上源码可以得知,axios中导出的axios对象是通过createInstance方法以及默认配置defaults来创建的。
createInstance方法没有仅仅创建Axios实例,还做了一系列绑定和拓展的操作,使得获得的Axios实例支持axios(url,{config})和axios.get/post这种请求方式。
Axios类及request方法分析
从前面的分析可知,不管是创建的默认实例还是用自定义配置创建的实例,以及axios请求的几种写法,都和Axios类以及request方法息息相关。
function Axios(instanceConfig) {
  this.defaults = instanceConfig; //默认配置
  this.interceptors = { //拦截器
    request: new InterceptorManager(),
    response: new InterceptorManager()
  };
}

Axios.prototype.request = function request(config) {
    if (typeof config === 'string') {//为了支持axios(url, {config})这种写法
    config = arguments[1] || {};
    config.url = arguments[0];
  } else {
    config = config || {};
  }

  config = mergeConfig(this.defaults, config);//合并配置

  //设置请求方法
  if (config.method) {
    config.method = config.method.toLowerCase();
  } else if (this.defaults.method) {
    config.method = this.defaults.method.toLowerCase();
  } else {
    config.method = 'get';
  }

  //通过以promise resolve, reject为一组值的链式数组,来支持拦截器中间件,并将配置参数传给dispatchRequest方法
  // config配置--> 请求拦截器 --> dispatchRequest--> 响应拦截器
  var chain = [dispatchRequest, undefined];
  var promise = Promise.resolve(config);

  this.interceptors.request.forEach(function unshiftRequestInterceptors(interceptor) {
    chain.unshift(interceptor.fulfilled, interceptor.rejected);//请求拦截器插入到数组前部
  });

  this.interceptors.response.forEach(function pushResponseInterceptors(interceptor) {
    chain.push(interceptor.fulfilled, interceptor.rejected); //响应拦截器插入到数组尾部
  });

  while (chain.length) {//遍历生成最终的请求promise(包含配置信息,请求拦截器,dispatchRequest方法,响应拦截器)
    promise = promise.then(chain.shift(), chain.shift());
  }

  return promise;
};


//为了支持axios.get(url, config)这种写法
utils.forEach(['delete', 'get', 'head', 'options'], function forEachMethodNoData(method) {
  /*eslint func-names:0*/
  Axios.prototype[method] = function(url, config) {
    return this.request(utils.merge(config || {}, {
      method: method,
      url: url
    }));
  };
});

//为了支持axios.post(url, data, config)这种写法
utils.forEach(['post', 'put', 'patch'], function forEachMethodWithData(method) {
  /*eslint func-names:0*/
  Axios.prototype[method] = function(url, data, config) {
    return this.request(utils.merge(config || {}, {
      method: method,
      url: url,
      data: data
    }));
  };
});
通过以上源码,Axios类有默认配置和拦截器两个属性值,同时类上有Axios的核心方法request。
- request方法只声明了一个参数config,但是通过判断config的类型是否是字符串,巧妙的支持了axios(url, config)这种写法。
config = mergeConfig(this.defaults, config);合并了默认配置和请求上设置的配置。结合axios类中的create工厂方法的代码可以知道,配置信息的优先级由高到低分别是请求方法上的> 创建axios实例的> axios默认的- axios支持promise是通过在request方法中按照Promise中的then方法中的参数结构,一个resolve和一个reject为一组将dispatchRequest,请求拦截器和响应拦截器塞进数组中的。
// axios内部Promise的简要流程
 Promise.resolve(config).then(function requestInterceptorFulfill(config) {
    return config;
  }, function requestInterceptorReject(error) {
    return Promise.reject(error);
  }).then(function dispatchrequest(config) {
    return dispatchRequest(config);
  }, undefined).then(function responseInterceptorFulfill(response) {
    return response;
  }, function responseInterceptorReject(error) {
    return Promise.reject(error);
  });
dispatchRequest分析
通过上面的源码,我们知道了axios是如何支持拦截器的,以及config在内部的流动方向。其中,有个dispatchRequest方法,还没有分析它做了什么。
从字面意思来看,dispatchRequest 就是发送请求的意思,查看源码,可以发现这个方法主要做了这几件事情:
- 1.支持取消请求
- 2.对请求数据做转换
- 3.处理请求头
- 4.使用网络请求适配器adapter以及配置config发送请求
- 5.对返回数据做转换
module.exports = function dispatchRequest(config) {

 //如果设置了cancelToken则直接取消请求,后续会分析取消请求的相关源码
  throwIfCancellationRequested(config);

  // 确保headers存在
  config.headers = config.headers || {};

  // 对请求的数据做转换
    config.data = transformData(
    config.data,
    config.headers,
    config.transformRequest
  );

  // 合并headers
  config.headers = utils.merge(
    config.headers.common || {},
    config.headers[config.method] || {},
    config.headers
  );

  utils.forEach(
    ['delete', 'get', 'head', 'post', 'put', 'patch', 'common'],
    function cleanHeaderConfig(method) {
      delete config.headers[method];
    }
  );

 // 获取config上设置的网络请求适配器(若没有则使用默认的)
 // axios中有两个预定义的适配器:分别是nodejs中的http和浏览器中的XMLHttpRequest

  var adapter = config.adapter || defaults.adapter;

  //将配置config传入adpater中,return这个promise
  return adapter(config).then(function onAdapterResolution(response) {
    //如果设置了cancelToken则直接取消请求
    throwIfCancellationRequested(config);

    // 对返回的数据做转换
    response.data = transformData(
      response.data,
      response.headers,
      config.transformResponse
    );

    return response;
  }, function onAdapterRejection(reason) {
    if (!isCancel(reason)) {
      throwIfCancellationRequested(config);

      // 对返回的数据做转换
      if (reason && reason.response) {
        reason.response.data = transformData(
          reason.response.data,
          reason.response.headers,
          config.transformResponse
        );
      }
    }

    return Promise.reject(reason);
  });
};
可以看到,就算是走到了dispatchRequest方法内部,也不是真正发送请求的地方。源码告诉我们,请求是从adapter内部发送出去的。
adapter-xhr分析
在axios内部,默认定义了两种请求适配器,分别是nodejs端的http和浏览器端的xhr。在这里主要分析xhr的源码。
xhr: 即XMLHttpRequest,具体用法可以参考MDN文档https://developer.mozilla.org/en/docs/Web/API/XMLHttpRequest/Using_XMLHttpRequest
//xhr的精简源码,删除了一些非重点代码
module.exports = function xhrAdapter(config) {
  return new Promise(function dispatchXhrRequest(resolve, reject) {

    //构造一个XMLHttpRequest对象
    var request = new XMLHttpRequest();

    //构造请求完整路径(相对路径->绝对路径)
      var fullPath = buildFullPath(config.baseURL, config.url);

     //根据配置config中的数据,初始化请求
     //open方法三个参数分别为:请求方法,url,是否异步
     //https://developer.mozilla.org/en-US/docs/Web/API/XMLHttpRequest/open
    request.open(config.method.toUpperCase(), buildURL(fullPath, config.params, config.paramsSerializer), true);

    //设置监听请求的onreadystatechange回调事件
    request.onreadystatechange = function handleLoad() {
     //响应头
      var responseHeaders = 'getAllResponseHeaders' in request ? parseHeaders(request.getAllResponseHeaders()) : null;
      //响应数据
      var responseData = !config.responseType || config.responseType === 'text' ? request.responseText : request.response;

     //构造axios中的响应对象
      var response = {
        data: responseData,
        status: request.status,
        statusText: request.statusText,
        headers: responseHeaders,
        config: config,
        request: request
      };
      //根据响应的状态,返回promise的reslove或reject
      settle(resolve, reject, response);
      request = null;
    };

     //设置监听请求的onabort回调事件
     request.onabort = function handleAbort() {
          reject(createError('Request aborted', config, 'ECONNABORTED', request));

      request = null;
    };
        //设置监听请求的onerror回调事件
        request.onerror = function handleError() {

      reject(createError('Network Error', config, null, request));

      request = null;
    };

   //设置监听请求的ontimeout回调事件
    request.ontimeout = function handleTimeout() {
      var timeoutErrorMessage = 'timeout of ' + config.timeout + 'ms exceeded';
      if (config.timeoutErrorMessage) {
        timeoutErrorMessage = config.timeoutErrorMessage;
      }
      reject(createError(timeoutErrorMessage, config, 'ECONNABORTED',
        request));
      request = null;
    };

       //若设置了cancelToken,则取消请求
       if (config.cancelToken) {
          config.cancelToken.promise.then(function onCanceled(cancel) {
        request.abort();//中断请求
        reject(cancel);//使用cancel信息返回promise的reject
        request = null;
      });
    }

    if (requestData === undefined) {
      requestData = null;
    }

    request.send(requestData);//使用请求数据requestData,最终发送请求
  });
};
可以看到,adapter中封装了使用XMLHttpRequest的具体细节,包括,创建XHR对象,初始化请求,构造请求链接,设置请求参数,构造响应对象等等
取消请求分析
在前面,我们讲到了两种取消请求的用法,现在就分析下取消请求相关部分的源码。
//CancelToken.js
function CancelToken(executor) {

  var resolvePromise;
  this.promise = new Promise(function promiseExecutor(resolve) {
    resolvePromise = resolve;
  });

  var token = this;
  executor(function cancel(message) {
    if (token.reason) {//已经取消过了
      return;
    }

    //构造Cancel类,用于标志是否是取消请求,同时设置取消请求的信息
    token.reason = new Cancel(message);
    resolvePromise(token.reason);
  });


    //xhr.js
    if (config.cancelToken) {
      // 处理取消请求的情况
      config.cancelToken.promise.then(function onCanceled(cancel) {
        if (!request) {
          return;
        }

        request.abort();//中断请求
        reject(cancel);
        request = null;
      });
    }
通过以上源码,我们知道
- 1.CancelToken内部声明了promise成员变量
this.promise = new Promise(function promiseExecutor(resolve) { resolvePromise = resolve; });。 - 2.构造CancelToken对象的时候,传入的executor方法在其中执行,并传入了一个cancel方法作为参数,在这个cancel方法中,判断了这个请求是否已经取消过,构造了Cancel类,用于存储取消信息,然后将cancel对象通过保存的promise的reslove方法传出去。
- 3.在xhr代码中,第二步resolve的cancel对象,通过then方法继续传递,并在其中中断了请求,并通过xhr的promise的reject方法传到外部。也就是我们使用axios请求的catch中得到的。
- 4.在使用CancelToken的时候,会把第2步中的cancel方法保存下来,当需要取消请求的时候再像这样调用。
cancel('Cancel by user!')。方法参数就是Cancel对象中的message。
梳理一下:
 //xhr中的promise
 new Promise((resolve, reject)=>{
        let request = {
            abort: ()=>{

            }
        };
        //CancelToken中的promise
        Promise.resolve(new Cancel('Cancel by User!')).then(cancel => {
            request.abort();//中断请求
            reject(cancel);//将cancel对象reject出去
        });
    }).catch(error => {
        if(axios.isCancel(error)) { //捕获在xhr中reject出来的cancel对象并打印message
            console.log(cancel.message);
        }
    });