Jax-ws在使用上很方便,也很轻量级。重点是他是jvnet(dev.java.net)的项目,是基于java标准的(JSR181)。
不过它与Spring的整合相对麻烦,于此,我将自己的一些研究结果贴出来以供备忘和后来者参考。
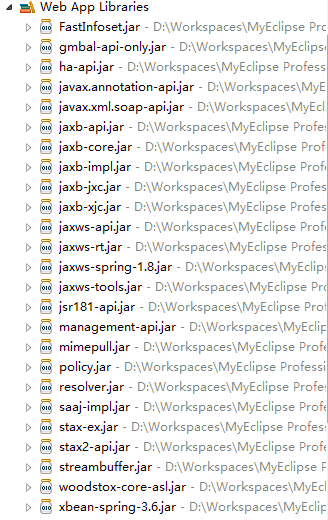
首先我们要有组件支持,包括三部分(我们需要他们的jar包):
Spring就不用说了,如果大家使用MyEclipse的话就直接添加支持。
jax-ws的jar包可以再网站上下载,或者搜索下载“jax-ws 2.2”。
jaxws commons spring的jar包是中间件,这个可能不好下载,如果不适用maven的话可能就只能在网络上搜索下载“jaxws-spring-1.8”(包含不只一个jar包哦)。
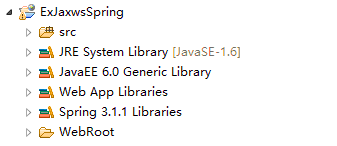
然后我们导入jar包并创建web项目。


然后编写一个测试WebService类:

 1 package org.coderecord.blog;
 2
 3 import javax.jws.WebMethod;
 4 import javax.jws.WebService;
 5 import javax.jws.soap.SOAPBinding;
 6 import javax.jws.soap.SOAPBinding.Style;
 7 import org.springframework.stereotype.Service;
 8
 9 /**
10  * 测试服务类<br>
11  * Service注解为在使用Spring的packeage-scan功能进行自动装配<br>
12  * WebService注解中可以不传递参数<br>
13  * SOAPBinding中也可不传递参数,或者按照自己的需求进行更改
14  */
15 @Service("helloWorldService")
16 @WebService(targetNamespace = "org.coderecord.blog")
17 @SOAPBinding(style = Style.RPC)
18 public class HelloWorldService {
19
20     /* 使用Spring来注入dao或service吧
21     @Autowired
22     private XXDao xxDao;*/
23
24     /**
25      * 接口方法必须加上WebMethod注解
26      */
27     @WebMethod
28     public void sayHello() {
29         System.out.println("Hello World!");
30     }
31 }
然后修改applicationContext.xml,加上webservice的绑定,这里面有几个问题,对于wss和ws的schema必须加上:

 1 <?xml version="1.0" encoding="UTF-8"?>
 2 <beans xmlns="http://www.springframework.org/schema/beans"
 3     xmlns:xsi="http://www.w3.org/2001/XMLSchema-instance" xmlns:ws="http://jax-ws.dev.java.net/spring/core"
 4     xmlns:wss="http://jax-ws.dev.java.net/spring/servlet" xmlns:p="http://www.springframework.org/schema/p"
 5     xmlns:context="http://www.springframework.org/schema/context"
 6     xsi:schemaLocation="http://www.springframework.org/schema/beans
 7     http://www.springframework.org/schema/beans/spring-beans-3.0.xsd
 8     http://www.springframework.org/schema/context http://www.springframework.org/schema/context/spring-context-3.2.xsd
 9     http://jax-ws.dev.java.net/spring/core
10     http://jax-ws.dev.java.net/spring/core.xsd
11     http://jax-ws.dev.java.net/spring/servlet
12     http://jax-ws.dev.java.net/spring/servlet.xsd">
13
14     <context:component-scan base-package="org.coderecord.blog">
15     </context:component-scan>
16
17     <wss:binding url="/service/hello">
18         <wss:service>
19             <ws:service bean="#helloWorldService" />
20         </wss:service>
21     </wss:binding>
22 </beans>
最后修改web.xml,修改几个地方:
加上Spring的listener,并配置正确;
加上WSSpringServlet的拦截。

 1 <?xml version="1.0" encoding="ISO-8859-1"?>
 2 <web-app xmlns:xsi="http://www.w3.org/2001/XMLSchema-instance" xmlns:web="http://xmlns.jcp.org/xml/ns/javaee" xsi:schemaLocation="http://xmlns.jcp.org/xml/ns/javaee http://java.sun.com/xml/ns/javaee/web-app_2_5.xsd">
 3   <listener>
 4     <listener-class>org.springframework.web.context.ContextLoaderListener</listener-class>
 5   </listener>
 6   <context-param>
 7     <param-name>contextConfigLocation</param-name>
 8     <param-value>classpath:applicationContext.xml</param-value>
 9   </context-param>
10   <!-- Start WebService Config -->
11     <servlet>
12         <servlet-name>JAXWSServlet</servlet-name>
13         <servlet-class>com.sun.xml.ws.transport.http.servlet.WSSpringServlet</servlet-class>
14         <load-on-startup>2</load-on-startup>
15     </servlet>
16     <servlet-mapping>
17         <servlet-name>JAXWSServlet</servlet-name>
18         <url-pattern>/service/hello</url-pattern>
19     </servlet-mapping>
20     <!-- End WebService Config -->
21 </web-app>
最后就启动,搞定。
访问localhost:8080/ExJaxwsSpring/service/hello?wsdl就是接口;访问localhost:8080/ExJaxwsSpring就是你的网站。

于2016-02-22:
有朋友说用新版Spring(Spring4.x)时产生“Caused by: java.lang.IllegalArgumentException: class com.sun.proxy.$Proxy5 has neither @WebSerivce nor @WebServiceProvider annotation”类似错误,这是由于“代理”类生成的子类(为了方便AOP)没有了@WebService注解。如果你不清楚Proxy和AOP,我举个栗子,你继承一个有注解的类,子类会继承父类的注解吗?
那么解决办法是在ws:service节点中加入一个impl属性约定继承的接口。例如
<wss:binding url="/service/hello">
    <wss:service>
        <ws:service bean="#helloWorldService" impl="org.coderecord.blog.HelloWorldService" />
    </wss:service>
</wss:binding>
(最后编辑时间2016-02-22 10:07:57)

