Spring容器是生成Bean的工厂,我们在做项目的时候,会用到监听器去获取spring的配置文件,然后从中拿出我们需要的bean出来,比如做网站首页,假设商品的后台业务逻辑都做好了,我们需要创建一个监听器,在项目启动时将首页的数据查询出来放到application里,即在监听器里调用后台商品业务逻辑的方法,也就是说我们需要在监听器里获取Spring中配置的相应的bean。先把监听器创建出来:
1. 创建InitDataListener
创建一个监听器InitDataListener继承ServletContextListener:
 1 //@Component //监听器是web层的组件,它是tomcat实例化的,不是Spring实例化的。不能放到Spring中
 2 public class InitDataListener implements ServletContextListener {
 3
 4     private ProductService productService = null;//productService中定义了跟商品相关的业务逻辑
 5
 6     @Override
 7     public void contextDestroyed(ServletContextEvent event) {
 8
 9     }
10
11     @Override
12     public void contextInitialized(ServletContextEvent event) {
13
14     }
15
16 }
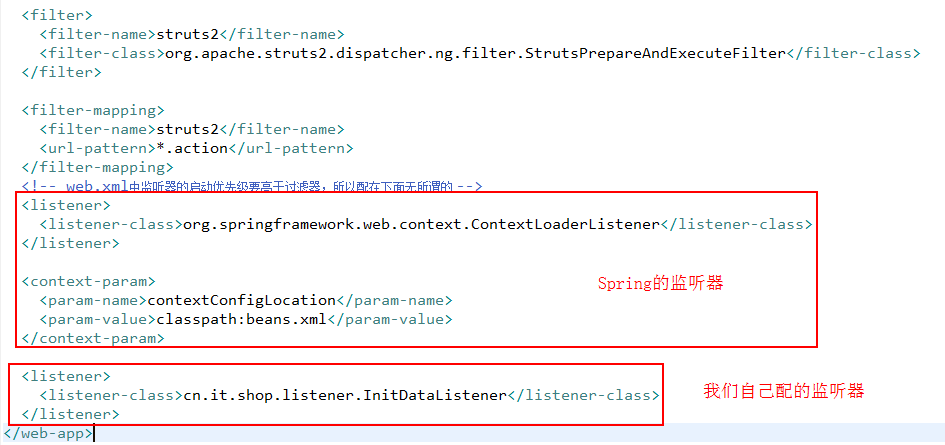
并在web.xml中配置该监听器:
如上,productService中定义了商品的一些业务逻辑,并且这个productService是交给Spring管理的,那么我们如何得到这个对象呢?首先肯定的一点是:我们不能自己new出来,因为new出来的话就跟Spring的IoC没有关系了……主要有三种方式可以实现,我们先一个个分析,最后比较优劣。
2. 直接加载beans.xml文件
这种方式比较简单粗暴,不是要加载配置文件么?那好,我加载就是了,如下:
 1 //@Component //监听器是web层的组件,它是tomcat实例化的,不是Spring实例化的。不能放到Spring中
 2 public class InitDataListener implements ServletContextListener {
 3
 4
 5     private ProductService productService = null; //productService中定义了跟商品相关的业务逻辑
 6
 7     @Override
 8     public void contextDestroyed(ServletContextEvent event) {
 9
10     }
11
12     @Override
13     public void contextInitialized(ServletContextEvent event) {
14         // 获取业务逻辑类productService查询商品信息
15         ApplicationContext context = new ClassPathXmlApplicationContext("beans.xml");
16         productService = (ProductService) context.getBean("productService");
17         System.out.println(productService); //输出看看拿到了没有
18
19                 //下面是具体productService相关操作……
20     }
21
22 }
这种方法完全没问题,思路很清晰,先加载配置文件beans.xml,然后获取bean,但是启动tomcat后,我们看看控制台输出的信息:
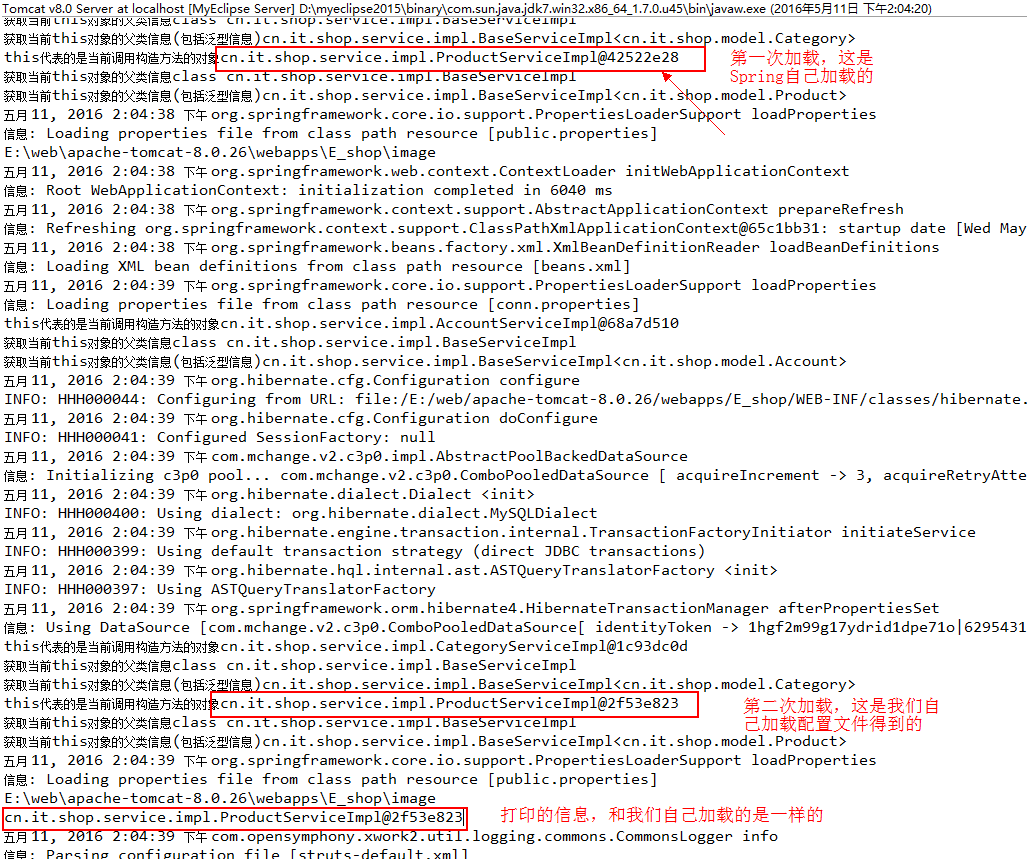
到这里应该发现这种方式的弊端了,加载了两次配置文件,也就是说那些bean被实例化了两次,从打印的信息来看,是拿到我们自己加载配置文件是实例化的bean。这种方式明显不可取。
3. 从ServletContext中获取
从上面的方法中,我们最起码可以知道,Spring通过自己的监听器已经加载过一次配置文件了,我们没必要再加载一次,那么很容易想到,如果知道Spring加载后放到哪里了,那我们就可以从那地方获取该配置文件,下面我们看下Spring加载配置文件的过程:
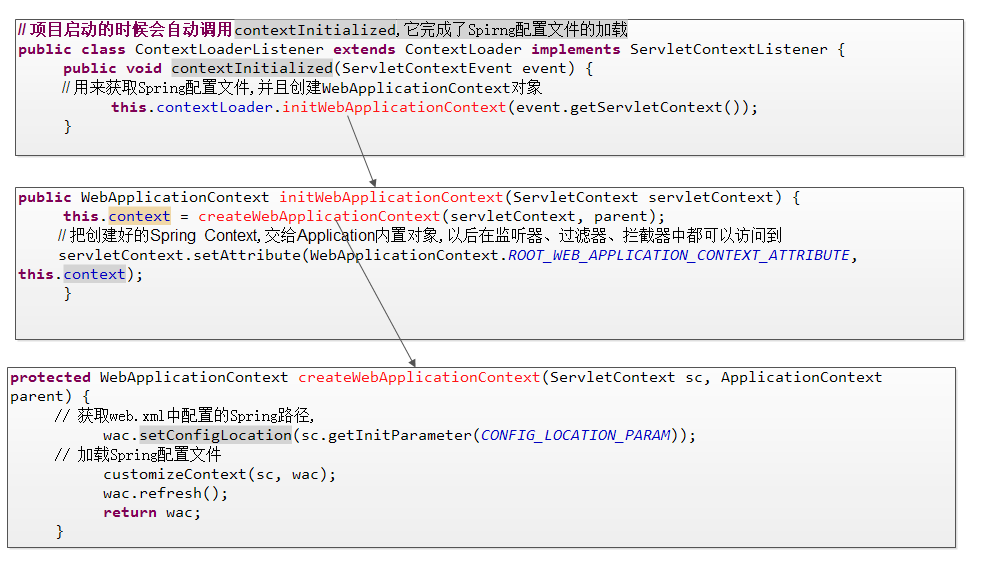
上图中(省略了无关的代码),ContextLoaderListener就是web.xml中我们配置的Spring监听器,它也实现了ServletContextListener并继承了ContextLoader。在监听器中主要通过initWebApplicationContext方法来获取配置文件,并创建WebApplicationContext对象,在initWebApplicationContext方法里主要做两件事:一是拿到Spring的上下文,二是把Spring上下文放到ServletContext中,并且键为:WebApplicationContext.ROOT_WEB_APPLICATION_CONTEXT_ATTRIBUTE。那么如何拿到Spring的上下文呢?是通过获取web.xml中配置的Spring的路径,CONFIG_LOCATION_PARM其实是个字符串常量,就是上面web.xml中配置Spring监听器下面的:
<context-param>
<param-name>contextConfigLocation</param-name> <!--CONFIG_LOCATION_PARM就是contextConfigLocation-->
<param-value>classpath:beans.xml</param-value>
</context-param>
所以就很明显了,通过web.xml中配置的路径拿到beans.xml,然后加载这个配置文件,实例化bean。
现在我们既然知道了Spring在加载配置文件后,把它放在了ServletContext中,那么我们就可以去这里面直接拿!
 1 //@Component //监听器是web层的组件,它是tomcat实例化的,不是Spring实例化的。不能放到Spring中
 2 public class InitDataListener implements ServletContextListener {
 3
 4
 5     private ProductService productService = null;
 6
 7     @Override
 8     public void contextDestroyed(ServletContextEvent event) {
 9         // TODO Auto-generated method stub
10
11     }
12
13     @Override
14     public void contextInitialized(ServletContextEvent event) {
15         //  获取业务逻辑类查询商品信息
16
17         // 解决方案二,项目在启动时,把Spring配置文件通过Spring的监听器加载,存储到ServletContext中,我们只要在ServletContext中获取即可。
18         ApplicationContext context = (ApplicationContext) event.getServletContext()
19                                              .getAttribute(WebApplicationContext.ROOT_WEB_APPLICATION_CONTEXT_ATTRIBUTE);
20         productService = (ProductService) context.getBean("productService");
21         System.out.println(productService);
22     }
23
24 }
这样我们就可以拿到produceService的实例化对象了,这种方法好是好,就是getAttribute中的参数太长,也不知道当时程序员的脑门子被夹了还是咋地,估计是想不到其他更合适的名字了吧~
4. 通过Spring提供的工具类加载
也许开发Spring的大牛们也意识到了这个参数名字太长了,于是他们提供了一个方法类,可以加载配置文件:
 1 public class InitDataListener implements ServletContextListener {
 2
 3
 4     private ProductService productService = null;
 5
 6     @Override
 7     public void contextDestroyed(ServletContextEvent event) {
 8         // TODO Auto-generated method stub
 9
10     }
11
12     @Override
13     public void contextInitialized(ServletContextEvent event) {
14         // 获取业务逻辑类查询商品信息
15
16         WebApplicationContext context = WebApplicationContextUtils.getWebApplicationContext(event.getServletContext());
17         productService = (ProductService) context.getBean("productService");
18         System.out.println(productService);
19     }
20
21 }
其实,这里的getWebApplicationContext方法就是把上面的那个方法封装了一下而已,我们看看这个方法的源码就知道了:
public static WebApplicationContext getWebApplicationContext(ServletContext sc) {
        return getWebApplicationContext(sc, WebApplicationContext.ROOT_WEB_APPLICATION_CONTEXT_ATTRIBUTE);
    }
这样更加方便程序员调用,仅此而已……所以一般我们使用第三种方法来获取Spring的配置文件,从而获取相应的实例化bean。
参考文章:http://blog.csdn.net/eson_15/article/details/51373937
----更多文章请看:http://blog.csdn.net/eson_15
代码实践:
Spring整合web项目时的问题:
启动服务器之后:
访问action时,每次访问都会重新加载spring配置文件,效率低下
解决方法:在服务器启动的时候,利用监听器只加载一次spring配置文件即可。
在spring里边不需要自己写代码实现,框架已经做好了封装
只需要配置即可:但是配置监听器时,需要导入一个spring整合web项目的jar包
创建一个web项目,要求每次访问action都无需加载新的xml文件,利用框架的监听器实现只在服务器启动时加载一次xml配置,用于提高性能
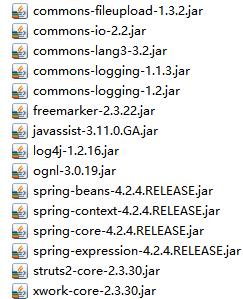
开发准备,导入struts相关jar和spring框架IOC相关jar以及spring整合web项目的jar包
第一种自己完成监听器的代码(不推荐,纯属娱乐)
 1 package org.lister;
 2
 3 import javax.servlet.ServletContext;
 4 import javax.servlet.ServletContextEvent;
 5 import javax.servlet.ServletContextListener;
 6
 7 import org.springframework.context.ApplicationContext;
 8 import org.springframework.context.support.ClassPathXmlApplicationContext;
 9
10 public class Lis implements ServletContextListener {
11
12     public void contextDestroyed(ServletContextEvent arg0) {
13         // TODO Auto-generated method stub
14
15     }
16     public void contextInitialized(ServletContextEvent arg0) {
17         // TODO Auto-generated method stub
18         //服务器启动的时候创建ApplicationContext对象
19         ApplicationContext ac=new ClassPathXmlApplicationContext("applicationContext.xml");
20
21         //得到ServletContext对象
22         ServletContext sc=arg0.getServletContext();
23
24         //保存创建的ApplicationContext对象,在action中调用
25         sc.setAttribute("applicationcontext",ac);
26     }
27 }
 1 <?xml version="1.0" encoding="UTF-8"?>
 2 <web-app version="2.5"
 3     xmlns="http://java.sun.com/xml/ns/javaee"
 4     xmlns:xsi="http://www.w3.org/2001/XMLSchema-instance"
 5     xsi:schemaLocation="http://java.sun.com/xml/ns/javaee
 6     http://java.sun.com/xml/ns/javaee/web-app_2_5.xsd">
 7   <welcome-file-list>
 8     <welcome-file>index.jsp</welcome-file>
 9   </welcome-file-list>
10
11   <!-- struts过滤器配置 -->
12     <filter>
13      <filter-name>struts2</filter-name>
14      <filter-class>org.apache.struts2.dispatcher.ng.filter.StrutsPrepareAndExecuteFilter</filter-class>
15      <init-param>
16           <param-name>actionPackages</param-name>
17           <param-value>com.mycompany.myapp.actions</param-value>
18      </init-param>
19   </filter>
20
21   <filter-mapping>
22       <filter-name>struts2</filter-name>
23        <url-pattern>/*</url-pattern>
24   </filter-mapping>
25
26   <!-- 自己的监听器配置 -->
27   <listener>
28       <listener-class>org.lister.Lis</listener-class>
29   </listener>
30
31 </web-app>
1 package org.model;
2
3 public class User {
4     public void add(){
5         System.out.println("add。。。。。。。。。。。。");
6     }
7 }
 1 package org.action;
 2
 3 import java.util.Map;
 4
 5 import javax.servlet.ServletContext;
 6 import org.apache.struts2.ServletActionContext;
 7 import org.model.User;
 8 import org.springframework.context.ApplicationContext;
 9
10 import com.opensymphony.xwork2.ActionContext;
11 import com.opensymphony.xwork2.ActionSupport;
12
13 public class UserAction extends ActionSupport {
14
15     @Override
16     public String execute() throws Exception {
17         System.out.println("进入action");
18 //        ApplicationContext ac=new ClassPathXmlApplicationContext("applicationContext.xml");
19 //        User user=(User)ac.getBean("user");
20 //        user.add();
21
22         //得到ServletContext(上下文对象,即application对象)对象 并且得到里边保存的applicationContext对象;
23         ServletContext servletContext = ServletActionContext.getServletContext();
24         ApplicationContext ac=(ApplicationContext) servletContext.getAttribute("applicationcontext");
25         if(ac!=null){
26             User u=(User) ac.getBean("user");
27             u.add();
28         }
29
30         /*
31          //以下代码也能实现
32         ActionContext actioncontext=ActionContext.getContext();
33         Map application=actioncontext.getApplication();
34         ApplicationContext ac2=(ApplicationContext) application.get("applicationcontext");
35         if(ac2!=null){
36             User u2=(User) ac2.getBean("user");
37             u2.add();
38         }
39         */
40         return NONE;
41     }
42 }
1 <?xml version="1.0" encoding="UTF-8"?>
2 <beans xmlns="http://www.springframework.org/schema/beans"
3     xmlns:xsi="http://www.w3.org/2001/XMLSchema-instance"
4     xmlns:p="http://www.springframework.org/schema/p"
5     xmlns:aop="http://www.springframework.org/schema/aop" xsi:schemaLocation="
6         http://www.springframework.org/schema/beans http://www.springframework.org/schema/beans/spring-beans.xsd">
7         <bean id="user" class="org.model.User"></bean>
8 </beans>
在上边的程序中没有配置spring框架的监听器,只配置了自己定义的,所以也实现了题目要求的功能:

服务器启动的时候加载了配置文件:
然后访问action截图如下:

即使反复请求,只会输出以上两句,控制台并没有打印其他内容,说明xml文件只加载了一次。
第二种:使用框架提供的监听机制,我们只需要配置即可,不多说 直接上代码
1 package org.dao;
2
3 public class UserDao {
4     public void add(){
5         System.out.println("UserDao.........");
6     }
7 }
 1 package org.service;
 2
 3 import org.dao.UserDao;
 4
 5 public class Service {
 6     private UserDao userdao;
 7
 8     public void setUserdao(UserDao userdao) {//使用set注入
 9         this.userdao = userdao;
10     }
11
12     public void add(){
13         System.out.println("Service.........");
14         userdao.add();
15     }
16 }
 1 <?xml version="1.0" encoding="UTF-8"?>
 2 <web-app version="2.5"
 3     xmlns="http://java.sun.com/xml/ns/javaee"
 4     xmlns:xsi="http://www.w3.org/2001/XMLSchema-instance"
 5     xsi:schemaLocation="http://java.sun.com/xml/ns/javaee
 6     http://java.sun.com/xml/ns/javaee/web-app_2_5.xsd">
 7   <welcome-file-list>
 8     <welcome-file>index.jsp</welcome-file>
 9   </welcome-file-list>
10         <filter>
11       <filter-name>struts2</filter-name>
12       <filter-class>org.apache.struts2.dispatcher.ng.filter.StrutsPrepareAndExecuteFilter</filter-class>
13       <init-param>
14           <param-name>actionPackages</param-name>
15           <param-value>com.mycompany.myapp.actions</param-value>
16       </init-param>
17       </filter>
18   <filter-mapping>
19       <filter-name>struts2</filter-name>
20       <url-pattern>/*</url-pattern>
21   </filter-mapping>
22
23
24   <!-- 使用框架提供的监听机制  需要配置下面代码 -->
25   <listener>
26       <listener-class>org.springframework.web.context.ContextLoaderListener</listener-class>
27   </listener>
28
29   <context-param>
30       <param-name>contextConfigLocation</param-name>
31       <param-value>classpath:applicationContext.xml</param-value>
32   </context-param>
33 </web-app>
 1 <?xml version="1.0" encoding="UTF-8"?>
 2 <beans
 3     xmlns="http://www.springframework.org/schema/beans"
 4     xmlns:xsi="http://www.w3.org/2001/XMLSchema-instance"
 5     xmlns:p="http://www.springframework.org/schema/p"
 6     xmlns:aop="http://www.springframework.org/schema/aop"
 7     xsi:schemaLocation="http://www.springframework.org/schema/beans
 8     http://www.springframework.org/schema/beans/spring-beans-3.0.xsd
 9     http://www.springframework.org/schema/aop
10     http://www.springframework.org/schema/aop/spring-aop-3.0.xsd">
11     <bean id="ud" class="org.dao.UserDao"></bean>
12
13     <bean id="us" class="org.service.Service">
14         <property name="userdao" ref="ud"></property>
15     </bean>
16
17 </beans>
18
 1 package org.action;
 2
 3 import java.util.Map;
 4
 5 import javax.servlet.ServletContext;
 6
 7 import org.apache.struts2.ServletActionContext;
 8 import org.springframework.context.ApplicationContext;
 9 import org.springframework.context.support.ClassPathXmlApplicationContext;
10 import org.springframework.web.context.WebApplicationContext;
11 import org.springframework.web.context.support.WebApplicationContextUtils;
12
13 import com.opensymphony.xwork2.ActionSupport;
14
15 import org.service.*;
16 public class UserAction extends ActionSupport {
17
18     @Override
19     public String execute() throws Exception {
20         //ApplicationContext ac=new ClassPathXmlApplicationContext("applicationContext.xml");
21
22         //得到servletContext对象(上下文application对象)
23         ServletContext sc=ServletActionContext.getServletContext();
24
25         //从上下文对象中取得在服务器启动时创建的ApplicationContext对象
26         //因为在服务器启动的时候就创建了一个applicationContext对象 并且保存在了ServletContext中(上下文application中),
27         //并且键为:WebApplicationContext.ROOT_WEB_APPLICATION_CONTEXT_ATTRIBUTE
28         ApplicationContext ac=(ApplicationContext)sc.getAttribute(WebApplicationContext.ROOT_WEB_APPLICATION_CONTEXT_ATTRIBUTE);
29         if(ac!=null){
30         Service s=(Service)ac.getBean("us");
31         s.add();
32         }else{
33             System.out.println("没有取得ApplicationContext对象");
34         }
35         /*
36         WebApplicationContext context = WebApplicationContextUtils.getWebApplicationContext(ServletActionContext.getServletContext());
37         if(ac!=null){
38         Service s=(Service)context.getBean("us");
39         s.add();
40         }else{
41         System.out.println("没有取得ApplicationContext对象");
42         }
43          */
44         return NONE;//不做任何的返回
45     }
46 }
启动服务器:

反复访问action:
效果和上面的一样,没有反复加载xml生成Spring容器
-------------------------------
欢迎大家转载,但请注明原创链接:http://www.cnblogs.com/Joke-Jay/p/6507171.html