1.1 CommandLineProperty初始化
CommandLineProperty即命令行参数,当启动时通过类似指定配置例如--server.port=8888的方式作为参数传递进来时,Spring对它是这么解析的:
ApplicationArguments applicationArguments = new DefaultApplicationArguments(args);
这里的args就是命令行参数:--server.port=8888。点击DefaultApplicationArguments构造方法跟进源码:
public class DefaultApplicationArguments implements ApplicationArguments {
	public DefaultApplicationArguments(String... args) {
		Assert.notNull(args, "Args must not be null");
		this.source = new Source(args);
		this.args = args;
	}
	private static class Source extends SimpleCommandLinePropertySource {
		Source(String[] args) {
			super(args);
		}
		@Override
		public List<String> getNonOptionArgs() {
			return super.getNonOptionArgs();
		}
		@Override
		public List<String> getOptionValues(String name) {
			return super.getOptionValues(name);
		}
	}
}
Source是DefaultApplicationArguments的内部类,这里直接通过new Source(..)的方式调用父类SimpleCommandLinePropertySource的构造:
public class SimpleCommandLinePropertySource extends CommandLinePropertySource<CommandLineArgs> {

	public SimpleCommandLinePropertySource(String... args) {
		super(new SimpleCommandLineArgsParser().parse(args));
	}
}
这里对SimpleCommandLineArgsParser实例化,调用parse方法开始解析命令行参数,跟进源码:
class SimpleCommandLineArgsParser {
	public CommandLineArgs parse(String... args) {
		CommandLineArgs commandLineArgs = new CommandLineArgs();
		for (String arg : args) {
			// 判断命令行参数是否以--开头,例如启动SpringBoot时经常会通过外部传递命令进来如--spring.port=9999
			if (arg.startsWith("--")) {
				// 截取结果spring.port=9999
				String optionText = arg.substring(2);
				String optionName;
				String optionValue = null;
				int indexOfEqualsSign = optionText.indexOf('=');
				if (indexOfEqualsSign > -1) {
					// optionName就是spring.port
					optionName = optionText.substring(0, indexOfEqualsSign);
					// optionValue就是9999
					optionValue = optionText.substring(indexOfEqualsSign + 1);
				}else {
					optionName = optionText;
				}
				if (optionName.isEmpty()) {
					throw new IllegalArgumentException("Invalid argument syntax: " + arg);
				}
				// 对于commandLineArgs内部维护两个集合,一个是Map<String, List<String>> optionArgs,另一个是List<String> nonOptionArgs
				// optionArgs用于维护--开头的命令行参数
				// nonOptionArgs用于维护一切不以--开头的命令行参数
				commandLineArgs.addOptionArg(optionName, optionValue);
			}else {
				commandLineArgs.addNonOptionArg(arg);
			}
		}
		return commandLineArgs;
	}
}
可以看出commandLineArgs就是将命令行参数存放到其内部属性中,这个对象将会在下面进行环境初始化时作为一个重要的参数。
1.2 prepareEnvironment准备环境
ConfigurableEnvironment environment = prepareEnvironment(listeners, applicationArguments);
在准备环境阶段,将SpringApplicationRunListeners和命令行参数作为参数传入,点击prepareEnvironment跟进源码:
private ConfigurableEnvironment prepareEnvironment(SpringApplicationRunListeners listeners,ApplicationArguments applicationArguments) {
	ConfigurableEnvironment environment = getOrCreateEnvironment();
	configureEnvironment(environment, applicationArguments.getSourceArgs());
	ConfigurationPropertySources.attach(environment);
	listeners.environmentPrepared(environment);
	bindToSpringApplication(environment);
	if (!this.isCustomEnvironment) {
		environment = new EnvironmentConverter(getClassLoader()).convertEnvironmentIfNecessary(environment,deduceEnvironmentClass());
	}
	ConfigurationPropertySources.attach(environment);
	return environment;
}
1.2.1 getOrCreateEnvironment获取默认环境
这里的getOrCreateEnvironment()由于在之前的SpringApplication初始化时已设置为SERVLET,所以该方法返回一个StandardServletEnvironment环境对象,以下是StandardServletEnvironment环境对象的类图:
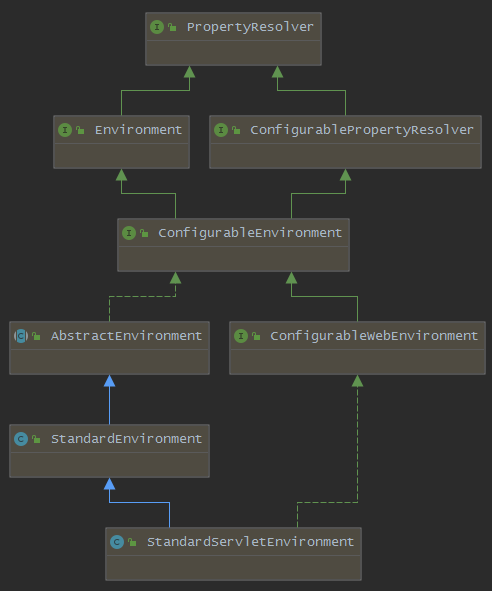
以下是对于该类图继承关系的说明:
- PropertyResolver:最顶层的用于配置读取解析接口
- Environment:拓展了当前应用程序正在运行的环境
- ConfigurablePropertyResolver:提供用于访问和自定义转换服务的工具,用于将属性值从一种类型转换为另一种类型
- ConfigurableEnvironment:继承了Environment和ConfigurablePropertyResolver,提供设置激活的profile和默认的profile的功能以及操作Properties的工具
- AbstractEnvironment:实现了ConfigurableEnvironment的抽象类,用于提供默认的设置,并且为子类预留可覆盖了扩展方法
- ConfigurableWebEnvironment:提供配置Servlet上下文和Servlet参数的功能
- StandardEnvironment:继承自AbstractEnvironment,非Servlet(Web)环境下的标准Environment实现
- StandardServletEnvironment:基于web使用的Environment,默认情况下所有与web相关(基于servlet)都会初始化该实例
实例化StandardServletEnvironment对象时实际调用的是父类AbstractEnvironment的构造:
public AbstractEnvironment() {
      customizePropertySources(this.propertySources);
}
最终调用StandardServletEnvironment自己本身重写了父类AbstractEnvironment的customizePropertySources方法:
@Override
protected void customizePropertySources(MutablePropertySources propertySources) {
	propertySources.addLast(new StubPropertySource(SERVLET_CONFIG_PROPERTY_SOURCE_NAME));
	propertySources.addLast(new StubPropertySource(SERVLET_CONTEXT_PROPERTY_SOURCE_NAME));
	if (JndiLocatorDelegate.isDefaultJndiEnvironmentAvailable()) {
		propertySources.addLast(new JndiPropertySource(JNDI_PROPERTY_SOURCE_NAME));
	}
	super.customizePropertySources(propertySources);
}
这里将servletConfigInitParams和servletContextInitParams作为参数包装成PropertySource类型的对象存放到MutablePropertySources中,然后调用父类StandardEnvironment的customizePropertySources方法并以此参数PropertySource传入:
public class StandardEnvironment extends AbstractEnvironment {
	@Override
	protected void customizePropertySources(MutablePropertySources propertySources) {
		propertySources.addLast(new PropertiesPropertySource(SYSTEM_PROPERTIES_PROPERTY_SOURCE_NAME, getSystemProperties()));
		propertySources.addLast(new SystemEnvironmentPropertySource(SYSTEM_ENVIRONMENT_PROPERTY_SOURCE_NAME, getSystemEnvironment()));
	}
}
在父类StandardEnvironment的customizePropertySources方法中又通过将systemProperties和systemEnvironment作为参数通过PropertiesPropertySource和SystemEnvironmentPropertySource构造包装成对象设置到MutablePropertySources中,最终将MutablePropertySources初始化完后得到完整对象如下:

初始化好MutablePropertySources后,查看MutablePropertySources的类图结构:

PropertySources接口为包含一个或多个属性源PropertySource对象的持有者,作为PropertySources默认的实现MutablePropertySources,它允许操作包含的属性源并提供了从一个已经存在的属性源集PropertySources实例的拷贝操作。另外它内部提供了多个方法例如addFirst、addLast、addBefore、addAfter等用于保证属性源的优先级,属性源的优先级与添加到属性源集中的顺序有关,所以不难看出这个对象是用于控制配置优先级。
1.2.2 configureEnvironment配置环境
基于web的环境对象获取到之后,会将该环境对象和命令行参数对象作为参数传入开始执行配置:
configureEnvironment(environment, applicationArguments.getSourceArgs());
protected void configureEnvironment(ConfigurableEnvironment environment, String[] args) {
	if (this.addConversionService) {
		ConversionService conversionService = ApplicationConversionService.getSharedInstance();
		environment.setConversionService((ConfigurableConversionService) conversionService);
	}
	configurePropertySources(environment, args);
	configureProfiles(environment, args);
}
初始化ApplicationConversionService
由于在初始化阶段addConversionService变量总是true,所以进入if语句开始初始化ApplicationConversionService,点击getSharedInstance()方法跟进源码:
public class ApplicationConversionService extends FormattingConversionService {

	private static volatile ApplicationConversionService sharedInstance;

	public static ConversionService getSharedInstance() {
		ApplicationConversionService sharedInstance = ApplicationConversionService.sharedInstance;
		if (sharedInstance == null) {
			synchronized (ApplicationConversionService.class) {
				sharedInstance = ApplicationConversionService.sharedInstance;
				if (sharedInstance == null) {
					sharedInstance = new ApplicationConversionService();
					ApplicationConversionService.sharedInstance = sharedInstance;
				}
			}
		}
		return sharedInstance;
	}
}
可以看出这里的ApplicationConversionService是一个单例类,点击ApplicationConversionService()构造跟进源码看看内部初始化:
public class ApplicationConversionService extends FormattingConversionService {

	private static volatile ApplicationConversionService sharedInstance;

	public ApplicationConversionService() {
		this(null);
	}

	public ApplicationConversionService(StringValueResolver embeddedValueResolver) {
		if (embeddedValueResolver != null) {
			setEmbeddedValueResolver(embeddedValueResolver);
		}
		configure(this);
	}

	// 这里将ApplicationConversionService实例转换成父类参数
	public static void configure(FormatterRegistry registry) {
		DefaultConversionService.addDefaultConverters(registry);
		DefaultFormattingConversionService.addDefaultFormatters(registry);
		addApplicationFormatters(registry);
		addApplicationConverters(registry);
	}
}
configure方法内部就是将多个convertors和多个formatters实例化后添加到父类GenericConversionService的内部类Converters中维护。
值得注意的是:这种初始化方式在SpringBoot启动过程中也是屡见不鲜,一个核心接口拓展出不同功能的接口以及实现类,通过实例化最底层的类来实例化上层的父类,初始化时根据传入的参数对象来调用父类的方法达到初始化父类中的逻辑。
若该实例一开始就不存在,就会对它进行初始化,初始化工作主要是添加大量的格式转换器等,例如:
public static void configure(FormatterRegistry registry) {
	DefaultConversionService.addDefaultConverters(registry);
	DefaultFormattingConversionService.addDefaultFormatters(registry);
	addApplicationFormatters(registry);
	addApplicationConverters(registry);
}
public static void addDefaultConverters(ConverterRegistry converterRegistry) {
	addScalarConverters(converterRegistry);
	addCollectionConverters(converterRegistry);
	converterRegistry.addConverter(new ByteBufferConverter((ConversionService) converterRegistry));
	converterRegistry.addConverter(new StringToTimeZoneConverter());
	converterRegistry.addConverter(new ZoneIdToTimeZoneConverter());
	converterRegistry.addConverter(new ZonedDateTimeToCalendarConverter());
	converterRegistry.addConverter(new ObjectToObjectConverter());
	converterRegistry.addConverter(new IdToEntityConverter((ConversionService) converterRegistry));
	converterRegistry.addConverter(new FallbackObjectToStringConverter());
	converterRegistry.addConverter(new ObjectToOptionalConverter((ConversionService) converterRegistry));
}
......
配置属性源
configurePropertySources(environment, args);
传入对应的刚创建的StandardServletEnvironment环境对象以及命令行参数,点击configurePropertySources跟进源码:
protected void configurePropertySources(ConfigurableEnvironment environment, String[] args) {

	public static final String COMMAND_LINE_PROPERTY_SOURCE_NAME = "commandLineArgs";

	// 从环境对象中获取属性源
	MutablePropertySources sources = environment.getPropertySources();
	// defaultProperties没有得到初始化所以这里不会执行
	if (this.defaultProperties != null && !this.defaultProperties.isEmpty()) {
		sources.addLast(new MapPropertySource("defaultProperties", this.defaultProperties));
	}
	// 处理命令行参数,若命令行参数存在的话
	if (this.addCommandLineProperties && args.length > 0) {
		// 属性源这时是没有包含commandLineArgs
		String name = CommandLinePropertySource.COMMAND_LINE_PROPERTY_SOURCE_NAME;
		if (sources.contains(name)) {
			PropertySource<?> source = sources.get(name);
			CompositePropertySource composite = new CompositePropertySource(name);
			composite.addPropertySource(
					new SimpleCommandLinePropertySource("springApplicationCommandLineArgs", args));
			composite.addPropertySource(source);
			sources.replace(name, composite);
		}
		else {
			// 所以将commandLineArgs包装为属性一添加到第1的位置
			sources.addFirst(new SimpleCommandLinePropertySource(args));
		}
	}
}
配置激活的环境标识
configureProfiles(environment, args);
传入对应的刚创建的StandardServletEnvironment环境对象以及命令行参数,点击configureProfiles跟进源码:
protected void configureProfiles(ConfigurableEnvironment environment, String[] args) {
	Set<String> profiles = new LinkedHashSet<>(this.additionalProfiles);
	profiles.addAll(Arrays.asList(environment.getActiveProfiles()));
	environment.setActiveProfiles(StringUtils.toStringArray(profiles));
}
初始化时additionalProfiles并不会得到初始化,所以这里没有激活的环境。
1.2.3 attachEnvironment连接环境
点击attach方法进入源码:
public static void attach(Environment environment) {
	Assert.isInstanceOf(ConfigurableEnvironment.class, environment);
	MutablePropertySources sources = ((ConfigurableEnvironment) environment).getPropertySources();
	PropertySource<?> attached = sources.get(ATTACHED_PROPERTY_SOURCE_NAME);
	if (attached != null && attached.getSource() != sources) {
		sources.remove(ATTACHED_PROPERTY_SOURCE_NAME);
		attached = null;
	}
	if (attached == null) {
		sources.addFirst(new ConfigurationPropertySourcesPropertySource(ATTACHED_PROPERTY_SOURCE_NAME,
				new SpringConfigurationPropertySources(sources)));
	}
}
这里从原有的属性源中获取是否存在configurationProperties的属性源,若没有将此通过ConfigurationPropertySourcesPropertySource实例化后加入到属性源的集合列表头位置,至此属性源初始化完毕。
1.2.4 发布支持ApplicationEnvironmentPreparedEvent事件的监听器
这里就跟之前的发布支持ApplicationStartingEvent时间的监听器逻辑一致,只是事件类型不同。
1.2.5 绑定环境信息
初始化好环境后,将环境绑定到SpringApplication:
bindToSpringApplication(environment);
public class SpringApplication {
	protected void bindToSpringApplication(ConfigurableEnvironment environment) {
		try {
			Binder.get(environment).bind("spring.main", Bindable.ofInstance(this));
		}
		catch (Exception ex) {
			throw new IllegalStateException("Cannot bind to SpringApplication", ex);
		}
	}
}
还记得该绑定之前存在一个方法:
ConfigurationPropertySources.attach(environment);
当时的处理逻辑是从环境中获取属性源,再从属性源中获取是否存在configurationProperties的属性源,不存在则通过ConfigurationPropertySourcesPropertySource包装名称为configurationProperties,名称对应属性源为SpringConfigurationPropertySources的对象,然后添加到MutablePropertySources中的集合第一个位置上,即MutablePropertySources属性源中存在一个包含自身的属性源,这个configurationProperties的属性源就是为了后续的将环境绑定到SpringApplication而准备的。在Spring源码中,很经常能看到一个类并没有初始化但会提供静态方法,该静态方法就是用来初始化自身属性,Binder也不例外,首先来看看它的get静态方法实现:
public class Binder {
	public static Binder get(Environment environment, BindHandler defaultBindHandler) {
                // 这里的get方法就是获取configurationProperties的属性源
		Iterable<ConfigurationPropertySource> sources = ConfigurationPropertySources.get(environment);
                // 初始化占位符解析器
		PropertySourcesPlaceholdersResolver placeholdersResolver = new PropertySourcesPlaceholdersResolver(environment);
		return new Binder(sources, placeholdersResolver, null, null, defaultBindHandler);
	}
}
最后通过new Binder初始化Binder对象:
public class Binder {
	public Binder(Iterable<ConfigurationPropertySource> sources, PlaceholdersResolver placeholdersResolver,
			ConversionService conversionService, Consumer<PropertyEditorRegistry> propertyEditorInitializer,
			BindHandler defaultBindHandler, BindConstructorProvider constructorProvider) {
		Assert.notNull(sources, "Sources must not be null");
		this.sources = sources;
		this.placeholdersResolver = (placeholdersResolver != null) ? placeholdersResolver : PlaceholdersResolver.NONE;
		this.conversionService = (conversionService != null) ? conversionService
				: ApplicationConversionService.getSharedInstance();
		this.propertyEditorInitializer = propertyEditorInitializer;
		this.defaultBindHandler = (defaultBindHandler != null) ? defaultBindHandler : BindHandler.DEFAULT;
		if (constructorProvider == null) {
			constructorProvider = BindConstructorProvider.DEFAULT;
		}
		ValueObjectBinder valueObjectBinder = new ValueObjectBinder(constructorProvider);
		JavaBeanBinder javaBeanBinder = JavaBeanBinder.INSTANCE;
		this.dataObjectBinders = Collections.unmodifiableList(Arrays.asList(valueObjectBinder, javaBeanBinder));
	}
}
那么Binder具体是如何绑定SpringApplication的,Binder的bind方法需要两个参数,第一个是配置的属性名用来和SpringApplication关联的名称spring.main,第二个就是将SpringApplication作为参数包装成Bindable:
Binder.get(environment).bind("spring.main", Bindable.ofInstance(this));
public class Binder {
	public <T> BindResult<T> bind(String name, Bindable<T> target) {
		return bind(ConfigurationPropertyName.of(name), target, null);
	}
	public <T> BindResult<T> bind(ConfigurationPropertyName name, Bindable<T> target, BindHandler handler) {
		T bound = bind(name, target, handler, false);
		return BindResult.of(bound);
	}
	private <T> T bind(ConfigurationPropertyName name, Bindable<T> target, BindHandler handler, boolean create) {
		Assert.notNull(name, "Name must not be null");
		Assert.notNull(target, "Target must not be null");
		handler = (handler != null) ? handler : this.defaultBindHandler;
		Context context = new Context();
		return bind(name, target, handler, context, false, create);
	}
	private <T> T bind(ConfigurationPropertyName name, Bindable<T> target, BindHandler handler, Context context,
			boolean allowRecursiveBinding, boolean create) {
		context.clearConfigurationProperty();
		try {
			Bindable<T> replacementTarget = handler.onStart(name, target, context);
			if (replacementTarget == null) {
				return handleBindResult(name, target, handler, context, null, create);
			}
			target = replacementTarget;
			Object bound = bindObject(name, target, handler, context, allowRecursiveBinding);
			return handleBindResult(name, target, handler, context, bound, create);
		}
		catch (Exception ex) {
			return handleBindError(name, target, handler, context, ex);
		}
	}
}
但是最终跟进后返回一个BindResult<?> UNBOUND = new BindResult<>(null)对象,这里还不得知用意为何,后续若有深入体会再说明。
1.2.6 转换环境重新连接
跟进源码如下:
if (!this.isCustomEnvironment) {
	environment = new EnvironmentConverter(getClassLoader()).convertEnvironmentIfNecessary(environment,deduceEnvironmentClass());
}
ConfigurationPropertySources.attach(environment);
这里将StandardServletEnvironment转换成StandardEnvironment类型,StandardEnvironment是StandardServletEnvironment的父类,它作为参数传递到attach方法中,这里只为了在前一个attach方法中将设置的configurationProperties属性源移除掉。