一、配置Bean的两种方式之使用注解配置Bean
1.使用注解配置Bean和使用xml配置Bean的对比
如果我们要将一个Bean上交给IOC容器管理,要么使用xml配置方式,要么使用注解,以下是注解配置以及xml配置的对比:
创建一个Bean:
public class Annotation {

    public String name;

    public String getName() {
        return name;
    }

    public void setName(String name) {
        this.name = name;
    }

    @Override
    public String toString() {
        return "Annotation [name=" + name + "]";
    }

}
将其使用xml的配置方式交给IOC容器管理:
<?xml version="1.0" encoding="UTF-8"?>
<beans xmlns="http://www.springframework.org/schema/beans"
    xmlns:xsi="http://www.w3.org/2001/XMLSchema-instance"
    xmlns:context="http://www.springframework.org/schema/context"
    xsi:schemaLocation="http://www.springframework.org/schema/beans http://www.springframework.org/schema/beans/spring-beans.xsd
        http://www.springframework.org/schema/context http://www.springframework.org/schema/context/spring-context-4.0.xsd">

    <bean id="annotation" class="com.spring.model.Annotation"></bean>
</beans>
测试代码:
public class Main {

    @SuppressWarnings("resource")
    public static void main(String[] args) throws SQLException {
        ApplicationContext ctx = new ClassPathXmlApplicationContext("applicationContext.xml");
        Annotation an = ctx.getBean(Annotation.class);
        System.out.println(an);
        //运行后输出:Annotation [name=null]
    }
}
接着我们使用注解的方式,将Bean交给IOC容器管理:
首先,开启注解扫描包
<?xml version="1.0" encoding="UTF-8"?>
<beans xmlns="http://www.springframework.org/schema/beans"
    xmlns:xsi="http://www.w3.org/2001/XMLSchema-instance"
    xmlns:context="http://www.springframework.org/schema/context"
    xsi:schemaLocation="http://www.springframework.org/schema/beans http://www.springframework.org/schema/beans/spring-beans.xsd
        http://www.springframework.org/schema/context http://www.springframework.org/schema/context/spring-context-4.0.xsd">
    <!-- 开启注解扫描包 -->
    <context:component-scan base-package="com.spring.model"></context:component-scan>
</beans>
其次,在Bean上添加注解:
@Component
public class Annotation {

    public String name;

    public String getName() {
        return name;
    }

    public void setName(String name) {
        this.name = name;
    }

    @Override
    public String toString() {
        return "Annotation [name=" + name + "]";
    }

}
测试程序:
public class Main {

    @SuppressWarnings("resource")
    public static void main(String[] args) throws SQLException {
        ApplicationContext ctx = new ClassPathXmlApplicationContext("applicationContext.xml");
        Annotation an = ctx.getBean(Annotation.class);
        System.out.println(an);
        //运行后输出:Annotation [name=null]
    }
}
总结:
使用注解的方式,相当于Bean被配置到IOC容器中,不同的是使用注解的方式需要开启注解扫描的包。
2.组件扫描
- @Component: 基本注解, 标识了一个受 Spring 管理的组件
- @Respository: 标识持久层组件
- @Service: 标识服务层(业务层)组件
- @Controller: 标识表现层组件
- 使用非限定类名, 第一个字母小写,例如Annotation这个Bean添加上注解,那么默认生成的Bean id为annotation,我们就可以通过getBean("annotation")来获取这个Bean了;
- 也可以在注解中通过 value 属性值标识组件的名称,例如Annotation这个Bean上添加注解并指定名称,如@Component("anno"),,我们就可以通过getBean("anno")来获取这个Bean了;
- 当需要扫描多个包时, 可以使用逗号分隔
- 如果仅希望扫描特定的类而非基包下的所有类,可使用 resource-pattern 属性过滤特定的类
<?xml version="1.0" encoding="UTF-8"?>
<beans xmlns="http://www.springframework.org/schema/beans"
    xmlns:xsi="http://www.w3.org/2001/XMLSchema-instance"
    xmlns:context="http://www.springframework.org/schema/context"
    xsi:schemaLocation="http://www.springframework.org/schema/beans http://www.springframework.org/schema/beans/spring-beans.xsd
        http://www.springframework.org/schema/context http://www.springframework.org/schema/context/spring-context-4.0.xsd">
    <!-- 开启注解扫描包 -->
    <context:component-scan base-package="com.spring" resource-pattern="model/Annotation.class"></context:component-scan>
</beans>
这里,我们基包为com.spring,resource-pattern配置为model包下的Annotation.class这个类,说明目前只需要扫描Annotation这个自定义Bean,以下是测试程序:
public class Main {

    @SuppressWarnings("resource")
    public static void main(String[] args) throws SQLException {
        ApplicationContext ctx = new ClassPathXmlApplicationContext("applicationContext.xml");
        Annotation an = ctx.getBean(Annotation.class);
        System.out.println(an);
        //运行后输出:Annotation [name=null]
    }
}
相反,如果配置不包含这个Bean,
<context:component-scan base-package="com.spring" resource-pattern="model/Hello.class"></context:component-scan>
那么会报错:No qualifying bean of type [com.spring.model.Annotation] is defined
同时,它支持*通配符,即某个包下的所有类:
<context:component-scan base-package="com.spring" resource-pattern="model/*.class"></context:component-scan>
这时,Bean又是可以被扫描到的:
public class Main {

    @SuppressWarnings("resource")
    public static void main(String[] args) throws SQLException {
        ApplicationContext ctx = new ClassPathXmlApplicationContext("applicationContext.xml");
        Annotation an = ctx.getBean(Annotation.class);
        System.out.println(an);
        //运行后输出:Annotation [name=null]
    }
}
④.<context:include-filter> 和 <context:exclude-filter> 子节点支持多种类型的过滤表达式
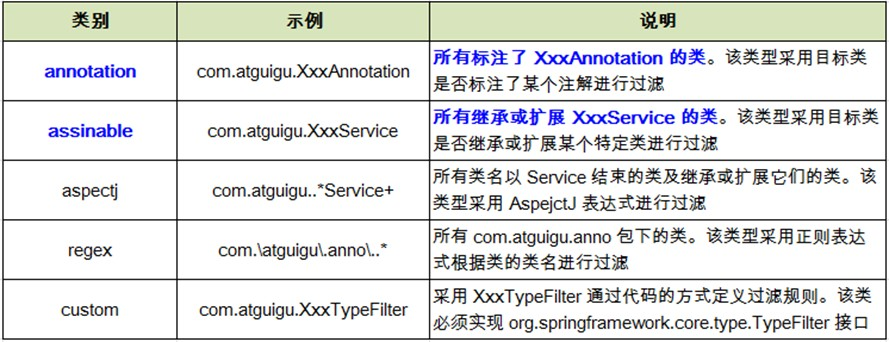
顾名思义,include是包含,exclude是不包含的意思,我们可以在<context:component-scan></context:component-scan>这个标签中配置有哪些是包含在扫描之内,有哪些是不被扫描;
另外可以指定要包含扫描的特定的注解和不被扫描的特定的注解以及包含要扫描的类和不被扫描的类,常用的两个属性为:annotation,表示注解,assinable表示特定的类
以下是案例:
===>针对特定的注解进行配置
首先,Bean还是使用上方的那个Annotation Bean,并且标注@Component注解,我们针对特定的注解来配置:
<!-- 开启注解扫描包 -->
<context:component-scan base-package="com.spring" resource-pattern="model/*.class">
  <!-- 表示不扫描包含Component的注解 -->
   <context:exclude-filter type="annotation" expression="org.springframework.stereotype.Component"/>
</context:component-scan>
测试程序:
public class Main {

    @SuppressWarnings("resource")
    public static void main(String[] args) throws SQLException {
        ApplicationContext ctx = new ClassPathXmlApplicationContext("applicationContext.xml");
        Annotation an = (Annotation) ctx.getBean(Annotation.class);
        System.out.println(an);
        //运行后输出:No qualifying bean of type [com.spring.model.Annotation] is defined
    }
}
<!-- 开启注解扫描包 -->
    <context:component-scan base-package="com.spring" resource-pattern="model/*.class">
        <!-- 表示不扫描包含Component的注解 -->
        <!-- <context:exclude-filter type="annotation" expression="org.springframework.stereotype.Component"/> -->
        <!-- 表示扫描包含Component的注解 -->
        <context:include-filter type="annotation" expression="org.springframework.stereotype.Component"/>
    </context:component-scan>
测试程序:
public class Main {

    @SuppressWarnings("resource")
    public static void main(String[] args) throws SQLException {
        ApplicationContext ctx = new ClassPathXmlApplicationContext("applicationContext.xml");
        Annotation an = (Annotation) ctx.getBean(Annotation.class);
        System.out.println(an);
        //运行后输出:Annotation [name=null]
    }
}
===>针对特定的类进行配置:
<!-- 开启注解扫描包 -->
<context:component-scan base-package="com.spring" resource-pattern="model/*.class">
  <!-- 不扫描Annotation这个类 -->
  <context:exclude-filter type="assignable" expression="com.spring.model.Annotation"/>
</context:component-scan>
测试程序:
public class Main {

    @SuppressWarnings("resource")
    public static void main(String[] args) throws SQLException {
        ApplicationContext ctx = new ClassPathXmlApplicationContext("applicationContext.xml");
        Annotation an = (Annotation) ctx.getBean(Annotation.class);
        System.out.println(an);
        //运行后输出:No qualifying bean of type [com.spring.model.Annotation] is defined
    }
}
<!-- 开启注解扫描包 -->
    <context:component-scan base-package="com.spring" resource-pattern="model/*.class">
        <!-- 扫描Annotation这个类 -->
        <context:include-filter type="assignable" expression="com.spring.model.Annotation"/>
    </context:component-scan>
测试程序:
public class Main {

    @SuppressWarnings("resource")
    public static void main(String[] args) throws SQLException {
        ApplicationContext ctx = new ClassPathXmlApplicationContext("applicationContext.xml");
        Annotation an = (Annotation) ctx.getBean(Annotation.class);
        System.out.println(an);
        //运行后输出:Annotation [name=null]
    }
}
注意:如果type="assignable",并且 expression配置的是接口或者类,那么该接口下的所有实现类或者该类下的所有子类都被/不被扫描。
3.使用@autowire自动装配Bean
说明:
构造器, 普通字段(即使是非 public),一切具有参数的方法都可以应用@Authwired 注解;
默认情况下, 所有使用 @Autowired 注解的属性都需要被设置(被IOC管理),当 Spring 找不到匹配的 Bean 装配属性时,会抛出异常,若某一属性允许不被设置, 可以设置 @Autowired 注解的 required 属性为 false;
默认情况下, 当 IOC 容器里存在多个类型兼容的 Bean 时(例如一个接口有多个实现类), 通过类型的自动装配将无法工作,此时可以在 @Qualifier 注解里提供 Bean 的名称, Spring 允许对方法的入参标注 @Qualifiter 已指定注入 Bean 的名称;
@Controller
public class UserController {

    @Autowired
    private UserService userService;

    public void controller() {
        System.out.println("这是controller,准备调用service...");
        userService.service();
    }
}
public interface UserService {

    public void service();
}
@Service
public class UserServiceImpl implements UserService{

    @Override
    public void service() {
        System.out.println("这是service");
    }

}
注意:被引用的Bean上都添加了@Autowire注解,表示在当前Bean中引入这个Bean
接着,配置IOC容器注解扫描包:
<?xml version="1.0" encoding="UTF-8"?>
<beans xmlns="http://www.springframework.org/schema/beans"
    xmlns:xsi="http://www.w3.org/2001/XMLSchema-instance"
    xmlns:context="http://www.springframework.org/schema/context"
    xsi:schemaLocation="http://www.springframework.org/schema/beans http://www.springframework.org/schema/beans/spring-beans.xsd
        http://www.springframework.org/schema/context http://www.springframework.org/schema/context/spring-context-4.0.xsd">

    <!-- 开启注解扫描包 -->
    <context:component-scan base-package="com.spring"/>
</beans>
最后,是测试方法:
public class Main {

    @SuppressWarnings("resource")
    public static void main(String[] args) throws SQLException {
        ApplicationContext ctx = new ClassPathXmlApplicationContext("applicationContext.xml");
        UserController userController = (UserController) ctx.getBean("userController");
        userController.controller();
        /**
         * 四月 07, 2018 8:31:51 上午 org.springframework.context.support.AbstractApplicationContext prepareRefresh
         *信息: Refreshing org.springframework.context.support.ClassPathXmlApplicationContext@c4437c4: startup date [Sat Apr 07 08:31:51 GMT+08:00 2018]; root of context hierarchy
         *四月 07, 2018 8:31:51 上午 org.springframework.beans.factory.xml.XmlBeanDefinitionReader loadBeanDefinitions
         *信息: Loading XML bean definitions from class path resource [applicationContext.xml]
         *这是controller,准备调用service...
         *这是service
         */
    }
}
我们在创建一个UserService实现类,即UserLoggingServiceImpl:
@Service
public class UserLoggingServiceImpl implements UserService{

    @Override
    public void service() {
        System.out.println("这是UserLoggingServiceImpl...");
    }

}
再次运行测试程序:
public class Main {

    @SuppressWarnings("resource")
    public static void main(String[] args) throws SQLException {
        ApplicationContext ctx = new ClassPathXmlApplicationContext("applicationContext.xml");
        UserController userController = (UserController) ctx.getBean("userController");
        userController.controller();
        /**
         * Error creating bean with name 'userController': Injection of autowired dependencies failed;
         * nested exception is org.springframework.beans.factory.BeanCreationException: Could not autowire field:
         * private com.spring.service.UserService com.spring.controller.UserController.userService;
         * nested exception is org.springframework.beans.factory.NoUniqueBeanDefinitionException:
         * No qualifying bean of type [com.spring.service.UserService] is defined:
         * expected single matching bean but found 2: userLoggingServiceImpl,userServiceImpl
         */
    }
}
意思是UserController引入UserService后,由于UserService有两个实现类,且这两个实现类都被IOC管理,不知道该注入哪个Bean!
我们尝试着在引入UserService时,使用@Qualifiter来跟UserController说明该注入哪个Bean:
@Controller
public class UserController {

    @Autowired
    @Qualifier("userServiceImpl")
    private UserService userService;

    public void controller() {
        System.out.println("这是controller,准备调用service...");
        userService.service();
    }
}
再次运行测试程序:
public class Main {

    @SuppressWarnings("resource")
    public static void main(String[] args) throws SQLException {
        ApplicationContext ctx = new ClassPathXmlApplicationContext("applicationContext.xml");
        UserController userController = (UserController) ctx.getBean("userController");
        userController.controller();
        /**
         * 这是controller,准备调用service...
         * 这是service
         */
    }
}
- Spring 还支持 @Resource 和 @Inject 注解,这两个注解和 @Autowired 注解的功用类似
- @Resource 注解要求提供一个 Bean 名称的属性,若该属性为空,则自动采用标注处的变量或方法名作为 Bean 的名称
- @Inject 和 @Autowired 注解是按类型匹配注入的 Bean, 但没有 reqired 属性
- 建议使用 @Autowired 注解
总结:
1.对于组件扫描,有以下组件:
- @Component: 基本注解, 标识了一个受 Spring 管理的组件
- @Respository: 标识持久层组件
- @Service: 标识服务层(业务层)组件
- @Controller: 标识表现层组件
虽然这里都说明了标识的位置,比如Controller标识在web层,但是这并不是强制要求,而是建议最好这么做,开发中达成一致不至于导致每个人有自己的一套标注而导致混乱;
2.组件扫描注解,例如@Service可以指定参数,例如@Service("userService"),那么可以通过getBean("userService")来获得Bean;
3.当某个Bean有多个实现类时,spring不知道该注入哪个实现类时,可以使用@qualifier指定注入的Bean;
4.开发中,注解扫描被大量运用,必须掌握;
5.配置注解扫描包,在整合web框架的时候经常用到include和exclude,后续整合springmvc时会详细说明
6.Bean的配置有很多内容,这里只是列出开发中最常用的几点,有时间或有兴趣的可以多多去研究和运用,相信会有更多的收获。