本章内容
Spring Bean定义
Spring Bean作用域
Spring Bean生命周期
Spring Bean继承
Spring Bean定义
概念:
-
Spring IoC是一个容器,生产和管理Bean
特点:
需要告诉容器:
-
需要哪些
Bean -
哪种方式装配
Bean
Spring配置文件的格式:
-
Properties:以键值对的形式存在,使用简单的属性配置 -
Xml:树形结构,使用大型项目
Xml的根元素是<beans>包含多个子元素<bean>每一个<bean>元素都定义了一个Bean,并描述了该Bean如何被装配到Spring容器
<bean>元素包含的属性:
| 属性名称 | 描述 |
|---|---|
| id | Bean的唯一标识符,定义了Bean。id的值必须以字母开始,可以使用字母、数字、下划线等符号。 |
| name | name 属性中可以为 Bean 指定多个名称,每个名称之间用逗号或分号隔开。Spring 容器可以通过 name 属性配置和管理容器中的 Bean。 |
| class | 该属性指定了 Bean 的具体实现类,是一个完整的类名。 |
| scope | 用于设定 Bean 实例的作用域,属性值可以为 singleton(单例)、prototype(原型)、request、session 和 global Session。其默认值是 singleton |
| constructor-arg | <bean>元素的子元素,可以使用此元素传入构造参数进行实例化。该元素的 index 属性指定构造参数的序号(从 0 开始),type 属性指定构造参数的类型 |
| property | <bean>元素的子元素,用于调用 Bean 实例中的 setter 方法来属性赋值,从而完成依赖注入。该元素的 name 属性用于指定 Bean 实例中相应的属性名 |
| ref | <property> 和 <constructor-arg> 等元素的子元索,该元素中的 bean 属性用于指定对某个 Bean 实例的引用 |
| value | <property> 和 <constractor-arg> 等元素的子元素,用于直接指定一个常量值 |
| list | 用于封装 List 或数组类型的依赖注入 |
| set | 用于封装 Set 类型的依赖注入 |
| map | 用于封装 Map 类型的依赖注入 |
| entry | <map> 元素的子元素,用于设置一个键值对。其 key 属性指定字符串类型的键值,ref 或 value 子元素指定其值 |
| init-method | 容器加载 Bean 时调用该方法,类似于 Servlet 中的 init() 方法 |
| destroy-method | 容器删除 Bean 时调用该方法,类似于 Servlet 中的 destroy() 方法。该方法只在 scope=singleton 时有效 |
| lazy-init | 懒加载,值为 true,容器在首次请求时才会创建 Bean 实例;值为 false,容器在启动时创建 Bean 实例。该方法只在 scope=singleton 时有效 |
Spring Bean作用域
Spring Bean作用域的种类:
-
singleton:默认值、单例模式。在Spring容器中只有一个Bean实例,以单例的方式存在 -
prototype:原型模式,每次通过Spring容器获取Bean时,容器都会创建一个Bean实例 -
request:每次Http请求容器都会创建一个Bean实例 -
session:同一个Http Session共享一个Bean实例。不同的Session使用不同的Bean实例。仅在当前的Http Session内有效 -
application:同一个Web应用共享一个Bean实例,在当前的ServletContext内有效 -
websocket:在整个WebSocket中有效
request、session、application、websocket 和 global Session 作用域只能在 Web 环境下使用,如果使用 ClassPathXmlApplicationContext 加载这些作用域中的任意一个的 Bean,就会抛出异常。
java.lang.IllegalStateException: No Scope registered for scope name 'xxx'
常用的作用域:
singleton:
特点:
-
当
Bean作用域为singleton时,Spring容器中只会存在一个共享的Bean实例。 -
存储在高速缓存中
-
并且所有对
Bean的请求,只要id与该Bean定义相匹配,都会返回该缓存对象
使用方法:
配置文件中使用scope属性设置值:
<bean id="..." class="..." scope="singleton" />
测试属性scope:
步骤:
-
在
com.junkingboy包下创建HelloWorld和MainApp类 -
在
resources包下创建Beans.xml文件 -
运行项目
HelloWorld:
package com.junkingboy;
/**
* @description:Spring的测试类
* @data: 2021/11/15 11:11
* @author: Lucifer
*/
public class HelloWorld {
private String message;
/* 提供get和set方法 */
public String getMessage() {
String result = "message :" + message;
System.out.println(result);
return result;
}
public void setMessage(String message) {
this.message = message;
}
}
MainApp:
package com.junkingboy;
import org.springframework.context.ApplicationContext;
import org.springframework.context.support.ClassPathXmlApplicationContext;
/**
* @description:获取Spring当中的Bean.xml配置文件下的类和属性信息
* @data: 2021/11/15 11:20
* @author: Lucifer
*/
public class MainApp {
public static void main(String[] args) {
ApplicationContext context = new ClassPathXmlApplicationContext("Beans.xml");
HelloWorld objA = (HelloWorld) context.getBean("helloWorld");
objA.setMessage("对象A!");
objA.getMessage();
HelloWorld objB = (HelloWorld) context.getBean("helloWorld");
objB.getMessage();
}
}
Beans.xml:
两次输出内容相同,说明 Spring 容器只创建了一个 HelloWorld 类的实例。由于 Spring 容器默认作用域是 singleton,所以如果省略 scope 属性,其输出结果也会是一个实例。
prototype:
特点:
-
Spring容器会在每次请求该Bean时都创建一个新的Bean实例 -
prototype作用域适用于需要保持会话状态的Bean(如Struts2和Action类)
使用方法:
<bean id="..." class="..." scope="prototype"/>
在上诉基础上修改scope属性值:
两次输出的内容并不相同,说明在 prototype 作用域下,Spring 容器创建了两个不同的 HelloWorld 实例
Spring Bean生命周期
Spring Bean的生命周期和Java Bean的生命周期不同之处:
Java Bean:
-
使用关键字
new实例化Bean,当不需要该Bean时由Java的垃圾回收机制进行自动回收
Spring Bean:
-
Bean的定义--->Bean的初始化--->Bean的使用--->Bean的销毁
不同作用域Spring Bean的生命周期也不同:
-
singleton作用域:Spring能够精确地知道该Bean何时被创建、何时初始化完成、何时被销毁 -
prototype作用域:Spring只负责创建,创建完成后就交给客户端代码管理。Spring容器不再跟踪其生命周期
Spring Bean生命周期执行流程:
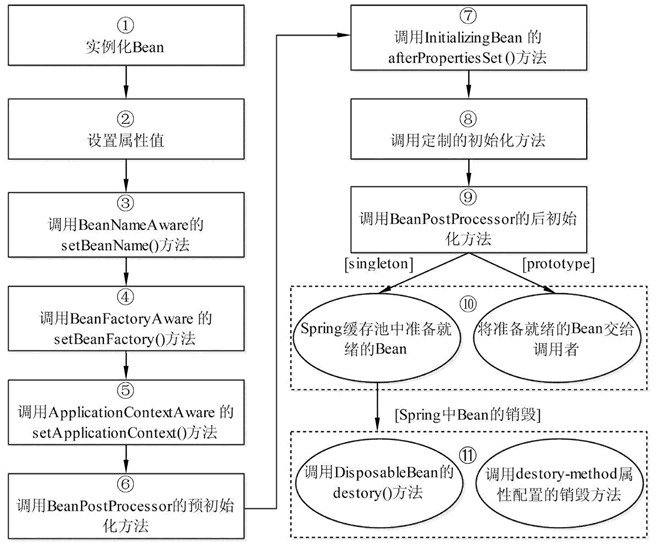
注意:
-
此图的箭头不是依次调用的关系,而是一个
if关系
下面详细阐述从第二步--->第八步:--->这里都是if的关系不是依次调用的关系
第三步:如果Bean实现了BeanNameAware接口,Spring调用Bean的setBeanName()方法传入当前Bean的id值
第三步:如果Bean实现了BeanFactoryAware接口,Spring调用setBeanFactory()方法传入当前工厂实例的引用
第四步:如果Bean实现了ApplicationContextAware接口,Spring调用setApplicationContext()方法传入当前ApplicationContext实例的引用
第五步:如果Bean实现了InitializingBean接口,Spring调用该接口的预初始化方法afterPropertiesSet()方法
定制初始化方法:
第一步:配置文件中通过init-method属性指定初始化方法,调用该初始化方法
第二步:BeanPostProcessor和Bean关联,Spring调用该接口的初始化方法postProcessAfterInitialization(),Bean可以被应用系统使用
如果Bean实现了BeanPostProcessor接口,Spring调用该接口的预初始化方法postProcessBeforeInitialzation()对 Bean进行加工操作。Spring的AOP就是这样实现的
Spring后置处理器--->BeanPostProcessor接口
作用:
-
自定义调用初始化前后执行的操作方法
BeanPostProcessor接口下定义了两个方法:
-
postProcessBeforeIntialization在Bean实例化、依赖注入后、初始化前调用 -
postProcessAfterInitialization在Bean实例化、依赖注入、初始化都完成后调用
多个后置处理器:
-
Spring容器根据后置处理器定义顺序依次调用 -
通过实现
Ordered接口的getOrder方法指定后置处理器的执行顺序。返回整数,默认值为0。值越大优先级越低
示例:
-
重构
HelloWorld、MainApp类,新添InitHelloWorld、InitHelloWorld2类
HelloWorld:
package com.junkingboy;

/**
 * @description:Spring的测试类
 * @data: 2021/11/15 11:11
 * @author: Lucifer
 */
public class HelloWorld {
    private String message;

    /* 定义get和set方法 */
    public String getMessage() {
        return message;
    }

    public void setMessage(String message) {
        this.message = message;
    }

    /* 提供初始化和销毁bean的方法 */
    public void init() {
        System.out.println("Bean正在初始化!");
    }

    public void destroy() {
        System.out.println("Bean将要被销毁!");
    }
}
InitHelloWorld:
package com.junkingboy;

import org.springframework.beans.BeansException;
import org.springframework.beans.factory.config.BeanPostProcessor;
import org.springframework.core.Ordered;

/**
 * @description:一个新增的类,实现BeanPostProcessor和Order接口
 * @data: 2021/11/17 10:20
 * @author: Lucifer
 */
public class InitHelloWorld implements BeanPostProcessor, Ordered {
    @Override
    public Object postProcessBeforeInitialization(Object bean, String beanName) throws BeansException {
        System.out.println("A Before :" + beanName);
        return bean;
    }

    @Override
    public Object postProcessAfterInitialization(Object bean, String beanName) throws BeansException {
        System.out.println("A After" + beanName);
        return bean;
    }

    @Override
    public int getOrder() {
        return 5;
    }
}
/*
注意:
BeanPostProcessor接口当中定义的方法返回值不能为空。
如果为空会报空指针异常或者getBean()方法获取不到实例对象。
原因:
后置处理器从Spring IoC 容器中取出 Bean 实例对象后没有再次放回到 IoC 容器中。
 */
InitHelloWorld2:
package com.junkingboy;

import org.springframework.beans.factory.config.BeanPostProcessor;
import org.springframework.core.Ordered;

/**
 * @description:新增的初始化类,实现BeanPostProcessor和Ordered接口
 * @data: 2021/11/17 10:32
 * @author: Lucifer
 */
public class InitHelloWorld2 implements BeanPostProcessor, Ordered {
    @Override
    public Object postProcessBeforeInitialization(Object bean, String beanName) {
        System.out.println("B Before :" + beanName);
        return bean;
    }

    @Override
    public Object postProcessAfterInitialization(Object bean, String beanName) {
        System.out.println("B After :" + beanName);
        return bean;
    }

    @Override
    public int getOrder() {
        return 0;
    }
}
Bean.xml:
<?xml version="1.0" encoding="UTF-8" ?>
<beans xmlns="http://www.springframework.org/schema/beans"
       xmlns:xsi="http://www.w3.org/2001/XMLSchema-instance"
       xsi:schemaLocation="http://www.springframework.org/schema/beans
   http://www.springframework.org/schema/beans/spring-beans-3.0.xsd">

    <!-- 针对新构建的HelloWorld以及新添加进来的类进行bean.xml文件的配置 -->
    <bean id="helloWorld" class="com.junkingboy.HelloWorld"
          init-method="init" destroy-method="destroy">
        <!-- 定义类当中的属性的值 -->
        <property name="message" value="New World!" />
    </bean>

    <!-- 注册处理器 -->
    <bean class="com.junkingboy.InitHelloWorld" />
    <bean class="com.junkingboy.InitHelloWorld2" />
</beans>
MainApp:
package com.junkingboy;

import org.springframework.context.support.AbstractApplicationContext;
import org.springframework.context.support.ClassPathXmlApplicationContext;

/**
 * @description:获取Spring当中的Bean.xml配置文件下的类和属性信息
 * @data: 2021/11/15 11:20
 * @author: Lucifer
 */
public class MainApp {
    public static void main(String[] args) {
        AbstractApplicationContext context = new ClassPathXmlApplicationContext("Beans.xml");
        HelloWorld objA = (HelloWorld) context.getBean("helloWorld");
        objA.getMessage();
        context.registerShutdownHook();
    }
}
结论:
-
从运行结果上看,
postProcessBeforeInitialization方法实在Spring的Bean初始化之前运行的 -
postProcessAfterInitialization是在Spring的Bean初始化之后运行的 -
由于
getOrder方法返回值越大,优先级越低,所以InitHelloWorld2先执行
指定销毁方式:--->默认的scope或者设置其值为singleton
第一步:Bean实现了DisposableBean接口,Spring调用destory()方法销毁Bean
如果配置文件中通过destory-method属性制定了Bean的销毁方法,Spring将调用制定的方法对Bean进行销毁
Spring官方提供了 3 种方法实现初始化回调和销毁回调:
-
实现
InitializingBean和DisposableBean接口 -
在
Xml中配置init-method和destory-method -
使用
@PostConstruct和@PreDestory注解
Bean中多种生命周期回调方法的优先级为:
注解--->接口--->XML
接口和注解会让POJO类和Spring框架紧耦合。不建议使用
初始化回调:
-
使用接口
/*
org.springframework.beans.factory.DisposableBean接口
*/
void destroy() throws Exception;
可以实现以上接口,在destory()方法内指定Bean初始化后需要执行的操作:
<bean id="..." class="..." />
package com.bean;

import org.springframework.beans.factory.InitializingBean;

/**
 * @description:一个Spring的Bean类,通过Spring框架来实例化该类
 * @data: 2021/11/16 15:12
 * @author: Lucifer
 */
public class User implements InitializingBean {
    @Override
    public void afterPropertiesSet() {
        try {
            System.out.println("接口调用:InitializingBean, 方法:afterPropertiesSet,无参数");
        }catch (Exception e) {
            e.printStackTrace();
        }
    }
}
-
配置
XML--->配置init-method属性
<?xml version="1.0" encoding="UTF-8" ?>
<beans xmlns="http://www.springframework.org/schema/beans"
       xmlns:xsi="http://www.w3.org/2001/XMLSchema-instance"
       xsi:schemaLocation="http://www.springframework.org/schema/beans
   http://www.springframework.org/schema/beans/spring-beans-3.0.xsd">
    <!-- 设置init-method指定的初始化方法对User类下的方法进行初始化 -->
    <bean id="init" class="com.bean.User" init-method="init" />
</beans>
对应的init()方法:
package com.bean;

import org.springframework.beans.factory.InitializingBean;

/**
 * @description:一个Spring的Bean类,通过Spring框架来实例化该类
 * @data: 2021/11/16 15:12
 * @author: Lucifer
 */
public class User {
    public void init() {
        System.out.println("调用指定的初始化方法:init");
    }
}
-
使用注解
使用注解初始化Bean:
package com.bean;

import javax.annotation.PostConstruct;

/**
 * @description:用于举例的JavaBean类
 * @data: 2021/11/16 15:33
 * @author: Lucifer
 */
public class ExampleBean {
    @PostConstruct
    public void init() {
        System.out.println("@PostConstruct注解指定的初始化方法:init");
    }
}
销毁回调:
-
使用接口
/*
org.springframework.beans.factory.DisposableBean接口
*/
void destroy() throws Exception;
实现以上接口,在destory()方法内指定Bean初始化后需要执行的操作:
<bean id="..." class="..." />
package com.bean;

import org.springframework.beans.factory.InitializingBean;

/**
 * @description:一个Spring的Bean类,通过Spring框架来实例化该类
 * @data: 2021/11/16 15:12
 * @author: Lucifer
 */
public class User implements InitializingBean {
    @Override
    public void afterPropertiesSet() {
        try {
            System.out.println("接口调用:InitializingBean, 方法:afterPropertiesSet,无参数");
        }catch (Exception e) {
            e.printStackTrace();
        }
    }
}
-
配置
XML--->配置destory-method属性
<?xml version="1.0" encoding="UTF-8" ?>
<beans xmlns="http://www.springframework.org/schema/beans"
       xmlns:xsi="http://www.w3.org/2001/XMLSchema-instance"
       xsi:schemaLocation="http://www.springframework.org/schema/beans
   http://www.springframework.org/schema/beans/spring-beans-3.0.xsd">
    <!-- 设置destroy-method指定需要销毁的Spring Bean对象使用的销毁方法 -->
    <bean id="destroy" class="com.bean.ExampleBean" destroy-method="init" />
</beans>
-
使用注解
package com.bean;

import javax.annotation.PostConstruct;
import javax.annotation.PreDestroy;

/**
 * @description:用于举例的JavaBean类
 * @data: 2021/11/16 15:33
 * @author: Lucifer
 */
public class ExampleBean {
    @PreDestroy
    public void destroy() {
        System.out.println("@PreDestroy注解指定的初始化方法:destroy");
    }
}
示例:
-
使用
XML的方式初始化和销毁Bean
重构HelloWorld类:
package com.junkingboy;

/**
 * @description:Spring的测试类
 * @data: 2021/11/15 11:11
 * @author: Lucifer
 */
public class HelloWorld {
    private String message;

    /* 提供get和set方法 */
    public String getMessage() {
        String result = "message :" + message;
        System.out.println(result);
        return result;
    }

    /* 提供初始化和销毁的方法 */
    public void init() {
        System.out.println("Bean正在初始化!");
    }

    public void destroy() {
        System.out.println("Bean将被销毁!");
    }

    public void setMessage(String message) {
        this.message = message;
    }
}
在MainApp类中使用AbstractApplicationContext类的registerShutdownHook()方法,确保开关机正常并且调用初始化和销毁方法
package com.junkingboy;

import org.springframework.context.support.ClassPathXmlApplicationContext;
import org.springframework.context.support.AbstractApplicationContext;

/**
 * @description:获取Spring当中的Bean.xml配置文件下的类和属性信息
 * @data: 2021/11/15 11:20
 * @author: Lucifer
 */
public class MainApp {
    public static void main(String[] args) {
        AbstractApplicationContext context = new ClassPathXmlApplicationContext("Beans.xml");
        HelloWorld objA = (HelloWorld) context.getBean("helloWorld");
        objA.getMessage();
        context.registerShutdownHook();
    }
}
修改Beans.xml配置:
<?xml version="1.0" encoding="UTF-8" ?>
<beans xmlns="http://www.springframework.org/schema/beans"
       xmlns:xsi="http://www.w3.org/2001/XMLSchema-instance"
       xsi:schemaLocation="http://www.springframework.org/schema/beans
   http://www.springframework.org/schema/beans/spring-beans-3.0.xsd">

    <!-- 针对修改后的HelloWorld类的方法进行配置 -->
    <bean id="helloWorld" class="com.junkingboy.HelloWorld" scope="singleton" init-method="init" destroy-method="destroy">
        <property name="message" value="Hello New World!" />
    </bean>
</beans>
默认的初始化和销毁方法:
-
在根元素的属性中添加
default-init-method和default-destroy-method即可
<beans xmlns="http://www.springframework.org/schema/beans"
    xmlns:xsi="http://www.w3.org/2001/XMLSchema-instance"
    xsi:schemaLocation="http://www.springframework.org/schema/beans
   http://www.springframework.org/schema/beans/spring-beans-3.0.xsd"
    default-init-method="init"
    default-destroy-method="destroy">
    <bean id="..." class="...">
        ...
    </bean>
</beans>
Spring Bean继承
特点:
-
在
Spring当中Bean是可以继承的。 -
Bean定义可以包含很多配置信息,子Bean可以继承父Bean的配置数据。根据需要子Bean可以重写值或添加其他值
作用:
-
使得在
Java代码当中两个类不需要继承的关系,通过Spring框架实现两个类的继承关系 -
Spring Bean定义的继承和Java中的继承无关,可以将父Bean定义作为一个模板,其它子Bean从父Bean中继承所需要的配置
使用属性:
parent
示例:
-
重构
HelloWorld、MainApp类 -
新增
HelloChina类 -
通过
Spring下的Beans.xml文件让HelloChina类继承HelloWorld类并给他们的属性赋值
HelloWorld:
package com.junkingboy;

/**
 * @description:Spring的测试类
 * @data: 2021/11/15 11:11
 * @author: Lucifer
 */
public class HelloWorld {
    private String message1;
    private String message2;

    /* 提供get和set方法 */
    public String getMessage1() {
        return message1;
    }

    public String getMessage2() {
        return message2;
    }

    public void setMessage1(String message1) {
        System.out.println("World Message1 :"  + message1);
    }

    public void setMessage2(String message2) {
        System.out.println("World Message2 :" + message2);
    }
}
HelloChina:
package com.junkingboy;

/**
 * @description:新增的类,在SpringBean当中作为HelloWorld的子类
 * @data: 2021/11/16 18:31
 * @author: Lucifer
 */
public class HelloChina {
    private String message1;
    private String message2;
    private String message3;

    /* 提供get和set方法 */
    public String getMessage1() {
        return message1;
    }

    public String getMessage2() {
        return message2;
    }

    public String getMessage3() {
        return message3;
    }

    public void setMessage1(String message1) {
        System.out.println("China Message1 :" + message1);
    }

    public void setMessage2(String message2) {
        System.out.println("China Message2 :" + message2);
    }

    public void setMessage3(String message3) {
        System.out.println("China Message3 :" + message3);
    }
}
通过Beans.xml的parent属性将HelloChina定义为HelloWorld的子类:
<?xml version="1.0" encoding="UTF-8" ?>
<beans xmlns="http://www.springframework.org/schema/beans"
       xmlns:xsi="http://www.w3.org/2001/XMLSchema-instance"
       xsi:schemaLocation="http://www.springframework.org/schema/beans
   http://www.springframework.org/schema/beans/spring-beans-3.0.xsd">
    <!-- 使用parent属性将hellochina定义为helloworld的子类 -->
    <bean id="helloWorld" class="com.junkingboy.HelloWorld">
        <!-- 定义类当中的属性 -->
        <property name="message1" value="HelloWorld!" />
        <property name="message2" value="HelloWorld2!" />
    </bean>

    <bean id="helloChina" class="com.junkingboy.HelloChina" parent="helloWorld">
        <!-- 定义类当中的属性并且将类设置成helloWorld的子类 -->
        <property name="message1" value="HelloChinaNo1" />
        <property name="message3" value="HelloChinaNo3" />
    </bean>
</beans>
<!--
在该bean当中没有给message2属性赋值
-->
MainApp类:
package com.junkingboy;

import org.springframework.context.ApplicationContext;
import org.springframework.context.support.ClassPathXmlApplicationContext;
import org.springframework.context.support.AbstractApplicationContext;

/**
 * @description:获取Spring当中的Bean.xml配置文件下的类和属性信息
 * @data: 2021/11/15 11:20
 * @author: Lucifer
 */
public class MainApp {
    public static void main(String[] args) {
        ApplicationContext context = new ClassPathXmlApplicationContext("Beans.xml");
        HelloWorld objA = (HelloWorld) context.getBean("helloWorld");
        objA.getMessage1();
        objA.getMessage2();

        /* 创建子类对象(SpringBean定义的子类) */
        HelloChina objB = (HelloChina) context.getBean("helloChina");
        objB.getMessage1();
        objB.getMessage2();
        objB.getMessage3();
    }
}
结论:
-
结果当中由于在
Spring Bean定义了HelloChina继承HelloWorld。所以会将HelloWorld的message2的值传递给HelloChina的message2
Bean定义模板:
特点:
创建一个·Bean定义模板,该模板只能被继承,不能被实例化。创建Bean定义模板时,不用指定class属性,而是指定 abstarct="true"将该Bean定义为抽象Bean
<?xml version="1.0" encoding="UTF-8"?>
<beans xmlns="http://www.springframework.org/schema/beans"
    xmlns:xsi="http://www.w3.org/2001/XMLSchema-instance"
    xsi:schemaLocation="http://www.springframework.org/schema/beans
   http://www.springframework.org/schema/beans/spring-beans-3.0.xsd">
    <bean id="beanTeamplate" abstract="true">
        <property name="message1" value="Hello World!" />
        <property name="message2" value="Hello World2!" />
        <property name="message3" value="Hello World3!" />
    </bean>
    <bean id="helloChina" class="net.biancheng.HelloChina"
        parent="beanTeamplate">
        <property name="message1" value="Hello China!" />
        <property name="message3" value="Hello China!" />
    </bean>
</beans>