主要介绍:自定义数据、绑定数据库数据
前台代码:
 1 <div>
 2     <asp:ListBox ID="ListBox1" runat="server" Rows ="5" Width ="100px">
 3         <asp:ListItem>1</asp:ListItem>
 4         <asp:ListItem>2</asp:ListItem>
 5         <asp:ListItem>3</asp:ListItem>
 6         <asp:ListItem>4</asp:ListItem>
 7         <asp:ListItem>5</asp:ListItem>
 8         <asp:ListItem>6</asp:ListItem>
 9         <asp:ListItem>7</asp:ListItem>
10         <asp:ListItem>8</asp:ListItem>
11         <asp:ListItem>9</asp:ListItem>
12         <asp:ListItem>0</asp:ListItem>
13     </asp:ListBox><br /><br />
14     <asp:Button ID="Button1" runat="server" Text="Button" OnClick ="Button1_Click"/><br /><br />
15     <asp:Label ID="Label1" runat="server" Text=""></asp:Label>
16 </div>
*其中的
Rows:设置该属性以指定一次显示多少项。
Width:宽度。
Height:高度。
SelectionMode ="Multiple":可以选中多个。
SelectionMode ="Single":只能选一个。
其余属性,参见MSDN。
后台代码:
 1 /// <summary>
 2 /// Button1按钮的单击事件
 3 /// </summary>
 4 /// <param name="sender"></param>
 5 /// <param name="e"></param>
 6 protected void Button1_Click(object sender, EventArgs e)
 7 {
 8     string s = string.Empty;
 9
10     s = ListBox1.SelectedItem.Text;
11
12     this.Label1.Text = "您点选的是:" + s;
13 }
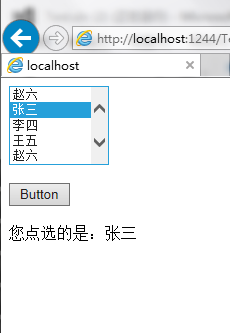
最终效果:
以上是自定义数据的ListBox控件。
--------------------------------------------------------------------
下面是绑定数据库数据的ListBox控件:
一:
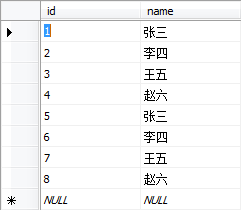
首先,先在数据库中建立一张表:
1 CREATE TABLE KK
2 (
3     id INT,
4     [name] VARCHAR(20),
5 )
然后插入数据:
1 INSERT INTO KK (id, [name]) VALUES (1, '张三')
2 INSERT INTO KK (id, [name]) VALUES (2, '李四')
3 INSERT INTO KK (id, [name]) VALUES (3, '王五')
4 INSERT INTO KK (id, [name]) VALUES (4, '赵六')
5 ·
6 ·
7 ·
8 ·
9 ·
这是最终建立的表:
二:
然后是前台代码(其中可以设置SelectionMode为多选):
1 <div>
2     <asp:ListBox ID="ListBox1" runat="server" Rows ="5" Width ="100px" ></asp:ListBox><br /><br />
3     <asp:Button ID="Button1" runat="server" Text="Button" OnClick ="Button1_Click"/><br /><br />
4     <asp:Label ID="Label1" runat="server" Text=""></asp:Label>
5 </div>
然后是后台代码:
web.config中数据库连接字符串:
1   <connectionStrings>
2     <add name="connectionString" connectionString="data source = (local); database = TEMP; integrated security = true"/>
3   </connectionStrings>
后台Page_Load中的代码:
 1 protected void Page_Load(object sender, EventArgs e)
 2 {
 3     if (!IsPostBack)
 4     /* 为什么判断IsPostBack:当你需要执行一些仅需要在页面第一次浏览时执行的事件
 5         * 比如页面初始化,数据绑定之类的操作时,需要将操作放在if(!IspostBack)里面,
 6         * 这样当你在点击页面中的按钮或者执行其他回发事件时,不贵再次初搜索始化或者
 7         * 重复绑定数据,提高了执行效率。
 8         */
 9     {
10         string connectionString = ConfigurationManager.ConnectionStrings["connectionString"].ConnectionString;
11
12         SqlConnection connection = new SqlConnection(connectionString);
13
14         connection.Open();
15
16         string sql = "SELECT * FROM KK";
17
18         SqlCommand cmd = new SqlCommand(sql, connection);
19
20         SqlDataReader sdr = cmd.ExecuteReader();
21
22         //任意给的字段名,只要是想显示在界面上的就行。其值给了:Text
23         this.ListBox1.DataTextField = "name";
24
25         //任意给得字段名,只要是想在后台看到前台看不到的数据就行。其值给了:Value
26         this.ListBox1.DataValueField = "id";//此字段可以去掉。value的值默认为Text的值。
27
28         this.ListBox1.DataSource = sdr;
29
30         this.ListBox1.DataBind();
31
32         sdr.Close();
33
34         connection.Close();
35     }
36 }
其中,检查网页是否会发很重要。if (!IsPostBack)。如果没有这个,将无法使用。
后台之中Button1(结果)按钮:
 1 /// <summary>
 2 /// Button1按钮的单击事件
 3 /// </summary>
 4 /// <param name="sender"></param>
 5 /// <param name="e"></param>
 6 protected void Button1_Click(object sender, EventArgs e)
 7 {
 8     string s = string.Empty;
 9
10     for (int i = 0; i < ListBox1.Items.Count; i++)
11     {
12         if (ListBox1.Items[i].Selected)
13         {
14             s += ListBox1.Items[i].Text + " ";
15         }
16     }
17
18     this.Label1.Text = "您点选的是:" + s;
19 }
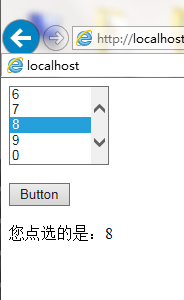
最终效果: