1.Menu菜单控件
Exp1:

Code:

<Window x:Class="菜单Menu.MainWindow"
        xmlns="http://schemas.microsoft.com/winfx/2006/xaml/presentation"
        xmlns:x="http://schemas.microsoft.com/winfx/2006/xaml"
        Title="MainWindow" Height="350" Width="525">
    <Grid>
        <StackPanel>
            <Menu HorizontalAlignment="Left" Height="19" VerticalAlignment="Top" Width="167"><!--Menu控件下,每个子菜单都为MenuItem,Header可以设置显示的内容-->
                <MenuItem Header="文件">
                    <MenuItem Header="打开">
                        <MenuItem Header="1.txt"></MenuItem>
                        <MenuItem Header="2.txt"></MenuItem>
                        <MenuItem Header="3.txt"></MenuItem>
                    </MenuItem>
                    <MenuItem Header="退出"></MenuItem>
                </MenuItem>
                <MenuItem Header="编辑">
                    <MenuItem Header="复制"></MenuItem>
                    <MenuItem Header="粘贴"></MenuItem>
                </MenuItem>
            </Menu>
        </StackPanel>
    </Grid>
</Window>
Exp2:

Code:

<Window x:Class="Menu菜单.MainWindow"
        xmlns="http://schemas.microsoft.com/winfx/2006/xaml/presentation"
        xmlns:x="http://schemas.microsoft.com/winfx/2006/xaml"
        Title="MainWindow" Height="350" Width="525">
    <Grid>
        <DockPanel><!--使用DockPanel布局,可使控件向上、下、左或右靠-->
            <Menu DockPanel.Dock="Top"><!--使Menu向上靠-->
                <MenuItem Header="文件">
                    <MenuItem Name="menuItemFirst" Header="1.txt" Click="menuItemFirst_Click"></MenuItem><!--向子菜单添加一个单击事件-->
                    <MenuItem Header="2.txt"></MenuItem>
                    <MenuItem Header="3.txt"></MenuItem>
                </MenuItem>
                <MenuItem Header="编辑">
                    <MenuItem Header="复制"></MenuItem>
                    <MenuItem Header="粘贴"></MenuItem>
                </MenuItem>
            </Menu>
            <!--<TextBox TextWrapping="Wrap" DockPanel.Dock="Bottom"></TextBox>--><!--使TextBox向下靠-->
            <RichTextBox DockPanel.Dock="Bottom"></RichTextBox><!--使RichTextBox向下靠-->
        </DockPanel>
    </Grid>
</Window>

private void menuItemFirst_Click(object sender, RoutedEventArgs e)
 {
        MessageBox.Show("1.txt被点击了");
}
知识点:
1)Menu默认会有一个Margin属性值,如果想要按自己的方式显示,最好重新设置,或删除
2)Menu下的每个项都是MenuItem,其中,MenuItem下又可以设置MenuItem项,每个MenuItem项中,指定显示的文本,应该可用Header属性来设置
3)DockPanel布局(我自己解析为靠边布局,Dock为码头的意思)可以使控件向上(Top)、下(Bottom)、左(Lfet)或右(Right)四个方向之一靠,例如设置方式是:DockPanel.Dock = "Top"向上靠
3)可为Menu或MenuItem指定名字,设置属性为Name
2.ToolBar控件
Exp:

Code:

<Window x:Class="ToolBar控件.MainWindow"
        xmlns="http://schemas.microsoft.com/winfx/2006/xaml/presentation"
        xmlns:x="http://schemas.microsoft.com/winfx/2006/xaml"
        Title="MainWindow" Height="350" Width="525">
    <Grid>
        <DockPanel>
            <Menu DockPanel.Dock="Top"><!--Menu也是靠上靠,但如果大家都是往同一方向靠的话,就按顺序来定了-->
                <MenuItem Header="文件"></MenuItem>
                <MenuItem Header="编辑"></MenuItem>
            </Menu>
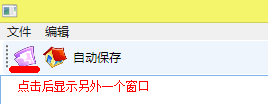
            <ToolBar DockPanel.Dock="Top"><!--工具条控件,一般把常用的都放到工具条上面,而且上面可以放置很多的其他控件,不过,有些控件放进去之后,样子会发生一些变化-->
                <!--<Button Content="保存"></Button>-->
                <!--可以通过设置Button的Content属性显示图片,这样工具条就不会显得单调了-->
                <Button Height="30"><!--设置Button的content属性有些特殊,可以不用Button.Content来设置,直接在Button标签下设置,但其他控件 ,就都要指定哪一个属性-->
                    <Image Source="images/2052.ico"></Image>
                </Button>
                <!--<Button Content="新建"></Button>-->
                <Button Height="30">
                    <Button.Content>
                        <Image Source="images/2063.ico"></Image>
                    </Button.Content>
                </Button>
                <CheckBox>自动保存</CheckBox>
            </ToolBar>
            <RichTextBox DockPanel.Dock="Bottom"></RichTextBox>
        </DockPanel>
    </Grid>
</Window>
知识点:
1)ToolBar控件中可以放置很多其他常用操作的控件,但有些控件放置到ToolBar里面后,样子可能会有些改变
2)使用DockPanel靠边布局的时候,如果出现有相同设置方向的情况时,就按控件添加的顺序来显示
3)Button控件的属性Content比较特殊,可以再不指明的情况下,直接设置Content属性的内容,而无需标明Button.Content,例如:
<Button>
<Image Source = ... />
<Button>
与
<Button>
<Button.Content>
<Image Source = ... />
</Button.Content>
<Button>
是一样的,不过对于其他控件,就要标明哪一个属性了
3.设置多窗口
Exp:


Main.XAML

<Window x:Class="ToolBar控件.MainWindow"
        xmlns="http://schemas.microsoft.com/winfx/2006/xaml/presentation"
        xmlns:x="http://schemas.microsoft.com/winfx/2006/xaml"
        WindowState="Maximized"
        Title="主窗口" Height="350" Width="525">
    <Grid>
        <DockPanel>
            <Menu DockPanel.Dock="Top"><!--Menu也是靠上靠,但如果大家都是往同一方向靠的话,就按顺序来定了-->
                <MenuItem Header="文件"></MenuItem>
                <MenuItem Header="编辑"></MenuItem>
            </Menu>
            <ToolBar DockPanel.Dock="Top"><!--工具条控件,一般把常用的都放到工具条上面,而且上面可以放置很多的其他控件,不过,有些控件放进去之后,样子会发生一些变化-->
                <!--<Button Content="保存"></Button>-->
                <!--可以通过设置Button的Content属性显示图片,这样工具条就不会显得单调了-->
                <Button Height="30" Click="Button_Click"><!--设置Button的content属性有些特殊,可以不用Button.Content来设置,直接在Button标签下设置,但其他控件 ,就都要指定哪一个属性-->
                    <Image Source="images/2052.ico"></Image>
                </Button>
                <!--<Button Content="新建"></Button>-->
                <Button Height="30">
                    <Button.Content>
                        <Image Source="images/2063.ico"></Image>
                    </Button.Content>
                </Button>
                <CheckBox>自动保存</CheckBox>
            </ToolBar>
            <!--<RichTextBox Name="richTextBox" DockPanel.Dock="Bottom"></RichTextBox>-->
            <TextBox Name="textBox" TextWrapping="Wrap" AcceptsReturn="True" DockPanel.Dock="Bottom"></TextBox>
            <!--AcceptsReturn设置可以支持回车换行,默认为false-->
        </DockPanel>
    </Grid>
</Window>
Main.XAML.cs

using System;
using System.Collections.Generic;
using System.Linq;
using System.Text;
using System.Windows;
using System.Windows.Controls;
using System.Windows.Data;
using System.Windows.Documents;
using System.Windows.Input;
using System.Windows.Media;
using System.Windows.Media.Imaging;
using System.Windows.Navigation;
using System.Windows.Shapes;

namespace ToolBar控件
{
    /// <summary>
    /// MainWindow.xaml 的交互逻辑
    /// </summary>
    public partial class MainWindow : Window
    {
        public MainWindow()
        {
            InitializeComponent();
        }

        private void Button_Click(object sender, RoutedEventArgs e)
        {
            AboutWindow aboutWindow = new AboutWindow();
            //aboutWindow.Txt = System.Windows.Markup.XamlWriter.Save(richTextBox.Document);
            //string s = System.Windows.Markup.XamlWriter.Save(richTextBox.Document).ToString();
            aboutWindow.Txt = textBox.Text;
            aboutWindow.ShowDialog();//打开窗口
        }
    }
}
About.XAML

<Window x:Class="ToolBar控件.AboutWindow"
        xmlns="http://schemas.microsoft.com/winfx/2006/xaml/presentation"
        xmlns:x="http://schemas.microsoft.com/winfx/2006/xaml"
        Title="关于" Height="300" Width="300" ResizeMode="NoResize" WindowStartupLocation="CenterScreen" Loaded="Window_Loaded"><!--Title修改窗口的标题为‘关于’,ResizeMode修改窗口的最小化、最大化,WindowStartupLocation窗口显示的初始位置-->
    <Grid>
        <TextBlock Name="textBlock" Text="第一个新建的子窗口"></TextBlock>
    </Grid>
</Window>
About.XAML.cs

using System;
using System.Collections.Generic;
using System.Linq;
using System.Text;
using System.Windows;
using System.Windows.Controls;
using System.Windows.Data;
using System.Windows.Documents;
using System.Windows.Input;
using System.Windows.Media;
using System.Windows.Media.Imaging;
using System.Windows.Shapes;

namespace ToolBar控件
{
    /// <summary>
    /// AboutWindow.xaml 的交互逻辑
    /// </summary>
    public partial class AboutWindow : Window
    {
        public string Txt { get; set; }
        public AboutWindow()
        {
            InitializeComponent();
        }

        private void Window_Loaded(object sender, RoutedEventArgs e)
        {
            textBlock.Text = Txt;
        }
    }
}
知识点:
1)WindowState设置窗体的初始状态(最大化,最小化)
Titile设置窗体的显示标题
ResizeMode设置窗体初始时的是否显示最大化、最小化(是否显示最大化、是否显示最小化)
WindowStartupLocation窗体初始时的显示位置(窗体居中,默认)


2.aboutWindow.ShowDialog() 打开窗口

3.如果把一个窗口A中的值传到另外一个窗口B,可以在B中设置属性,然后在A中定义B的对象后,直接调用即可
(无论是把主窗体的值传递给子窗体,还是把子窗体的值传递给主窗体,都可以运用设置属性的方法)


4.通过修改App.xaml文件,指定程序启动时哪一个窗体最先打开
...
StartupUri="MainWindow.xaml"
...

5.TextBox中通过设置属性AcceptsReturn,设置是否支持回车换行,默认是false

4.窗口间传值
1. 窗口键传值,可以通过设置属性来实现
2.如果窗口使用ShowDialog打开的,则给DialogResult赋值会自动关闭窗口,并且把DialogResult属性的通过ShowDialog方法的返回值返回


Code:
Main.XAML

<Window x:Class="窗口间传值.MainWindow"
        xmlns="http://schemas.microsoft.com/winfx/2006/xaml/presentation"
        xmlns:x="http://schemas.microsoft.com/winfx/2006/xaml"
        Title="主窗口" Height="350" Width="525">
    <Grid>
        <Button Name="btnTest" Content="窗口间传值" HorizontalAlignment="Left" Margin="100,65,0,0" VerticalAlignment="Top" Width="139" Click="btnTest_Click"/>

    </Grid>
</Window>
Main.XALM.cs

using System;
using System.Collections.Generic;
using System.Linq;
using System.Text;
using System.Windows;
using System.Windows.Controls;
using System.Windows.Data;
using System.Windows.Documents;
using System.Windows.Input;
using System.Windows.Media;
using System.Windows.Media.Imaging;
using System.Windows.Navigation;
using System.Windows.Shapes;

namespace 窗口间传值
{
    /// <summary>
    /// MainWindow.xaml 的交互逻辑
    /// </summary>
    public partial class MainWindow : Window
    {
        public MainWindow()
        {
            InitializeComponent();
        }

        private void btnTest_Click(object sender, RoutedEventArgs e)
        {
            InputWindow inputWindow = new InputWindow();
            bool? b = inputWindow.ShowDialog();
            if (b == null)
            {
                MessageBox.Show("没有输入值!");
            }
            else if (b == true)
            {
                MessageBox.Show("确定:" + inputWindow.InputValues);
            }
            else
            {
                MessageBox.Show("取消");
            }

        }
    }
}
InpoutWindow.XAML

<Window x:Class="窗口间传值.InputWindow"
        xmlns="http://schemas.microsoft.com/winfx/2006/xaml/presentation"
        xmlns:x="http://schemas.microsoft.com/winfx/2006/xaml"
        WindowStartupLocation="CenterScreen"
        ResizeMode="NoResize"
        Title="输入窗体" Height="150" Width="300">
    <Grid>
        <Grid>
            <Grid.RowDefinitions>
                <RowDefinition></RowDefinition>
                <RowDefinition></RowDefinition>
            </Grid.RowDefinitions>
            <Grid.ColumnDefinitions>
                <ColumnDefinition></ColumnDefinition>
                <ColumnDefinition></ColumnDefinition>
            </Grid.ColumnDefinitions>
            <TextBox Name="txtInput" Grid.ColumnSpan="2"></TextBox>
            <Button Name="btnOK" Content="确定" Grid.Row="1" Margin="10" Click="btnOK_Click"></Button>
            <Button Name="btnCancel" Content="取消" Grid.Row="1" Grid.Column="1" Margin="10" Click="btnCancel_Click"></Button>
        </Grid>
    </Grid>
</Window>
InputWindow.XAML.cs

using System;
using System.Collections.Generic;
using System.Linq;
using System.Text;
using System.Windows;
using System.Windows.Controls;
using System.Windows.Data;
using System.Windows.Documents;
using System.Windows.Input;
using System.Windows.Media;
using System.Windows.Media.Imaging;
using System.Windows.Shapes;

namespace 窗口间传值
{
    /// <summary>
    /// InputWindow.xaml 的交互逻辑
    /// </summary>
    public partial class InputWindow : Window
    {
        public string InputValues { get; set; }
        public InputWindow()
        {
            InitializeComponent();
        }

        private void btnOK_Click(object sender, RoutedEventArgs e)
        {
            InputValues = txtInput.Text;
            DialogResult = true;//如果窗口使用ShowDialog打开的,则给DialogResult赋值会自动关闭窗口,
                                //并且把DialogResult属性的通过ShowDialog方法的返回值返回
        }

        private void btnCancel_Click(object sender, RoutedEventArgs e)
        {
            DialogResult = false;
        }
    }
}
5.OpenFileDialog打开文件对话框
Code:

 private void Button_Click(object sender, RoutedEventArgs e)
        {
            //打开文件对话框
            OpenFileDialog ofd = new OpenFileDialog();//打开文件对话框
            //ofd.InitialDirectory设置默认打开的文件目录
            ofd.Filter = "文本文件|*.txt|图片文件|*.jpg;*.png;*.JPEG|所有文件|*.*";//设置过滤器,前两个为一组,以“|”问分割线,前一个是要显示的内容,后一个是文件的类型,如果文件的类型有多个时,可用“;”分隔
            //注意:Fileter属性的设置,应该是在ShowDialog()方法执行前才进行设置
            if (ofd.ShowDialog() == true)
            {
                string s = ofd.FileName;//打开的文件名
                MessageBox.Show("打开文件:" + s);
            }
            else
            {
                MessageBox.Show("取消");
            }
        }
知识点:
1)需引用命名空间:Microsoft.Win32;
2)ShowDialog()方法打开对话框
3)InitialDirectory属性设置默认打开的文件目录
4)Filter属性设置过滤器。设置过滤器时,前两个为一组,以“|”问分割线,前一个是要显示的内容,后一个是文件的类型,如果文件的类型有多个时,可用“;”分隔
注意:Fileter属性的设置,应该是在ShowDialog()方法执行前才进行设置
5)FileName为打开的文件名
6.SaveFileDialog保存文件对话框
Code:

  private void btnSaveFile_Click(object sender, RoutedEventArgs e)
        {
            //保存文件对话框
            SaveFileDialog sfd = new SaveFileDialog();
            sfd.Filter = "文本文件|*.txt|图片文件|*.jpg;*.png;*.JPEG|所有文件|*.*";
            if (sfd.ShowDialog() == true)
            {
                MessageBox.Show("保存文件" + sfd.SafeFileName);
            }
        }

private void btnShowImage_Click(object sender, RoutedEventArgs e)
        {
            OpenFileDialog ofd = new OpenFileDialog();
            ofd.Filter = "图片|*.jpg;*.png;*.JPEG";
            if (ofd.ShowDialog() == true)
            {
                string fileName = ofd.FileName;
                imageControl.Source = new BitmapImage(new Uri(fileName));//用代码设置Image控件的Source属性
            }
        }
知识点:
1)ShowDialog()方法显示保存文件对话框
2)Filter 属性设置过滤器
3)SafeFileName属性为保存文件名
4)用代码设置Image控件的Source属性: imageControl.Source = new BitmapImage(new Uri(fileName))
