A instanceof B 是判断 A 是否继承自B,是返回true, 否返回false
再精确点就是判断B 是否 再 A 的 原型链上,
什么是原型链,举个例子:
我们定义三个对象:
const grandFather = {
    name: 'liu',
    age: 80
},father = {
    age: 50
},son = {
    age: 18
};
怎么让这三个对象形成一种继承关系呢 ? 让father 和 son 继承 grandFather 的 name 属性
我们知道对象上有一个内部属性__proto__ , 该属性的属性值指向改对象的原型,
我们是否可以这样写:
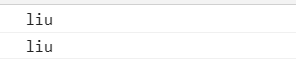
const grandFather = {
    name: 'liu',
    age: 80
},father = {
    age: 50,
    __proto__: grandFather
},son = {
    age: 18,
    __proto__: father
};
console.log(father.name);
console.log(son.name);
ok ,打印出:
原理就是如果对象本身没有查找的属性, 就会沿着原型链也就是__proto__属性往上找直到为null为止。
这就是原型链的概念。
但是__proto__前后加双下划线说明它本质是一个内部属性, 而不是一个正式的对外的API,只是由于浏览器广泛支持,才被加入了ES6,
所以只有浏览器必须部署这个属性,其他运行环境不一定要部署,因此,无论从语义的角度,还是从兼容性的角度,都最好不要使用这个属性,
而是使用Object.setPrototyleOf(写操作), Object.getPrototyleOf(读操作), Object.create(生成操作),
所以我们改成这样:
const grandFather = {
    name: 'liu',
    age: 80
},father = {
    age: 50,
},son = {
    age: 18,
};
Object.setPrototypeOf(father, grandFather);
Object.setPrototypeOf(son, father);
console.log(father.name);
console.log(son.name);
打印结果是一样的。
又或者这样:
const grandFather = {
        name: 'liu',
        age: 80
    },
    father = Object.create(grandFather),
    son = Object.create(father);
father.age = 50;
son.age = 18;
console.log(father.name);
console.log(son.name);
打印结果也是一样的。
原型链大家弄清楚了 我们就可以写一个instanceof 的 方法了:
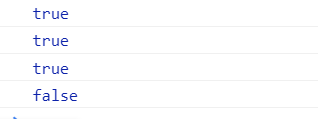
function instanceofMy (A, B) {
    const proto = Object.getPrototypeOf(A), prototype = B.prototype;
    if (proto === null || proto === undefined) {
        return false;
    } else if (proto === prototype) {
        return true;
    } else {
        return instanceofMy(Object.getPrototypeOf(proto), B);
    }
}
// 测试
console.log(instanceofMy({}, Object));
console.log(instanceofMy([], Array));
function Test() {}
let test = new Test();
console.log(instanceofMy(test, Test));
console.log(instanceofMy('', Array));
测试结果:
利用递归来沿着原型链往上查找, 有同学不想用递归,太耗费内存了,我们可以改成while循环:
function instanceofMy (A, B) {
    let proto = Object.getPrototypeOf(A), prototype = B.prototype;
    while (proto !== null && proto !== undefined) {
        if (proto === prototype) {
            return true;
        } else {
            proto = Object.getPrototypeOf(proto);
        }
    }
    return false;
}
proto = null 作为while循环的出口, 出来了就return false。
---------------------------------------------------------------------------分割线
实现绑定/派发自定义事件的事件类
有时候我们需要自定义一个事件并在特定的条件下手动触发该事件绑定的函数,
这个时候我们就需要这样一个事件类:
class Event {
    constructor() {
        // 存事件和回调函数的对象
        this.cache  = {};
    }
    // 绑定事件
    on (type, callback) {
        if (this.cache[type] && !this.cache[type].includes(callback)) {
            this.cache[type].push(callback);
        } else if (this.cache[type] && this.cache[type].includes(callback)) {
            return this;
        } else {
            this.cache[type] = [callback];
        }
        return this;
    }

    // 触发事件
    trigger(type, ...params) {
        if (this.cache[type]) {
            this.cache[type].forEach(fn => {
                fn(...params);
            })
        }
        return this;
    }

    // 解绑事件
    off(type, callback) {
        // 传了callback清除指定callback, 没传清空数组
        if (this.cache[type] && this.cache[type].includes(callback)) {
            this.cache[type].split(this.cache[type].findIndex(callback), 1);
        } else if (this.cache[type] && !callback) {
            this.cache[type] = [];
        }
        return this;
    }
}
const event = new Event();

// 测试
function start(str) {
    console.log(str + ' start');
}
function end(str) {
    console.log(str + ' end');
}
event.on('start', start)
    .on('start', end)
    .trigger('start', 'Hello world')
    .off('start')
    ;
我们先给一个自定start事件绑定两个函数,然后传参触发, 最后解绑
打印结果:

这样这个事件类就写完了