HashMap
内部结构
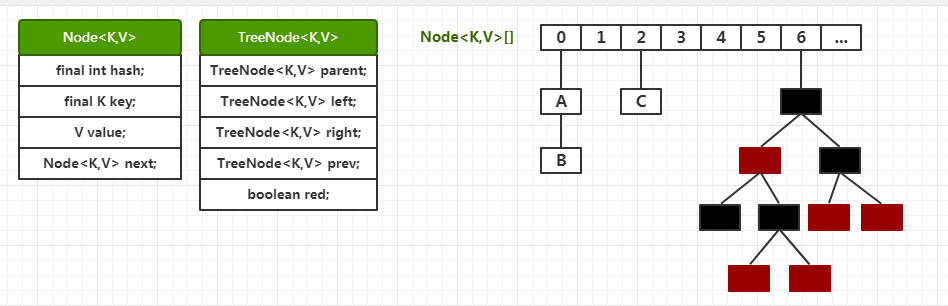
内部是一个Node数组,每个Node都是链表的头,当链表的大小达到8之后链表转变成红黑树。
put操作
final V putVal(int hash, K key, V value, boolean onlyIfAbsent, boolean evict) {
    Node<K,V>[] tab; Node<K,V> p; int n, i;
    // 当table为空或者长度为0,执行resize
    if ((tab = table) == null || (n = tab.length) == 0)
        n = (tab = resize()).length;
    // 根据hash计算对应数组下标
    if ((p = tab[i = (n - 1) & hash]) == null)
        // 如果没有值,直接插入
        tab[i] = newNode(hash, key, value, null);
    else {
        // 如果有值
        Node<K,V> e; K k;
        if (p.hash == hash &&
            ((k = p.key) == key || (key != null && key.equals(k))))
            // key存在,把当前节点引用存在e中
            e = p;
        else if (p instanceof TreeNode)
            // 如果是树节点,插入树中。这里也一样,如果key冲突了,就返回冲突节点的引用,存储在e中
            e = ((TreeNode<K,V>)p).putTreeVal(this, tab, hash, key, value);
        else {
            // 插入链表
            for (int binCount = 0; ; ++binCount) {
                // 插入到链表末尾
                if ((e = p.next) == null) {
                    p.next = newNode(hash, key, value, null);
                    // 此时如果 binCount大于等于7(因为是从0开始),则将链表转变成红黑树
                    if (binCount >= TREEIFY_THRESHOLD - 1) // -1 for 1st
                        treeifyBin(tab, hash);
                    break;
                }
                // 找到元素,break
                if (e.hash == hash &&
                    ((k = e.key) == key || (key != null && key.equals(k))))
                    break;
                // 向后遍历
                p = e;
            }
        }
        // 修改e所在位置的值(这个位置代码的作用就是处理链表中和树中的冲突key)
        if (e != null) { // existing mapping for key
            V oldValue = e.value;
            // 新value覆盖旧value
            if (!onlyIfAbsent || oldValue == null)
                e.value = value;
            afterNodeAccess(e);
            // 返回旧value
            return oldValue;
        }
    }
    ++modCount;
    // 容量达到阈值,扩容
    if (++size > threshold)
        resize();
    afterNodeInsertion(evict);
    return null;
}
流程可以概括为:如果Node数组为空则先按照默认容量初始化数组。利用计算得到的hsah值确定数组下标,
1. 如果下标所在位置的Node为null,则直接新创建节点放在此处;
2. 如果下标所在位置的Node不为null,则判断是否已存在相同key的Node,有则临时存储冲突key涉及的Node的引用;
3. 如果key不冲突,则判断当前位置的Node的类型,如果为TreeNode,则将其插入树中,如果和树中已有的key冲突了,把涉及到的节点的引用返回并临时存储;如果不是TreeNode,则从头开始遍历链表,把新结点插入到链表尾部,插完之后判断是否达到链表的阈值,决定是否进行红黑树的转变。
4. 如果有冲突key需要处理,也就是临时变量存储的Node引用不为空,则用新value覆盖旧的value,并返回旧的value。
5. 如果没有冲突key,则判断添加完毕之后是否需要扩容。
下面说一下扩容
// 初始化或者加倍table的大小。如果table为空,则按照默认容量初始化;
// 如果table不为空,则根据规则把老数组的数据放到新数组中。
final Node<K,V>[] resize() {
    // 老数组:扩容之前的数组
    Node<K,V>[] oldTab = table;
    // 如果老数组为空,老容量为0
    int oldCap = (oldTab == null) ? 0 : oldTab.length;
    // 老的扩容阈值,默认为0(扩容阈值=容量*负载因子,默认情况下达到容量的75%即需要扩容)
    int oldThr = threshold;
    int newCap, newThr = 0;
    // 老容量大于0,也就是老数组不为空
    if (oldCap > 0) {
        // 如果老容量大于等于最大容量
        if (oldCap >= MAXIMUM_CAPACITY) {
            // 扩容阈值设置为Integer的最大值
            threshold = Integer.MAX_VALUE;
            // 返回旧容量
            return oldTab;
        }
        // 新容量=2*旧容量;新容量小于最大容量 并且 老容量大于等于默认初始化容量(16)
        else if ((newCap = oldCap << 1) < MAXIMUM_CAPACITY &&
                 oldCap >= DEFAULT_INITIAL_CAPACITY)
            // 新扩容阈值=2*老扩容阈值
            newThr = oldThr << 1; // double threshold
    }
    // 如果老的扩容阈值大于0
    else if (oldThr > 0) // initial capacity was placed in threshold
        // 新容量 = 老的扩容阈值
        newCap = oldThr;
    else {               // zero initial threshold signifies using defaults
        // 老的扩容阈值等于0,也就是初始化的时候【这里可以看出,在这个地方进行了初始化的工作:设置默认容量,设置扩容阈值】
        // 新容量等于默认的容量
        newCap = DEFAULT_INITIAL_CAPACITY;
        // 新的扩容阈值等于默认容量的75%
        newThr = (int)(DEFAULT_LOAD_FACTOR * DEFAULT_INITIAL_CAPACITY);
    }
    if (newThr == 0) {
        // 如果新扩容阈值等于0,则设置新的扩容阈值(新容量的75%)
        float ft = (float)newCap * loadFactor;
        newThr = (newCap < MAXIMUM_CAPACITY && ft < (float)MAXIMUM_CAPACITY ?
                  (int)ft : Integer.MAX_VALUE);
    }
    // 更新扩容阈值!
    threshold = newThr;
    @SuppressWarnings({"rawtypes","unchecked"})
        // 按照新容量new了一个新的Node数组
        Node<K,V>[] newTab = (Node<K,V>[])new Node[newCap];
    // 更新table!
    table = newTab;
    // 第一次初始化为oldTab=null,不走这个
    if (oldTab != null) {
        // 这里才是真正意义上的扩容操作!
        // 遍历老数组
        for (int j = 0; j < oldCap; ++j) {
            Node<K,V> e;
            // 老数组当前位置的元素不为null
            if ((e = oldTab[j]) != null) {
                // 置空,这里可以看出:table中存放的只是Node的引用
                oldTab[j] = null;
                // 如果没有后继元素
                if (e.next == null)
                    // 根据当前元素的hash,放进新数组对应的位置
                    newTab[e.hash & (newCap - 1)] = e;
                else if (e instanceof TreeNode)
                    // 如果当前元素类型为TreeNode,主要分为两个部分:1. 将树进行节点拆分 2. 如果达到退化阈值6,将把红黑树退化成链表
                    ((TreeNode<K,V>)e).split(this, newTab, j, oldCap);
                else { // 对链表的拆分,实际上和上一步类似,都是把原结构拆分成high和low两部分
                    // low链的head和tail
                    Node<K,V> loHead = null, loTail = null;
                    // high链的head和tail
                    Node<K,V> hiHead = null, hiTail = null;
                    Node<K,V> next;
                    // 查看循环条件可知:遍历原链表e,一直到最后e.next=null
                    do {
                        // 下一个节点
                        next = e.next;
                        // 根据条件:(e.hash & oldCap) == 0 把原链表划分成两部分
                        if ((e.hash & oldCap) == 0) {
                            if (loTail == null)
                                // low链表为空,直接放在头结点
                                loHead = e;
                            else
                                // 否则放在尾部
                                loTail.next = e;
                            // 移动尾指针
                            loTail = e;
                        }
                        else {
                            // 过程同上
                            if (hiTail == null)
                                hiHead = e;
                            else
                                hiTail.next = e;
                            hiTail = e;
                        }
                    } while ((e = next) != null);
                    // 把low链放在新表j的位置上。新表的下标位置与旧表一致都为j
                    if (loTail != null) {
                        loTail.next = null;
                        newTab[j] = loHead;
                    }
                    // 把high链放在新表[j+oldCap]的位置上
                    if (hiTail != null) {
                        hiTail.next = null;
                        newTab[j + oldCap] = hiHead;
                    }
                }
            }
        }
    }
    // 返回新table
    return newTab;
}
总结一下过程:
1. 如果table为null,则按照默认配置初始化,容量为16,扩容阈值为16*0.75=12【也就是添加完第13个元素的时候启动扩容】。
2. 如果table不为null:①、如果老容量大于0,则新容量=2*老容量,新扩容阈值=2*老扩容阈值。②、在不满足①的前提下,新容量=老的扩容阈值。③、在不满足①个②的前提下,初始化新容量为默认的16,新扩容阈值为12。
3. 如果新的扩容阈值为0,则将其设置为新容量的75%。然后更新HashMap的成员变量threshold为新的扩容阈值。
4. 利用前面计算出来的新容量,new一个新的Node数组。然后更新HashMap的成员变量table为新的数组。
5. 如果老数组里面有数据,则将老数组里的数据转移到新数组。遍历老数组,①:当前元素的后继为null,直接把当前元素放在新数组的e.hash & (newCap - 1)位置上。②:如果当前节点有后继元素并且元素类型为TreeNode,则按照树的规则进行拆分;如果元素数量达到阈值6,则退化成一个链表。③:如果当前节点有后继元素并且元素类型为Node,则按照(e.hash & oldCap) == 0规则将链表拆分为两部分,一部分放在新数组j的位置上,一部分放在新数组j+oldCap位置上。
6. 返回新数组。
简单来讲:
1. 当table需要初始化或者需要扩容的时候执行resize。初始化的时候按照默认值进行初始化(容量=16,扩容阈值=12);扩容的时候新容量是老容量的2倍,扩容阈值也是老扩容阈值的2倍。
2. 每次扩容都会新建一个数组,然后将老table中的元素re-hash到新的table中, 但元素在新旧table中的位置存在一定的联系:要么下标相同,要么相差一个oldCap(原table的大小)。
扩展一下hash方法
我们知道默认Object的hashCode()方法是个native方法,也有人说返回值是内存地址,但是事实上
JDK8 的默认hashCode的计算方法是通过和当前线程有关的一个随机数+三个确定值,运用Marsaglia's xorshift scheme随机数算法得到的一个随机数。
这位网友解读的很详细:https://www.jianshu.com/p/be943b4958f4
知道了hashCode的返回值是什么之后,回到HashMap的hash方法
static final int hash(Object key) {
    int h;
    return (key == null) ? 0 : (h = key.hashCode()) ^ (h >>> 16);
}
其返回值是key的hashCode与hashCode无符号右移16位的结果进行异或运算。
然后计算存储位置的方法 (n - 1) & hash,数组长度-1,和hash值进行按位与操作。
1. 无符号右移16位,异或运算
int h = new Object().hashCode();
int hh = h >>> 16;
int hash = h ^ hh;
System.out.println(h + "	" + Integer.toBinaryString(h));
System.out.println(hh + "		" + Integer.toBinaryString(hh));
System.out.println(hash + "	" + Integer.toBinaryString(hash));
执行结果:
1880587981    1110000000101110111111011001101
28695         111000000010111
1880559322    1110000000101110000111011011010
以上代码取了一个hashCode,然后进行了无符号右移操作和异或操作。
h 0111 0000 0001 0111 0111 1110 1100 1101
h >>> 16 0000 0000 0000 0000 0111 0000 0001 0111
右移16位,也就是保留了高区的16位。
按位异或:相同为0,不同为1。0^0=0, 1^1=0, 1^0=1, 0^1=1
h 0111 0000 0001 0111 0111 1110 1100 1101
h >>> 16 0000 0000 0000 0000 0111 0000 0001 0111
h ^ (h >>> 16) 0111 0000 0001 0111 0000 1110 1101 1010
原hashCode和右移16位之后的结果做异或操作。也就是自己的高半区和低半区做异或操作。混合原始哈希码的高位和低位,得到的结果:高位不变,低位是混合后的结果。
这一步的目的是增大低位的随机性,进而降低碰撞的几率。
2. 按位与运算
hash & (n-1)
这一步骤利用上一步计算得到的hash值,和数组长度减1做按位与运算。
按位与:有0则0,无0则1。0&0=0, 0&1=0, 1&0=0, 1&1=1
16-1 0000 0000 0000 0000 0000 0000 0000 1111
hash 0111 0000 0001 0111 0000 1110 1101 1010
hash & (n-1) 0000 0000 0000 0000 0000 0000 0000 1010
1010的十进制就是10
==================================
这一步的目的就是计算位置,而一般我们找位置,取模运算就可以了啊:hash % 16。为什么用按位与运算?
1. 位运算直接对内存数据进行操作,处理速度非常快。并且移位指令有更高的效率,因为移位指令占2个机器周期,而乘除法指令占4个机器周期。
2. 因为HashMap要求数组长度为2的幂,在这种情况下, hash & (n-1) 等价于 hash % n
两种方试都可以,当然选择效率高的方式了。
总结:对hashCode做右移16位,然后自己的高半区和低半区做异或,就是为了增加hashCode低位的随机性,减少hash碰撞的几率。而hashCode和数组长度减1做与运算,仅仅是因为与运算效率高于取模运算。
Hashtable
先来看默认构造方法
public Hashtable() {
    this(11, 0.75f);
}
初始容量是11,并不是16。
HashMap计算位置用的是与运算,为了提高效率;HashTable为什么直接用取模运算呢?
HashTable默认的初始大小为11,之后每次扩容为原来的2n+1。这样,HashTable底层数组的大小维持在一个素数(在大于1的整数中,仅有1及其本身能将它整除的数)。
证明表示:当哈希表的大小为素数时,简单的取模哈希的结果会更加均匀。
添加操作
public synchronized V put(K key, V value) {
    // HashTable不允许值为空
    if (value == null) {
        throw new NullPointerException();
    }
    // Makes sure the key is not already in the hashtable.
    Entry<?,?> tab[] = table;
    // 计算hash值
    int hash = key.hashCode();
    // 计算位置(不同:HashMap的做法是(n - 1) & hash)
    int index = (hash & 0x7FFFFFFF) % tab.length;
    @SuppressWarnings("unchecked")
    Entry<K,V> entry = (Entry<K,V>)tab[index];
    // 遍历数组位置的链表
    for(; entry != null ; entry = entry.next) {
        // 如果发现key已存在,则覆盖旧值
        if ((entry.hash == hash) && entry.key.equals(key)) {
            V old = entry.value;
            entry.value = value;
            return old;
        }
    }
    // 检查扩容
    addEntry(hash, key, value, index);
    return null;
}

private void addEntry(int hash, K key, V value, int index) {
    // 修改次数+1
    modCount++;
    Entry<?,?> tab[] = table;
    // 如果当前元素数量超过了扩容阈值
    if (count >= threshold) {
        // Rehash the table if the threshold is exceeded
        rehash();
        // 指向新table
        tab = table;
        hash = key.hashCode();
        // 重新计算下标
        index = (hash & 0x7FFFFFFF) % tab.length;
    }
    // Creates the new entry.
    @SuppressWarnings("unchecked")
    Entry<K,V> e = (Entry<K,V>) tab[index];
    // 把元素添加到新位置
    tab[index] = new Entry<>(hash, key, value, e);
    // 元素数量+1
    count++;
}


protected void rehash() {
    // 旧容量
    int oldCapacity = table.length;
    // 临时存储旧table数据
    Entry<?,?>[] oldMap = table;
    // 新容量 = 2 * oldCapacity + 1 (左移1位相当于乘2)
    int newCapacity = (oldCapacity << 1) + 1;
    // 检查新容量是否满足要求
    if (newCapacity - MAX_ARRAY_SIZE > 0) {
        if (oldCapacity == MAX_ARRAY_SIZE)
            // Keep running with MAX_ARRAY_SIZE buckets
            return;
        newCapacity = MAX_ARRAY_SIZE;
    }
    Entry<?,?>[] newMap = new Entry<?,?>[newCapacity];
    modCount++;
    // 新的扩容阈值 = 新容量 * 扩容因子(默认0.75)
    threshold = (int)Math.min(newCapacity * loadFactor, MAX_ARRAY_SIZE + 1);
    // 替换旧table
    table = newMap;
    // 重新规划元素位置
    for (int i = oldCapacity ; i-- > 0 ;) {
        for (Entry<K,V> old = (Entry<K,V>)oldMap[i] ; old != null ; ) {
            Entry<K,V> e = old;
            old = old.next;
            int index = (e.hash & 0x7FFFFFFF) % newCapacity;
            e.next = (Entry<K,V>)newMap[index];
            newMap[index] = e;
        }
    }
}
过程:
0. 首先线程安全的保证是synchronized关键字
1. 对key取hash值,hash值和0x7FFFFFFF做与运算(目的是得出一个正整数),其结果与数组容量做取模运算得出index。
2. 遍历index位置的链表,判断key是否已存在。
3. 如果当前存储的元素数量大于等于扩容阈值,则进行扩容
- 新容量 = 2* 旧容量 + 1,新扩容阈值 = 新容量 * 0.75
- 把旧数组中的元素rehash放进新数组中
4. 扩容之后,根据传入的key重新计算下标,并放入新数组中。
get元素
public synchronized V get(Object key) {
    Entry<?,?> tab[] = table;
    // 取hash
    int hash = key.hashCode();
    // 计算下标
    int index = (hash & 0x7FFFFFFF) % tab.length;
    // 遍历目标位置的链表,找到即返回
    for (Entry<?,?> e = tab[index] ; e != null ; e = e.next) {
        if ((e.hash == hash) && e.key.equals(key)) {
            return (V)e.value;
        }
    }
    return null;
}
小结:
总体来说没有HashMap复杂,有意思的地方是容量为素数,计算下标用的取模。扩容为旧容量的2倍+1。
LinkedHashMap
成员变量
/**
 * LinkedHashMap 继承了 HashMap.Node
 */
static class Entry<K,V> extends HashMap.Node<K,V> {
    // 前驱后继,双向链表特征
    Entry<K,V> before, after;
    Entry(int hash, K key, V value, Node<K,V> next) {
        super(hash, key, value, next);
    }
}

// transient关键字标记的成员变量不参与序列化过程

// 表头
transient LinkedHashMap.Entry<K,V> head;
// 表尾
transient LinkedHashMap.Entry<K,V> tail;
put【实际上调用的是HashMap的put方法】
final V putVal(int hash, K key, V value, boolean onlyIfAbsent,
               boolean evict) {
    Node<K,V>[] tab; Node<K,V> p; int n, i;
    // 1. table初始化,LinkedHashMap的数据依然存储在数组上,没想到吧
    if ((tab = table) == null || (n = tab.length) == 0)
        n = (tab = resize()).length;
    // 2. 下标位置为null,新建node【这个newNode方法被LinkedHashMap重写】
    if ((p = tab[i = (n - 1) & hash]) == null)
        // 调用LinkedHashMap#newNode
        tab[i] = newNode(hash, key, value, null);
    else {
        Node<K,V> e; K k;
        if (p.hash == hash &&
            ((k = p.key) == key || (key != null && key.equals(k))))
            e = p;
        else if (p instanceof TreeNode)
            // 3. 在红黑树结构中,LinkedHashMap也重写了其中newTreeNode方法:LinkedHashMap#newTreeNode
            e = ((TreeNode<K,V>)p).putTreeVal(this, tab, hash, key, value);
        else {
            for (int binCount = 0; ; ++binCount) {
                if ((e = p.next) == null) {
                    // 4. 在已存在的链表结构里插入也是调用 LinkedHashMap#newNode
                    p.next = newNode(hash, key, value, null);
                    if (binCount >= TREEIFY_THRESHOLD - 1) // -1 for 1st
                        treeifyBin(tab, hash);
                    break;
                }
                if (e.hash == hash &&
                    ((k = e.key) == key || (key != null && key.equals(k))))
                    break;
                p = e;
            }
        }
        if (e != null) { // existing mapping for key
            V oldValue = e.value;
            if (!onlyIfAbsent || oldValue == null)
                e.value = value;
            afterNodeAccess(e);
            return oldValue;
        }
    }
    ++modCount;
    if (++size > threshold)
        resize();
    // 节点插入后置处理【LinkedHashMap重写】
    afterNodeInsertion(evict);
    return null;
}


Node<K,V> newNode(int hash, K key, V value, Node<K,V> e) {
    LinkedHashMap.Entry<K,V> p =
        new LinkedHashMap.Entry<K,V>(hash, key, value, e);
    // 连接到表尾
    linkNodeLast(p);
    return p;
}
private void linkNodeLast(LinkedHashMap.Entry<K,V> p) {
    LinkedHashMap.Entry<K,V> last = tail;
    // 尾指针指向新元素
    tail = p;
    if (last == null)
        // 链表为空,则初始化头指针
        head = p;
    else {
        // 新元素的前驱指向老尾巴
        p.before = last;
        // 老尾巴的后继指向新元素
        last.after = p;
    }
}

// 而对于红黑树,LinkedHashMap依然重新了其 newTreeNode 方法
TreeNode<K,V> newTreeNode(int hash, K key, V value, Node<K,V> next) {
    TreeNode<K,V> p = new TreeNode<K,V>(hash, key, value, next);
    linkNodeLast(p);
    return p;
}
虽然调用的是HashMap的put方法,内部数据存储结构依然是数组,但是仅仅重写了newNode方法就实现了双向链表的逻辑。
remove方法【直接调用的HashMap的remove方法】
public V remove(Object key) {
    Node<K,V> e;
    return (e = removeNode(hash(key), key, null, false, true)) == null ?
        null : e.value;
}

final Node<K,V> removeNode(int hash, Object key, Object value,
                           boolean matchValue, boolean movable) {
    Node<K,V>[] tab; Node<K,V> p; int n, index;
    if ((tab = table) != null && (n = tab.length) > 0 &&
        (p = tab[index = (n - 1) & hash]) != null) {
        Node<K,V> node = null, e; K k; V v;
        if (p.hash == hash &&
            ((k = p.key) == key || (key != null && key.equals(k))))
            // 下标位置的node
            node = p;
        else if ((e = p.next) != null) {
            // 从红黑树中寻找
            if (p instanceof TreeNode)
                node = ((TreeNode<K,V>)p).getTreeNode(hash, key);
            else {
                // 从数组链表中寻找
                do {
                    if (e.hash == hash &&
                        ((k = e.key) == key ||
                         (key != null && key.equals(k)))) {
                        node = e;
                        break;
                    }
                    // 记录当前元素的前驱
                    p = e;
                } while ((e = e.next) != null);
            }
        }
        // 找到之后
        if (node != null && (!matchValue || (v = node.value) == value ||
                             (value != null && value.equals(v)))) {
            if (node instanceof TreeNode)
                // 从红黑树中移除
                ((TreeNode<K,V>)node).removeTreeNode(this, tab, movable);
            else if (node == p)
                // 在下标位置,node的后继成为数组下标位置的元素
                tab[index] = node.next;
            else
                // 在链表中,node前驱的next指向node的后继
                p.next = node.next;
            ++modCount;
            --size;
            // 移除node之后的处理【重写方法:LinkedHashMap#afterNodeRemoval】
            afterNodeRemoval(node);
            return node;
        }
    }
    return null;
}

// 删除node,连接其前驱和后继【LinkedHashMap#afterNodeRemoval】
void afterNodeRemoval(Node<K,V> e) { // unlink
    // 先记录好node的前驱和后继
    LinkedHashMap.Entry<K,V> p =
        (LinkedHashMap.Entry<K,V>)e, b = p.before, a = p.after;
    p.before = p.after = null;

    if (b == null)
        // 前驱为空,则head直接指向node的后继,也就是a
        head = a;
    else
        // 前驱不为空,则node前驱的after指向node的后继
        b.after = a;

    if (a == null)
        // 如果后继为空,则tail指向node的前驱,也就是b
        tail = b;
    else
        // 后继不为空,则node后继的前驱指向node的前驱
        a.before = b;
}
由此可见:添加和删除都需要处理两部分逻辑(物理结构和逻辑结构)
添加:放入HashMap内部数组中存储 & LinkedHashMap处理链表连接关系
删除:从HashMap内部数组中删除 & LinkedHashMap处理链表连接关系优点:按照添加顺序排列;随机查找效率高,注意人家get方法也是计算hash值的,而不是顺序遍历链表结构;
缺点:插入和删除效率差一些,因为除了要维护HashMap内部存储结构,还要维护LinkedHashMap的链表逻辑结构。
WeakHashMap
先来个小测试
Map<String, String> map = new WeakHashMap<>();
String s = new String("key");
map.put(s, "value");
System.gc();
System.out.println("有外部引用的key,不会被回收:" + map);

// 置空外部引用
s = null;
System.gc();
System.out.println("外部引用置空,key被回收:" + map);

map.put(new String("key"), "value");
System.gc();
System.out.println("没有外部引用,key被回收:" + map);

s = "key";
map.put(s, "value");
System.gc();
System.out.println("常量池里的无法被回收:" + map);
输出:
[Full GC (System.gc())  4096K->1315K(8192K), 0.0065595 secs]
   [Eden: 4096.0K(24.0M)->0.0B(3072.0K) Survivors: 0.0B->0.0B Heap: 4096.0K(128.0M)->1315.8K(8192.0K)], [Metaspace: 3395K->3395K(1056768K)]
 [Times: user=0.00 sys=0.00, real=0.01 secs]
有外部引用的key,不会被回收:{key=value}
[Full GC (System.gc())  1438K->1055K(8192K), 0.0033753 secs]
   [Eden: 1024.0K(3072.0K)->0.0B(3072.0K) Survivors: 0.0B->0.0B Heap: 1438.7K(8192.0K)->1055.8K(8192.0K)], [Metaspace: 3410K->3410K(1056768K)]
 [Times: user=0.08 sys=0.00, real=0.00 secs]
外部引用置空,key被回收:{}
[Full GC (System.gc())  1178K->1051K(8192K), 0.0038189 secs]
   [Eden: 1024.0K(3072.0K)->0.0B(3072.0K) Survivors: 0.0B->0.0B Heap: 1178.8K(8192.0K)->1051.9K(8192.0K)], [Metaspace: 3411K->3411K(1056768K)]
 [Times: user=0.00 sys=0.00, real=0.00 secs]
没有外部引用,key被回收:{}
[Full GC (System.gc())  1174K->1052K(8192K), 0.0029810 secs]
   [Eden: 1024.0K(3072.0K)->0.0B(3072.0K) Survivors: 0.0B->0.0B Heap: 1174.8K(8192.0K)->1052.5K(8192.0K)], [Metaspace: 3448K->3448K(1056768K)]
 [Times: user=0.00 sys=0.00, real=0.00 secs]
常量池里的无法被回收:{key=value}
下面看内部结构
构造方法
public WeakHashMap() {
    // 默认容量16,负载因子0.75
    this(DEFAULT_INITIAL_CAPACITY, DEFAULT_LOAD_FACTOR);
}
弱引用相关
// Entry数组
Entry<K,V>[] table;

// 弱引用队列:检测到可达性更改后,垃圾收集器将注册的引用对象追加到该队列
private final ReferenceQueue<Object> queue = new ReferenceQueue<>();

// Entry对象继承了WeakReference
private static class Entry<K,V> extends WeakReference<Object> implements Map.Entry<K,V> {
    V value;
    final int hash;
    Entry<K,V> next;

    /**
     * Creates new entry.
     */
    Entry(Object key, V value,
          ReferenceQueue<Object> queue,
          int hash, Entry<K,V> next) {
        // 将key作为referent,GC将对referent进行特殊处理
        super(key, queue);
        this.value = value;
        this.hash  = hash;
        this.next  = next;
    }

    ...
}
以上就是实现弱引用Map的关键了。
put方法
public V put(K key, V value) {
    // 允许key为空
    Object k = maskNull(key);
    // 对key取hash
    int h = hash(k);
    // 获取当前table,其中包含一个处理过期Entry的过程
    Entry<K,V>[] tab = getTable();
    // 计算下标:hash & (len - 1)
    int i = indexFor(h, tab.length);
    // 判断该位置的链表是否已存在key,已存在则覆盖旧值
    for (Entry<K,V> e = tab[i]; e != null; e = e.next) {
        if (h == e.hash && eq(k, e.get())) {
            V oldValue = e.value;
            if (value != oldValue)
                e.value = value;
            return oldValue;
        }
    }
    // 修改次数+1
    modCount++;
    Entry<K,V> e = tab[i];
    // 最后一个参数e代表next,所以可以看出这里的链表是头插法
    tab[i] = new Entry<>(k, value, queue, h, e);
    // 如果达到扩容阈值,则进行扩容,新容量 = 2 * 旧容量
    if (++size >= threshold)
        resize(tab.length * 2);
    return null;
}

void resize(int newCapacity) {
    Entry<K,V>[] oldTable = getTable();
    int oldCapacity = oldTable.length;
    if (oldCapacity == MAXIMUM_CAPACITY) {
        threshold = Integer.MAX_VALUE;
        return;
    }
    // 新建一个数组
    Entry<K,V>[] newTable = newTable(newCapacity);
    // 这一步,对旧数组中的元素进行rehash操作,根据重新计算得到的下标放进新数组
    transfer(oldTable, newTable);
    table = newTable;

    // 如果元素数量大于等于扩容阈值的一半
    if (size >= threshold / 2) {
        // 扩容阈值更新为新容量的75%
        threshold = (int)(newCapacity * loadFactor);
    } else {

        // * 如果忽略空元素并处理ref队列导致大量收缩,则恢复旧表。这种情况应该很少见,但是可以避免无限地扩展充满垃圾的表。

        // 从表中删除过期的Entry
        expungeStaleEntries();
        // 删除之后元素变少,把元素rehash进旧表
        transfer(newTable, oldTable);
        // 恢复旧表
        table = oldTable;
    }
}
过程:
1. 对key取hash 并和 数组长度减1 做与操作得出下标。
2. 获取当前的数组
3. 下标位置不为空,判断key是否已存在,已存在则覆盖旧值。
4. 下标位置为空,则new一个Entry对象,采用头插法插入链表。
5. 扩容操作
- 新容量 = 2*旧容量,按照新容量来新建一个Entry数组。
- 对旧数组中的元素进行rehash操作,根据新计算得到的下标放进新数组
- 考虑到弱引用回收的情况,回收导致新数组元素急剧减少,则需要恢复旧表
.