多线程的难点主要就是多线程通信协作这一块了,前面笔记二中提到了常见的同步方法,这里主要是进行实例学习了,今天总结了一下3个实例:
1、银行存款与提款多线程实现,使用Lock锁和条件Condition。 附加 : 用监视器进行线程间通信
2、生产者消费者实现,使用LinkedList自写缓冲区。
3、多线程之阻塞队列学习,用阻塞队列快速实现生产者消费者模型。 附加:用布尔变量关闭线程
在三种线程同步方法中,我们这里的实例用Lock锁来实现变量同步,因为它比较灵活直观。
实现了变量的同步,我们还要让多个线程之间进行“通话”,就是一个线程完成了某个条件之后,告诉其他线程我完成了这个条件,你们可以行动了。下面就是java提供的条件接口Condition定义的同步方法:
很方便的是,java的Lock锁里面提供了newConditon()方法可以,该方法返回:一个绑定了lock锁的Condition实例,有点抽象,其实把它看作一个可以发信息的锁就可以了,看后面的代码,应该就能理解了。
1、银行存款与提款多线程实现。
我们模拟ATM机器存款与提款,创建一个账户类Account(),该类包含同步方法:
存款方法:deposit()
提款方法:withdraw()
以及一个普通的查询余额的方法getbalance().
我们创建两个任务线程,分别调用两个同步方法,进行模拟操作,看代码:
import java.util.concurrent.ExecutorService;
import java.util.concurrent.Executors;
import java.util.concurrent.locks.Condition;
import java.util.concurrent.locks.Lock;
import java.util.concurrent.locks.ReentrantLock;
public class ThreadCooperation {
	private static Account account = new Account();
	public static void main(String[] args)
	{
		//创建线程池
		ExecutorService executor = Executors.newFixedThreadPool(2);
		executor.execute(new DepositTask());
		executor.execute(new WithdrawTask());
	}
	//存钱
	public static class DepositTask implements Runnable
	{
		@Override
		public void run() {
			try {
				while(true)
				{
					account.deposit((int)(Math.random()*1000)+1);
					Thread.sleep(1000);
				}
				} catch (InterruptedException e) {
					e.printStackTrace();
			}
		}
	}
	public static class WithdrawTask implements Runnable
	{
		@Override
		public void run() {
			try{
				while(true)
				{
					account.withdraw((int)(Math.random()*1000)+1);
					Thread.sleep(500);
				}
			} catch (InterruptedException e) {
				e.printStackTrace();
			}
		}
	}

	public static class Account
	{
		//一个锁是一个Lock接口的实例   它定义了加锁和释放锁的方法     ReentrantLock是为创建相互排斥的锁的Lock的具体实现
		private static Lock lock = new ReentrantLock();
		//创建一个condition,具有发通知功能的锁,前提是要实现了lock接口
		private static Condition  newDeposit = lock.newCondition();
		private int balance = 0;
		public int getBalance()
		{
			return balance;
		}
		public void withdraw(int amount)
		{
			lock.lock();
			try {
				while(balance < amount)
				{
				System.out.println("		钱不够,等待存钱");
					newDeposit.await();
				}
				balance -= amount;
				System.out.println("		取出"+amount+"块钱	剩余"+getBalance());
			} catch (InterruptedException e) {
				e.printStackTrace();
			}finally{
				lock.unlock();
			}
		}

		public void deposit(int amount)
		{
			lock.lock();
			try{
				balance+=amount;
				System.out.println("存入"+amount+"块钱");
				newDeposit.signalAll();   //发信息唤醒所有的线程
			}
			finally{
				lock.unlock();
			}
		}
	}
}
分析:
1、程序中需要注意的:创建一个condition,具有发通知功能的锁,前提是要实现了lock接口。
2、while(balance < amount)不能改用if判断,用if会使得线程不安全,使用if会不会进行循环验证,而while会,我们经常看到while(true),但是不会经常看到if(true).
3、调用了await方法后,要记得使用signalAll()或者signal()将线程唤醒,否则线程永久等待。
最后再来分析一下这个类的结构,有3个类,两个静态任务类实现了Runnable接口,是线程类,而另外一个类则是普通的任务类,包含了线程类所用到的方法。我们的主类在main方法前面就实例化一个Account类,以供线程类调用该类里面的同步方法。
这种构造方式是多线程常用到的一种构造方式吧。不难发现后面要手写的生产者消费者模型也是这样子构造的。这相当于是一个多线程模板。也是我们学习这个例子最重要的收获吧。
用监视器进行线程之间的通信
还有一点,接口Lock与Condition都是在java5之后出现的,在这之前,线程通信是通过内置的监视器(monitor)实现的。
监视器是一个相互排斥且具有同步能力的对象,任意对象都有可能成为一个monitor。监视器是通过synchronized关键字来对自己加锁(加锁解锁是解决线程同步最基本的思想),使用wait()方法时线程暂停并 等待条件发生,发通知则是通过notify()和notifyAll()方法。大体的模板是这样子的:
不难看出await()、signal()、signally()是wait()、notify()、notifyAll()的进化形态,所以不建议使用监视器。
2、生产者消费者实现,使用LinkedList自写缓冲区
这个模型一直很经典,学操作系统的时候还学过,记得linux还用PV操作去实现它,不过这东西是跨学科的。
考虑缓存区buffer的使用者,生产者和消费者,他们都能识别缓冲区是否满的,且两种各只能发出一种信号:
生产者:它能发出notEmpty()信号,即缓冲区非空信号,当它看到缓冲区满的时候,它就调用await等待。
消费者:它能发出notFull()信号,即缓冲区未满的信号,当它看到缓冲区空的时候,它也调用await等待。
看代码:
import java.util.concurrent.ExecutorService;
import java.util.concurrent.Executors;
import java.util.concurrent.locks.Condition;
import java.util.concurrent.locks.Lock;
import java.util.concurrent.locks.ReentrantLock;

//生产者消费者
public class ConsumerProducer {
	private static Buffer  buffer= new Buffer();
	public static void main(String[] args)
	{
		ExecutorService executor = Executors.newFixedThreadPool(2);
		executor.execute(new ProducerTask());
		executor.execute(new ConsumerTask());
		executor.shutdown();
	}

	public static class ProducerTask implements Runnable
	{
		@Override
		public void run() {
			int i=1;
			try {
				while(true)
				{
					System.out.println("生产者写入数据"+i);
					buffer.write(i++);
					Thread.sleep((int)(Math.random()*80));

				}
			}catch (InterruptedException e) {
					e.printStackTrace();
			}
		}
	}

	public static class ConsumerTask implements Runnable
	{
		public void run() {
			try {
				while(true){
					System.out.println("		消费读出数据"+buffer.read());
					Thread.sleep((int)(Math.random()*100));
					}
				} catch (InterruptedException e) {
				e.printStackTrace();
			}
		}
	}

	public static class Buffer
	{
		private static final int CAPACTIY = 4;  //缓冲区容量
		private java.util.LinkedList<Integer> queue = new java.util.LinkedList<Integer>();

		private static Lock lock = new ReentrantLock();

		private static Condition  notEmpty = lock.newCondition();
		private static Condition notFull = lock.newCondition();

		public void write(int value)
		{
			lock.lock();
			try{
				while(queue.size()==CAPACTIY)
				{
					System.out.println("缓冲区爆满");
					notFull.await();
				}
				queue.offer(value);
				notEmpty.signalAll();  //通知所有的缓冲区未空的情况
			}catch(InterruptedException ex){
				ex.printStackTrace();
			}finally{
				lock.unlock();
			}
		}

		@SuppressWarnings("finally")
		public int read()
		{
			int value = 0;
			lock.lock();
			try{
				while(queue.isEmpty())
				{
					System.out.println("		缓冲区是空的,等待缓冲区非空的情况");
					notEmpty.await();
				}
				value = queue.remove();
				notFull.signal();
			}catch(InterruptedException ex){
				ex.printStackTrace();
			}finally{
				lock.unlock();
				return value;
			}
		}
	}
}
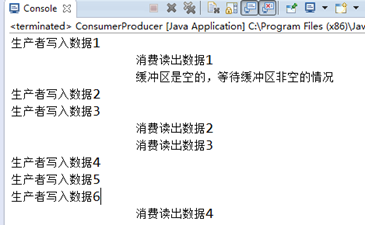
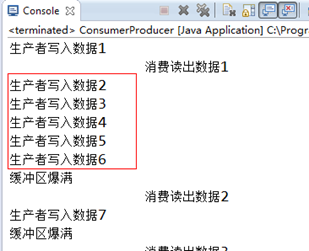
程序里面设置的容量是4,可是这里却可以存入最多5个数据,而且更合理的情况应该是初始缓冲区是空的,后面找了下这个小bug,原来是调用offer()函数应该放在检测语句之前,如果希望一开始就调用ConsumerTask,在main方法里面调换两者的顺序即可。
3、用阻塞队列快速实现生产者消费者模型
java的强大之处是它有着丰富的类库,我们学习java在某种程度上就是学习这些类库。
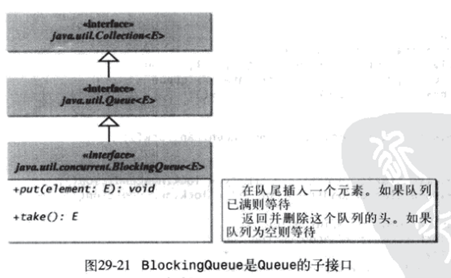
阻塞队列是这样的一种队列:当试图向一个满队列里添加元素 或者 从空队列里删除元素时,队列会让线程自动阻塞,且当队列满时,队列会继续存储元素,供唤醒后的线程使用。这应该说是专门为消费者生产者模型而设计的一种队列吧,它实现了Queue接口,主要方法是put()和take()方法。
java支持三个具体的阻塞队列ArrayBlockingQueue、LinkedBlockingQueue、PriorityBlockingQueue。都在java.util.concurrent包中。
简单描述上面三个阻塞队列:
ArrayBlockingQueue: 该阻塞用数组实现,按照FIFO,即先进先出的原则对数据进行排序,和数组的使用有点相似,它事先需要指定一个容量,不过即便队列超出这个容量,也是不会报错滴。
LinkeddBlockingQueue:用链表实现,默认队列大小是Integer.MAX_VALUE,也是按照先进先出的方法对数据排序,性能可能比ArrayBlockingQueue,有待研究。
PriorityBlockingQueue:用优先队列实现的阻塞队列,会对元素按照大小进行排序,也可以创建不受限制的队列,put方法永不阻塞。
ok,看代码:
import java.util.concurrent.ArrayBlockingQueue;
import java.util.concurrent.ExecutorService;
import java.util.concurrent.Executors;

public class ConsumerProducerUsingBlockQueue {
	private static ArrayBlockingQueue<Integer>  buffer = new ArrayBlockingQueue<Integer>(2);
	public static void main(String[] args)
	{
		ExecutorService executor = Executors.newFixedThreadPool(2);
		executor.execute(new Consumer());
		executor.execute(new Producer());

		try {
			Thread.sleep(100);
			executor.shutdownNow();     //暴力关闭,会报错,不推荐
		} catch (InterruptedException e) {
			// TODO Auto-generated catch block
			e.printStackTrace();
		}

	}

	public static class Consumer implements Runnable
	{
		@Override
		public void run() {
			try{
				int i=1;
				while(true){
					System.out.println("生成者写入:"+i);
					buffer.put(i++);
					Thread.sleep((int)(Math.random())*1000);
				}
			}catch(InterruptedException ex){
				ex.printStackTrace();
			}
		}
	}
	public static class Producer implements Runnable
	{
		@Override
		public void run() {
			try{
				while(true)
				{
					System.out.println("		消费者取出"+buffer.take());
					Thread.sleep((int)(Math.random())*10000);
				}
			}catch(InterruptedException ex){
				ex.printStackTrace();
			}
		}
	}
}
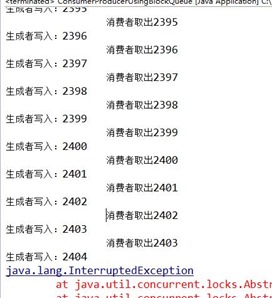
没啥大的问题,就是在关闭线程的时候太过暴力了,会报错,线程里面的每一个函数都似乎值得研究,之前想通过Interrupt暂停,不过失败了,就直接使用线程池执行器的shoutdownNow方法来的。后面自己又用了另外一种关闭线程的方法,见下面代码
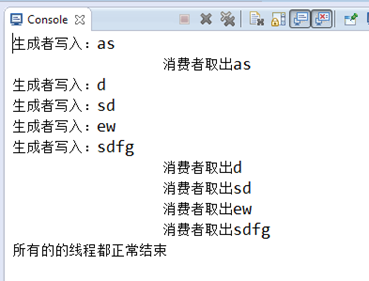
使用LinkedBlockingQueue实现消费者生产者且使用布尔变量控制线程关闭
import java.util.concurrent.ExecutorService;
import java.util.concurrent.Executors;
import java.util.concurrent.LinkedBlockingQueue;
public class A_Control_stop {
	private static LinkedBlockingQueue<String>  buffer = new LinkedBlockingQueue<String>();

	public static void main(String[] args)
	{
		ExecutorService executor = Executors.newFixedThreadPool(2);
		executor.execute(new Consumer());
		executor.execute(new Producer());
		executor.shutdown();

		while(!executor.isTerminated()){}
		System.out.println("所有的的线程都正常结束");
	}

	public static class Consumer implements Runnable
	{
		private volatile boolean exit = false;
		@Override
		public void run() {
			try{
				int i=0;
				String[] str ={"as","d","sd","ew","sdfg","esfr"};
				while(!exit){
					System.out.println("生成者写入:"+str[i]);
					buffer.put(str[i++]);
					Thread.sleep((int)(Math.random())*10);
					if(5==i)
					{
						exit=true;
					}
				}
			}catch(InterruptedException ex){
				ex.printStackTrace();
			}
		}
	}
	public static class Producer implements Runnable
	{
		private volatile boolean exit = false;
		@Override
		public void run() {
			try{
				int i=0;
				while(!exit)
				{
					System.out.println("		消费者取出"+buffer.take());
					i++;
					Thread.sleep((int)(Math.random())*10);
					if(5==i)
					{
						exit=true;
					}
				}
			}catch(InterruptedException ex){
				ex.printStackTrace();
			}
		}
	}
}
关于阻塞队列,觉得这篇文章讲的不错,推荐大家看看 聊聊并发----Java中的阻塞队列
用了几天,多线程算是学了点皮毛,附注一下:这几天文章主要是参考了《java程序语言设计进阶篇第8版》,老外写的书讲的真心不错,只不过现在java都已经更新到java8了。在其他一些网站上看到自己的文章,没有说明转载什么的,估计是直接“被采集”过去了。
本文出自于博客园兰幽,转载请说明出处。

![C1]I1L)1D0(F)I4MCX3)4$I C1]I1L)1D0(F)I4MCX3)4$I](https://images0.cnblogs.com/blog/516931/201409/081237256066407.png)

