一、步骤:
-
导入包和读取数据
-
数据预处理
-
编码层和解码层的建立 + 构建模型
-
编译模型
-
训练模型
-
测试模型【只用编码层来画图】
二、代码:
1、导入包和读取数据
#导入相关的包
import numpy as np
np.random.seed(1337)  # for reproducibility

from keras.datasets import mnist
from keras.models import Model #采用通用模型
from keras.layers import Dense, Input #只用到全连接层
import matplotlib.pyplot as plt

#读取数据
(X_train, _), (X_test, y_test) = mnist.load_data()
2、数据预处理:将28*28维度的数据拉成一个向量784,原数据X_train的shape为(60000,28,28),转成x_train(60000,784)。
x_train = X_train.astype('float32') / 255. - 0.5       # minmax_normalized

x_test = X_test.astype('float32') / 255. - 0.5         # minmax_normalized

x_train = X_train.reshape((x_train.shape[0], -1))

x_test = X_test.reshape((x_test.shape[0], -1))

print(x_train.shape) #(60000, 784)
print(x_test.shape) #(10000, 784)
print(X_train.shape)  # (60000, 28, 28)
3、编码层和解码层的建立+构建模型
# in order to plot in a 2D figure
encoding_dim = 2

# this is our input placeholder
input_img = Input(shape=(784,))


# encoder layers编码层
encoded = Dense(128, activation='relu')(input_img)
encoded = Dense(64, activation='relu')(encoded)
encoded = Dense(10, activation='relu')(encoded)
encoder_output = Dense(encoding_dim)(encoded)

# decoder layers解码层
decoded = Dense(10, activation='relu')(encoder_output)
decoded = Dense(64, activation='relu')(decoded)
decoded = Dense(128, activation='relu')(decoded)
decoded = Dense(784, activation='tanh')(decoded)

#构建模型
#包括编码层也包括解码层
autoencoder = Model(input = input_img,output = decoded)
#只包括编码层
encoder = Model(input = input_img,output = encoder_output)
4、编译模型
#编译模型
autoencoder.compile(optimizer='adam', loss='mse')
5、训练模型【编码和解码一起训练】
autoencoder.fit(x_train, x_train,
                epochs=20,
                batch_size=256,
                shuffle=True)
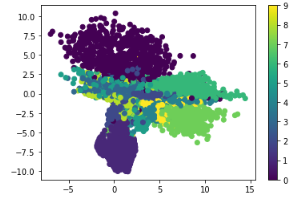
6、测试模型并画图显示【仅用编码来预测2维的特征空间】
encoded_imgs = encoder.predict(x_test)
plt.scatter(encoded_imgs[:, 0], encoded_imgs[:, 1], c=y_test) #c表示颜色维度
plt.colorbar()
plt.show()